Migrating Horizon from VMware to Omnissa: Why a Parallel Connection Server Deployment Is Often the Safest Approach

The transition from VMware Horizon to Omnissa Horizon introduced more than just a branding change. Starting with Horizon 2412 and continuing with later releases such as 2503 and 2506, several architectural and configuration elements have been modified.

These changes include licensing format updates, ADAM/AD LDS database modifications, registry key renaming, folder restructuring, and updated group policy templates.

While the official upgrade path works, in many environments a parallel deployment strategy can significantly reduce risk and allow end users to validate the new platform before switching production workloads.

This article outlines the key changes introduced by Omnissa and explains why building a new Horizon pod alongside the existing one can be a practical migration strategy.

.

Key Changes Introduced with Omnissa Horizon

1. New Licensing Model

Beginning with Horizon 2412, Omnissa introduced a new licensing mechanism and licensing portal.

During the transition phase, both VMware and Omnissa license keys are temporarily accepted, but this compatibility window is limited. Later releases, such as 2503.1 ESB and 250,6 rely entirely on the Omnissa License Module (OLM).

If a valid Omnissa license key is not installed after upgrading, the Horizon Console may enter a restricted or degraded mode.

Relevant KB and documentation references include:

• KB 6000212 – Horizon licensing transition guidance
• KB 6000745 – Omnissa rebranding changes and affected components

.

2. ADAM / AD LDS Database Changes

One of the most important backend changes affects the Horizon LDAP (ADAM/AD LDS) database.

Historically, Horizon used application partitions referencing the VMware namespace.
With the Omnissa rebranding, new environments now use the
horizon namespace.

Example:

Old partition naming:

dc=vdi,dc=vmware,dc=int

dc=vdiglobal,dc=vmware,dc=int

New partition naming:

dc=vdi,dc=horizon,dc=internal

dc=vdiglobal,dc=horizon,dc=internal

Omnissa provides a migration script to update the partition names after upgrading all pods to newer versions, such as 2503.

Relevant documentation:

• KB 6000797 – ADLDS partition migration for Horizon

.

3. Registry Key and File System Changes

The rebranding also impacted multiple components of the Horizon installation:

Component

Previous Location

New Location

Installation folder

C:\Program Files\VMware\VMware View

C:\Program Files\Omnissa\Horizon

Logs

C:\ProgramData\VMware\VDM\logs

C:\ProgramData\Omnissa\Horizon\logs

Registry keys

HKLM\Software\VMware, Inc.\VMware VDM

HKLM\Software\Omnissa\Horizon

ADAM DB instance

VMwareVDMDS

OmnissaHzeDS

Because registry paths changed, Group Policy templates (ADMX) were also updated and must be replaced during upgrades.

Failure to update the ADMX files can lead to policies silently no longer applying.

.

Why a Parallel Horizon Deployment Can Be a Better Migration Strategy

Although a direct upgrade of the Connection Servers is supported, the number of changes introduced with the Omnissa transition makes a greenfield-style deployment attractive.

Instead of upgrading the existing servers, consider deploying new Connection Servers alongside the current environment.

Advantages include:

1. Opportunity to Upgrade Windows Server

New Connection Servers allow administrators to deploy a modern operating system, such as:

• Windows Server 2022 or later (Windows 2025 is a like option)

This avoids performing multiple upgrades on the same system.

.

2. User Acceptance Testing

With a parallel deployment, you can:

• publish test desktop pools
• provide pilot users access
• validate authentication flows
• verify DEM and App Volumes integration

Users can test the environment before the production switch.

.

3. Reduced Upgrade Risk

Upgrading in place modifies:

• ADAM database
• registry keys
• services
• folder paths

A clean installation avoids potential issues caused by legacy configurations.

.

Example Parallel Migration Architecture

A typical migration architecture might look like this:

Existing Environment

• Horizon Connection Servers
• Unified Access Gateways
• Instant Clone pools
• DEM and App Volumes

New Environment

• New Omnissa Connection Servers
• New Omnissa Unified Access Gateways
• Same vCenter Server
• Same Active Directory
• Same desktop images
• Same DEM*
• Same App Volumes*

*After migration, it will be upgraded.

This allows a staged migration.

Key points:

• vCenter Server can remain unchanged
• Desktop pools can be recreated or migrated
• User profiles continue to work through DEM

.

Migrating Instant Clone Desktop Pools

In environments heavily using Instant Clones, rebuilding pools manually can be time-consuming.

Automation scripts can accelerate the process by exporting and recreating pools through the Horizon APIs.

In my environment, I use a PowerShell-based migration script that reads the configuration of Instant Clone pools and recreates them on the new pod.

This allows administrators to migrate:

• pool configuration
• entitlements
• naming patterns
• provisioning settings

with minimal manual effort.

This is the link to the script

OMNISSA/OMNISSA – Export and Import Desktop and Entitlements v7.ps1 at main · fabio1975/OMNISSA

.

Reusing DEM and App Volumes

Existing deployments of

• Omnissa Dynamic Environment Manager
• Omnissa App Volumes

can usually remain unchanged during migration.

However, compatibility must always be validated using the official interoperability matrix.

Relevant documentation:

• Horizon interoperability matrix
• App Volumes compatibility with Horizon
• DEM compatibility with Horizon

Official documentation:

These matrices confirm supported combinations between:

• Horizon versions
• App Volumes
• Dynamic Environment Manager
• vCenter Server
• ESXi

.

Suggested Migration Workflow

A practical migration process could look like this:

    1. Deploy new Connection Servers with Omnissa Horizon
    2. Deploy new Unified Access Gateways
    3. Connect the new pod to the existing vCenter
    4. Validate App Volumes and DEM compatibility
    5. Recreate or migrate Instant Clone pools
    6. Perform pilot user testing
    7. Switch production access
    8. Decommission legacy Connection Servers
    9. Create the news GPO for Horizon (we need use the new GPO Templates)
    10. Upgrade the Horizon Agent, DEM and App Volumes

    .

    Final Thoughts

    The transition from VMware Horizon to Omnissa Horizon introduces several structural changes that go beyond simple branding.

    Changes in licensing, LDAP partitions, registry paths, and policy templates can complicate traditional upgrade workflows.

    For many environments, especially large VDI deployments, deploying new Connection Servers in parallel offers a safer and more flexible migration strategy.

    It provides an opportunity to modernize the infrastructure, validate compatibility with components such as App Volumes and DEM, and allow users to test the platform before the final cutover.

    .

    .

    Migrating Horizon from VMware to Omnissa: Why a Parallel Connection Server Deployment Is Often the Safest Approach

    Horizon Cloud Service Next Gen Apis – Chapter 2

    Immagine che contiene testo, Neon, Segnali luminosi, Insegna al neon Il contenuto generato dall'IA potrebbe non essere corretto.

    Set Syslog settings across UAG deployments

    In this second article on working with APIs in Horizon Cloud Services, we will focus on a practical, security-relevant use case: configuring Syslog on Unified Access Gateways (UAGs) deployed through Horizon Cloud.

    Whether you are running Horizon Cloud Service on Microsoft Azure or Horizon Cloud Service on vSphere, centralized logging is a fundamental component of any secure and well-governed environment. Proper Syslog configuration ensures that security events, authentication logs, and operational data generated by UAG appliances are forwarded to your SIEM or log management platform for monitoring, auditing, and incident response.

    Instead of performing manual configuration tasks, we will explore how to leverage Horizon Cloud APIs to automate and standardise Syslog settings across UAG deployments, improving consistency, scalability, and operational efficiency.

    Now when can explain the API we need to use and how to apply the syslog configuration on UAG (In this case, I used an HCS on vSphere, the new solution where we don’t deploy the Connection Server, but we use the HCS control panel to configure Pools, Entitlements and other…)

    The first step is always the authentication process; I explained how to create the API token in my previous post (Horizon Cloud Service Next Gen Apis – Chapter 1), and now I won’t explain it again.

    Let’s go…..

    How to show UAG information

    This command displays the UAG’s information

    Invoke-RestMethod -Uri https://cloud-sg.horizon.omnissa.com/admin/v2/uag-deployments Method Get -Headers $Header

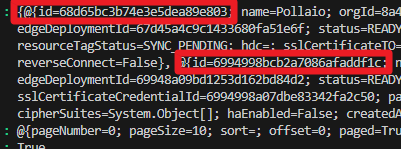
     We have two UAG deployments connected to HCS, and the output displays two deployment ids:

    Immagine che contiene testo, schermata, Carattere Il contenuto generato dall'IA potrebbe non essere corretto.

    The UAG id for HCS on vSphere is the second id.

    Immagine che contiene testo, schermata, Carattere Il contenuto generato dall'IA potrebbe non essere corretto.

    Now I need to recover only the UAG IDs and OrgIDs

    Invoke-RestMethod -Uri https://cloud-sg.horizon.omnissa.com/admin/v2/uag-deployments -Method Get -Headers $Header | Select-Object -ExpandProperty content | Select-Object id,OrgId

    Immagine che contiene testo, schermata, Carattere Il contenuto generato dall'IA potrebbe non essere corretto.

    The UAG id that I need to use for identifying the deployment for HCS on vSphere is:

    6994998bcb2a7086afaddf1c 

    I will use this ID to associate the syslog configuration with the UAG server.


    How to set the correct parameters for Syslog configuration

    We need to create a Body value like this:

    $Body = @{
      orgId  = "8a4931b3-e6ac-44bf-9d25-723f4119e46f"
      projectId = "Pollaio-Project"
      name = "Pollaio-Configuration2"
      syslogEventCategory = "ALL_EVENTS"
      syslogServerProtocolSettingsCreateTO = @{
        sourceToSyslogServerProtocol = "TCP"
      }
      syslogFormat = "TEXT"
      syslogURI = "192.168.111.223:514"
      includeSystemMessages = $true
      sources = @(
        @{
          type = "UAG"
          id   = "6994998bcb2a7086afaddf1c"
        }
      )
    }

    .

    Where:

    Value Description Accept value
    OrgID It is the OrgId that we recovered with the previous command String
    ProjectId ID of theCSP project that owns this data String
    Name User defined name of the syslog server configuration String
    SyslogEventCategory Events sent from the UAG appliance to the syslog server [ ALL_EVENTS, AUDIT_EVENTS ]
    sourceToSyslogServerProtocol The protocol used to send data from the UAG appliance to the syslog server [ UDP, TCP, TLS, MQTT ]
    syslogFormat [ JSON_TITAN, TEXT ]
    syslogURI Syslog server URI String
    includeSystemMessages If true, system messages are sent to the syslog server [ $True]
    sources

    List of sources associated with the syslog server:

    Type = Source for the syslog server. For es: UAG

    Id = Id of the source associated with the syslog server (The Id value that we recovered with the previous command


    .

    .

    How to set the configuration for UAG
    $Body = @{
      orgId  = "8a4931b3-e6ac-44bf-9d25-723f4119e46f"
      projectId = "Pollaio-Project"
      name = "Pollaio-Configuration2"
      syslogEventCategory = "ALL_EVENTS"
      syslogServerProtocolSettingsCreateTO = @{
        sourceToSyslogServerProtocol = "TCP"
      }
      syslogFormat = "TEXT"
      syslogURI = "192.168.111.223:514"
      includeSystemMessages = $true
      sources = @(
        @{
          type = "UAG"
          id   = "6994998bcb2a7086afaddf1c"
        }
      )
    }
    
    #Convert Body to JSON
    $JsonBody = $Body | ConvertTo-Json -Depth 5
    #Send POST request to create Syslog Server UAG configuration
    Invoke-RestMethod -Uri https://cloud-sg.horizon.omnissa.com/admin/v1/syslog-server -Method Post -Headers $Header -Body $JsonBody
    HOW to check SYSLOG Configuration on UAG deployment


    Invoke-RestMethod -Uri https://cloud-sg.horizon.omnissa.com/admin/v1/syslog-server -Method Get -Headers $Header
    

    The command output is like this:

    .

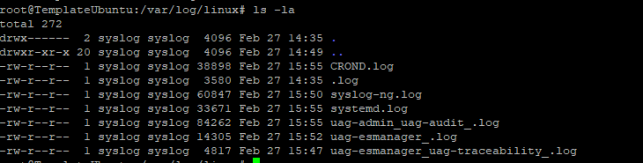
     Now I can see in my SYSLOG server the UAG Log

    Immagine che contiene testo, schermata, Carattere Il contenuto generato dall'IA potrebbe non essere corretto.

    .

    .

    .

    Horizon Cloud Service Next Gen Apis – Chapter 2

    SSL Certificates in an Omnissa Horizon + Omnissa Access World: Why They Matter More Than You Think

    .

    A red lock on a blue background

AI-generated content may be incorrect.Let’s be honest: certificates are not the most exciting thing in IT. They don’t sparkle, they don’t blink, and they rarely impress your CIO in a slide deck. But if you’re running an Omnissa Horizon environment (also with Omnissa Access integration), SSL certificates are the unsung heroes that make your infrastructure secure, trusted, and usable.

    In this post, let’s break down why certificates matter, where they should live in your Horizon world, and how they unlock some pretty cool features like True SSO.

    .

    .

    The Basics: Why SSL Certificates?

    At their core, SSL/TLS certificates do three things:

    1.Encrypt traffic – so that nobody can sniff your users’ RDP or Blast traffic.
    2.Prove identity – so your clients know they’re talking to the real Horizon server, not some sneaky impostor.
    3.Build trust – because “untrusted certificate” pop-ups are the fastest way to kill user confidence.

    In Horizon, these are not “nice to haves”—they’re essential.

    .

    Public vs Internal CA: Which Flavor Do You Need?

    In most deployments, you’ll be juggling two kinds of certificates:

    • Public CA Certificates: Perfect for components exposed to the internet—like your Unified Access Gateways (UAGs). Public certs ensure that external clients (home users, contractors, BYOD devices) connect without scary warnings.
    • Internal Microsoft CA Certificates: Handy for internal components—like Connection Servers—especially if all your clients are domain-joined and trust your Microsoft enterprise CA. They’re cheaper (sometimes free) and give you tighter control.

    Pro tip: You don’t have to pick one or the other. Most production environments mix both.

    .

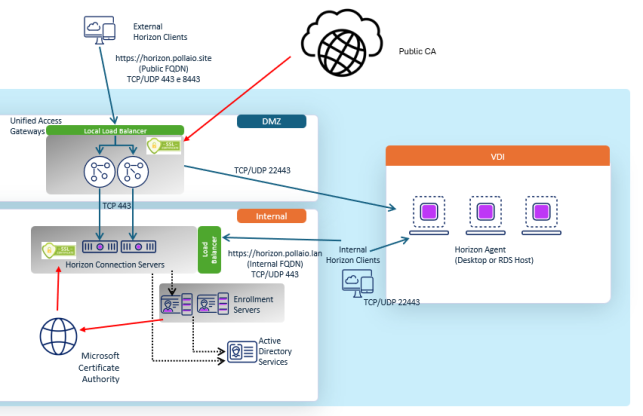
    Certificates in the Horizon Architecture (The Big Picture)

    .

    A screenshot of a computer

AI-generated content may be incorrect.

    .

    Think of the certificates as passports:

    • The UAG needs a passport recognized globally (public CA).
    • The Connection Servers can survive with a local passport (internal CA).
    • True SSO hands out temporary passports at the border (short-lived certs) so users don’t need to fumble with passwords.

    .

    Certificates on Connection Servers

    Your Horizon Connection Servers are the brains of the operation. By default, they come with a self-signed certificate. That’s fine for a lab, but in production it’s a recipe for distrust and compatibility issues.

    Replacing it with either:

    • An internal CA-issued cert (for domain-only environments)

    means your Horizon Clients and web browsers connect seamlessly and securely. Bonus: no frantic helpdesk calls about “why does Horizon keep saying untrusted connection?”

    Here are more details on how to install the certificates

    .

    .

    Certificates on Unified Access Gateways (UAGs)

    The UAG is your secure doorway to Horizon from the outside world (more time behind a load balancer). And here, public CA certs are king. Imagine asking a remote contractor to install your company’s internal root CA certificate just to connect—that’s not going to fly.

    With a trusted public certificate:

    • Users get smooth experience from the get-go.
    • Browsers, Horizon Clients, and even thin clients connect without any fuss.
    • You avoid troubleshooting nightmares tied to certificate trust chains.

    Here are more details on how to install the certificates

    .

    The Secret Sauce: Certificates and True SSO

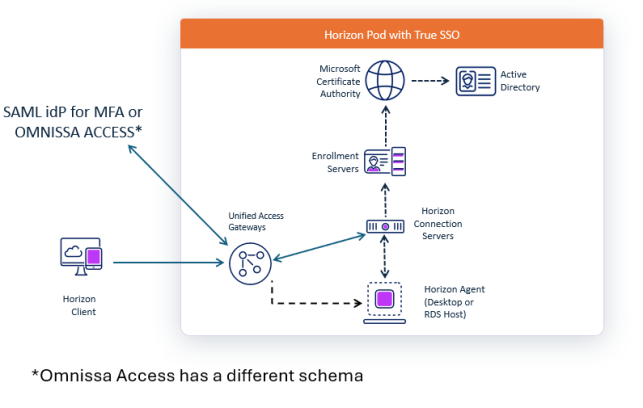
    Now, let’s talk about one of Horizon’s coolest features: True SSO.

    True SSO lets users log into Horizon desktops and apps with their identity from Omnissa Access—no extra password prompts or integrate with other SAML idP. Behind the scenes, Horizon uses short-lived, smart card-like certificates to authenticate the user to the desktop.

    Guess what makes this magic possible? Certificates.

    • A trusted internal CA (usually Microsoft AD CS) issues these ephemeral certificates.
    • The Horizon infrastructure validates them and grants access seamlessly.
    • The user just experiences fast, passwordless login.

    So, without properly set up certificates, True SSO doesn’t fly.

    A diagram of a network

AI-generated content may be incorrect.

    Here are more details on how to install the certificates (coming soon)

    .

    .

    Wrapping It Up

    Certificates might not be glamorous, but in an Omnissa Horizon + Omnissa Access environment they are foundational:

    • They secure Connection Servers for internal trust.
    • They harden UAGs with public-facing credibility.
    • They power True SSO, giving users a smooth, passwordless experience.

    Think of them as the quiet guardians of your virtual desktops: invisible when done right, but disastrous if ignored.

    So next time you see a certificate renewal reminder, don’t sigh. Smile. Because your Horizon users—and your future self—will thank you.

    .

    SSL Certificates in an Omnissa Horizon + Omnissa Access World: Why They Matter More Than You Think

    Replacing the Public Certificate on Your Omnissa Unified Access Gateways

    .

    Close-up of a screen with a lock and text

AI-generated content may be incorrect.So, you’ve got your shiny new public SSL certificate, and it’s time to make your Unified Access Gateways (UAGs) happy. Excellent choice — a properly installed certificate keeps your users safe, your browser warnings quiet, and your security team smiling.

    .

    In this post, I’ll walk you through how to replace or install a new public certificate on your Omnissa Unified Access Gateways.
    We’ll use a
    PFX (PKCS#12) certificate file, since it neatly bundles the private key, certificate, and intermediates in one convenient package.

    .

    My Preferred Setup

    I like to keep things clean and consistent, so instead of juggling multiple certificates, I use a single public certificate for all Unified Access Gateways in my deployment.

    Here’s the trick:
    When generating or requesting your certificate, make sure the
    Subject Alternative Name (SAN) section includes:

    • The VIP used to access the UAGs through the load balancer (Normally, a public FQDN)

    If you use the UAGs for internal access (for network segmentation), I suggest adding to SAN the internal UAG FQDN.

    .

    🔧 Step-by-Step: Installing the Certificate

    (Insert screenshots of each step here)

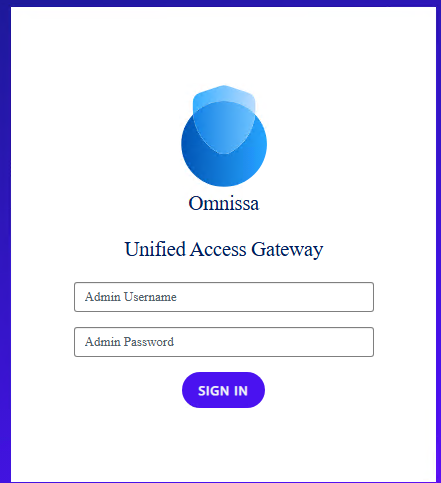
    1.Log in to the UAG admin console
    Open your browser and connect to the UAG admin interface:
    2.https://<UAG-FQDN>:9443/admin

    A screenshot of a login form

AI-generated content may be incorrect.

    Sign in with your admin credentials.

    A screen shot of a computer

AI-generated content may be incorrect.

    3.Go to the TLS/SSL Settings
    From the left menu, navigate to:

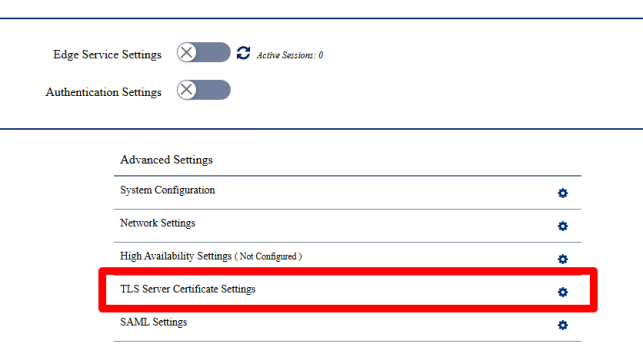
    System Configuration → TLS Server Certificate Settings

    A screenshot of a computer

AI-generated content may be incorrect.

    4. Prepare your PFX file
    You should already have your .
    pfx file ready, containing:
    ◦ Your public certificate
    ◦ Any intermediate certificates
    ◦ Your private key

    You’ll also need the PFX password you set when exporting the file.

    5 .Import the new certificate
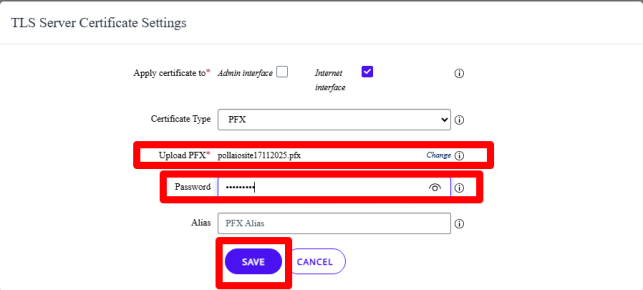
    In the TLS configuration page, click
    Select PFX, browse to your certificate file, and enter the password.
    Then hit
    Save at the bottom of the page.

    A screenshot of a computer

AI-generated content may be incorrect.

    A green rectangle with black text

AI-generated content may be incorrect.

    6. Wait for the magic
    The Unified Access Gateway will automatically restart the Edge service to apply the new certificate.

    Grab a coffee ☕ — it only takes a few seconds.
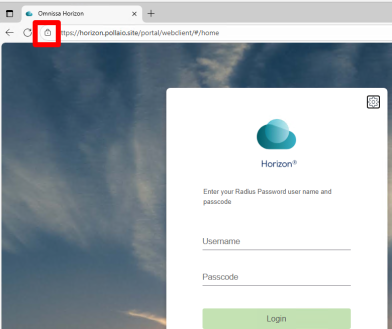
    7 .Verify everything works
    Once the UAG is back online, open the VIP URL in your browser
    or Horizon Client and check the certificate details.
    Browser

    A screenshot of a computer

AI-generated content may be incorrect.

    Horizon Client

    A screenshot of a login screen

AI-generated content may be incorrect.

    .

    Bonus Tips

    • Consistency is key: Replace the certificate across all your UAGs (behind the same Public FQDN).
    • Backup the old cert: Always keep a copy of the previous working certificate — just in case something goes sideways.
    • Keep a note of the certificate expiration date and plan your next renewal ahead of time (trust me, future-you will thank you).
    IMPORTANT: Once you’ve changed the certificate, always verify that it works. Especially if you have thin clients, make sure they have loaded the necessary certificates (RootCA and SubCA) to validate the new certificate.

    . That’s It!

    You’ve successfully installed a new public certificate on your Omnissa Unified Access Gateways.
    Your users now enjoy secure, trusted access — and you get the satisfaction of another clean green padlock in the browser.

    .

    Replacing the Public Certificate on Your Omnissa Unified Access Gateways

    Omnissa Unified Access Gateway and headersToBeLogged

    A close-up of a sign

Description automatically generated

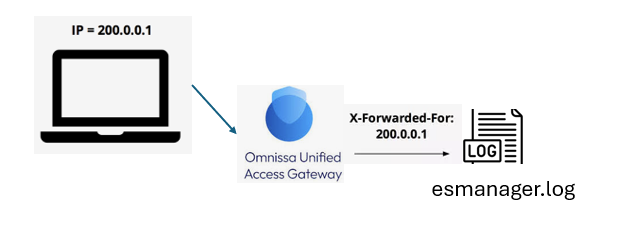
    About the 2312 Unified Access Gateway version there is a new log function to increase the Readable of the esmanager.log (default log level).

    This function is HeadersToBeLogged and is enabled by default from 2312. The default value for this field is set to X-Forwarded-For and includes the details for Username, Client build, and Client version.

    These details will be added to the esmanager.log file.

    For example for connection to VDI from the Internet :

    Where:

    • 4.232.131.22 is the public IP of my OS from I try to connect
    • 192.168.222.222 is the IP of My LB in front of UAG
    • pbrividi is my username
    • VMware-Horizon-Client-Win32-Windows is the type of client
    • 8.13.0-9986028157 is the Horizon Client Build

    To modify the logged information I need to change the JSON or ini file:

    This is the default configuration for headersToBeLogged

    A screenshot of a computer

Description automatically generated

    I can add this value :

    And I can see more info

    Omnissa Unified Access Gateway and headersToBeLogged

    App Volumes 2406 and Unified Access Gateway 2406

    All of VMware’s EUC products were continuously updated (in recent years almost always every 3 months) to add new features, fix bugs and mitigate security vulnerabilities.

    The move to Broadcom and the subsequent sell of EUC products in Omnissa has brought a few months of stabilization… but I’m happy to announce that versions 2406 of the App Volumes and Unified Access Gateway products are out.

    What do we find new?

    A logo with text on it

Description automatically generated

    App Volumes

    Persistent Desktop Support

    Expanded Use Cases: New support for classic Windows desktop environments, a significant enhancement to our Apps Everywhere strategy. This new feature extends our efficient one-to-many provisioning model, previously available only for non-persistent desktops, to persistent virtual desktop environments.

    And more…

    Replicate Application Packages in Specific Stages

    We are excited to introduce the Replicate Application Packages in Specific Stages feature, designed to enhance the life cycle management of applications across multiple instances of App Volumes Manager

    And more…

    Select a specific Package Version when Launching an App (Technology Preview)

    Writable Volumes Performance Improvements

    Here the Release Notes

    A logo of a cloud security system

Description automatically generated

    Unified Access Gateway

    Added support for Horizon Connection Server’s Home Site Redirection feature (associated with Cloud Pod Architecture)

    Added support for Basic and NTLM authentications in outbound proxy configuration.

    Added support in PowerShell script to enable/disable monitoring of unrecognized sessions using the new field unrecognizedSessionsMonitoringEnabled.

    And more..

    Here the Release Notes 


    The 2406 version of the Connection Server ……..stay tuned!

    App Volumes 2406 and Unified Access Gateway 2406

    How to test communication between UAG and CS

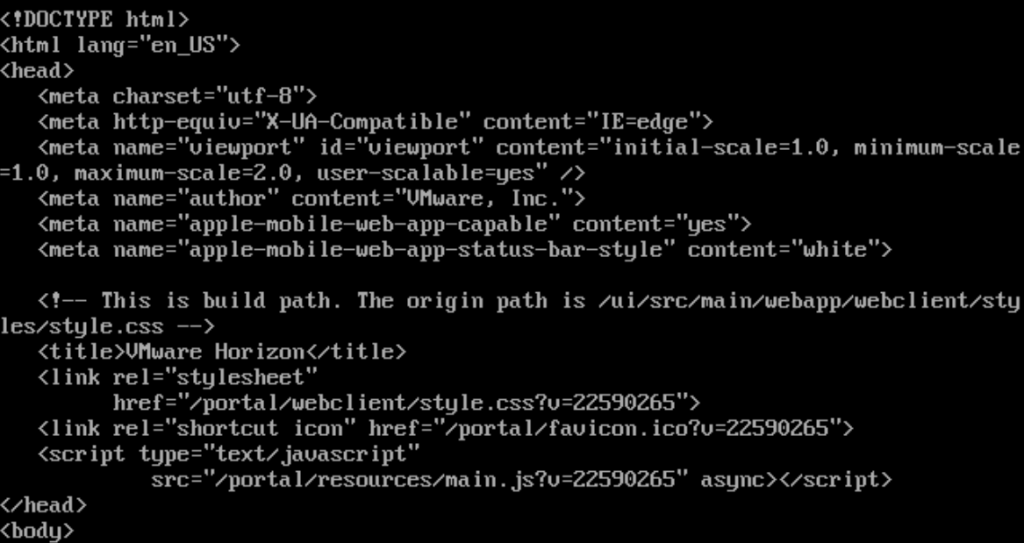
    Many times I found myself having to demonstrate that the communication between the Unified Access Gateway and the Connection Servers was not working due to problems with poorly configured firewall rules. A very useful test is to connect to the UAG console and launch the classic CURL command:

    curl -v -k https://<FQDN or IP ADDRESS CS>:443/

    the outcome of which is as follows if the connection is ok (HTML output)

    or the following if the connection is not enabled on the firewall

    More info and tools here:

    https://docs.vmware.com/en/Unified-Access-Gateway/2309/uag-deploy-config/GUID-390D3A2A-0CB7-4A82-9B0F-D525B74CF55B.html

    How to test communication between UAG and CS

    VMware Horizon 8 2303

    At the end of March 2023, new versions of the products that make up the Horizon suite were released. (Connection Server, Volume App, DEM, and Unified Access Gateway)

    There are several interesting features, below I report the link to each release note.

    I bring to your attention the presence of AppVolume in a preview solution related to the use of AppVolume in the Azure environment. (This deployment option is intended for applications packages and not Writable Volumes)

    Horizon

    VMware Horizon 8 2303 Release Notes

    App Volume on Azure

    VMware App Volumes Manager Deployment Guide for Azure –

    App Volume 

    VMware App Volumes 4, version 2303 Release Notes

    DEM

    VMware Dynamic Environment Manager 2303 Release Notes

    Unified Access Gateway

    Unified Access Gateway 2303 Release Notes (vmware.com)

    VMware Horizon 8 2303

    Exploit Log4j mitigate on VMware Unified Access Gateway

    ## UPDATE 20/12/2021 ##

    On December 14, 2021 the Apache Software Foundation notified the community that their initial guidance for CVE-2021-44228 workarounds was not sufficient. We believed the previous instructions in this article to be an effective mitigation for CVE-2021-44228, but in the best interest of our customers, we must assume the earlier workaround may not adequately address all attack vectors. 

    We need to run a script:

    #!/bin/bash
    
    # Log contents to file by prefixing timestamp. Maximum file size is 50MB
    function log_to_console() {
        echo "$(date +'%Y-%m-%d %T')" "$HOSTNAME" "$@"
    }
    
    log_to_console "Running script to remove JndiLookup.class from jars in Unified Access Gateway"
    
    log_to_console "UAG Version: " $(tail -1 /opt/vmware/gateway/logs/version.info 2>/dev/null)
    
    mkdir /tmp/test
    mkdir /tmp/bkp
    
    log_to_console "Unpacking archive and removing JndiLookup.class"
    cp /opt/vmware/gateway/lib/ab-frontend-0.2.jar /tmp/bkp
    
    unzip -q -o /opt/vmware/gateway/lib/ab-frontend-0.2.jar -d /tmp/test
    
    unzip -q -o /tmp/test/hc.war -d /tmp/test/hc
    
    zip -dq /tmp/test/hc/WEB-INF/lib/log4j-core-*.jar org/apache/logging/log4j/core/lookup/JndiLookup.class
    
    rm /tmp/test/hc.war
    cd /tmp/test/hc
    
    zip -r -q ../hc.war .
    
    cd ..
    rm -rf hc
    
    log_to_console "Repackaging archive"
    
    zip -r -q ab-frontend-0.2.jar .
    
    chown gateway:users ab-frontend-0.2.jar
    mv ab-frontend-0.2.jar /opt/vmware/gateway/lib
    
    log_to_console "Replaced updated ab-frontend-0.2.jar, now looking for jndi in other places"
    
    find / -type f \( -name "*.jar" -o -name *.war \) -exec sh -c "zipinfo -1 {} 2>/dev/null | grep 'JndiLookup.class' && echo {}" \; | grep .jar | while read -r line ; do
        jar_path=$line
        log_to_console "Updating $jar_path"
        zip -dq $jar_path org/apache/logging/log4j/core/lookup/JndiLookup.class
        chown gateway:users $jar_path
    done
    
    
    log_to_console "Restarting authbroker"
    supervisorctl restart authbroker
    
    log_to_console "Cleaning up."
    cd /tmp
    rm -rf /tmp/test
    
    log_to_console "Verification: We are good if no jars are listed below"
    find / -type f \( -name "*.jar" -o -name *.war \) -exec sh -c "zipinfo -1 {} 2>/dev/null | grep 'JndiLookup.class' && echo {}" \;
    
    log_to_console "Verification: Grep authbroker-std-out.log for log4j errors, we are good if no exception is displayed below"
    cat /opt/vmware/gateway/logs/authbroker-std-out.log | grep log4j
    
    log_to_console "Done!"


    Well we need to connect to UAG and create a uag_rm_log4j_jndilookup.sh file

    vi uag_rm_log4j_jndilookup.sh

    copy into the file the code, and enable it for execution

    chmod +x uag_rm_log4j_jndilookup.sh

    running the script

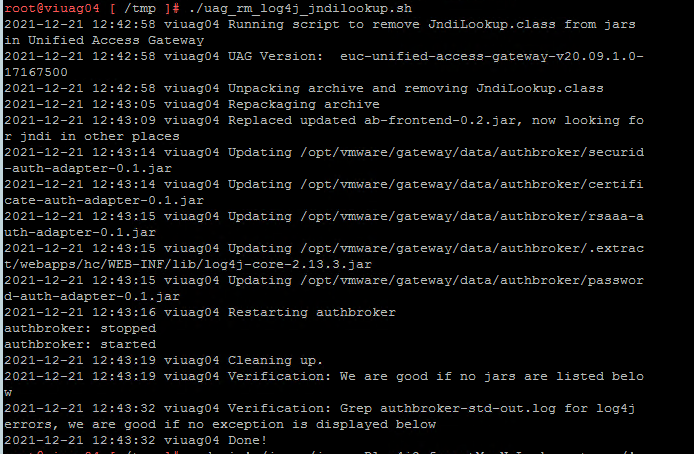
    ./uag_rm_log4j_jndilookup.sh

    now if the UAG version is between 2009 and 2111 it is also necessary to set the -Dlog4j2.formatMsgNoLookups=true option on the authbroker service with the following commands. Note the space between “s/java /java”  and a space after “true /” in the command, these are important to ensure the command works correctly and doesn’t attempt to modify the wrong lines in the configuration file.

    sed -i ‘s/java /java -Dlog4j2.formatMsgNoLookups=true /’ /opt/vmware/gateway/supervisor/conf/authbroker.ini

    and restart the supervisorctl

    supervisorctl update

    more info in this VMware KB

    Mitigation instructions to address CVE-2021-44228 and CVE-2021-45046 in VMware Unified Access Gateway (UAG) (87092)

    #########################

    In the middle of December month, we found a “little exploit”……

    Ok it is not a joke, for mitigate on UAG (Unified Access Gateway that is a Security Server exposed on the Internet for remote access at Horizon infrastructure) it is necessary (To apply the workaround for CVE-2021-44228 to Unified Access Gateway version 2009 through to 2111):

    • Connect to UAG server with SSH Session

    Check if SSH is enabled on UAG server to accept root connection.

    Connect from WEB console or VMware Remote Console to UAG virtual appliance and modify in /etc/ssh/sshd_config the following line (for modify use vi commands):

    PermitRootLogin no

    to

    PermitRootLogin yes

    Save the file

    Restart SSHD service with this command:

    service sshd restart

    now you are able to create an SSH connection to UAG server, REMEMBER TO DISABLE SSH CONNECTION FOR ROOT USER WITH ROLLBACK THE SETTING INTO SSHD_CONFIG FILE

    • Append the fix -Dlog4j2.formatMsgNoLookups=true

    Type this command:

    sed -i ‘s/java /java -Dlog4j2.formatMsgNoLookups=true /’ /opt/vmware/gateway/supervisor/conf/authbroker.ini

    Reload the service

    supervisorctl update

    Check if the fix is applied with this command:

    ps -ef | grep ab-frontend

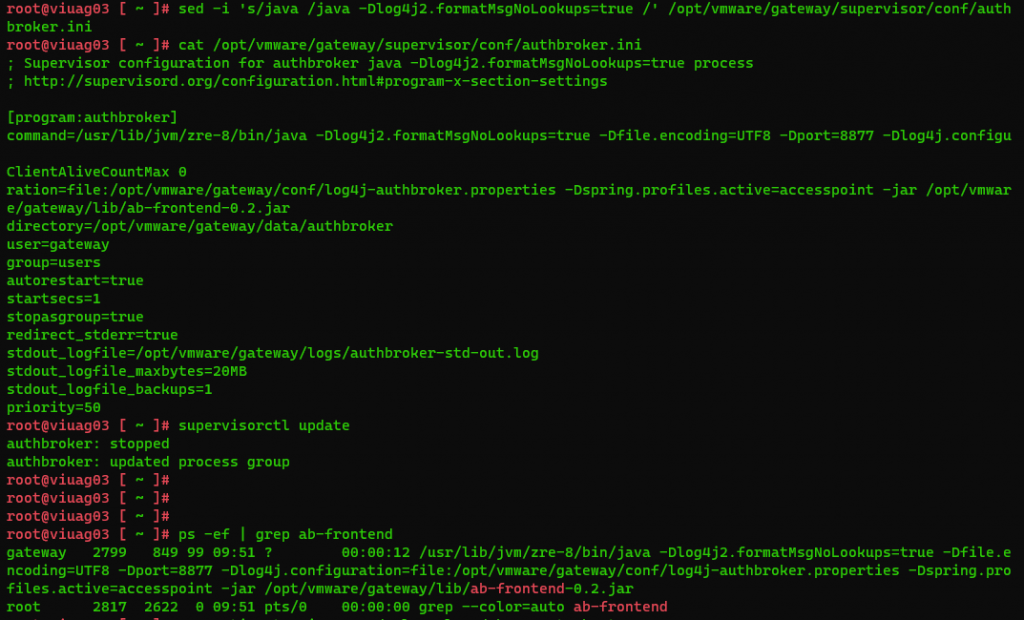
    the output of the command should need:

    root@viuag03 [ ~ ]# ps -ef | grep ab-frontend
    gateway 2799 849 99 09:51 ? 00:00:12 /usr/lib/jvm/zre-8/bin/java -Dlog4j2.formatMsgNoLookups=true -Dfile.encoding=UTF8 -Dport=8877 -Dlog4j.configuration=file:/opt/vmware/gateway/conf/log4j-authbroker.properties -Dspring.profiles.active=accesspoint -jar /opt/vmware/gateway/lib/ab-frontend-0.2.jar
    root 2817 2622 0 09:51 pts/0 00:00:00 grep –color=auto ab-frontend

    Ref: Workaround instructions to address CVE-2021-44228 in VMware Unified Access Gateway (87092)

    Exploit Log4j mitigate on VMware Unified Access Gateway