Use Horizon VDI and VPN client

For us consultants, the VDI used in the Horizon environment can also be useful for having environments where we can install customers’ VPN clients.
Normally we find ourselves having, if the customer does not have Horizon infrastructure to give us access from the outside (Through UAG, MFA … all possible security), different VPN clients to support our customers, with the consequence of possible problems of compatibility between clients and degradation of your laptop.

In my case, I have a Horizon infrastructure in my Home Lab and I have created my own VDI where to install the clients’ VPN clients.
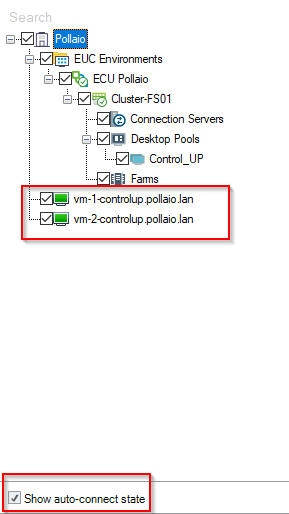
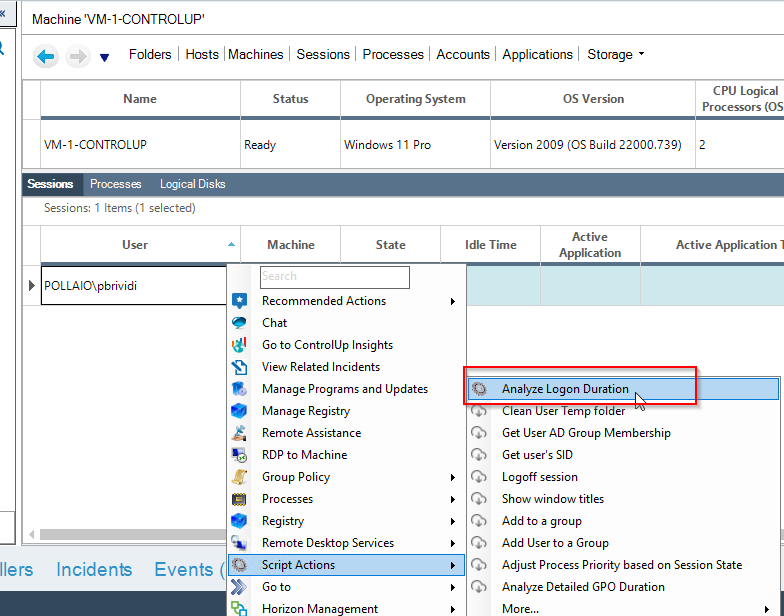
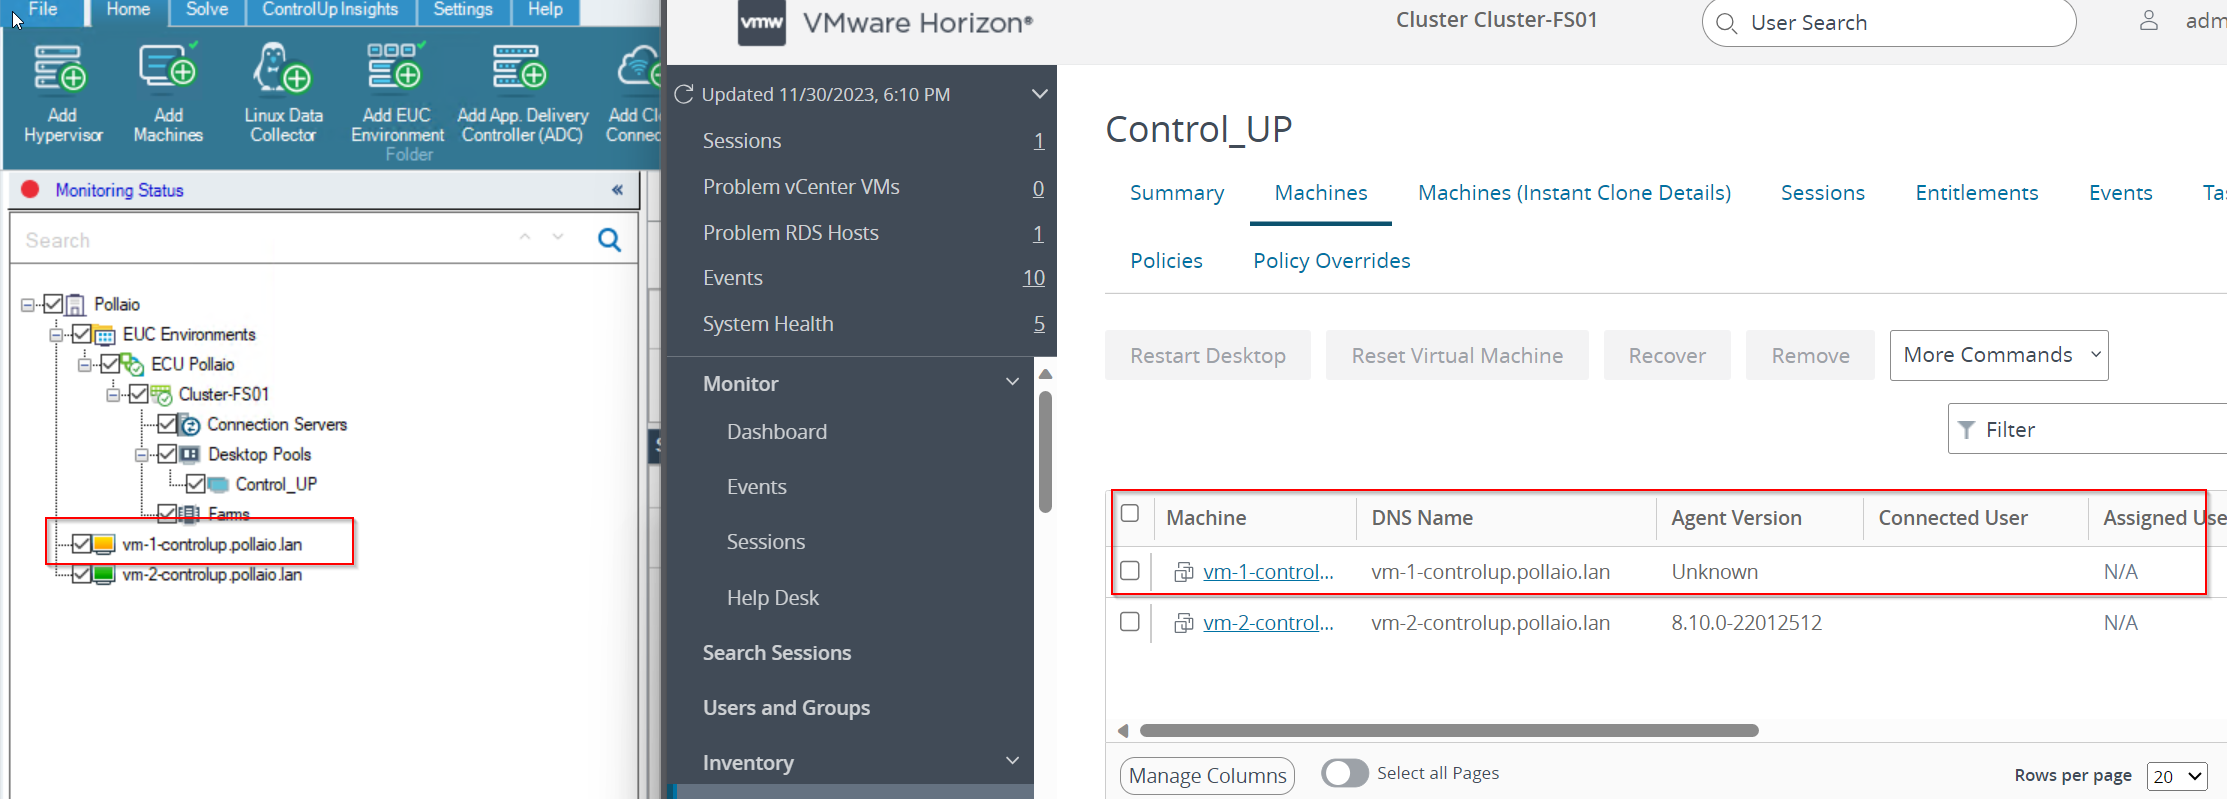
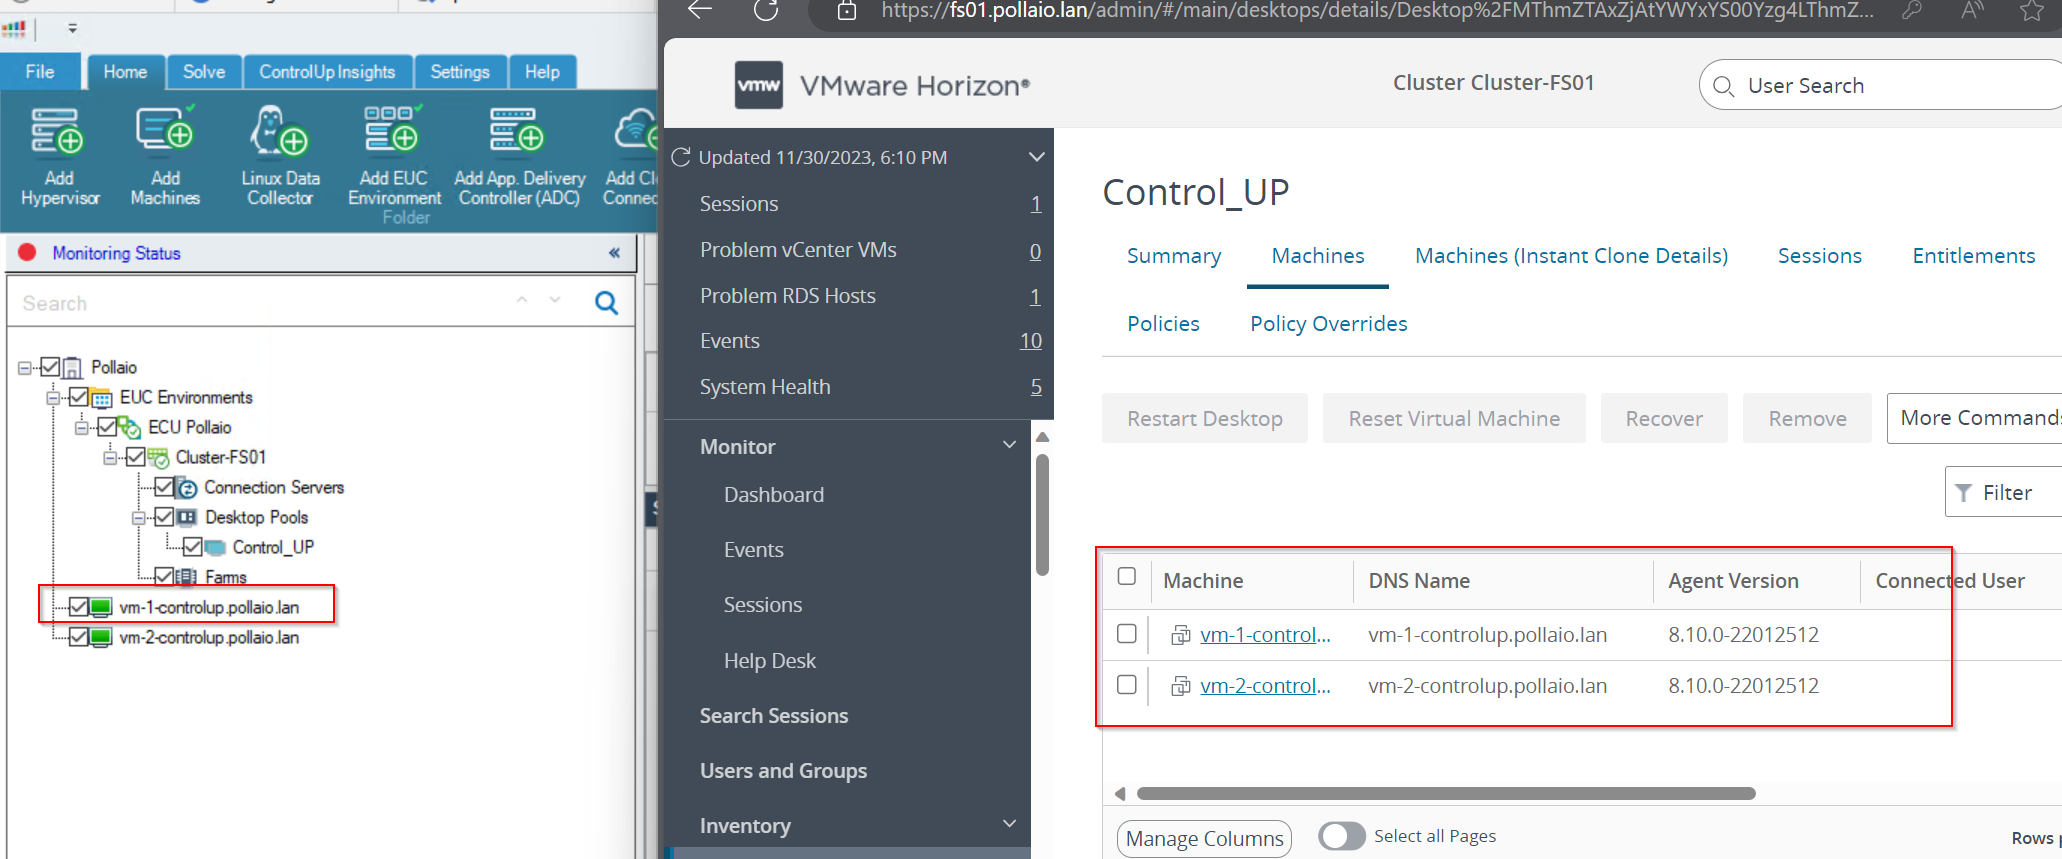
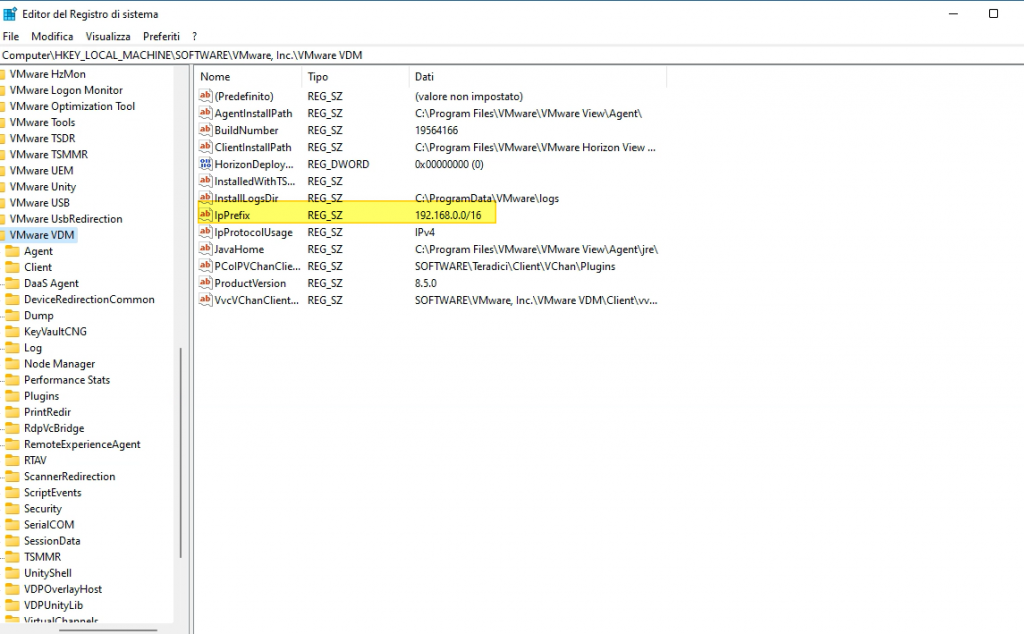
The only change to make, to prevent my Horizon session from ending when I activate a VPN connection, is to enter the following registry key
HKLM\Software\VMware, Inc.\VMware VDM\IpPrefix = n.n.n.n/m (REG_SZ)

where in n.n.n.n is the subnet and m is the number of bits in the subnet mask. Specifically, the network that must be used for the connection between the horizon agent and the various components (Horizon Client, Connection server, etc..)

es:

Use Horizon VDI and VPN client

Enable copy and paste between Guest Operating System and Remote Console

Copy and paste operations between the guest operating system and remote console are deactivated by default. 

To enable it:

  • Browse to the virtual machine in the vSphere Client inventory
  • Right-click the virtual machine and click Edit Settings.
  • Select Advanced Parameters.
  • Add or edit the following parameters.

    isolation.tools.copy.disable False
    isolation.tools.paste.disable False
    isolation.tools.setGUIOptions.enable True
    These options override any settings made in the guest operating system’s VMware Tools control panel.
  • Click OK.
  • (Optional) If you made changes to the configuration parameters, restart the virtual machine.

Enable copy and paste between Guest Operating System and Remote Console

Authenticator APP and Workspace One Access

It is very important to activate MFA (Multi-factor authentication) using applications such as Google Authenticator on corporate services exposed on the internet that require access using credentials.

If we talk about VMware Workspace One Access, a solution that allows us to publish applications and business services on the internet, it is mandatory to activate the MFA.

Since Workspace One Access version 22.09, you can use Authentication Applications such as Microsoft or Google.

Enabling MFA requires a few steps:

  • Enable the “Authenticator APP” authentication method on Workspace One Access
  • Ask the end user to install the APP on their phone or the company one (possibly we can use services that allow us to enrol automatically)
  • At the first access, the user will have to scan the QRcode that appears on the login page of Workspace One Access (in my case we try the access via WEB to workspace one access)

Enable the “Authenticator APP” authentication method on Workspace One Access

Access the Integration menu, select Authentication Methods, enable Authenticator App and select Configure.

Graphical user interface, text, application, email

Description automatically generated

We enable and possibly can change any classic account lock parameters etc …

Graphical user interface, text, application, email

Description automatically generated

At this point, we go to integrations, select identity provider and select our IDP related to the integration with AD

Graphical user interface, text, application, email

Description automatically generated

In the Authentication Methods menu select Authenticator APP

Graphical user interface, text, email

Description automatically generated

At this point, we just need to go and modify the policy used by our users by adding MFA for authentication

We go to the Resources, policies menu, select our policy and modify it

Graphical user interface, text, application, email

Description automatically generated

Graphical user interface, text, application, email

Description automatically generated

We select the rule of our interest (normally we select the one relating to access from public networks because we could reason that those who access from the company network have already done other methods of secure authentication …)

Graphical user interface, text, application, email

Description automatically generated

In the authentication methods used, we add the authenticator app

Graphical user interface, text

Description automatically generated with medium confidence

Graphical user interface, text, application, email

Description automatically generated

From now on, all users who log in to workspace one access and run with the rule we have modified we have the following user experience at the first login:

User experience at login

Go to WorkSpace One Access public URL.

If prompted, they will have to select the domain.

Graphical user interface, application

Description automatically generated

Then they will have to enter username and password

Graphical user interface, application

Description automatically generated

Finally, they will have a QRcode that they will have to use to configure their Authenticator APP (Microsoft or Google). So, in the selected phone app they will have to add an account by reading the QRCODE

Qr code

Description automatically generated

We access our smartphone and launch the authentication application that we will use (in my case I launch Google Authenticator)

Icon

Description automatically generated

We add the new account

Graphical user interface, text, application

Description automatically generated

We select the option to scan a QRCODE and scan it

Enter the passcode generated after scanning the QRCODE in the space provided under the QRcode code on the page WEB

Qr code

Description automatically generated

We will now have an account named WSA (Woekspace One:WSA) linked to our authenticator app

Graphical user interface, text, application

Description automatically generated

From the next login after entering your username and password you will be asked for the access code generated by the user application

Authenticator APP and Workspace One Access

vSphere DRS functionality was impacted due to an unhealthy state vSphere Cluster Service

If you see such an error on the Cluster object of a vSAN (in my case it appeared on two vSAN clusters managed by the same vCenter)

vSphere DRS functionality was impacted due to an unhealthy state vSphere Cluster Service …….

an unhealthy state of the Service cluster

Graphical user interface, text, application, email

Description automatically generated

Errors such as the following in the EAM log. vCenter LOG

EAM.log:

2023-01-26T13:16:39.996Z |  INFO | vim-monitor | VcListener.java | 131 | Retrying in 10 sec.
2023-01-26T13:16:41.432Z | ERROR | vlsi | DispatcherImpl.java | 468 | Internal server error during dispatch
com.vmware.vim.binding.eam.fault.EamServiceNotInitialized: EAM is still loading from database. Please try again later.
        at com.vmware.eam.vmomi.EAMInitRequestFilter.handleBody(EAMInitRequestFilter.java:57) ~[eam-server.jar:?]
        at com.vmware.vim.vmomi.server.impl.DispatcherImpl$SingleRequestDispatcher.handleBody(DispatcherImpl.java:373) [vlsi-server.jar:?]
        at com.vmware.vim.vmomi.server.impl.DispatcherImpl$SingleRequestDispatcher.dispatch(DispatcherImpl.java:290) [vlsi-server.jar:?]
        at com.vmware.vim.vmomi.server.impl.DispatcherImpl.dispatch(DispatcherImpl.java:246) [vlsi-server.jar:?]
        at com.vmware.vim.vmomi.server.http.impl.CorrelationDispatcherTask.run(CorrelationDispatcherTask.java:58) [vlsi-server.jar:?]
        at java.util.concurrent.ThreadPoolExecutor.runWorker(ThreadPoolExecutor.java:1149) [?:1.8.0_345]
        at java.util.concurrent.ThreadPoolExecutor$Worker.run(ThreadPoolExecutor.java:624) [?:1.8.0_345]
        at java.lang.Thread.run(Thread.java:750) [?:1.8.0_345]
2023-01-26T13:16:50.007Z |  INFO | vim-monitor | ExtensionSessionRenewer.java | 190 | [Retry:Login:com.vmware.vim.eam:b55a7f93b59f0f7e] Re-login to vCenter because method: currentTime of managed object: null::ServiceInstance:ServiceInstance failed due to expired client session: null
2023-01-26T13:16:50.007Z |  INFO | vim-monitor | OpId.java | 37 | [vim:loginExtensionByCertificate:913aec585658e328] created from [Retry:Login:com.vmware.vim.eam:b55a7f93b59f0f7e]
2023-01-26T13:16:51.440Z | ERROR | vlsi | DispatcherImpl.java | 468 | Internal server error during dispatch
com.vmware.vim.binding.eam.fault.EamServiceNotInitialized: EAM is still loading from database. Please try again later.

And you see the lack of vCLS VMs in the two vSANs

To resolve the anomaly you must proceed as follows:

  • vCenter Snapshots and Backup
  • Log in to the vCenter Server Appliance using SSH.
  • Run this command to enable access the Bash shell:

shell.set --enabled true

  • Type shell and press Enter.
  • Run this command to retrieve the vpxd-extension solution user certificate and key:

mkdir /certificate

/usr/lib/vmware-vmafd/bin/vecs-cli entry getcert --store vpxd-extension --alias vpxd-extension --output /certificate/vpxd-extension.crt

/usr/lib/vmware-vmafd/bin/vecs-cli entry getkey --store vpxd-extension --alias vpxd-extension --output /certificate/vpxd-extension.key

  • Run this command to update the extension’s certificate with vCenter Server.

python /usr/lib/vmware-vpx/scripts/updateExtensionCertInVC.py -e com.vmware.vim.eam -c /certificate/vpxd-extension.crt -k /certificate/vpxd-extension.key -s localhost -u "Administrator@domain.local"

Note: If this produces the error “Hostname mismatch, certificate is not valid for ‘localhost'”, change ‘localhost’ to the FQDN or IP of the vCenter. The process is checking this value against the SAN entries of the certificate.

Note: The default user and domain is Administrator@vsphere.local. If this was changed during configuration, change the domain to match your environment. When prompted, type in the Administrator@domain.local password.

  • Restart EAM and start the rest of the services with these commands:

service-control --stop vmware-eam

service-control --start --all

vSphere DRS functionality was impacted due to an unhealthy state vSphere Cluster Service

VMware Horizon 8 2212

VMware has just released a new version of Horizon 2212. These are some of the features/support introduced:

  • Horizon 8 version 2212 in conjunction with App Volumes 4 version 2212 introduces Horizon Published Apps on Demand.  With this new feature, administrators can use App Volumes applications directly in their instant-clone RDS farms.  Now applications can be delivered dynamically to a generic Windows OS as users launch them. This greatly simplifies static image management and gives administrators the ability to reduce their application specific farms. This also brings the Horizon and App Volumes administration consoles closer together, allowing Horizon administrators to add App Volumes Manager servers and entitle applications to users without the need for duplicate entitlements in App Volumes. This feature creates an opportunity to reduce the time-consuming management of application installations on RDS Farms, and enables scenarios such as multiple users being able to use different versions of the same application while logged in to the same RDS Server.
  • Microsoft MAK licenses are now supported with Instant Clones.
  • When you create an automated pool of full clone desktops, you can now specify an active directory OU in which computer accounts can be created. Previously, computer accounts would get created in the default OU and administrators would manually move them after pool creation. This feature, which already exists for Instant Clone desktop pools, addresses this pain point for administrators.
  • Cloud Pod Architecture is supported with IPv6 environments for more security and added address spaces.
  • Administrators can now generate a CSR configuration file, import a CA-signed certificate to Connection Server, and monitor health of the certificate from Horizon Console.

More details here:

VMware Horizon 8 2212 Release Notes

VMware Horizon 8 2212

AppVolume Application in Pending Delete

In some situations, removing an Application of AppVolume may not result correctly, and as a result, the state of applications from the UI may result in deleting and stalling:

In my case, I also have the advantage that they have not remained in cancellation even if the Packages

To perform the cleanup, you must work on the AppVolume Database.

To proceed we must:

  • Locate the server that hosts the DB.
    • On an AppVolume server, in 64-bit ODBC, there is an SRVMANAGER entry edit the entry and identify the server’s name and its DB name.
  • Shut down each server with the App Volume Manager role of the App Volume Manager service.

  • Connect with SQL Management Studio to AppVolume DB.
  • Back up your DB.
    • Using the native SQL tool or third-party backup tools.
  • Remove the rows corresponding to the application in the dbo.app_products table.
    • In some situations, it may not be enough the name and then in the removal query we indicate the status that is deleting.

Image containing text, device, gauge, screenshot

Auto-generated description

If there are also packages in a state of deleting also proceed with the removal of the corresponding rows that we can find in the dbo table .app_packages.

AppVolume Application in Pending Delete

Horizon Instant Clone -VM Replica and Template in inaccessible state

In the various maintenance activities of a Horizon infrastructure, it can happen to find VMs of the instant clone chain in an inaccessible state. (Caused by issues on hosts or vCenter such as sudden shutdowns without properly maintaining Horizon Desktop Pools.)

Image that contains text

Auto-generated description

In the VMware Horizon solution there is a tool, from the command line, that allows the cleaning of these objects.

The tool is present in the directory

C:\Program Files\VMware\VMware View\Server\tools\bin>

of one of the connection servers of the Horizon infrastructure

The command is iccleanup.cmd

The first step is to connect to the vCenter in question by launching the following command

iccleanup.cmd -vc <fqdn of vCenter> -uid <administrative user>

Once you have entered the password you will have the possibility to list the VMs of the instant clone infrastructures implemented on that vCenter with the LIST command

Image that contains text

Auto-generated description

Or delete objects in an inaccessible state, for example:

With the delete –index 2 command

Image that contains text

Auto-generated description

After the completion of the cleaning, the situation will be as follows:

Image that contains text

Auto-generated description

Horizon Instant Clone -VM Replica and Template in inaccessible state

I updated my Home Lab with the gift of Cohesity and the vEXPERT community

Immagine che contiene testo, interni

Descrizione generata automaticamente

Until a few weeks, my Home Lab was composed of two physical ESXi nodes (respectively an INTEL NUC NUC8i3BEH and an HP Desktop HP ProDesk 600 G2 DM), with 32 GB of RAM each and 5 TB of total disk.

For my testing activities, especially in VDI (Horizon) and some vSAN (implemented a 2-node cluster to test the operation of Shared Disks for Microsoft clusters) could be enough.

But the desire to test vSphere 8 (vSAN etc …) and the possibility of trying the Kubernetes world was pushing me to evaluate an expansion of my Home LAB ……….

………. And thanks to COHESITY and the vEXPERT community at VMware EXPLORER in Barcelona I was able to have my expansion…. a beautiful Maxtang NX6412 NX6412-Maxtang-A premier manufacturer (maxtangpc.com)

Image containing electronic, projector

Auto-generated description

here’s how I activated the new HW:

  • Equipment
    • Being barebones I had to buy RAM and DISK, taking advantage of Black Friday I bought:
      • Timetec 1TB SSD 3D NAND TLC SATA III 6Gb/s M.2 2280 NGFF 512TBW
      • Transcend JM3200HSE-32G 32GB DDR4 3200MHz SO-DIMM 2Rx8 1.2V

Image containing text, electronic, circuit

Auto-generated description

For the RAM I will proceed to evaluate an expansion with an additional 32GB bank

  • Installation
    • Updated vCenter to version 8
    • Installed ESXi version 8 on a USB stick (Using VMware Workstation and installing ESXi from an ISO on my USB stick) and used it to boot from Maxtang.

At this point I encountered the first problem, the two network cards are not compatible… I had to use a USB dongle -> Ethernet and I managed to start everything (Thanks also to the community drivers USB Network Native Driver for ESXi | VMware Flings

    • I finally added ESXi to my vCenter
  • First use
    • The first thing I did was use William Lam’s script to deploy a vSAN 8

Automated vSphere & vSAN 8 Lab Deployment Script (williamlam.com)

    • I configured the HA of my vCenter
    • Now I’m trying to improve my know-how on Tanzu and WorkSpace One

So THANK YOU vEXPERT, VMware and COHESITY

I updated my Home Lab with the gift of Cohesity and the vEXPERT community

VMware ThinAPP

ThinApp is an application virtualization (Agent-Less) solution.

Application virtualization, therefore, the use of ThinApp, allows us to:

  • Coexist different versions of the same application on the same Operating System
  • Use Windows 7 and Windows XP applications on Windows 10 and Windows 11 systems and thus simplify the migration from outdated operating systems to a modern OS
  • Reduce IT support and related Help Desk costs
  • Increase user mobility
  • Stream applications

In detail, ThinApp captures the installation of one or more applications (including files and registry keys that are modified) in an ecosystem that looks like a single executable file.

The executable file is portable on other systems (of the same version or different) and we can control the level of interaction with the operating system on which we are going to run the application and with other applications in our system.

ThinApp allows various ways of isolation using a sandbox:

  • FULL
  • MERGED
  • WRITE

During the creation of the virtualized package, we can choose only two of the previous options (MERGE and WRITECOPY) the third (FULL) we can activate by modifying an INI file post-capture of the installation

In the following diagrams, we find the three modes

The Sandbox is our box where changes to the ThinApp package that the end user performs during use can (depending on the isolation mode chosen) be saved.

The sandbox is:

  • Customizable the path where it resides
    • Editable in .ini file that generates application capture
    • Can reside in the same directory as the ThinApp EXE
    • Can be on a network share
    • By default is %appdata%\thinstall\application
  • Each user has his own sandbox
  • Resetting application configurations is executable by deleting the sandbox

The distribution of a ThinApp is feasible in several ways:

  • Using a network share and running application streaming
  • Using it from a USB device
  • Copying it to your computer

The use of the network share for the distribution of ThinApp packages allows an easy updating of the packages themselves.

VMware ThinAPP