vSphere Distributed Switch health check

For us VMware systems engineers who every day find ourselves “dialoguing” with those who manage the network ecosystem, we can only find the vSphere Distributed Switch health check function useful.

  1. What these checks allow us to highlight:

These are some of the common configuration errors that health check identifies:

  • Mismatched VLAN trunks between a vSphere distributed switch and a physical switch.
  • Mismatched MTU settings between physical network adapters, distributed switches, and physical switch ports.
  • Mismatched virtual switch teaming policies for the physical switch port-channel settings.

The network health check in vSphere monitors the following three network parameters at regular intervals:

  • VLAN: Checks whether vSphere distributed switch VLAN settings match trunk port configuration on the adjacent physical switch ports.
  • MTU: Checks whether the physical access switch port MTU setting based on per VLAN matches the vSphere distributed switch MTU setting.
  • Network adapter teaming: Checks whether the physical access switch ports EtherChannel setting matches the distributed switch distributed port group IP Hash teaming policy settings.
  1. How to activate:

Access the network section of our vCenter

Select the vDS on which we want to activate health checks

A screenshot of a computer

Description automatically generated

And enable the check that interests us:

A screenshot of a computer

Description automatically generated

  1. Where to check the outcome of the checks?

Wait a few minutes and already first feedback we can have it on ESXi hosts using the vDS in question, where if there are problems the classic red dot will be displayed

A screenshot of a computer

Description automatically generated

For more details, access the network section of our vCenter and select the vDS in question

A screenshot of a computer

Description automatically generated

And we can see that on the vmnic0 and vmnic3 of the first host, there are vLANs of which we have a Portgroup but which are not proposed correctly on all the ports of the switches to which we have attested our hosts. Then we have to have the configuration verified by our colleagues in the network.

  1. How to turn it off:

Repeat the enabling steps but this time select disable.

  1. Risks in activating it (we always consider activating it for a short time)

Depending on the options that you select, the vSphere Distributed Switch Health Check can generate a significant number of MAC addresses for testing teaming policy, MTU size, vLAN configuration, resulting in extra network traffic.
Ensure the number of MAC addresses to be generated by the health check will be less than the size of the physical switch(es) MAC table. Otherwise, there is a risk that the switches will run out of memory, with subsequent network connectivity failures. After you disable vSphere Distributed Switch Health Check, the generated MAC addresses age out of your physical network environment according to your network policy.

More info:

vDS Health Check reports unsupported VLANs for MTU and VLAN (2140503) (vmware.com)

Enabling vSphere Distributed Switch health check in the vSphere Web Client (2032878) (vmware.com)

vSphere Distributed Switch health check

Enable copy and paste between Guest Operating System and Remote Console

Copy and paste operations between the guest operating system and remote console are deactivated by default. 

To enable it:

  • Browse to the virtual machine in the vSphere Client inventory
  • Right-click the virtual machine and click Edit Settings.
  • Select Advanced Parameters.
  • Add or edit the following parameters.

    isolation.tools.copy.disable False
    isolation.tools.paste.disable False
    isolation.tools.setGUIOptions.enable True
    These options override any settings made in the guest operating system’s VMware Tools control panel.
  • Click OK.
  • (Optional) If you made changes to the configuration parameters, restart the virtual machine.

Enable copy and paste between Guest Operating System and Remote Console

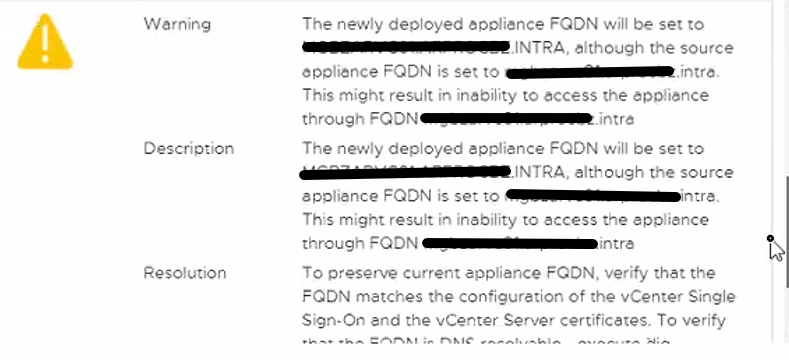
Prechecks fail during upgrade to vCenter Server 7.0 with the following message “The source appliance FQDN must be the same as the source appliance primary network identifier”

When upgrading vCenter 6.5x to version 7u3x we encountered the following problem

Text

Description automatically generated

Following this KB

Upgrading to vCenter Server 7.0 fails when case differs between FQDN and PNID (84355) (vmware.com)

We identify the problem in the fact that we have the hostname that differs from the PNID because one is all uppercase and the other lowercase.

From the following KB we find that we can not on vCenter 6.5 updatethe hostname

Cannot change the vCenter Server or Platform Service Controller 6.x hostname on versions prior to vCenter Server 6.7 Update 3 (2130599) (vmware.com)

To solve we proceed first with the update to the version of vcenter 6.7u3 that fixes the part of FQDN

Graphical user interface, text

Description automatically generated

Once updated to 6.7 relaunch the commands indicated by KB and see that the PNID and hostname coincide

Then we update to the vCenter version 7u3

Prechecks fail during upgrade to vCenter Server 7.0 with the following message “The source appliance FQDN must be the same as the source appliance primary network identifier”

VMware Horizon 8 2212

VMware has just released a new version of Horizon 2212. These are some of the features/support introduced:

  • Horizon 8 version 2212 in conjunction with App Volumes 4 version 2212 introduces Horizon Published Apps on Demand.  With this new feature, administrators can use App Volumes applications directly in their instant-clone RDS farms.  Now applications can be delivered dynamically to a generic Windows OS as users launch them. This greatly simplifies static image management and gives administrators the ability to reduce their application specific farms. This also brings the Horizon and App Volumes administration consoles closer together, allowing Horizon administrators to add App Volumes Manager servers and entitle applications to users without the need for duplicate entitlements in App Volumes. This feature creates an opportunity to reduce the time-consuming management of application installations on RDS Farms, and enables scenarios such as multiple users being able to use different versions of the same application while logged in to the same RDS Server.
  • Microsoft MAK licenses are now supported with Instant Clones.
  • When you create an automated pool of full clone desktops, you can now specify an active directory OU in which computer accounts can be created. Previously, computer accounts would get created in the default OU and administrators would manually move them after pool creation. This feature, which already exists for Instant Clone desktop pools, addresses this pain point for administrators.
  • Cloud Pod Architecture is supported with IPv6 environments for more security and added address spaces.
  • Administrators can now generate a CSR configuration file, import a CA-signed certificate to Connection Server, and monitor health of the certificate from Horizon Console.

More details here:

VMware Horizon 8 2212 Release Notes

VMware Horizon 8 2212

Script for removing and installing Horizon agent

Requirements:

  • Share containing the installation file of the Horizon agent version and a . bat containing the command to silently install the Horizon agent
  • List of VMs on which to perform the operation
  • A user to access vCenter with administrative rights
  • One user to install horizon agent on VMs

The script includes:

  • Credential request
    • First request the user to access the vCenter (line 6)
    • Second request the user to remove and install the Horizon Agent on the VMs (line 8)
  • Import the VM list (line 12)
  • Connecting to the vCenter (line 13)
  • Part a for each machine contained in the file with the list of VMs (line 14)
  • Check if the Horizon Agent is present (line 25)
  • If present, remove it and reboot (line 29), if not present, switch to the installation fa
  • Installing the Horizon agent (line 54)
    • Share mount
    • Running the .bat contained in the share
  • Waiting for the installation to finish and reboot

There are 3 “procedures” in the script

For  verification if the Horizon Agent is installed (line 18 to 20):

$script = @”

Get-WmiObject Win32_Product -filter “Name=’VMware Horizon Agent'” | Select Caption

” @

For the removal the Horizon  agent (line 22 to 24):

$removeapp= @”

wmic Product Where “Name=’VMware Horizon Agent'” Call Uninstall /NoInteractive

” @

For agent installation (Line 50 to 54):

$installapp = @”

New-PSDrive -Name “S” -Root “\\vimng03\share” -Persist -PSProvider “FileSystem”

S:\agentinstallv8.bat

” @

In this last agent installation procedure, you must modify:

  • S 🡪 letter with which the share will be temporarily mounted on the VM (which we can change but must also be modified in the installation file .Bat
  • \\vimng03\share –> put the share where you want the Horizon agent installation file and the installation file .bat
  • S:\agentinstallv8.bat is the file that will install the agent in silently mode

Where inside it is start:

s:\VMware-Horizon-Agent-x86_64-8.0.0-16530789.exe /s /v”/qn ADDLOCAL=BlastUDP,Core,HelpDesk,RDP,RTAV,TSMMR,USB,VmVideo,VmwVaudio,VmwVdisplay,VmwVidd”

to be parameterized according  VMware’s guide.

in my case the file will look like this

#The script need:
#List the VMs name where remove e reinstall the agent (file c:\vdi.txt or where you want)
#Share where is the horizon agent installation file and the file agentinstallv8.bat that contain the silent command for installation
#When the script start ask the vCenter Credential and the Admin User Credential for install the Horizon Agent on the VM
#Credential for access to vCenter
$credential = Get-Credential
#Credential with administrator role for install horizon agent 
$VMCredential = Get-Credential
#vcenter
$vcenter = "<FQDNvCenter>"
#List of VMs where remove e install new agent version
$VDIs = Get-Content "c:\vdi.txt"
connect-viserver $vcenter -Credential $credential
foreach ($VDI in $VDIs){
$VM = Get-VM -Name $VDI
Write-Host "Start remove agent from $VM"
#Script for verify if the agent is installed
$script = @"
Get-WmiObject Win32_Product -filter "Name='VMware Horizon Agent'" | Select Caption 
"@
#Script for remove
$removeapp= @"
wmic Product Where "Name='VMware Horizon Agent'" Call Uninstall /NoInteractive
"@
$value = Invoke-VMScript -VM $VM -ScriptType Powershell -ScriptText $script -GuestCredential $VMCredential 
#Check if horizon agent are install if present the script remove it and reboot the VM
if ($value.ScriptOutput -like "*Horizon*") {
     Write-Host "Horizon agent is installed"
     Invoke-VMScript -VM $VM -ScriptType Powershell -ScriptText $removeapp -GuestCredential $VMCredential -RunAsync
     While(Test-Connection $VM -Quiet -Count 1){
        Write-Progress -Activity "Rebooting $VM" -Status "Waiting for $VM to shut down."
        Start-Sleep -sec 1
     }
     While(!(Test-Connection $VM -Quiet -Count 1)){
        Write-Progress -Activity "Rebooting $VM" -Status "Waiting for $VM to come back up."
        Start-Sleep -sec 1
     }
     if ($value.ScriptOutput -cnotlike "*Horizon*") {
     Write-Host "Agent removed from $VM and $VM rebooted"
     } 
   }
   else { 
   Write-Host "Horizon agent is not installed on $VM" 
   } 

#####Agent Installation
Write-Host "Start the Horizon Agent installation in $VM"
Sleep 15 
#Installation with share change the fileserver,the share name, the labl and the file 
$installapp = @"
New-PSDrive -Name "S" -Root "\\vimng03\share" -Persist -PSProvider "FileSystem"
S:\agentinstallv8.bat
"@
Invoke-VMScript -VM $VM -ScriptType powershell -ScriptText $installapp -GuestCredential $VMCredential -RunAsync
While(Test-Connection $VM -Quiet -Count 1){
        Write-Progress -Activity "Rebooting $VM" -Status "Waiting for $VM to shut down."
        Start-Sleep -sec 1
    }
While(!(Test-Connection $VM -Quiet -Count 1)){
        Write-Progress -Activity "Rebooting $VM" -Status "Waiting for $VM to come back up."
        Start-Sleep -sec 1
    }
Write-Host "$VM after installation is UP" 
$value = Invoke-VMScript -VM $VM -ScriptType Powershell -ScriptText $script -GuestCredential $VMCredential
if ($value.ScriptOutput -like "*Horizon*") {
    Write-Host "New Horizon agent is installed in $VM"
    }
    else
    {
    Write-Host "New Horizon agent is not installed in $VM" 
    }
}
Disconnect-VIServer $vcenter -Force
Script for removing and installing Horizon agent

Script to see Datastore Permission

Last day in the VMware Community I saw a request for:

“I have AD group like mydomain\mygroup.

This group have access for many datastores.

How i can use powercli to get full list of datastores which the group can manage?”

I made this PowerCLI script:

$cred = Get-Credential
Connect-ViServer <vcenter-FQDN>; -Credential $cred
$datastores = Get-Datastore | Select Name
$groupAD = "domain\group"
$report = @()
foreach ($datastore in $datastores) {
  $report +=  Get-VIPermission
| Where-Object {($_.Entity.Name -Like $datastore.Name) -and ($_.Principal -eq $groupAD)} |Select Principal,Role,@{n='Datastore';E={$datastore.Name}},@{n='Entity';E={$_.Entity.Name}},@{N='Entity Type';E={$_.EntityId.Split('-')[0]}},@{N='vCenter';E={$_.Uid.Split('@:')[1]}}
}
$report | Export-Csv <path\csvfile> -NoTypeInformation

Script to see Datastore Permission

Copy file to VCSA with SCP

Well, in recent weeks we have often talked about how to heal vCenters from the log4j vulnerability.
I guess the first thing we all thought was “What a show VMware support released scripts to run to solve the problem …” and then every one to use WinSCP or similar tools/commands to copy the file …. but many will have found it impossible to copy files using the Root user …. but how SSH works but the SCP command does not work!
Well, the problem comes from the shell associated with the Root user. It is not the classic BASH but the APPLIANCESH.
Then we proceed as follows:

  • Let’s connect in SSH to the vCenter Virtual Appliance
  • We access the Bash SHELL with the command SHELL
  • We enable BASH as the default shell for the root user
  • We run our SCP
  • We re-enable APPLIANCESH for the root user

Copy file to VCSA with SCP

Automate workaround for mitigating Log4j exploit on VCSA (vCenter Virtual Appliance)

After the post where I apply the VMware workaround for mitigating the Log4j exploit on the UAG appliance, now I suggest using this VMware KB to apply the workaround on vCenter.

Python script to automate the workaround steps of VMSA-2021-0028 vulnerability on vCenter Server Appliance (87088) (vmware.com)

The Python script attached at the KB check the vCenter version (6.5, 6.7 and 7) and apply the correct workaround indicate from VMware [see the Workaround instructions to address CVE-2021-44228 in vCenter Server and vCenter Cloud Gateway (87081) (vmware.com)]

Automate workaround for mitigating Log4j exploit on VCSA (vCenter Virtual Appliance)

Copy-VMGuestFile

I needed to copy a folder to virtual machine on the DMZ network segment.
The firewall rule blocks any access to VM, well I used the Copy-VMGuestFile Powercli Command.

Connect-VIServer <vcenter server FQDN or IP>

$vm = Get-VM -Name <VM target>

Get-Item “<Source Path>” | Copy-VMGuestFile -Destination “<Destination Path on VM>” -VM $vm -LocalToGuest -GuestUser <User VM Guest> -GuestPassword <Password User VM Guest>

After the first tentative I receive this error:

Copy-VMGuestFile : 09/12/2021 11:08:40 Copy-VMGuestFile The request was aborted: The request was cancelled.
At line:1 char:27

Probably it is a time out error and I try to change the WebOperation Timeout Seconds.

PS C:\Windows\system32> Set-PowerCLIConfiguration -WebOperationTimeoutSeconds -1

Scope ProxyPolicy DefaultVIServerMode InvalidCertificateAction DisplayDeprecationWarnings WebOperationTimeout
Seconds
—– ———– ——————- ———————— ————————– ——————-
Session UseSystemProxy Multiple Unset True -1
User Multiple
AllUsers -1

After the change the error it is resolved

Copy-VMGuestFile

LDAP Identity source and vCenter

Whenever we installed a new vCenter the activity always included integration with Active Directory and normally IWA (Integrated Windows Authentication) was used.
Since vSphere 7.0 version this possibility has been deprecated
so it is good to start with the integration of the vCenter with Active Directory via LDAP.
In our case, we will use LDAPS which uses a certificate

For first the step we need to create the certificate:

  • Use SSH to vCenter connection

On shell use this command

openssl s_client -connect <DC FQDN>:636 -showcerts

Copy the certificate output with  —–BEGIN CERTIFICATE—– and —–END CERTIFICATE—–

Past on Notepad and save with .crt extension

Now we will go to configure the Identity Sources on vCenter:

  • Login as Single Sign-On Administrator to vCenter
  • Navigate to Menu > Administration > Single Sign-On Configuration
  • In the Identity Provider tab, open Identity Sources
  • Click ADD
  • Select Active Directory over LDAP or OpenLDAP, depending on your directory type.

Fill out the remaining fields as follows:
Identity Source Name: Label
Base DN for users: The Distinguished Name (DN) of the starting point for directory server searches. Example: “DC=pollaio,DC=lan”.
Base DN for groups: The Distinguished Name (DN) of the starting point for directory server searches.
Domain name: Your domain name. Example: “pollaio.lan”
Domain alias: Your NetBIOS name. Example: “pollaio.lan”
Username: Domain user with at least browse privileges. Example: “pollaio\administrator”.
Connect to:  “ldaps://<DC FQDN>”.

  • Click Browse next to SSL Certificate
  • Select the .cer file created in before step
Now we are ready to login to the vCenter with domain user (remember to assign the correct permission to domain group or user group)

If you want check the correct use of SSL certificate on the authentication to Active Directory with LDAP connection check the websso.log:

LDAP Identity source and vCenter