Horizon 2312, new feature to simplify the Gold Image Linux Configuration

A penguin and microsoft active logo

Description automatically generated

Few people know that it is possible use Linux Distribution to create VDI desktop or Stream Application (Like RDS) to publish it with Horizon.

The desktop pool can to be Instant Clone or Full Clone.

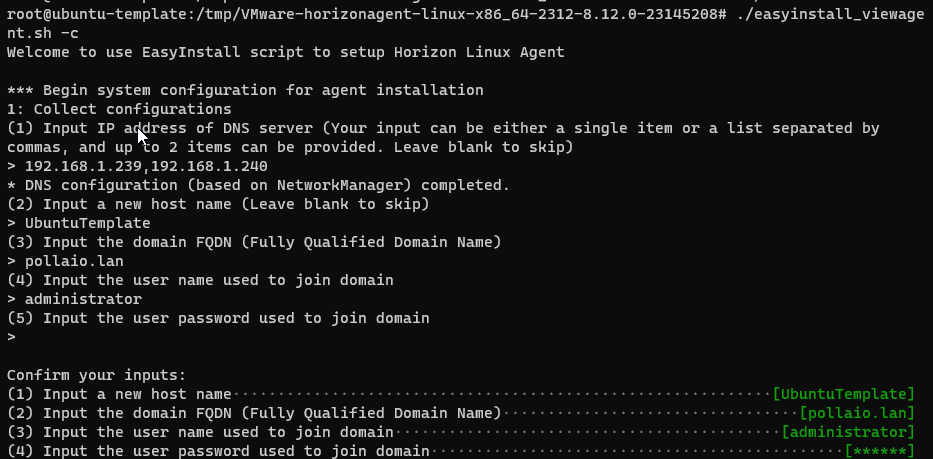
In the last Horizon version (2312) there is a new functionality to configure the agent, the function have to objective to simplify the installation and also configure the OS ((Like the joined to Active Directory domain).

In the Horizon Agent for Linux package there is a new command file:

easyinstall_viewagent.sh

We can use this command for:

  • Configure Linux OS template
  • Install Horizon Agent

For complete all previous steps you can start this command (with root privileges)

./easyinstall_viewagent.sh

The command do:

Platform check

A black screen with white text

Description automatically generated

Now you need to insert information like DNS, Hostname, Domain and Account to join to domain

A screenshot of a computer

Description automatically generated

Now the script check and install missed packages (SSSD etc.…) and make the domain join

A screen shot of a black screen

Description automatically generated

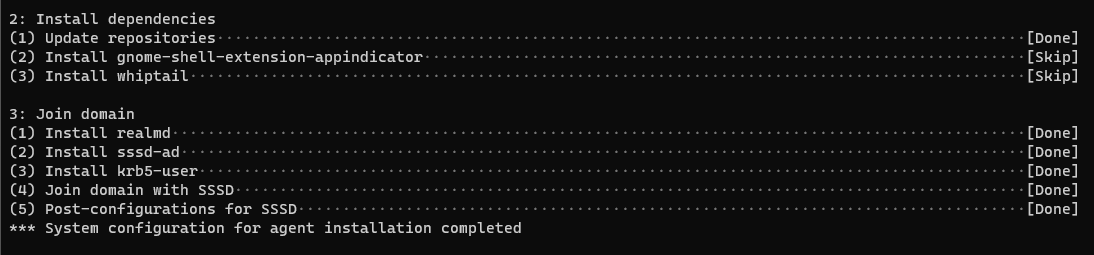
After joined the template to AD domain the script start to install the horizon agent

A screenshot of a computer

Description automatically generated

A black screen with white text

Description automatically generated

Now the Linux GoldI mage is ready to use for create a Horizon instant clone desktop pool or used for Full Clone Desktop Pool.

It is possible to configure the OS and install Horizon Agent in two different steps

  • Configure OS
    • For configure user Linux OS use this command:

./easyinstall_viewagent.sh -c

  • Install Agent
    • After configure the OS we can install the Horizon agent with this command:

./easyinstall_viewagent.sh -i

With this command we can to use some switch value:

Default (Hostname, Domain FQDN, DOMAIN Join User, DOMAIN Join PASSWORD …)

Advanced (The same option of DEFAULT with NTP, HORIZON AGENT FEATURE and other)

Expert (The same option of Advanced with another function)

In this link more information

Use the Easy Setup Tool to Prepare a Linux Machine (vmware.com)

Horizon 2312, new feature to simplify the Gold Image Linux Configuration

Horizon Client Linux, Domain User, and USB Redirect issue

We have a problem with USB redirection on the Linux client, the issue is present when a Linux guest OS (UBUNTU 20.04 in my case) is joined at the domain and we try to use a domain user to access the Linux to start a Horizon session with the Horizon client

The issue is “ USB initializing…” remain for all time and no USB device is redirected

A screenshot of a computer

Description automatically generated

In the log file /tmp/vmware-<user>/vmware-view-usbd-<pid session>.log we found

A screenshot of a computer program

Description automatically generated

With a Linux local user, the problem is not present.

Workaround

Add to /etc/passwd the domain user, for recover GID e UID use the command id <username>

A screen shot of a computer

Description automatically generated

After this, we need to restart the USB Arbitrator

After applying the workaround the problem is resolved

A screenshot of a computer

Description automatically generated

And I don’t have any error in the log file

A screenshot of a computer

Description automatically generated

Horizon Client Linux, Domain User, and USB Redirect issue

LDAP Identity source and vCenter

Whenever we installed a new vCenter the activity always included integration with Active Directory and normally IWA (Integrated Windows Authentication) was used.
Since vSphere 7.0 version this possibility has been deprecated
so it is good to start with the integration of the vCenter with Active Directory via LDAP.
In our case, we will use LDAPS which uses a certificate

For first the step we need to create the certificate:

  • Use SSH to vCenter connection

On shell use this command

openssl s_client -connect <DC FQDN>:636 -showcerts

Copy the certificate output with  —–BEGIN CERTIFICATE—– and —–END CERTIFICATE—–

Past on Notepad and save with .crt extension

Now we will go to configure the Identity Sources on vCenter:

  • Login as Single Sign-On Administrator to vCenter
  • Navigate to Menu > Administration > Single Sign-On Configuration
  • In the Identity Provider tab, open Identity Sources
  • Click ADD
  • Select Active Directory over LDAP or OpenLDAP, depending on your directory type.

Fill out the remaining fields as follows:
Identity Source Name: Label
Base DN for users: The Distinguished Name (DN) of the starting point for directory server searches. Example: “DC=pollaio,DC=lan”.
Base DN for groups: The Distinguished Name (DN) of the starting point for directory server searches.
Domain name: Your domain name. Example: “pollaio.lan”
Domain alias: Your NetBIOS name. Example: “pollaio.lan”
Username: Domain user with at least browse privileges. Example: “pollaio\administrator”.
Connect to:  “ldaps://<DC FQDN>”.

  • Click Browse next to SSL Certificate
  • Select the .cer file created in before step
Now we are ready to login to the vCenter with domain user (remember to assign the correct permission to domain group or user group)

If you want check the correct use of SSL certificate on the authentication to Active Directory with LDAP connection check the websso.log:

LDAP Identity source and vCenter