SaaS License Activation for Omnissa Horizon without EDGE Gateway

In the latest versions of Horizon, it is recommended to use the SaaS subscription, which requires the installation of an EDGE Gateway component generated by the Omnissa Connect portal under Horizon in the customer section.

This involves the need to install a Linux VM on our vSphere environment; not for everyone is this feasible:

–Need not have connections with Cloud services
–Resource savings (CPU, RAM and disk space)
–Test environments and any POCs
–Or, as in my case, I must test the new versions of Horizon

For this last point and since I need to install version 2606 as a test, I decided to explain how to do it… step by step.

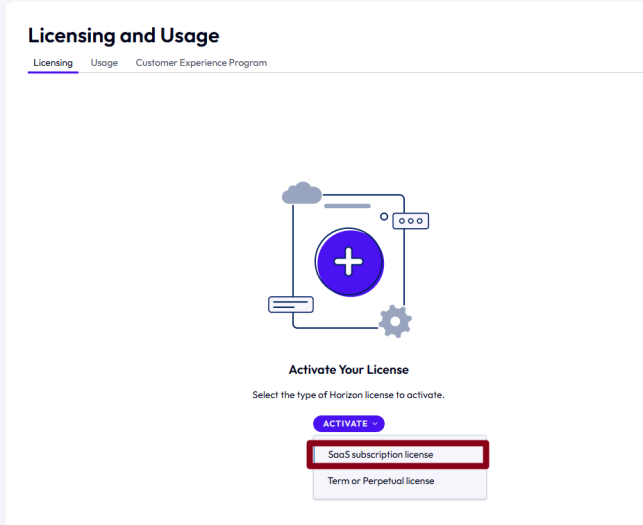
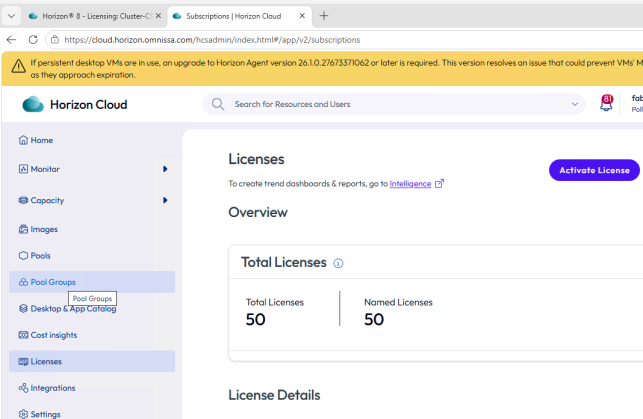
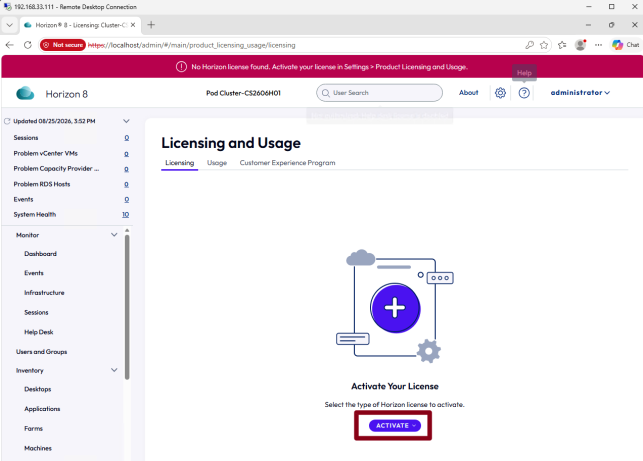
Installed my connection server on a Windows Server 2025. The first thing to do is access the administration console and activate the license:

.

.

.

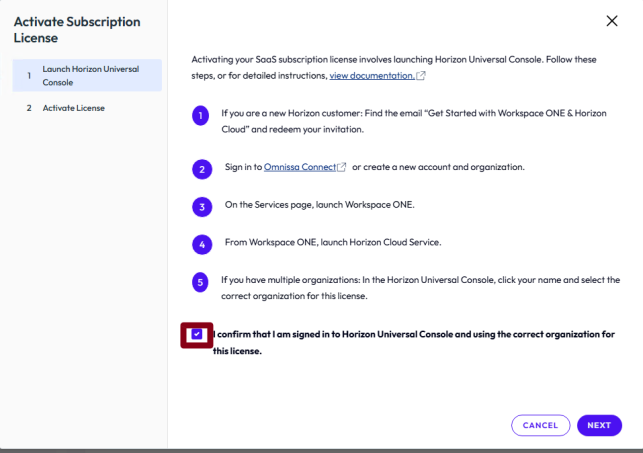
Verify that you have received the activation email or that you have a Horizon SaaS subscription and that you have access to the Connect Omnissa portal

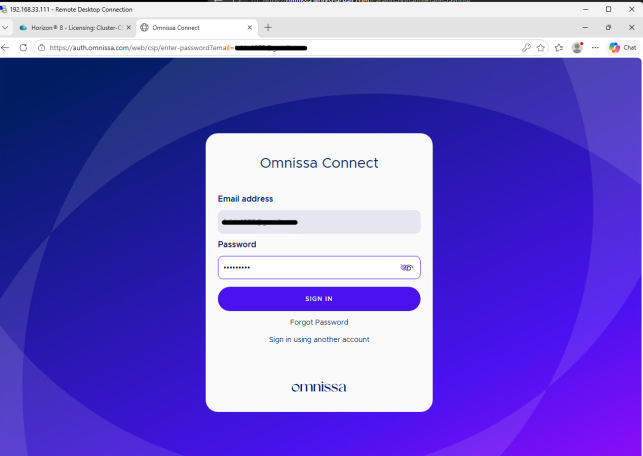
So you must log in to the Omnissa Connect portal (by opening a TAB from the Browser you are using to access the Horizon console) and authenticate on connect.omnissa.com and keep the tab open.

.

.

Enter accounts, passwords and if necessary, do MFA

.

.

A new tab will automatically open with the login already made

.

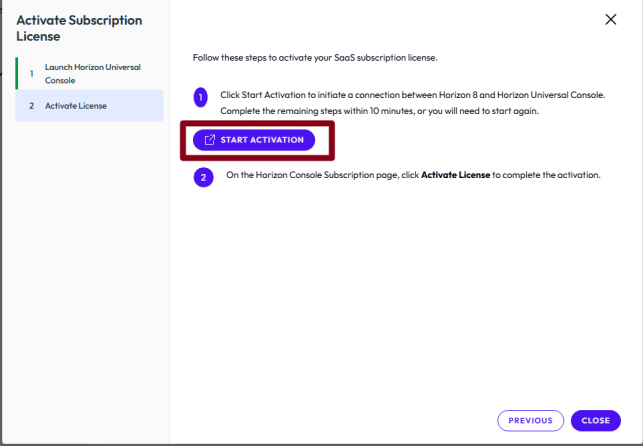
Now run

The following message will appear

.

.

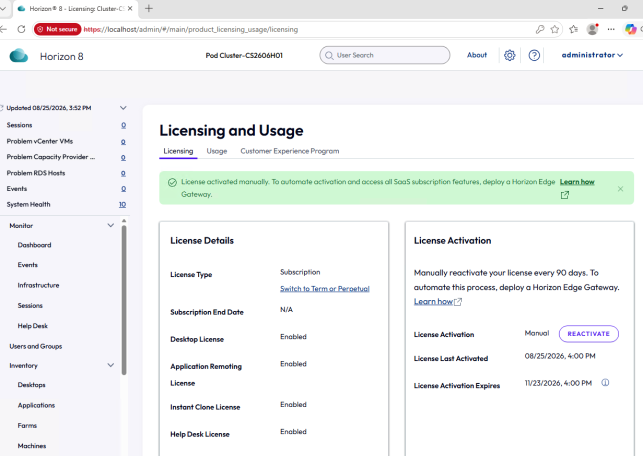
And on the Horizon console, the license status will be as follows

.

.

Two important points

–Mark your calendar to reactivate your license (in the same way) before 90 days have passed
–You can switch to a license via the EDGE Gateway by simply installing the EDGE Gateway (Follow the specific procedure)

.

.

.

.

SaaS License Activation for Omnissa Horizon without EDGE Gateway

App Volumes: VHD in-Guest vs Standard Mode

Technical comparison and recommended use cases

.

.

INTRODUCTION

Omnissa App Volumes provides two distinct modes for delivering applications to Horizon users: the standard mode (VMDK/VMFS-based) and VHD in-guest mode, introduced to support non-persistent OS scenarios and advanced Instant Clone environments.

The choice between the two modes directly affects performance, scalability, and infrastructure requirements.

MODE COMPARISON

Standard Mode (VMDK)

• VMDK disk attach via vCenter API

• Mandatory needs a vSphere infrastructure as a prerequisite

• Limited support for multi-hypervisor environments

• Dependency on shared vSphere datastores

• Compatible with all Horizon desktop types

VHD in-Guest

• VHD mounted directly inside the guest OS

• Hypervisor-independent

• Compatible with Azure, AVD and physical environments

• VHD exposed via SMB share or UNC path

• Application packages and writable volumes are stored in a high-performance file share

• Compatible with all Horizon desktop types

TAKE NOTE! We can select the mode (VMDK or VHD) when installing the first App Volumes Manager. We can’t switch from VMDK to VHD mode, or from VHD to VMDK mode, after the first configuration.

VHD IN GUEST ARCHITECTURE

In this mode, the App Volumes Agent inside the guest mounts the VHD file from the configured UNC path using native Windows APIs. The AppStack content is then layered onto the filesystem via the App Volumes kernel filter driver, making applications available without extraction.

.

.

Note: In VHD in guest mode, the AppStack .vhd file must be reachable via UNC path from the guest. Network latency to the share directly affects mount times.

WHEN TO CHOOSE VHD IN-GUEST

1

Reducing vCenter dependency

Environments with restrictive policies on vCenter API access or multi-cloud architectures.

.

2

Physical desktops or RDSH

Scenarios where the workload runs on bare metal or RDS servers without vSphere hypervisor.

.

3

Azure Virtual Desktop (AVD) environments

Non-vSphere infrastructure; inability to attach VMDK via vCenter.

.

.

App Volumes: VHD in-Guest vs Standard Mode

Microsoft Azure Edge and Omnissa-Managed Enterprise App Registration

My Initial Experience

During the preparation activities for deploying a new Horizon Cloud on Azure environment, I was reading the official documentation at

https://docs.omnissa.com/bundle/UsingManagingHorizonCloud/page/DeployingaMicrosoftAzureEdge.html

and discovered the presence of a new and recommended deployment method: the “Omnissa-managed” mode.

I immediately wanted to test it, but in my Omnissa Connect console, this option wasn’t yet available.

.

I contacted support and they informed me that the feature would be released soon, but if I wanted to use it immediately, they could enable it through a Feature Flag. Obviously, I couldn’t say no to that opportunity! Once they provided my ORG ID and enabled the flag, the new option appeared while I was creating the EDGE in the Primary Provider section.

This is my journey with the Omnissa-managed method, and I’d like to share what I learned about this game-changing approach.

.

.

Introduction

Horizon Cloud on Microsoft Azure is evolving, and Omnissa has introduced a significant security enhancement that every administrator should know about. The new Omnissa-managed Enterprise App registration method represents a paradigm shift in how organizations handle service principal credentials. If you’re planning a Horizon Cloud deployment on Azure, understanding the difference between this new approach and the traditional manual method could be crucial for your security posture.

The Security Challenge

Historically, deploying Horizon Edge in Horizon Cloud on Azure required organizations to create and manage their own Azure Enterprise Applications. This approach meant handling sensitive service principal secrets—credentials that need to be carefully managed, rotated, and protected. The more systems that have access to these secrets, the higher the security risk.

The traditional single-tenant deployment method (Manual Enterprise App registration) placed the responsibility of secret management squarely on the customer organization. While this approach continues to be supported, it introduces additional operational overhead and potential security vulnerabilities.

Enter Omnissa-Managed

Omnissa has introduced a new Enterprise App registration method that fundamentally changes who manages the service principal secrets.

Key Benefits

1. Enhanced Security

Organizations no longer need to provide their sensitive secrets key information to Omnissa or manage it themselves in the context of Horizon Cloud deployment. The credentials remain under Omnissa’s direct management, reducing the attack surface and potential points of compromise.

2. Simplified Administration

Say goodbye to manual Enterprise Application creation and complex permission configurations. With Omnissa-managed registration, the setup process is streamlined. Omnissa handles the heavy lifting—you focus on deployment.

3. Reduced Operational Overhead

No more worrying about secret rotation schedules, credential lifecycle management, or complex authentication flows. Omnissa manages these operational concerns, freeing your team for other critical tasks.

4. Enterprise-Grade Security

By centralizing secret management with Omnissa, organizations benefit from enterprise-grade security practices, regular audits, and dedicated security expertise that Omnissa brings to the table.

Manual Registration: Still Available

For organizations with specific requirements or legacy configurations, the traditional single-tenancy method remains available. This manual Enterprise App registration approach allows organizations to maintain full control over their authentication setup if needed. However, unless you have specific compliance or architectural reasons, the manual approach introduces unnecessary complexity.

The Recommendation

Omnissa-managed is the recommended method for all new Horizon Cloud deployments on Azure. Omnissa has taken the guesswork out of enterprise app management and elevated the security baseline for everyone using Horizon Cloud.

If you’re currently on the manual registration path, consider planning a migration to the Omnissa-managed approach. The transition offers immediate security benefits with reduced administrative overhead.

Getting Started

Ready to leverage Omnissa-managed registration for your deployment? The process is straightforward:

1.Initiate your Horizon Edge deployment in Omnissa Connect
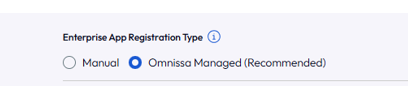
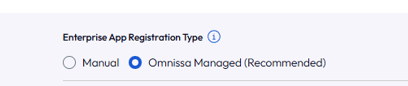
2.Select the Omnissa-managed option during the Primary Provider setup

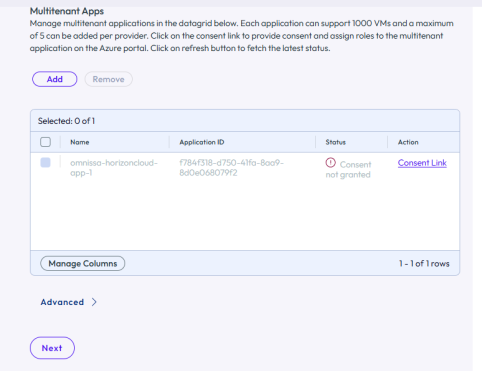
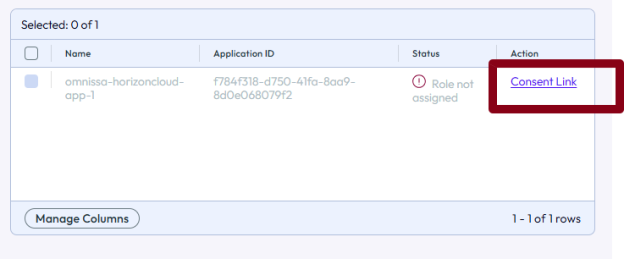
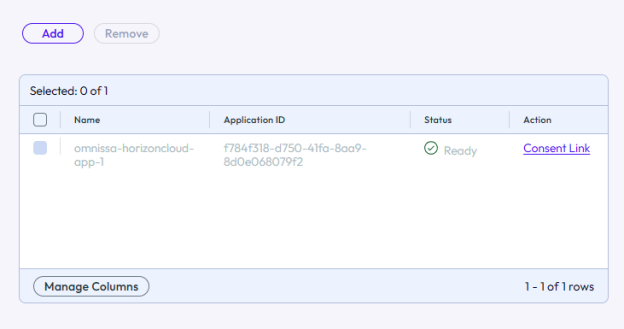
3.Link your Azure subscription using the consent flow (click Consent Link)

4.Authorize Omnissa to create the Enterprise Application

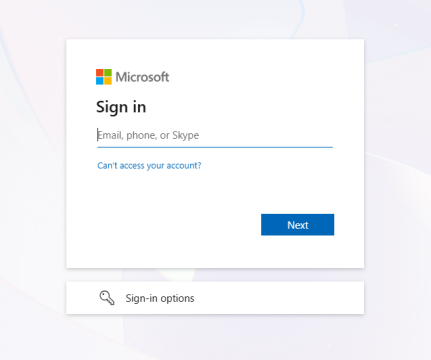
Insert Azure Subscription credentials (in my case Global Admin User)

Now we can see the new enterprise application with Omnissa Logo.

.

.

.

5.Assign necessary roles (Contributor or appropriate custom roles) to the subscription

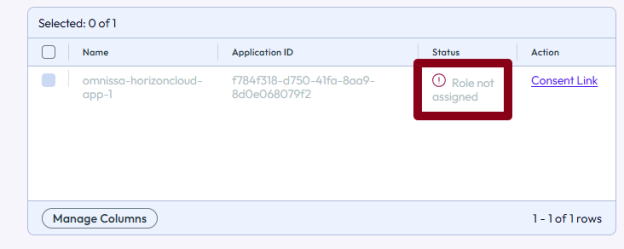
First, verify the role assignment status in Omnissa Connect:

.

.

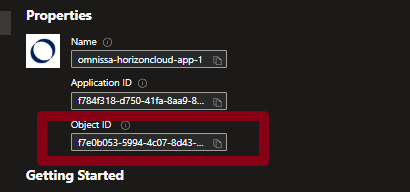
Get the Object ID from the Omnissa Enterprise App:

.

.

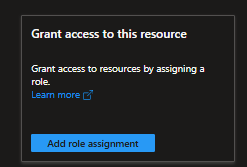
Go to your subscription and select IAM (Identity & Access Management):

.

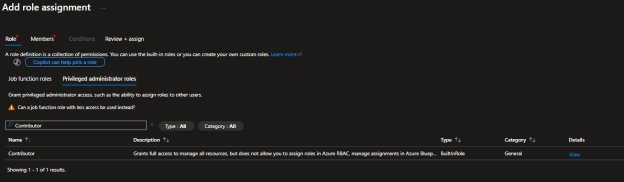
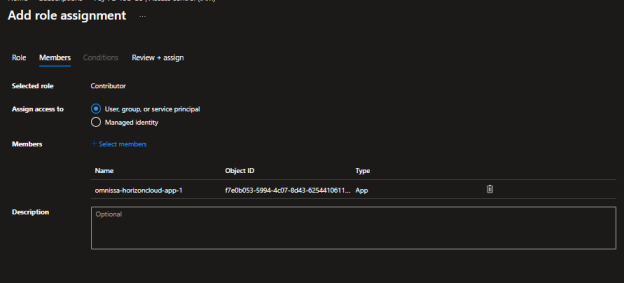
Select add role assignment

Search Contributor in Previleged admnistrator Role

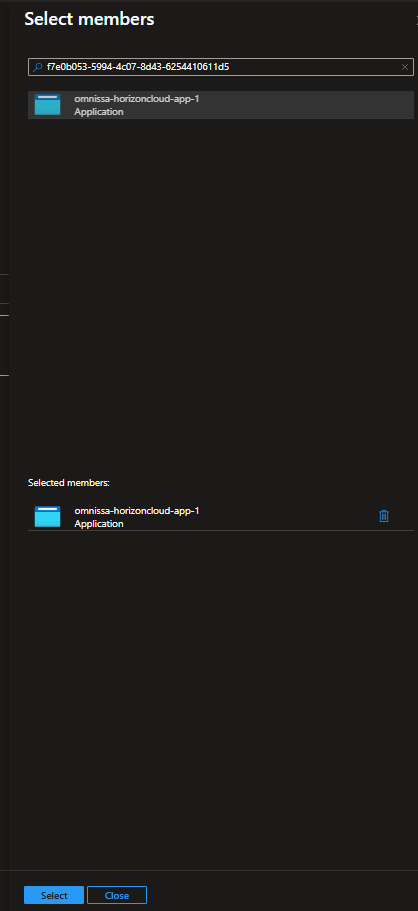
Select Member and ad the Enterprise Application Object ID or name

6.Refresh and verify the role assignment in Omnissa Connect

Return to the Omnissa Connect wizard. If the role is still showing as “Role not Assigned”

.

Go back to the previous step and return to refresh (Omnissa Engineer should add a refresh button)

.

.

.

At this point, you’re ready to choose whether your EDGE will be an AKS (Azure Kubernetes Service) or a Virtual Machine.

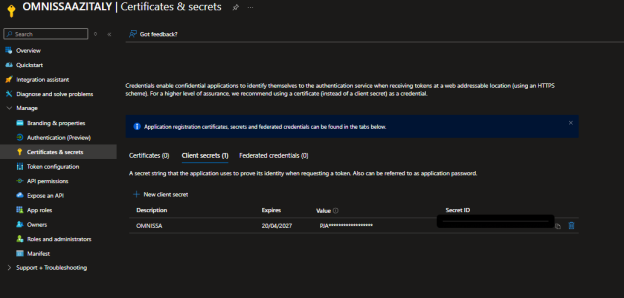
The Omnissa-managed Enterprise Application has been successfully created and configured with the naming convention omnissa-horizoncloud-app-1, marked with Omnissa’s branding for easy identification.

.

.

Conclusion

The shift to Omnissa-managed Enterprise App registration represents a meaningful step forward in cloud security practices. By removing the burden of service principal secret management from customer organizations, Omnissa enables secure, simplified, and scalable Horizon Cloud deployments on Microsoft Azure.

Whether you’re planning a new deployment or evaluating your current infrastructure, the Omnissa-managed method deserves your attention. It’s security and simplicity working in harmony—exactly what modern cloud deployments should be.

Microsoft Azure Edge and Omnissa-Managed Enterprise App Registration

Streamline Your Enterprise with Omnissa Connect and Microsoft Entra ID

A guide to enterprise federation, single sign-on, and modern identity management

What is Omnissa Connect?

Omnissa Connect is a centralized platform service that provides IT administrators and users with a single sign-on (SSO) gateway to access and manage all Omnissa services, such as Workspace ONE and Horizon. It streamlines workflows by unifying access, identity management, and service onboarding into one intuitive interface.

Key features of Omnissa Connect include:

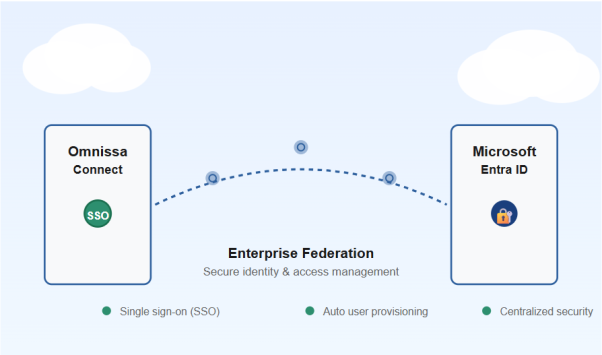
•Unified Identity: Single sign-on capabilities and seamless integration with third-party identity providers like Microsoft Entra ID and Okta through the Omnissa Identity Service
•Centralized Administration: IT owners can securely assign roles, set multi-factor authentication (MFA) policies, and manage OAuth applications or API tokens across the entire Omnissa ecosystem
•Subscription Management: Visibility into all Omnissa service subscriptions from a single location

What is Microsoft Entra ID?

Microsoft Entra ID (formerly Azure Active Directory) is Microsoft’s cloud-based identity and access management service. It’s the foundation that millions of organizations use to manage employee identities, secure access to applications, and protect their digital assets.

Entra ID is likely already at the heart of your organization if you use:

•Microsoft 365 (Office 365, Teams, SharePoint)
•Azure cloud services
•Dynamics 365 or other enterprise applications
•Single sign-on (SSO) solutions for SaaS applications

Why Integrate Omnissa Connect with Microsoft Entra ID?

Connecting Omnissa Connect with Microsoft Entra ID through enterprise federation creates a powerful identity ecosystem. Here’s what you gain:

Single Sign-On (SSO)

Your users log in once with their corporate credentials and automatically gain access to Omnissa Connect—no separate usernames or passwords to remember.

Automatic User Provisioning

When you add or remove users in Entra ID, they’re automatically synced to Omnissa Connect. No manual account creation, no forgotten deprovisioning, no stale user accounts cluttering your systems.

Centralized Security

Manage all user access, permissions, and security policies from one central location. Apply multi-factor authentication (MFA), enforce password policies, and monitor access across your entire organization from Entra ID.

Reduced IT Overhead

Your IT team spends less time managing separate identity systems, resetting passwords, and troubleshooting access issues. Everything is automated and synchronized.

Improved Compliance

Maintain detailed audit logs of who accessed what and when. Meet regulatory requirements for access control and identity management with confidence.

A Real-World Example

Before Federation:

Sarah joins your company. The IT team manually creates accounts in Omnissa Connect, Microsoft 365, and four other systems. Sarah has to memorize 5 different passwords. When Sarah leaves three years later, the team forgets to deactivate her Omnissa Connect account, leaving a security gap.

After Federation:

Sarah’s first day: HR adds her to Entra ID. Omnissa Connect automatically creates her account and grants the right permissions. She logs in with her corporate email and password—the same one she uses for everything else. On her last day: HR removes her from Entra ID. Within seconds, Omnissa Connect and all other connected systems automatically deactivate her access. No manual steps. No forgotten accounts. No security gaps.

Is This Right for Your Organization?

Enterprise federation between Omnissa Connect and Entra ID is ideal if your organization:

•Already uses Microsoft Entra ID or Azure Active Directory
•Wants to simplify identity management and reduce IT burden
•Has multiple employees and wants to automate user provisioning
•Needs strong security controls and audit capabilities
•Is undergoing digital transformation and standardizing on cloud-based identity solutions

What’s Involved?

Configuring enterprise federation requires several steps—from verifying your domain to setting up the connection between systems to testing everything works smoothly. The process typically involves:

•Domain verification to prove your organization owns the domain
•Creating and configuring an Enterprise Application in Microsoft Entra ID
•Setting up authentication protocols and user attribute mapping
•Testing the setup before activating federation for all users
•Notifying users and helping them transition to the new authentication method

The Complete Step-by-Step Guide

While this overview covers the benefits and concepts, implementing enterprise federation involves detailed technical configuration. The complete guide is a comprehensive document with in-depth instructions, detailed screenshots, and step-by-step walkthroughs for both Omnissa Connect and Microsoft Entra ID configuration. Due to its length and technical depth, I share it directly with clients and organizations ready to implement the solution.

The complete guide includes:

•Detailed screenshots and instructions for each configuration step
•Exact fields to fill in on both Omnissa Connect and Entra ID

.

Ready to streamline your organization’s identity management?

If your organization is ready to implement enterprise federation between Omnissa Connect and Microsoft Entra ID, I’m here to help. Whether you need guidance on setup, troubleshooting during configuration, or best practices for managing the transition, I can provide a complete, step-by-step implementation guide tailored to your needs.

Get in touch to request the full technical guide and start your journey toward simplified, centralized identity management.

.

📧 Contact me for the complete implementation guide

Let’s simplify your organization’s identity and access management together.

Streamline Your Enterprise with Omnissa Connect and Microsoft Entra ID

Horizon 2603 is here!

A new version of Omnissa Horizon has just been released, and 2603 is not just another update — it’s an ESB (Extended Service Branch) release and marks an important transition point for many environments.

🔗 Release Notes:
https://docs.omnissa.com/bundle/horizon8-rnV2603/page/Horizon8-ReleaseNotes.html


First things first: end of support for vSphere 7

Let’s start with something critical:

Horizon 2603 ESB no longer supports vSphere 7.x

  • Horizon 2512 was the last release supporting vSphere 7
  • Starting from 2603, vSphere 8 is the required platform

This means one thing:
If you’re planning to move to this ESB, your vSphere upgrade is no longer optional — it’s mandatory

This is a key architectural checkpoint, especially for environments that have been delaying the jump to vSphere 8. (vSphere 7 is end of support)


Event Database + Integrated Authentication (finally!)

Now, let’s talk about one of my favorite new features.

Horizon 2603 introduces the ability to configure the Event Database on Microsoft SQL Server using Active Directory identities (Domain User with Integrated Authentication).

No more SQL authentication.

Why this matters:

  • Eliminates stored SQL credentials
  • Aligns with enterprise security best practices
  • Simplifies credential lifecycle management
  • Improves compliance and auditability

From a design perspective, this is a very welcome step toward a more secure-by-default architecture.

 Final thoughts

This release is not just about new features — it’s about setting a new baseline:

  • ✔️ ESB = long-term stability
  • ✔️ vSphere 8 as the standard
  • ✔️ Stronger security integration

If you were waiting for the “right moment” to modernize your Horizon platform… this is probably it.


 In the next posts, I’ll dive deeper into the other new features and changes introduced in Horizon 2603 — stay tuned 👀


Need help testing or upgrading?

If you’re planning to:

  • Test Horizon 2603
  • Upgrade your existing environment
  • Move from vSphere 7 to vSphere 8 or 9

Feel free to reach out — happy to help with assessments, design, and upgrade strategies.


Have you already started testing Horizon 2603?
Or are you still planning your vSphere 8 migration?

Let’s discuss 

Horizon 2603 is here!

UPDATE – Remote Assistance Issue After January 2026 Windows Updates

Following up on the issue “Remote Assistance can’t make the connection”, as already mentioned in last week’s KB, the root cause has now been clearly identified.

The problem is related to recent Microsoft updates released for Windows 11, which address the security vulnerability CVE-2026-20824.

More specifically, the issue is documented in the following KB:

Remote Assistance feature of Omnissa Horizon View Administrator console, not working after January 2026 Windows security update (KB5074109) (6001252)

Note: The solution to this issue is described at the end of this post.

When Does the Issue Occur?

A key point to understand is that the issue is triggered if the updates are installed on either side of the Remote Assistance session:

  • The target machine (the device receiving assistance)
  • The operator machine (the device providing assistance)

 This means that even if your VDI environment is not patched, the error will still occur if the support operator is using a Windows 11 machine updated after January 2026.

The result is the well-known error:

Expected Fix

A permanent fix is expected to be released soon with Omnissa Horizon version 2603 (I hope cool)


Current Workaround

At the moment, if you want to provide Remote Assistance without removing Windows updates, you must follow a manual (and somewhat cumbersome) process.

Steps for the End User (Receiving Assistance)

  1. Click on the Start (Windows) button
  2. Search for and open Remote Assistance
  3. Select “Invite someone you trust to help you”
  4. Click “Save this invitation as a file”
  5. Save the file and share it with the support operator
  6. A security code will be displayed — share this code as well

Steps for the Support Operator

  1. Open the received invitation file
  2. Enter the provided security code
  3. Click OK

Final Step

  • The end user will receive a prompt to approve the connection
  • Once approved, the Remote Assistance session will start

Final Considerations

This workaround allows you to continue providing support without uninstalling security updates, but it is clearly less efficient compared to the standard workflow within the Horizon console.

Until the official fix is released, it is important to:

  • Inform support teams about the behaviour
  • Adjust troubleshooting procedures accordingly
  • Plan for the upcoming Horizon upgrade

Update (April 2026)
The issue described in this article regarding Remote Assistance after the January 2026 Windows updates has been resolved starting from Horizon Agent 2603, with the introduction of a specific registry key.

✅ Solution for Horizon Agent 2603 and later

With Horizon Agent 2603, the issue can be resolved by configuring the following registry key:

HKLM\SOFTWARE\Omnissa\Horizon\RemoteAssistance\fEnableLHTicket

STRING with value set to 1

This key enables a new Remote Assistance user experience, changing the behaviour compared to previous versions.

🧑‍💻 New user experience

When this setting is enabled:

  • The Remote Assistance session follows a more modern workflow aligned with recent Microsoft security changes
  • End users receive clearer and more contextual notifications
  • Compatibility with the latest Windows security updates is ensured

With the key modified, when a Remote Assistance session is initiated, the VDI user will see a code displayed on their screen (similar to the image below) that they must communicate to the operator to allow the operator to connect.

Versions before 2603

For Horizon Agent versions earlier than 2603, the registry key is not available by default.

In this case:

  • You must open a support request with Omnissa
  • Support can provide a specific/custom Agent build
  • Only with that version will it be possible to enable the registry key

Recommendations

    • Plan to upgrade to Horizon Agent 2603 or later whenever possible
    • Validate the registry configuration within your environment before production rollout
    • Test the new user experience to understand the behavioral changes
UPDATE – Remote Assistance Issue After January 2026 Windows Updates

Migrating Horizon from VMware to Omnissa: Why a Parallel Connection Server Deployment Is Often the Safest Approach

The transition from VMware Horizon to Omnissa Horizon introduced more than just a branding change. Starting with Horizon 2412 and continuing with later releases such as 2503 and 2506, several architectural and configuration elements have been modified.

These changes include licensing format updates, ADAM/AD LDS database modifications, registry key renaming, folder restructuring, and updated group policy templates.

While the official upgrade path works, in many environments a parallel deployment strategy can significantly reduce risk and allow end users to validate the new platform before switching production workloads.

This article outlines the key changes introduced by Omnissa and explains why building a new Horizon pod alongside the existing one can be a practical migration strategy.

.

Key Changes Introduced with Omnissa Horizon

1. New Licensing Model

Beginning with Horizon 2412, Omnissa introduced a new licensing mechanism and licensing portal.

During the transition phase, both VMware and Omnissa license keys are temporarily accepted, but this compatibility window is limited. Later releases, such as 2503.1 ESB and 250,6 rely entirely on the Omnissa License Module (OLM).

If a valid Omnissa license key is not installed after upgrading, the Horizon Console may enter a restricted or degraded mode.

Relevant KB and documentation references include:

• KB 6000212 – Horizon licensing transition guidance
• KB 6000745 – Omnissa rebranding changes and affected components

.

2. ADAM / AD LDS Database Changes

One of the most important backend changes affects the Horizon LDAP (ADAM/AD LDS) database.

Historically, Horizon used application partitions referencing the VMware namespace.
With the Omnissa rebranding, new environments now use the
horizon namespace.

Example:

Old partition naming:

dc=vdi,dc=vmware,dc=int

dc=vdiglobal,dc=vmware,dc=int

New partition naming:

dc=vdi,dc=horizon,dc=internal

dc=vdiglobal,dc=horizon,dc=internal

Omnissa provides a migration script to update the partition names after upgrading all pods to newer versions, such as 2503.

Relevant documentation:

• KB 6000797 – ADLDS partition migration for Horizon

.

3. Registry Key and File System Changes

The rebranding also impacted multiple components of the Horizon installation:

Component

Previous Location

New Location

Installation folder

C:\Program Files\VMware\VMware View

C:\Program Files\Omnissa\Horizon

Logs

C:\ProgramData\VMware\VDM\logs

C:\ProgramData\Omnissa\Horizon\logs

Registry keys

HKLM\Software\VMware, Inc.\VMware VDM

HKLM\Software\Omnissa\Horizon

ADAM DB instance

VMwareVDMDS

OmnissaHzeDS

Because registry paths changed, Group Policy templates (ADMX) were also updated and must be replaced during upgrades.

Failure to update the ADMX files can lead to policies silently no longer applying.

.

Why a Parallel Horizon Deployment Can Be a Better Migration Strategy

Although a direct upgrade of the Connection Servers is supported, the number of changes introduced with the Omnissa transition makes a greenfield-style deployment attractive.

Instead of upgrading the existing servers, consider deploying new Connection Servers alongside the current environment.

Advantages include:

1. Opportunity to Upgrade Windows Server

New Connection Servers allow administrators to deploy a modern operating system, such as:

• Windows Server 2022 or later (Windows 2025 is a like option)

This avoids performing multiple upgrades on the same system.

.

2. User Acceptance Testing

With a parallel deployment, you can:

• publish test desktop pools
• provide pilot users access
• validate authentication flows
• verify DEM and App Volumes integration

Users can test the environment before the production switch.

.

3. Reduced Upgrade Risk

Upgrading in place modifies:

• ADAM database
• registry keys
• services
• folder paths

A clean installation avoids potential issues caused by legacy configurations.

.

Example Parallel Migration Architecture

A typical migration architecture might look like this:

Existing Environment

• Horizon Connection Servers
• Unified Access Gateways
• Instant Clone pools
• DEM and App Volumes

New Environment

• New Omnissa Connection Servers
• New Omnissa Unified Access Gateways
• Same vCenter Server
• Same Active Directory
• Same desktop images
• Same DEM*
• Same App Volumes*

*After migration, it will be upgraded.

This allows a staged migration.

Key points:

• vCenter Server can remain unchanged
• Desktop pools can be recreated or migrated
• User profiles continue to work through DEM

.

Migrating Instant Clone Desktop Pools

In environments heavily using Instant Clones, rebuilding pools manually can be time-consuming.

Automation scripts can accelerate the process by exporting and recreating pools through the Horizon APIs.

In my environment, I use a PowerShell-based migration script that reads the configuration of Instant Clone pools and recreates them on the new pod.

This allows administrators to migrate:

• pool configuration
• entitlements
• naming patterns
• provisioning settings

with minimal manual effort.

This is the link to the script

OMNISSA/OMNISSA – Export and Import Desktop and Entitlements v7.ps1 at main · fabio1975/OMNISSA

.

Reusing DEM and App Volumes

Existing deployments of

• Omnissa Dynamic Environment Manager
• Omnissa App Volumes

can usually remain unchanged during migration.

However, compatibility must always be validated using the official interoperability matrix.

Relevant documentation:

• Horizon interoperability matrix
• App Volumes compatibility with Horizon
• DEM compatibility with Horizon

Official documentation:

These matrices confirm supported combinations between:

• Horizon versions
• App Volumes
• Dynamic Environment Manager
• vCenter Server
• ESXi

.

Suggested Migration Workflow

A practical migration process could look like this:

    1. Deploy new Connection Servers with Omnissa Horizon
    2. Deploy new Unified Access Gateways
    3. Connect the new pod to the existing vCenter
    4. Validate App Volumes and DEM compatibility
    5. Recreate or migrate Instant Clone pools
    6. Perform pilot user testing
    7. Switch production access
    8. Decommission legacy Connection Servers
    9. Create the news GPO for Horizon (we need use the new GPO Templates)
    10. Upgrade the Horizon Agent, DEM and App Volumes

    .

    Final Thoughts

    The transition from VMware Horizon to Omnissa Horizon introduces several structural changes that go beyond simple branding.

    Changes in licensing, LDAP partitions, registry paths, and policy templates can complicate traditional upgrade workflows.

    For many environments, especially large VDI deployments, deploying new Connection Servers in parallel offers a safer and more flexible migration strategy.

    It provides an opportunity to modernize the infrastructure, validate compatibility with components such as App Volumes and DEM, and allow users to test the platform before the final cutover.

    .

    .
    Migrating Horizon from VMware to Omnissa: Why a Parallel Connection Server Deployment Is Often the Safest Approach

    Horizon Cloud Service Next Gen Apis – Chapter 2

    Immagine che contiene testo, Neon, Segnali luminosi, Insegna al neon Il contenuto generato dall'IA potrebbe non essere corretto.

    Set Syslog settings across UAG deployments

    In this second article on working with APIs in Horizon Cloud Services, we will focus on a practical, security-relevant use case: configuring Syslog on Unified Access Gateways (UAGs) deployed through Horizon Cloud.

    Whether you are running Horizon Cloud Service on Microsoft Azure or Horizon Cloud Service on vSphere, centralized logging is a fundamental component of any secure and well-governed environment. Proper Syslog configuration ensures that security events, authentication logs, and operational data generated by UAG appliances are forwarded to your SIEM or log management platform for monitoring, auditing, and incident response.

    Instead of performing manual configuration tasks, we will explore how to leverage Horizon Cloud APIs to automate and standardise Syslog settings across UAG deployments, improving consistency, scalability, and operational efficiency.

    Now when can explain the API we need to use and how to apply the syslog configuration on UAG (In this case, I used an HCS on vSphere, the new solution where we don’t deploy the Connection Server, but we use the HCS control panel to configure Pools, Entitlements and other…)

    The first step is always the authentication process; I explained how to create the API token in my previous post (Horizon Cloud Service Next Gen Apis – Chapter 1), and now I won’t explain it again.

    Let’s go…..

    How to show UAG information

    This command displays the UAG’s information

    Invoke-RestMethod -Uri https://cloud-sg.horizon.omnissa.com/admin/v2/uag-deployments Method Get -Headers $Header

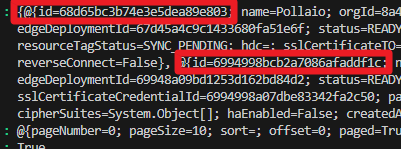
     We have two UAG deployments connected to HCS, and the output displays two deployment ids:

    Immagine che contiene testo, schermata, Carattere Il contenuto generato dall'IA potrebbe non essere corretto.

    The UAG id for HCS on vSphere is the second id.

    Immagine che contiene testo, schermata, Carattere Il contenuto generato dall'IA potrebbe non essere corretto.

    Now I need to recover only the UAG IDs and OrgIDs

    Invoke-RestMethod -Uri https://cloud-sg.horizon.omnissa.com/admin/v2/uag-deployments -Method Get -Headers $Header | Select-Object -ExpandProperty content | Select-Object id,OrgId

    Immagine che contiene testo, schermata, Carattere Il contenuto generato dall'IA potrebbe non essere corretto.

    The UAG id that I need to use for identifying the deployment for HCS on vSphere is:

    6994998bcb2a7086afaddf1c 

    I will use this ID to associate the syslog configuration with the UAG server.


    How to set the correct parameters for Syslog configuration

    We need to create a Body value like this:

    $Body = @{
      orgId  = "8a4931b3-e6ac-44bf-9d25-723f4119e46f"
      projectId = "Pollaio-Project"
      name = "Pollaio-Configuration2"
      syslogEventCategory = "ALL_EVENTS"
      syslogServerProtocolSettingsCreateTO = @{
        sourceToSyslogServerProtocol = "TCP"
      }
      syslogFormat = "TEXT"
      syslogURI = "192.168.111.223:514"
      includeSystemMessages = $true
      sources = @(
        @{
          type = "UAG"
          id   = "6994998bcb2a7086afaddf1c"
        }
      )
    }

    .

    Where:

    Value Description Accept value
    OrgID It is the OrgId that we recovered with the previous command String
    ProjectId ID of theCSP project that owns this data String
    Name User defined name of the syslog server configuration String
    SyslogEventCategory Events sent from the UAG appliance to the syslog server [ ALL_EVENTS, AUDIT_EVENTS ]
    sourceToSyslogServerProtocol The protocol used to send data from the UAG appliance to the syslog server [ UDP, TCP, TLS, MQTT ]
    syslogFormat [ JSON_TITAN, TEXT ]
    syslogURI Syslog server URI String
    includeSystemMessages If true, system messages are sent to the syslog server [ $True]
    sources

    List of sources associated with the syslog server:

    Type = Source for the syslog server. For es: UAG

    Id = Id of the source associated with the syslog server (The Id value that we recovered with the previous command


    .

    .

    How to set the configuration for UAG
    $Body = @{
      orgId  = "8a4931b3-e6ac-44bf-9d25-723f4119e46f"
      projectId = "Pollaio-Project"
      name = "Pollaio-Configuration2"
      syslogEventCategory = "ALL_EVENTS"
      syslogServerProtocolSettingsCreateTO = @{
        sourceToSyslogServerProtocol = "TCP"
      }
      syslogFormat = "TEXT"
      syslogURI = "192.168.111.223:514"
      includeSystemMessages = $true
      sources = @(
        @{
          type = "UAG"
          id   = "6994998bcb2a7086afaddf1c"
        }
      )
    }
    
    #Convert Body to JSON
    $JsonBody = $Body | ConvertTo-Json -Depth 5
    #Send POST request to create Syslog Server UAG configuration
    Invoke-RestMethod -Uri https://cloud-sg.horizon.omnissa.com/admin/v1/syslog-server -Method Post -Headers $Header -Body $JsonBody
    HOW to check SYSLOG Configuration on UAG deployment


    Invoke-RestMethod -Uri https://cloud-sg.horizon.omnissa.com/admin/v1/syslog-server -Method Get -Headers $Header
    

    The command output is like this:

    .

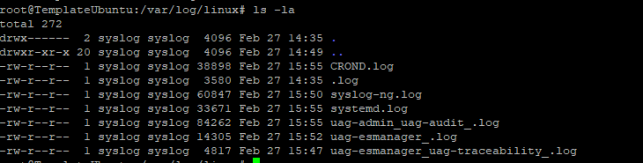
     Now I can see in my SYSLOG server the UAG Log

    Immagine che contiene testo, schermata, Carattere Il contenuto generato dall'IA potrebbe non essere corretto.

    .

    .

    .

    Horizon Cloud Service Next Gen Apis – Chapter 2

    Horizon Cloud Service Next Gen Apis – Chapter 1

    .

    Immagine che contiene testo, Carattere, Insegna al neon, Neon Il contenuto generato dall'IA potrebbe non essere corretto.

    If you are working with Omnissa Horizon Cloud Services, sooner or later you will want to automate tasks, integrate with external systems, or simply make your daily operations more efficient. (For example, configure SYSLOG server on Unified Access Gateway). This is where REST APIs come into play.

    Through the HCS Omnissa REST APIs, administrators and developers can programmatically interact with the platform, retrieve information, trigger actions, and build custom integrations that go beyond the capabilities of the graphical interface. APIs enable consistency, scalability, and repeatability — all essential elements in modern IT environments.

    In this post, we will explore how to get started with the HCS Omnissa REST APIs, understand the authentication process, and see practical examples of how they can simplify management and automation.

    This is the first post about this topic … here Horizon Cloud Service Next Gen Apis – Chapter 2, the second Chapter where I write about configuring SYSLOG on UAG deployment

    .

    Configure an Account for API Token

    Before interacting with the HCS Omnissa REST APIs, you need a properly configured account that is authorised to perform API operations. In this section, we will review the prerequisites, required roles and permissions, and how to create or configure a dedicated service account to ensure secure and controlled access to the platform.

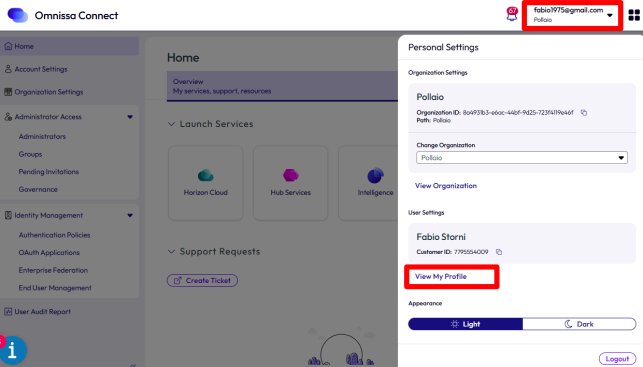
    Connect to https://connect.omnissa.com and go to View My Profile under the account info.

    Immagine che contiene testo, schermata, software, Icona del computer Il contenuto generato dall'IA potrebbe non essere corretto.

    .

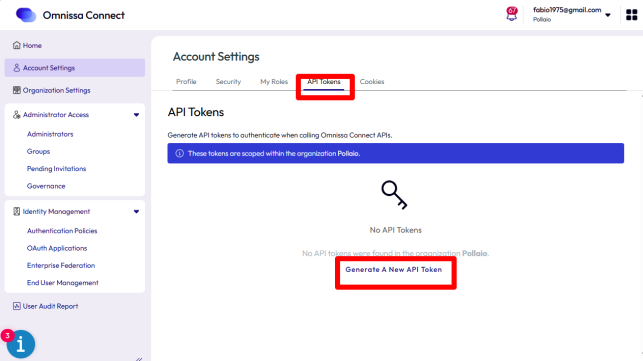
    Select API Tokens TAB and Generate A New API TokenImmagine che contiene testo, schermata, software, Pagina Web Il contenuto generato dall'IA potrebbe non essere corretto.

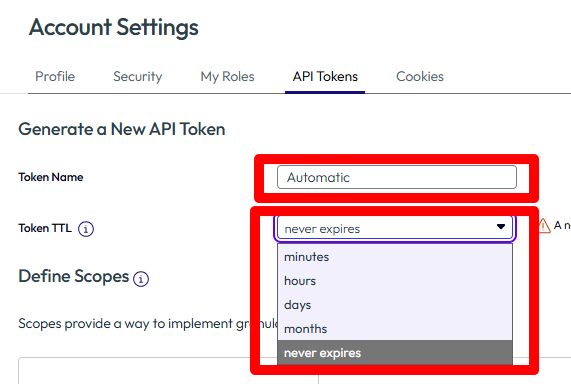
    Configure the new token, add Name and Token TTL (I suggest setting an expiration date to increase security)

    Immagine che contiene testo, schermata, software, numero Il contenuto generato dall'IA potrebbe non essere corretto.

    .

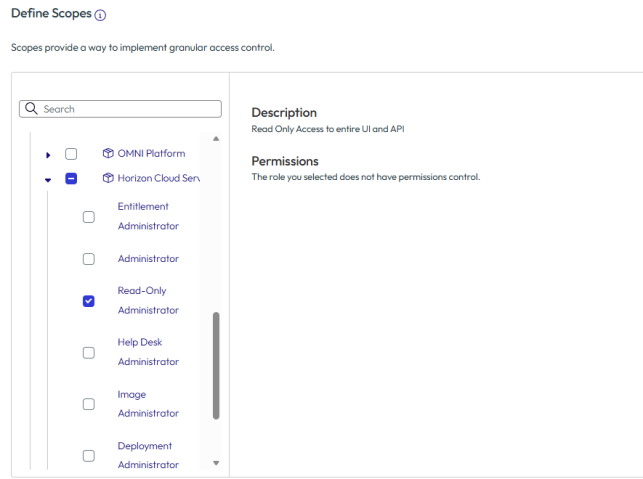
    About the scope of the token use, we need to select the appropriate permissions

    Immagine che contiene testo, schermata, software, numero Il contenuto generato dall'IA potrebbe non essere corretto.

    Select the OpenID format

    We can select if near the token expiration date, the system will send a mail notification.

    Immagine che contiene testo, schermata, Carattere, linea Il contenuto generato dall'IA potrebbe non essere corretto.

    .

    And now we can select Generate

    Immagine che contiene Carattere, logo, Elementi grafici, testo Il contenuto generato dall'IA potrebbe non essere corretto.

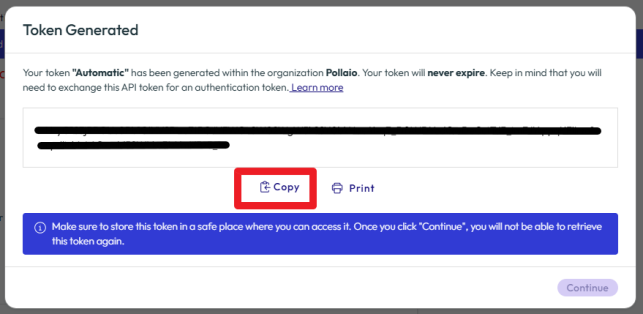
    It will take some seconds and will display the Token ID,

    It is important to save the token.

    Immagine che contiene testo, schermata, software, Sistema operativo Il contenuto generato dall'IA potrebbe non essere corretto.

    .

    .

    .

    .

    .

    Obtain the Authentication Token

    Authentication is a fundamental step when working with REST APIs. HCS Omnissa uses token-based authentication, which means you must first request and obtain a valid access token before performing any API calls. Here, we will walk through the authentication flow, explain the required headers and payload, and demonstrate how to retrieve and securely store the token for subsequent requests.

    We can use, for example, Postman or PowerShell.

    In the first step, I suggest using postman for handle the command, so we start Postman (Desktop or Web).

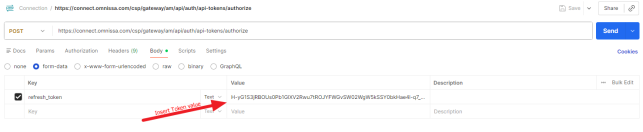
    POST https://connect.omnissa.com/csp/gateway/am/api/auth/api-tokens/authorize

    Immagine che contiene testo, schermata, linea, Carattere Il contenuto generato dall'IA potrebbe non essere corretto.

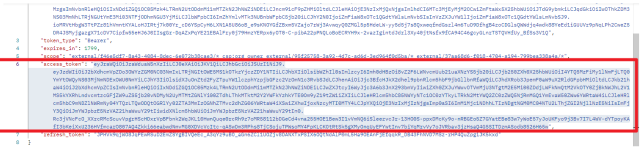
    In the command output, we can see the access_token to use for sending other commands.

    Immagine che contiene testo, Carattere, linea, numero Il contenuto generato dall'IA potrebbe non essere corretto.

    Test the APIs with Postman

    Before moving to automation, it is always a good practice to validate API calls using a tool like Postman. In this section, we will configure a collection, set up authentication headers, and test sample API requests. This approach helps you understand request structure, responses, and potential error handling in a simple and interactive way.

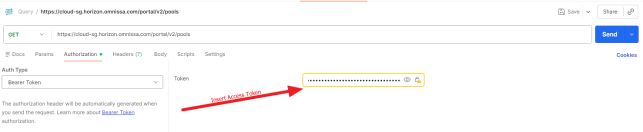
    In the next step, I use the RESTapi to list the Pools (in my environment are HCS on vSphere Pools):

    GET https://cloud-sg.horizon.omnissa.com/portal/v2/pools

    Immagine che contiene schermata, testo, linea, software Il contenuto generato dall'IA potrebbe non essere corretto.

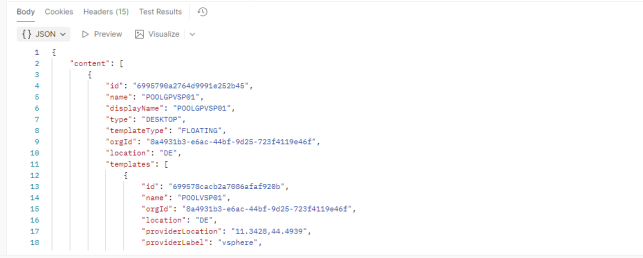
    Command output

    Immagine che contiene testo, schermata, Carattere, numero Il contenuto generato dall'IA potrebbe non essere corretto.

    .

    .

    Automating with PowerShell

    Once the API calls have been validated, the next step is automation. In this chapter, we will build a practical PowerShell script to authenticate, retrieve the access token, and execute REST API calls against HCS Omnissa. This will allow you to integrate API operations into your administrative workflows, scheduled tasks, or larger automation frameworks.

    PowerShell command for generating an access token

    $Header = @{
    	    "Content-Type" = "application/x-www-form-urlencoded"
        }
    $Body = @{
    	    "refresh_token" = "<Token API created from the Connect Omnissa Portal"
        }
    $Response = Invoke-RestMethod -Uri  https://connect.omnissa.com/csp/gateway/am/api/auth/api-tokens/authorize -Method Post -Headers $Header -Body $Body
    $AccessToken = $Response.access_token
    

     Powershell command to show the Pools

    $Header =	@{
    			"Content-Type" = "application/json";
    			"Authorization" = "Bearer $AccessToken"
    	}
    
    Invoke-RestMethod -Uri https://cloud-sg.horizon.omnissa.com/portal/v4/pools -Method Get -Headers $Header


    .

    .

    .

    Horizon Cloud Service Next Gen Apis – Chapter 1

    Horizon – Agent Update – Unable to see the last version

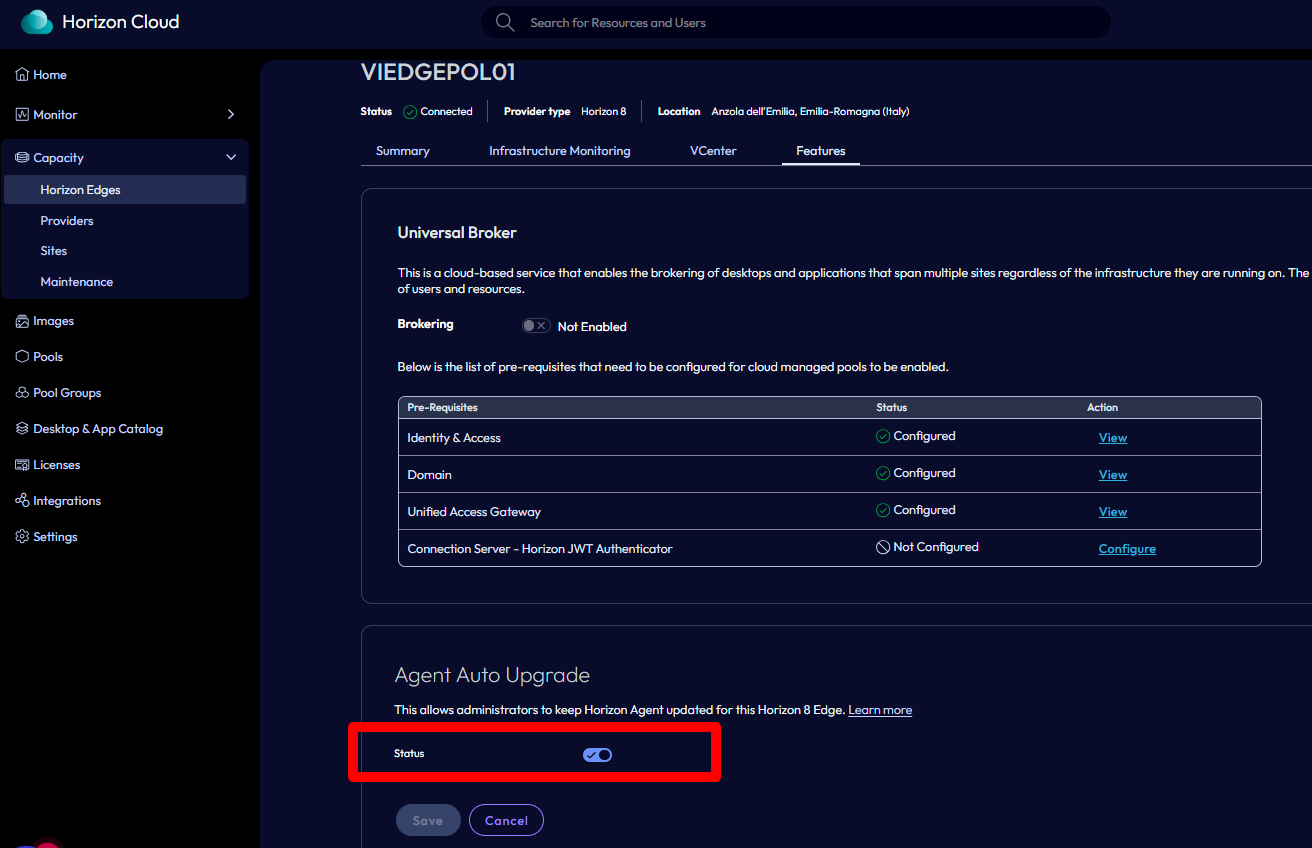
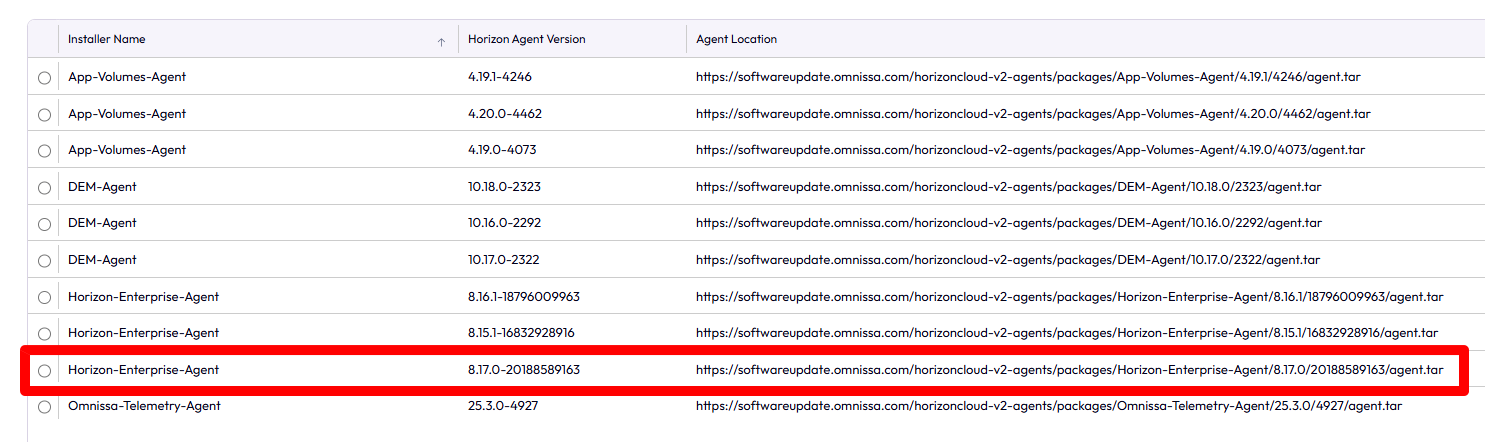
    After updating Horizon to version 2512, I noticed that the latest versions (8.17) weren’t being displayed in the Agent Updates section.


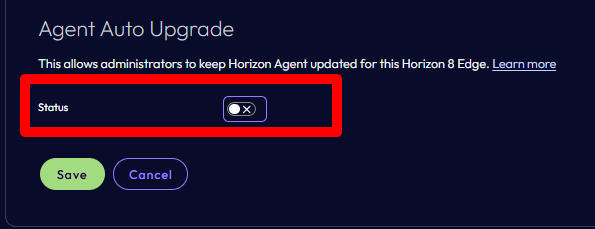
    To see the latest versions, I had to disable the Agent Update service on the Omnissa Connect side. Simply go to the Capacity section, select the relevant edge gateway,

    and disable the specific option in the Features section.


    Re-enable it after a few minutes.

    After a few minutes, the latest versions also appeared in the Horizon console.

    Horizon – Agent Update – Unable to see the last version