How to differentiate Horizon Smart Policies with Unified Access Gateway Location information

There is a Unified Access Gateway (UAG) configuration that can help to apply different Horizon Smart Policies (Like clipboard) to Horizon VDI Sessions

A screenshot of a computer

Description automatically generated

Normally I can suggest using UAG not only for external access (Home Worker) but also for internal access (Office Worker)* and I deploy a UAG group (two or plus UAG) for external and another for internal.

The Gateway location can Help us for example to enable Clipboard for internal access and disable for external access, It is possible to integrate this information (Gateway location) with a Dynamic Environment Manager Condition

In my example, I have configured two Horizon Smart Policies:

Clipboard_From_Internet 🡪 Where I disabled the clipboard with this condition:

A screenshot of a computer

Description automatically generated

Clipboard_From_Internal 🡪 Where I enabled the clipboard with this condition:

A screenshot of a computer

Description automatically generated

With those values, I can configure different functions depending on where the client is trying to connect to the VDIs

*The use of UAG on internal access can help to not deploy an Internal Load balancing (We can use UAG HA) and not use a balancing for Horizon Connection Servers. (I always suggest to map 1:1 the UAG with Connection Server)

How to differentiate Horizon Smart Policies with Unified Access Gateway Location information

Configure Proxy Server for Horizon for SAML integration

When we need to integrate a Horizon infrastructure to the cloud identity provider (like Workspace One Access SaaS solution) sometimes we need to manage firewall and proxy configuration.

For the Firewall rule, there is much information (KB link) while for the proxy server, we are not able to use Windows server configuration because Horizon ignores it.

To use a proxy server to permit communication to the IdP URL from Horizon Connection servers we need to configure some values on ADAM DB:

pae-SAMLProxyName

pae-SAMLProxyPort

To connect to ADAM DB and where modify the correct value

  • Connect with RDP session to Connection Server OS
  • Start from PowerShell adsedit

A close-up of a computer screen

Description automatically generated

  • In the console tree select Connect to..

A screenshot of a computer

Description automatically generated

  • Configure the connection with this information.

dc=vdi,dc=vmware,dc=int

localhost:389

A screenshot of a computer

Description automatically generated

  • Expand ADAM ADSI tree under the object path: dc=vdi,dc=vmware,dc=int,ou=Properties,ou=Global
  • Click on value Common and modify the following value

pae-SAMLProxyName -> With Proxy URL

pae-SAMLProxyPort -> With Proxy Port

Now we can configure the SAML integration from Horizon and IdP

Some information about why we need to integrate and use Workspace One Access with Horizon:

Integration between VMware Horizon and VMware Workspace ONE Access (formerly called Workspace ONE) uses the SAML 2.0 standard to establish mutual trust, which is essential for single sign-on (SSO) functionality. When SSO is enabled, users who log in to VMware Workspace ONE Access or Workspace ONE with Active Directory credentials can launch remote desktops and applications without having to go through a second login procedure.

Configure Proxy Server for Horizon for SAML integration

VMware Pre Broadcom vs VMware Broadcom – Primi dati reali

Attenzione è una mia valutazione….quindi non sparate sul sistemista

Broadcom ha acquisito VMware, ormai lo sappiamo tutti.
La situazione di incertezza aleggia ovunque soprattutto sul mondo vSphere e sui costi (con tanti competitor che provano a ritagliarsi la loro fetta di mercato togliendole al leader indiscusso di questi anni)


Finalmente in questi giorni incomincio ad avere i primi dati effettivi (Prezzi ecc…) su cui iniziare a fare i primi ragionamenti.
!!Attenzione non voglio dare giudizi ma voglio solo paragonare due offerte fatte allo stesso cliente che abbiamo dovuto rivedere a seguito del nuovo listino (E parliamo di prezzi di listino.. senza eventuali scontistiche)!!

Ragioniamo su un cluster vSphere con 3 nodi da 2 processori ciascuno da 16 core.

Con le precedenti licenze e il vecchio listino nello scenaro ipotizzato dovevamo considerare:

  • Licenza VMWARE VCENTER SERVER 8 STANDARD
  • Licenza VMWARE VSPHERE 8 STANDARD FOR 1 PROCESSOR
  • Support/Subscription
  • Support/Subscription

Con il nuovo listino e le nuove tipologie di licenze invece dobbiamo considerare:

  • VMWARE VSPHERE STANDARD per core (Che comprende la licenza di vCenter)

Entrambe le soluzioni con 5 anni.

Da una prima analisi le prime valutazioni sono:
Con il nuovo listino si viene a pagare circa 30-35% in meno.
Ho una semplificazione nella quotazione (una sola voce rispetto alle 4 precedenti)

Ovviamente:

  • Non abbiamo le licenze perpetue (comunque chi non vuole il supporto sul proprio ambiente di produzione o la possibilità di effettuare aggiornamenti?)
  • é una prima offerta e la quotazione può dipendere da vari fattori e i prezzi potrebbero nuovamente cambiare
  • Le funzionalità all’interno dei bundle possono essere leggermente differenti (il link per vedere le funzionalità presenti nei nuovi bundle VMware vSphere® Product Line Comparison)
  • Posso aver sbagliato i calcoli 🙂
  • Possono avermi dato dei prezzi sbagliati 🙂 spero di no per il cliente 🙂

ma aspettavo di avere due informazioni reali per fare le mie prime considerazioni.

L’unica cosa che posso dire è di valutare con attenzione il cambio …. (io sono il primo che accetta nuove sfide..) ma attenzione a tutti i prezzi nascosti e valutate bene!

P.S. se qualcuno ha delle esperienze in merito … condividiamole.

VMware Pre Broadcom vs VMware Broadcom – Primi dati reali

Failed to save domains. Resolving domains with the directory server failed with reason: [MyDomain – Kerberos authentication failed for domain.]

If we have a problem with the Identity directory on Workspace One Access like that:

Failed to save domains. Resolving domains with the directory server failed with reason: [fienile.lan – Kerberos authentication failed for domain.]

A close-up of a computer screen

Description automatically generated

In the situation where we have an Active Directory with Multi-Forest Active Directory Environment with Trust Relationships (The trust needs to be two-way and direct (non-transitive)).

There may be a problem with the Trust configuration, and you can find this error on DC (the DC of the user configuration for the connection)

The solution is to change the trust configuration and add:

A screenshot of a computer

Description automatically generated

Failed to save domains. Resolving domains with the directory server failed with reason: [MyDomain – Kerberos authentication failed for domain.]

DRS and HPE SimpliVity

In recent days, a customer reported an anomaly on an HPE SimpliVity cluster hosting instant clone Horizon VDIs. In detail:

  • vSphere with seven hosts present, two were always at 98% CPU utilization and 90% RAM utilization.
  • Continuous vMotion generated by the VM DRS to and from those two HOSTS.

After a careful analysis, we identified that there were no problems at the vSphere infrastructure level.
The issue was due to a Simplivity feature called IWO.

By disabling IWO and keeping DRS active (Full automatic) I have an optimal balance of CPU and RAM load between hosts at the expense of a slight increase in I/O trip times

Scenario – Even VM Load Distribution

I want even VM load across my cluster in terms of CPU and memory. Data locality and I/O performance are not top priorities. Most applications are CPU and memory intensive, and adding 1ms to 2ms to I/O trip times will not impact application performance.

In this scenario, IWO can be disabled thus ensuring no DRS affinity rules are populated into vCenter server. Suppressing DRS affinity rules will allow VMware DRS or allow you to directly distribute VMs across the cluster as desired to ensure all VMs are adequately resourced in terms of CPU and memory. The ‘Data Access Not Optimized’ alarm can be suppressed within vCenter server.

More information:

https://community.hpe.com/t5/around-the-storage-block/how-vm-data-is-managed-within-an-hpe-simplivity-cluster-part-3/ba-p/7033153

DRS and HPE SimpliVity

How to test communication between UAG and CS

Many times I found myself having to demonstrate that the communication between the Unified Access Gateway and the Connection Servers was not working due to problems with poorly configured firewall rules. A very useful test is to connect to the UAG console and launch the classic CURL command:

curl -v -k https://<FQDN or IP ADDRESS CS>:443/

the outcome of which is as follows if the connection is ok (HTML output)

or the following if the connection is not enabled on the firewall

More info and tools here:

https://docs.vmware.com/en/Unified-Access-Gateway/2309/uag-deploy-config/GUID-390D3A2A-0CB7-4A82-9B0F-D525B74CF55B.html

How to test communication between UAG and CS

Configure ControlUp for VMware Horizon Instant Clone VDI monitoring

In this guide, we will analyze how to configure ControlUP COP (ControlUP on-Premise) to monitor a VMware Horizon 2309 infrastructure with Instant Clone Desktop Pools (we will not cover the installation part of the product)

The following steps are required:

  • Control UP COP Server Component Installation (Optionally use an external SQL instance or SQL EXPRESS present in the Server component installation)
  • Installing the Control UP Console (Can also be installed on the same server)
  • Installing Agent Control Up on the GoldImage
  • Horizon Infrastructure Inventory
  • VirtualMachine Inventory (For this step we can also implement an automatism)

Requirements for the server part:


COP Server
COP Server Console Machine
Machine Windows Server Windows Server orWindows
Operating System Windows Server supported versions:2022,2019,2016 Windows Server supported versions:2022,2019,2016
OR Windows 11, 10
CPU* 2 CPUs 2 CPUs
Memory* 8 GB RAM 8 GB RAM
Disk Space* 10 GB 10 GB
Required Software & Permissions
  • .NET Framework 4.8 or later
  • PowerShell 5.x or later
.NET Framework 4.5 or later

Requirements for Part DB:

MSSQL Versions (Standard, Enterprise, or Express) Maximum Database Size Collation
2022,2019,2017,2016,2014 10 GB SQL_Latin1_General_CP1_CI_AS

Requirements for the VDI part:


ControlUp Agent
ControlUp Agent
Machine No server installation necessary. Deployed onto Windows machines that are monitored by ControlUp(Linux monitored via API).
Operating system Windows Server supported versions:
202220192016 (Core or Full)ORWindows 11, 10
Required installed software .NET 4.5 or later
TCP PORT 40705

A Service Account to access the Horizon infrastructure:

The Read-Only role is sufficient for all monitoring purposes. If you want to perform built-in Horizon actions, then the service account needs the following permissions:

  • Enable Farm and Desktop Pools
  • Manage Machine
  • Manage Sessions
  • Manage Global Sessions (Cloud Pod architecture only)

So what is needed is:

Download the version of ControlUP COP from the VMware site

Log in to the customer portal and in the product area under Desktop & End-User Computing

A screenshot of a computer

Description automatically generated

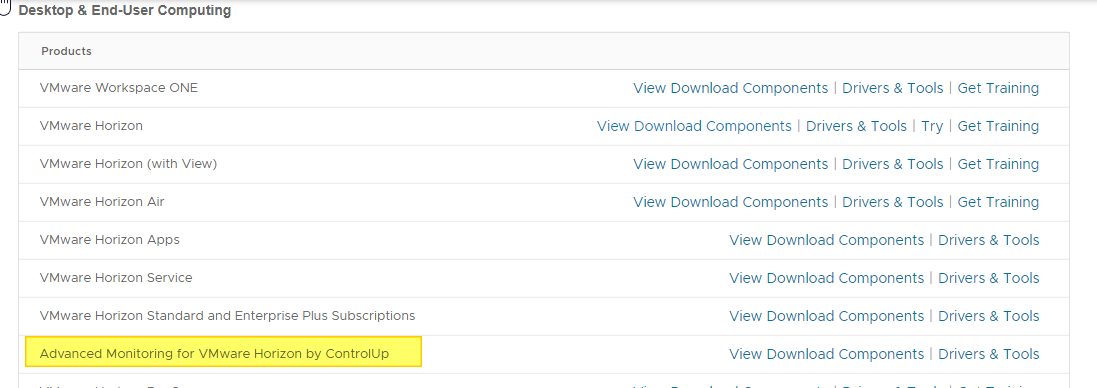
Log in to OEM Addons

A screenshot of a computer

Description automatically generated

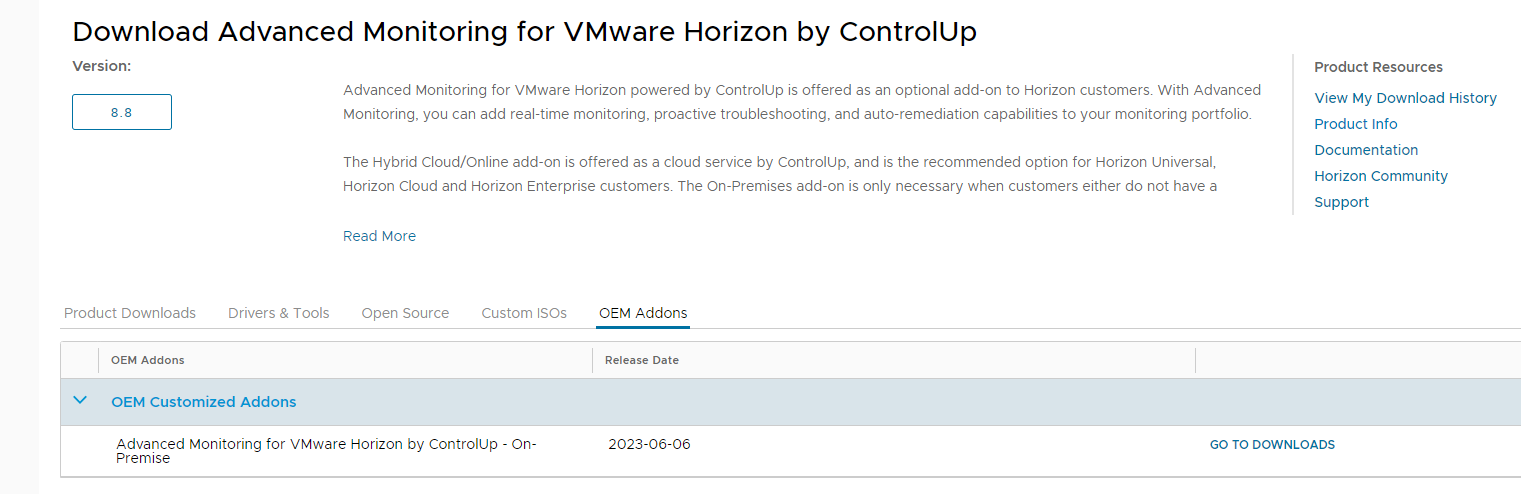
Download the on-premise version

Perform the basic installation

Once the COP version is installed and the console is installed, log in to our ControlUP installation

A screenshot of a computer

Description automatically generated

How to install the agent on the GoldImage:

  1. The agent MSI file is on the downloaded file zip from VMware Portal
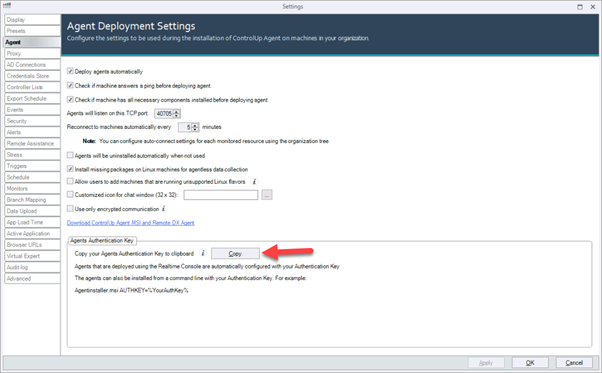
  2. Open the Real-Time Console and go to Agent Settings and copy your Agents Authentication Key. The key is used to connect the Agent to your ControlUp environment.

A screenshot of a computer

Description automatically generated

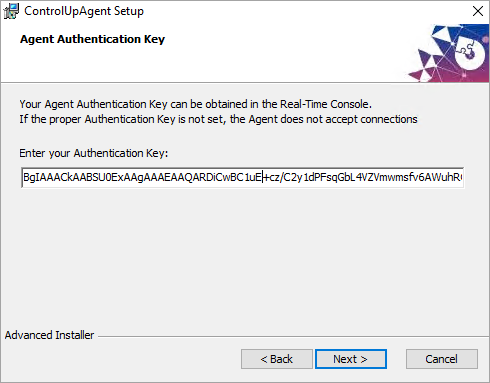
  1. Run the installation of the MSI package on the machine where you want to install the Agent.
  2. During the installation, paste the authentication key that you copied from the Real-Time Console.

A screenshot of a computer

Description automatically generated

  1. Complete the installation. The Agent is installed on the machine and the machine can be monitored from the Real-Time Console.
  2. Take the snapshot
  3. Deploy the new master image on Desktop Pool

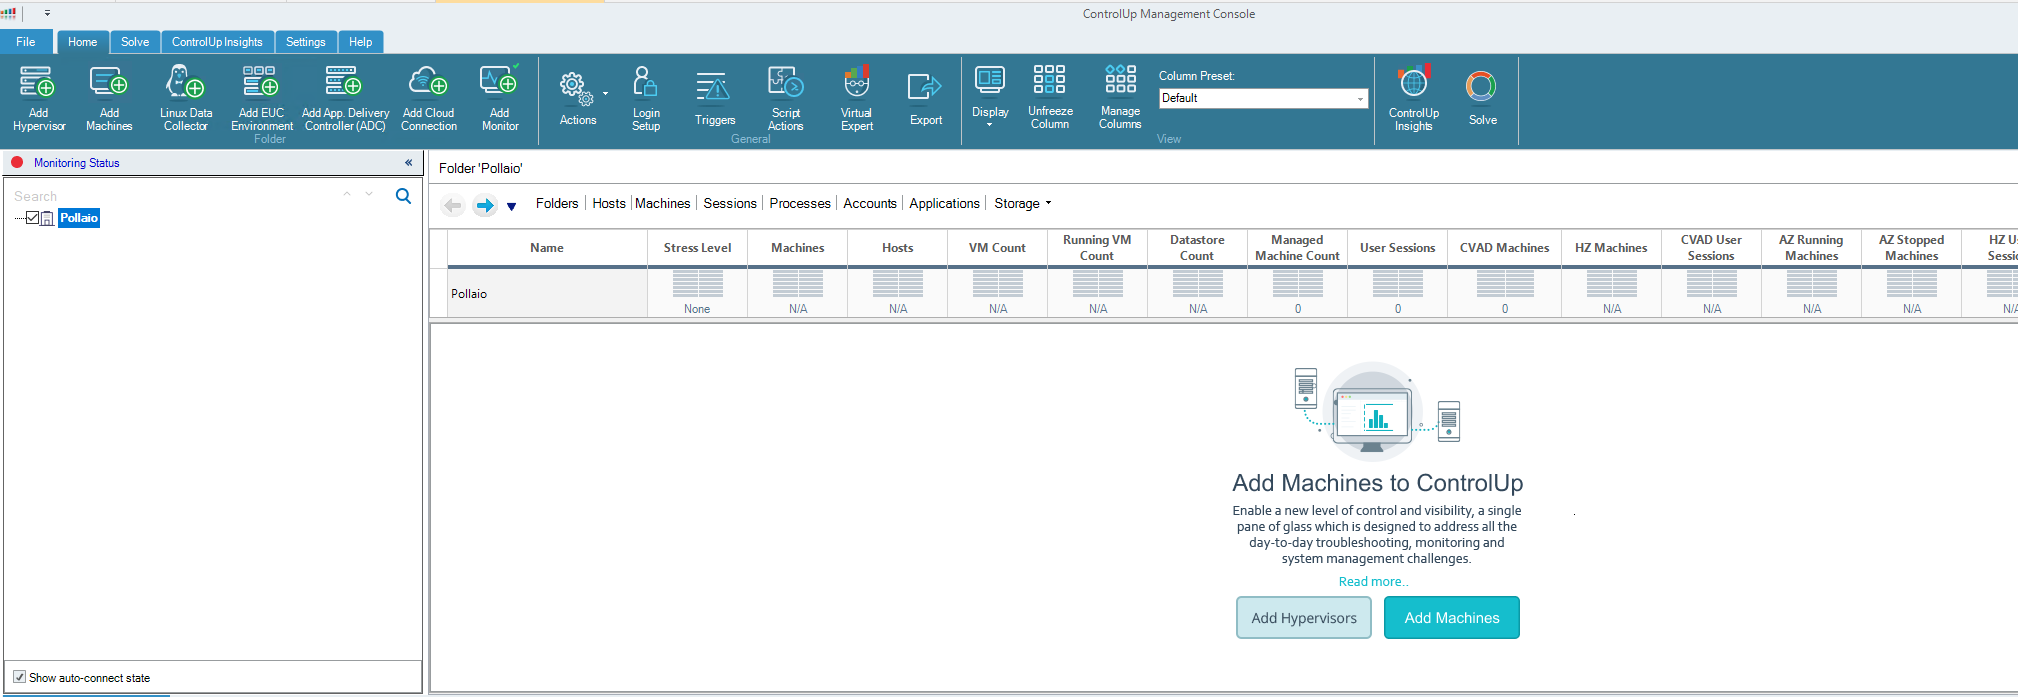
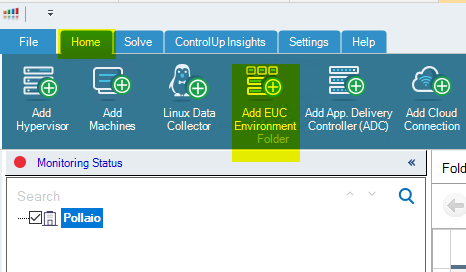
Now from the ControlUp Management console, we are able to:

  • Connect our Vmware Horizon infrastructure
  • Connect the instant clone machine

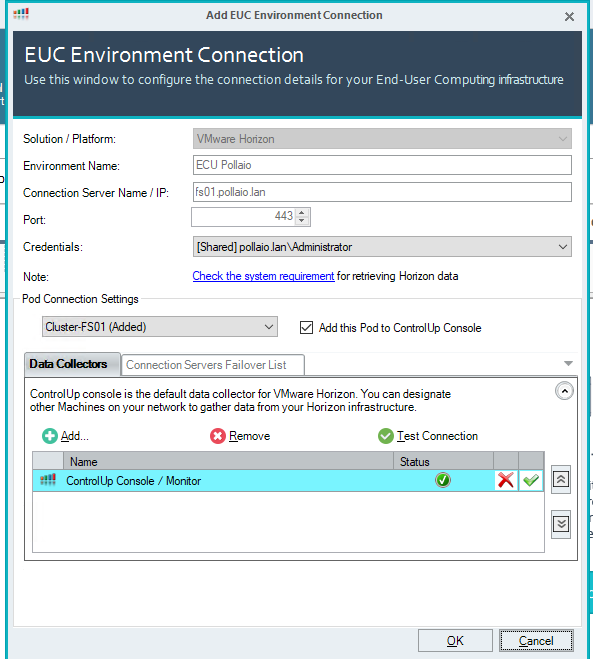
Add Horizon infrastructure:

A screenshot of a computer

Description automatically generated

Add the infrastructure info
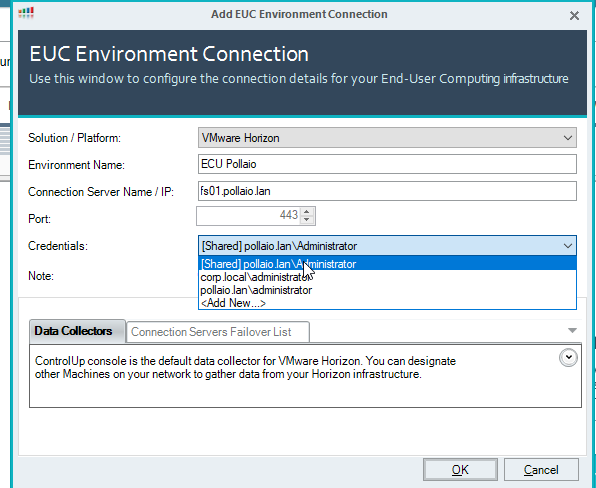
A screenshot of a computer

Description automatically generated

Click on OK

A screen shot of a computer

Description automatically generated

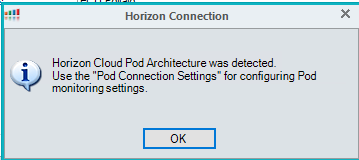
Add the pod to the console

A screenshot of a computer

Description automatically generated

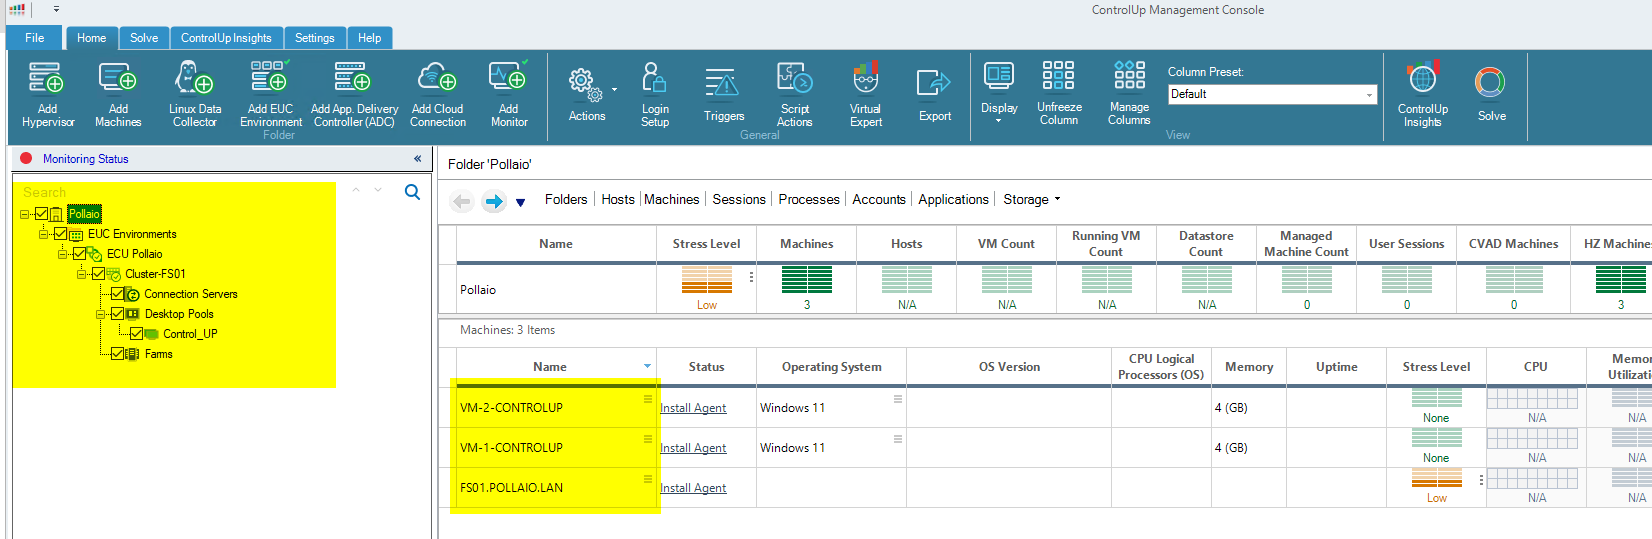
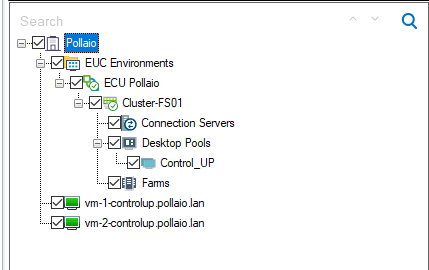
Now on the left panel, we have our Horizon infrastructure added.

A screenshot of a computer

Description automatically generated

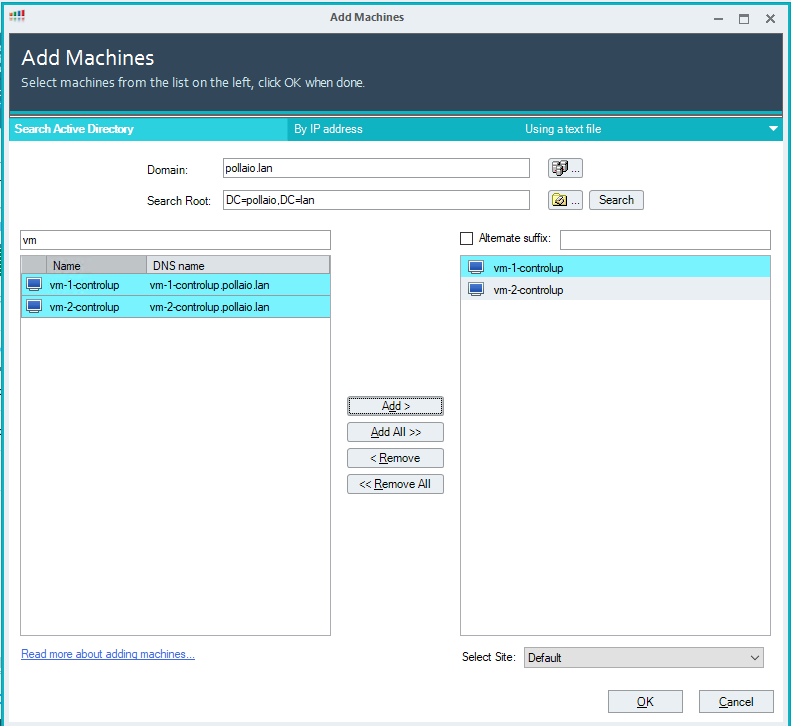
To monitor correctly our instant clone (after adding the agent) we need to discover the VM like a Machine

A screenshot of a computer

Description automatically generated

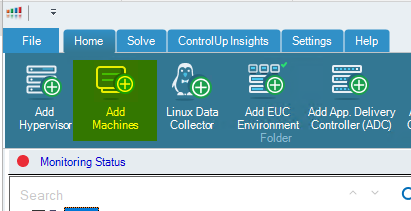
Search with the partial name of the VDI machines
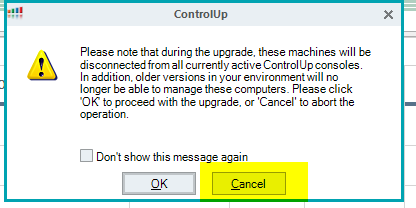
A screenshot of a computer

Description automatically generated

Select cancel

A screenshot of a computer error message

Description automatically generated

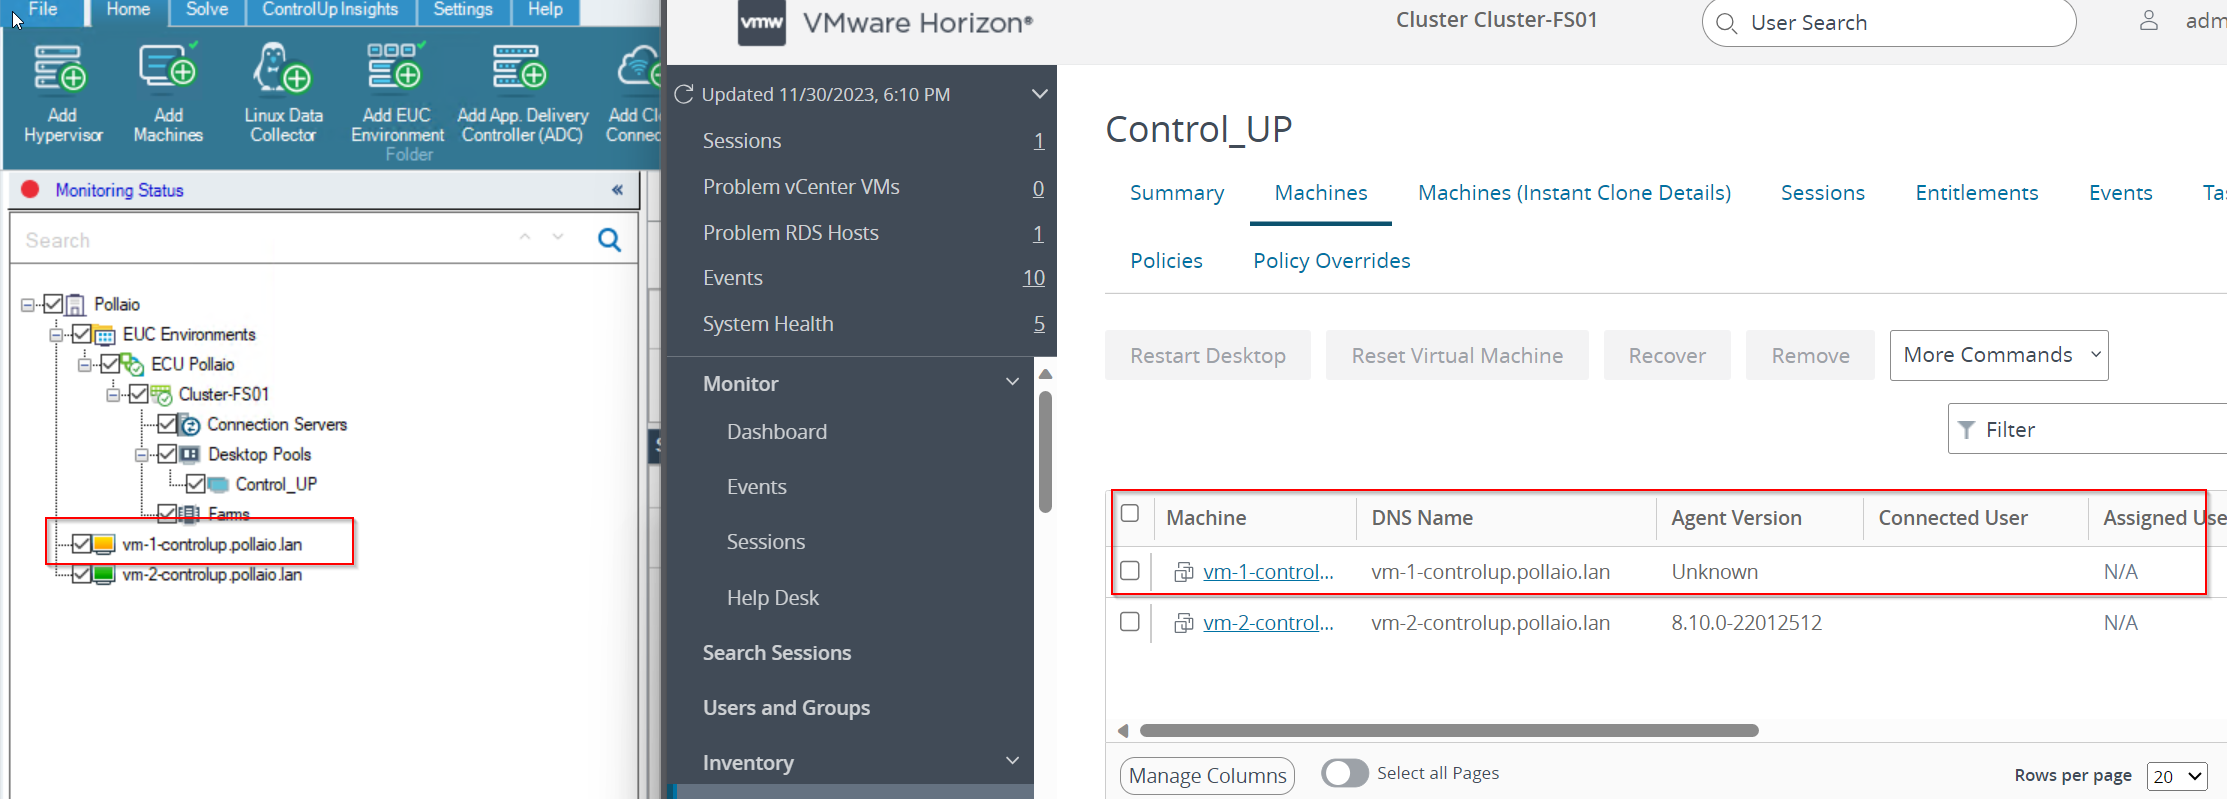
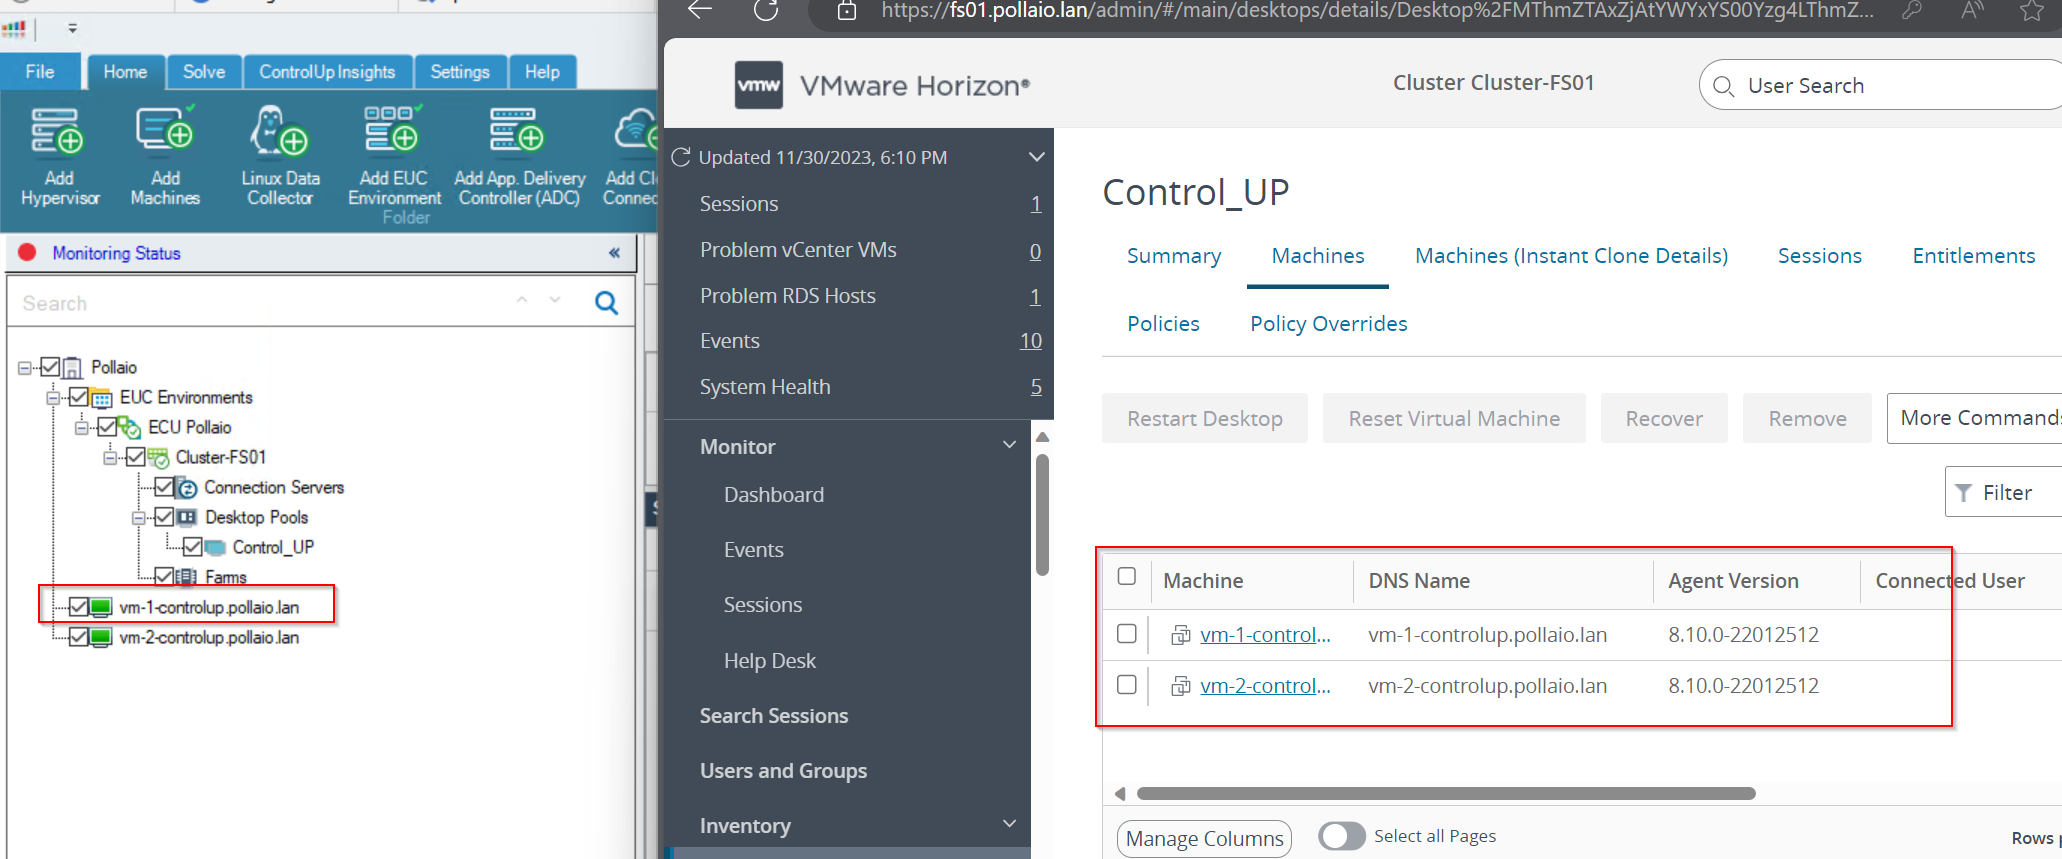
We are VM on the left control panel in black status

A screenshot of a computer

Description automatically generated

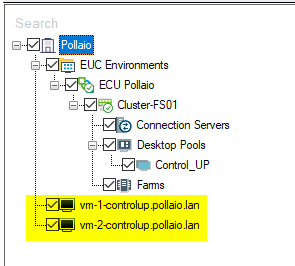
After a few seconds the VDI VM Goes to Green

A screenshot of a computer

Description automatically generated

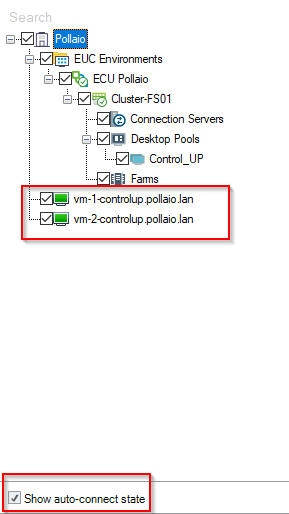
Auto connect state must be enabled (this function is important when the instant clone VDI is removed and recreated).

A screenshot of a computer

Description automatically generated

Now we can monitoring the Instant-Clone VDI

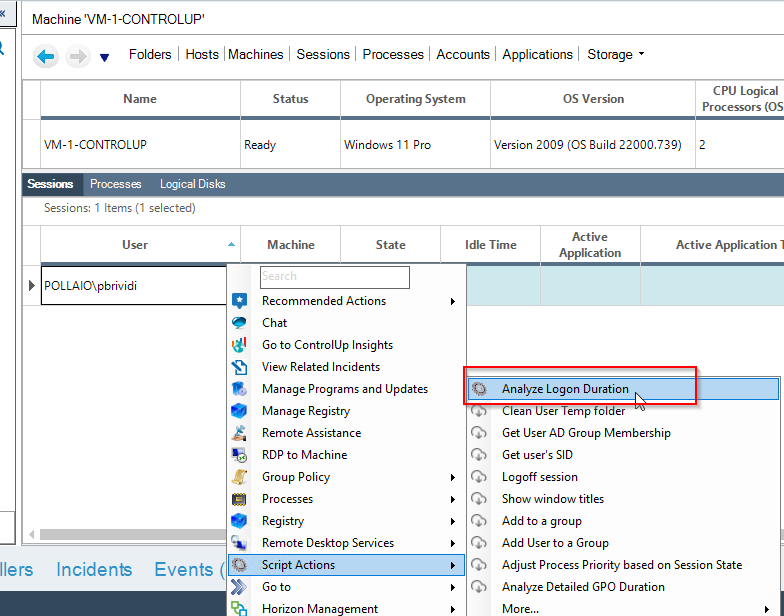
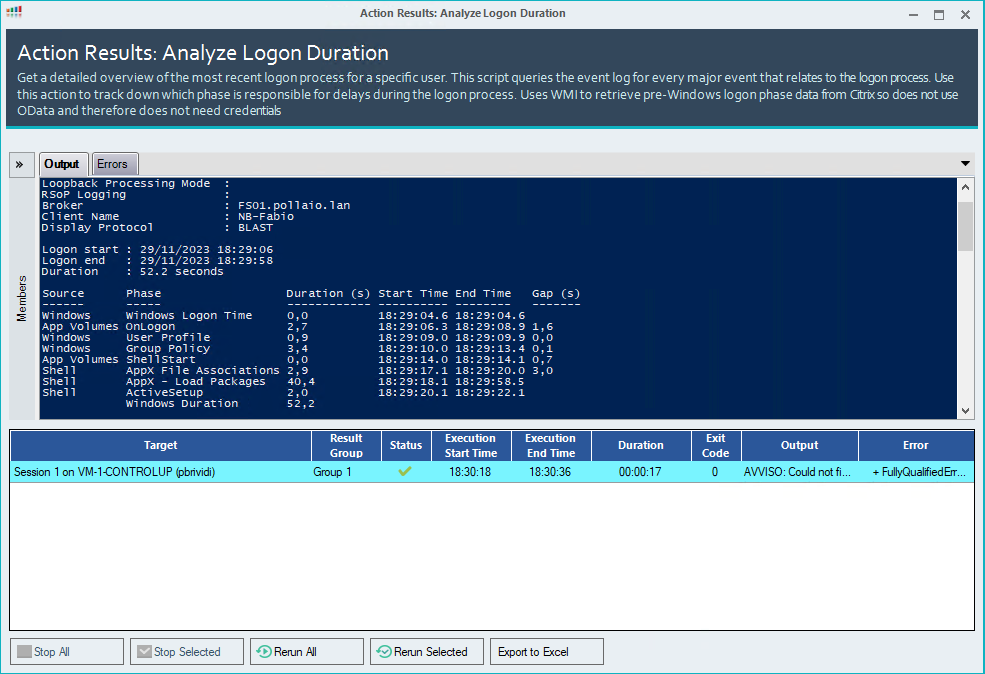
Check the VDI logon duration

Now we can manage and control the infrastructure, for example, to check the logon duration

A screenshot of a computer

Description automatically generated

A screenshot of a computer

Description automatically generated

What happens when VDI instant clones are regenerated?

If a user disconnects from his VDI of the instant clone type, it is destroyed and recreated, on the ControlUp side this is put in the Red -> Yellow state until it returns to Green

When recreating

A screenshot of a computer

Description automatically generated

After recess

A screenshot of a computer

Description automatically generated

Dynamic inventory

For a dynamic inventory of VDI, we can use Synchronization with Universal Sync Script (I’ll talk about this in a future post)

EUC Synchronization with Universal Sync Script (controlup.com)

After installation, we can schedule or start manually the script to sync my ControlUP with my EUC infrastructure.

References:

How to Deploy the Agent on Your Master Image for PVS/MCS/Linked/Instant Clones (controlup.com)

EUC Synchronization with Universal Sync Script (controlup.com)

ControlUp On-Premises

Configure ControlUp for VMware Horizon Instant Clone VDI monitoring

Steps for Upgrade Horizon 23xx to the next version

The release of new versions of VMware Horizon 8 each quarter of the year (to provide new features and resolve any security holes) entails the need to have a consolidated, conservative update procedure with the least impact on users.
Below I report the procedure that I am using successfully.

User impact:

  • Users already connected to the VDI do not encounter problems or disconnections
  • Users who need to connect during update activities may have problems (normally a maintenance window is declared)

Steps

  • Restarting the Connection Servers Operating System (One at a time is a step preparatory for committing any pending Windows updates), after each reboot check from the Horizon web console that everything is ok
  • Disable Provisioning
  • Shut down all three Connection Servers
  • Snapshot of the VMs hosting the Server connection
  • Turn on the Connection Server (One at a time), after each reboot check from the Horizon web console that everything is ok
  • Backup DB Adam (C:\Program Files\VMware\VMware View\Server\tools\bin\vdmexport.exe > vdmconfig.ldf)
  • Disable and Updating one Connection Server ( disabling the Connection Server being updated puts the connection server offline for the load balancer on the top of the connection servers and it is not used for authenticating users and assigning VDI) and after upgrade enable the Connection Server.
  • Repeat the previous step for all Connection Servers
  • If necessary, reapply the customizations
  • Check from the console that everything is ok

After the horizon upgrade, test the Desktop Pool:

  • Try a connection from internal
  • Try a connection from external
  • Delete a VDI machine
  • Publish a new Master Image

For upgrading three Connection servers all steps necessity of two hours
During the activities, the users connected to the VDI do not encounter any problems

The next step, after complete the Connection Servers upgrade, is to update the Horizon agent on the master image and delete the Connection Servers snapshot

Steps for Upgrade Horizon 23xx to the next version