Logs Don’t Lie: Why You Need Syslog Enabled on Omnissa Access SaaS

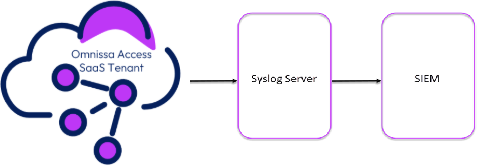
A diagram of a server AI-generated content may be incorrect.

If you’re running Omnissa Access SaaS and you haven’t enabled syslog yet, here’s your gentle-but-firm nudge: do it now. No, seriously. Your SIEM is hungry, and syslog is the buffet.

Let’s dig into why syslog matters, and how you can set it up in less time than it takes to reboot a stubborn printer.

.

Why Should I Enable Syslog?

You might think, “Access logs are already there in the console. Isn’t that enough?”
Short answer:
Nope.

Longer answer:

• Centralized Security Monitoring: Syslog lets you push logs to a SIEM (like Splunk or SYSLOG, I suppose that Omnissa increases the supported SIEM), helping you detect anomalies like brute force attacks, unusual login patterns, or rogue authentication attempts.
• Compliance & Auditing: GDPR, ISO 27001, HIPAA — they all love detailed, timestamped logs.
• Operational Insight: Know exactly who did what, where, and when — across all your users and apps.
• Forensics & Troubleshooting: Ever tried to investigate a login issue without logs? Exactly.

.

What Events Can I Capture?

Omnissa Access can emit audit events, system events, user authentication, and admin actions. Think:

• User logins (successful & failed)
• Policy evaluations
• App launches
• Admin config changes (Policies, Rule etc.)

All this, neatly packaged as syslog messages you can parse, alert on, or just hoard like a proper security engineer.

.

How to Enable Syslog in Omnissa Access SaaS

Requirement

–TLS connection
–Expose to internet our syslog or SIEM. (For now it is only possible configuration, OK this are a point of attention for the Security… but you can manage with firewall rule and other configuration to increase the security)

Setting up syslog in Omnissa Access SaaS is surprisingly painless.

1.Login to the Omnissa Access SaaS Admin Console
Navigate to the
Integrations section in the Omnissa Access SaaS Admin UI.
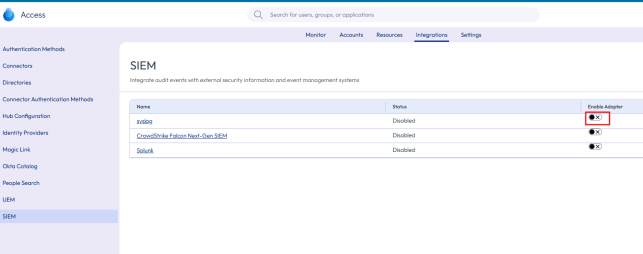
2.Go to SIEM
You’ll find the syslog settings under
SIEM
A screenshot of a computer AI-generated content may be incorrect.

3.Enable Syslog Forwarding
Toggle it
on, and enter your syslog destination (IP or FQDN), port, and protocol (TCP or UDP).

A screenshot of a computer AI-generated content may be incorrect.

Where

◦ Appname

A tag appends to the syslog raw

◦ Chose Facility
◦ Choose the Severity
Select which log levels
◦ Hostname
Currently the syslog server needs to be published on the internet (this might cause some headaches) in order for the Access SaaS solution to be able to send logs.
◦ TCP Port
◦ Client Certificate
◦ Client Private Key
◦ Syslog Certificate
4.Save & Monitor
Save your settings and check your syslog server for incoming logs. A quick
tcpdump or tail on your syslog endpoint can help confirm delivery.

.

Bonus Tip: Test It!

Try logging in as a test user, change a policy, or simulate a failed login — and watch the logs roll in. If your SIEM lights up, congrats — you’ve just levelled up your visibility game.

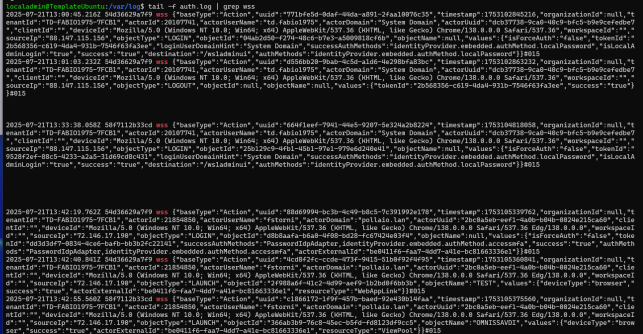
My syslog, in this case for the test, is a normal RSYSLOG installed on UBUNTU OS.

I can see a lot of information:
A screen shot of a computer screen AI-generated content may be incorrect.

Where can we see this action:

–LOGIN (Failed or Successful) -> Administrator account or user account and the type of login (MFA/Local Password …)
–LAUNCH -> Application launched and the name of the application/VDI.
–LOGOFF

And many other information like configuration changes, deleted or viewed objects (such as policies).

.

Pro Tips

• TCP with TLS over UDP for reliable, encrypted delivery. (it is a requirement)
• Use log tagging or filtering on the SIEM side to categorise Omnissa logs separately.
• Integrate with alerting tools like PagerDuty or Slack for real-time reactions.

.

🏁 Final Thoughts

Syslog isn’t just for compliance checkboxes — it’s your window into what’s happening inside Omnissa Access. Whether you’re defending against intrusions or just troubleshooting a login issue on a Friday at 5 PM, you’ll thank yourself for turning it on.

So go ahead — feed your SIEM. You know it’s hungry. 🍽️

.

Logs Don’t Lie: Why You Need Syslog Enabled on Omnissa Access SaaS

Securing Horizon Event DB to SQL Server with TLS

.

Because Who Likes Sniffers Anyway?

So you’ve installed Horizon (2503 is last version) and got your Event Database humming along on a shiny SQL Server. But hold on a sec — did you remember to lock down that traffic with TLS encryption? Or are you letting your event logs float around in plain text like it’s still 1999?

Let’s fix that.
Here’s how to set up
SSL/TLS encryption between Horizon and your SQL Server, with a proper certificate from your Microsoft CA, and make sure your event data isn’t the low-hanging fruit on your network.

.

 Why bother?

Because:

• Anyone with Wireshark can eavesdrop on your events and see user logins, VM power actions, etc.
• Your security team will buy you more coffee if you’re nice to them.

.

The Plan

1.Request & issue a certificate from your Microsoft CA infrastructure.
2.Install the certificate on your SQL Server.
3.Configure SQL Server to force encryption using that cert.
4.Enable Horizon to use SSL for SQL connection
5.Test it and sleep better.

.

1. Request a certificate from your Microsoft CA

On your SQL Server, create a certificate request:

Use certreq or just the MMC GUI.
Here’s the quick-and-dirty via MMC:

1.Open mmc.exe ➔ Add the Certificates snap-in for Computer account.
2.Right-click Personal ➔ Certificates ➔ All Tasks ➔ Request New Certificate.
3.Select your Active Directory Enrollment Policy.
4.Choose a template that includes “Server Authentication” EKU (typically Web Server template).
5.Fill in the common name (CN) with your SQL Server’s FQDN (must match exactly what clients connect to).

(Example: sql01.contoso.local)

6.Enable that private Key is exportable
7.Finish and you’re done. Your cert should show up in Personal ➔ Certificates.

.

2. Install, verify and assign right permission to the cert

Technically it’s already installed, but verify:

• It’s under Computer -> Personal ➔ Certificates on your SQL Server .
• It has Server Authentication (1.3.6.1.5.5.7.3.1) EKU.
• The private key is present (little key icon when you look at the cert).

.

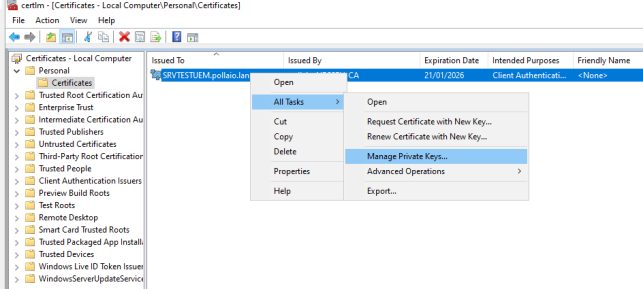
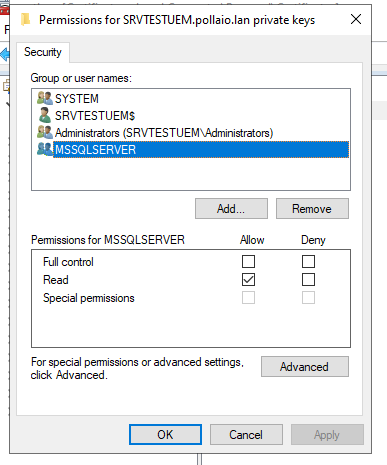
Now we need to assign to the user that starts the SQL server service the permissions to read the private key.

A screenshot of a computer AI-generated content may be incorrect.

.

A screenshot of a computer screen AI-generated content may be incorrect.

.

3. Tell SQL Server to use it

Configure SQL Server

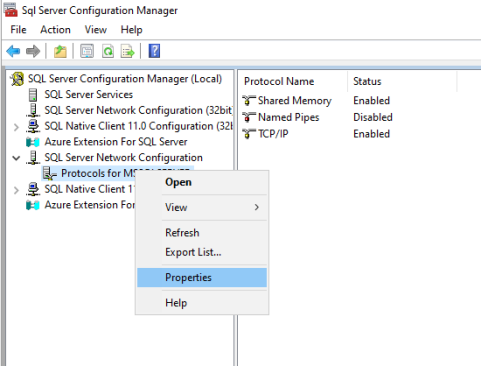
1.Open SQL Server Configuration Manager.
2.Go to SQL Server Network Configuration ➔ Protocols for MSSQLSERVER ➔ Properties ➔ Certificate tab.

A screenshot of a computer AI-generated content may be incorrect.

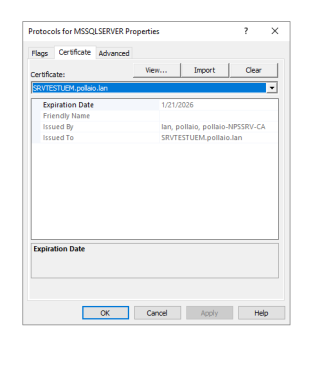
3.Select your cert from the dropdown.

.

A screenshot of a computer AI-generated content may be incorrect.

If it doesn’t show up:

• Check that CN matches the machine’s FQDN.
• Make sure it has Server Authentication EKU.
• Ensure it’s in LocalMachine\My (Personal store).

Force encryption (optional but recommended)

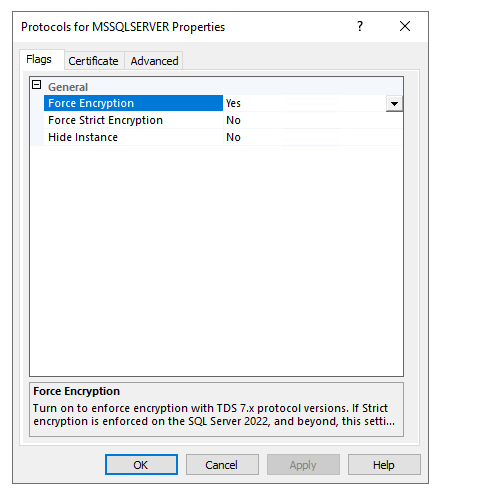
Still in Protocols for MSSQLSERVER ➔ Flags tab ➔ Set Force Encryption = Yes.

A screenshot of a computer AI-generated content may be incorrect.

.

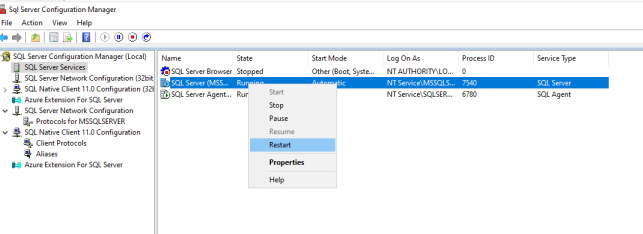
Restart SQL Service

You knew this was coming:

Restart-Service MSSQLSERVER

A screenshot of a computer AI-generated content may be incorrect.

.

Testing time

Use SQL Server Management Studio (SSMS) to connect, then run:

SELECT session_id, encrypt_option

FROM sys.dm_exec_connections

WHERE session_id = @@SPID;

If encrypt_option says TRUE, congrats! 🎉

.

What about Horizon?

Enable SSL with modification in the ADAM DB pae-enableDbSSL and set it to 1

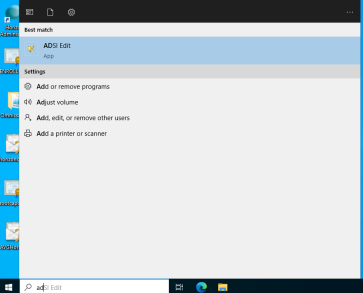
1. Start ADSI Edit

A screenshot of a computer AI-generated content may be incorrect.

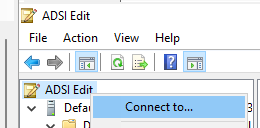
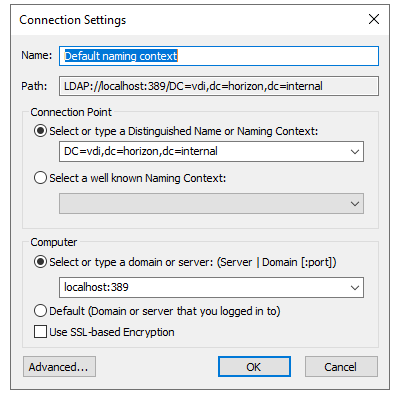
2.Connect to the ADAM DB

A screenshot of a computer AI-generated content may be incorrect.

A screenshot of a computer AI-generated content may be incorrect.

Remember that the Distinguished Name is different if you use the OLD ADAM Schema or the new Schema (the DN indicated in the image is the new schema with the rebranding Omnissa)

3.Go to OU=Properties > OU=Global > CN=Common and set the pae-enableDbSSL flag to 1 .

A screenshot of a computer AI-generated content may be incorrect.

4. Restart the omnissa Horizon Connection Server Service

A screenshot of a computer AI-generated content may be incorrect.

.

When you configure your Event Database settings in Horizon Administrator, it’ll negotiate TLS automatically if your SQL Server is set up for it.

Just make sure:

• Horizon connects via the FQDN matching the cert CN.
• The client OS trusts your CA (install the CA root cert if needed).

.

Done! Enjoy encrypted peace of mind.

Now your Horizon events are zipped up nice and secure in transit.
No more plain-text passwords, no more nosey packet sniffers. You
can go brag to your security team and earn those extra donuts.

.

.

Bonus topic!

Now I check the traffic from Horizon Connection Server and SQL Server

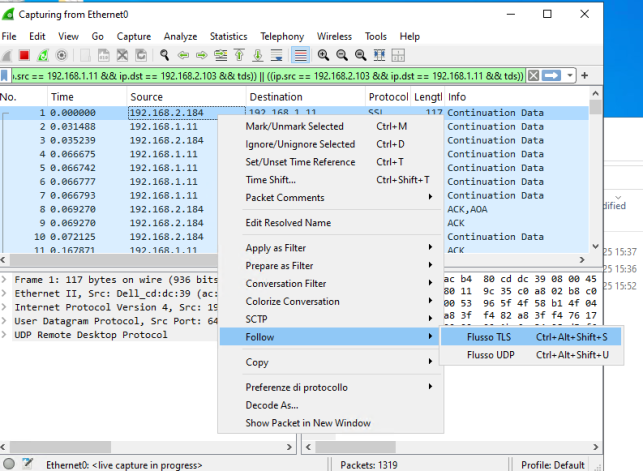
With Wireshark, we can check if the traffic is encrypted:

1. Install Wireshark and Npcap on the Windows server of one of your connection servers
2.Enable filter ((ip.src == <IP CS> && ip.dst == <IP SQL SERVER>)) || ((ip.src == <IP SQL SERVER> && ip.dst == <IP CS>))
3. Start the capture
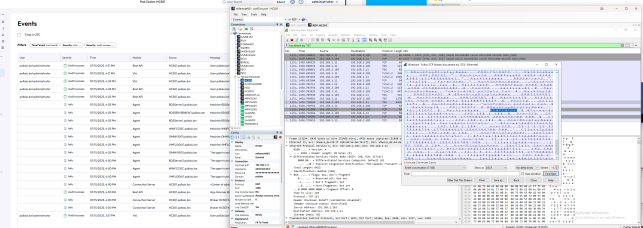
4. Log in to the connection server and create an Event filter
5 . Check

A screenshot of a computer AI-generated content may be incorrect.

.

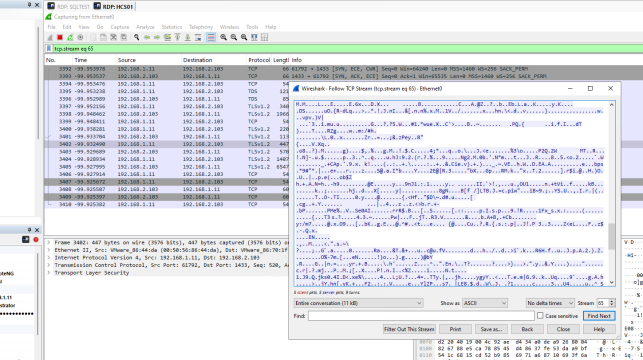
Whitout encryption

A screenshot of a computer AI-generated content may be incorrect.

With Encrypted


A screenshot of a computer AI-generated content may be incorrect.

Securing Horizon Event DB to SQL Server with TLS

Add icon to App Pool


# --- Step 1: Get admin credentials securely ---
$cred = Get-Credential
$domain = "yourdomain"

# --- Step 2: Build login payload ---
$loginBody = @{
    username = $cred.UserName
    password = $cred.GetNetworkCredential().Password
    domain   = $domain
} | ConvertTo-Json

# --- Step 3: API base URL and cert bypass for testing ---
$restApiBaseUrl = "https://horizon.domain.com/rest"
Add-Type @"
    using System.Net;
    using System.Security.Cryptography.X509Certificates;
    public class TrustAllCertsPolicy : ICertificatePolicy {
        public bool CheckValidationResult(ServicePoint srvPoint, X509Certificate certificate,
                                          WebRequest request, int certificateProblem) {
            return true;
        }
    }
"@
[System.Net.ServicePointManager]::CertificatePolicy = New-Object TrustAllCertsPolicy

# --- Step 4: Authenticate and get token ---
$tokenResponse = Invoke-RestMethod -Method POST -Uri "$restApiBaseUrl/login" -Body $loginBody -ContentType "application/json"
$token = $tokenResponse.access_token
$headers = @{ "Authorization" = "Bearer $token" }

# --- Step 5: Load and encode icon file ---
$iconFilePath = "C:\path\file.png"
$iconBytes = [System.IO.File]::ReadAllBytes($iconFilePath)
$base64Icon = [System.Convert]::ToBase64String($iconBytes)

# --- Step 6: Upload the icon ---
$iconBody = @{
    data = $base64Icon
    height = 256
    width = 256
} | ConvertTo-Json -Depth 2

$response = Invoke-RestMethod -Method POST -Uri "$restApiBaseUrl/inventory/v1/application-icons" -Headers $headers -Body $iconBody -ContentType "application/json"

# --- Step 7: Retrieve the icon ID from the uploaded base64 data ---
$iconId = ((Invoke-RestMethod -Method GET -Uri "$restApiBaseUrl/inventory/v1/application-icons/custom-icons" -Headers $headers -ContentType "application/json") | Select-Object data,id | Where-Object {$_.data -eq $base64Icon}).id

# --- Step 8: Get application ID by name (e.g., Notepad) ---
$appFilterJSON = @{
    type = "Equals"
    name = "name"
    value = "Notepad"
}
$appFilterURLEncoded = [System.Web.HttpUtility]::UrlEncode(($appFilterJSON | ConvertTo-Json -Depth 2 -Compress))
$appId = (Invoke-RestMethod -Method GET -Uri "$restApiBaseUrl/inventory/v4/application-pools?filter=$appFilterURLEncoded" -Headers $headers).id

# --- Step 9: Associate the custom icon with the application ---
$appIconAssocBody = @{
    application_pool_ids = @("$appId")
    icon_id = "$iconId"
} | ConvertTo-Json -Depth 2

Invoke-RestMethod -Method POST -Uri "$restApiBaseUrl/inventory/v1/application-pools/action/associate" -Headers $headers -Body $appIconAssocBody -ContentType "application/json"


Add icon to App Pool

Script to export and import Application Pools e i loro entitlements


# Script per esportare e importare Application Pools e le loro entitlements da un HCS ad un altro.
# Si basa sulle API REST di Omnissa (HCS) e richiede le credenziali di un utente con privilegi di amministratore.
# Il file JSON esportato contiene i pool e le entitlements associate, che possono essere importati in un altro HCS.
# Le API utilizzate sono documentate nella sezione "API Reference" della documentazione di Omnissa. 
# https://developer.omnissa.com/horizon-apis/
# https://retouw.nl/2021/10/02/horizon-rest-api-powershell-7-paging-and-filtering-with-samples/

# === LOGIN & TOKEN ===
function Get-HRToken {
    param([string]$Server, [string]$Domain, [string]$User, [string]$Password)
    $body = @{ domain=$Domain; username=$User; password=$Password } | ConvertTo-Json
    $uri  = "https://$Server/rest/login"   # POST /rest/login :contentReference[oaicite:0]{index=0}
    (Invoke-RestMethod -Method Post -Uri $uri -Body $body -ContentType 'application/json' `
                       -SkipCertificateCheck).access_token
}

# === UTILITY: rimuove campi read-only non clonabili ===
function Sanitize-Pool {
    param($Pool)
    $Pool | Select-Object * -ExcludeProperty id, avm_shortcut_id, global_application_entitlement_id
}


function Export-AppPoolsWithEntitlements {
    param(
        [string]$SrcServer,  [string]$Domain,
        [string]$User,       [string]$Password,
        [string]$OutFile 
    )

    $token = Get-HRToken $SrcServer $Domain $User $Password

    # Lista completa dei pool (max 1000) – GET /inventory/v4/application-pools :contentReference[oaicite:1]{index=1}
    $pools = Invoke-RestMethod -Method Get `
              -Uri "https://$SrcServer/rest/inventory/v3/application-pools?size=1000" `
              -Headers @{Authorization="Bearer $token"} -SkipCertificateCheck

    $export = foreach ($p in $pools) {
        # Entitlement del singolo pool – GET /entitlements/v1/application-pools/{id} :contentReference[oaicite:2]{index=2}
        $ents = Invoke-RestMethod -Method Get `
                -Uri "https://$SrcServer/rest/entitlements/v1/application-pools/$($p.id)" `
                -Headers @{Authorization="Bearer $token"} -SkipCertificateCheck

        [PSCustomObject]@{
            pool         = Sanitize-Pool $p
            entitlements = $ents.ad_user_or_group_ids
        }
    }

    $export | ConvertTo-Json -Depth 15 | Out-File $OutFile -Encoding UTF8
    Write-Host "✓ Esportati $($export.Count) pool in $OutFile"
}


function Import-AppPoolsWithEntitlements {
    param(
        [string]$DstServer,  [string]$Domain,
        [string]$User,       [string]$Password,
        [string]$JsonFile 
    )

    $token = Get-HRToken $DstServer $Domain $User $Password
    $data  = Get-Content $JsonFile | ConvertFrom-Json

    foreach ($item in $data) {
    Write-Host "Singolo item $item"
    $item.pool
    Read-Host -Prompt "Press Enter to continue"
        # 4.1  Crea il nuovo Application Pool – POST /inventory/v1/application-pools :contentReference[oaicite:3]{index=3}
        $bodyPool = $item.pool | ConvertTo-Json -Depth 15
        $newPool  = Invoke-RestMethod -Method Post `
                     -Uri "https://$DstServer/rest/inventory/v1/application-pools" `
                     -Headers @{Authorization="Bearer $token"} `
                     -ContentType 'application/json' -Body $bodyPool -SkipCertificateCheck 
        Write-Host "Pool creato $newPool"
        $nomepool = $($item.pool.name)
        Write-Host "Nome del application $nomepool"
        $poolid = Invoke-RestMethod -Method Get `
                     -Uri "https://hcs01.pollaio.lan/rest/inventory/v1/application-pools?filter=%7B%0A%09%22type%22%3A%20%22Equals%22%2C%0A%09%22name%22%3A%20%22name%22%2C%0A%09%22value%22%3A%20%22$nomepool%22%0A%7D" `
                     -Headers @{Authorization="Bearer $token"} `
                     -ContentType 'application/json' -SkipCertificateCheck
        $poolid
        $poolid.id

    Read-Host -Prompt "Press Enter to continue"
        Write-Host "✓ Creato pool '$($item.pool.name)' (nuovo id $($poolid.id))"

        # 4.2  Ripristina entitlement (se presenti) – POST /entitlements/v1/application-pools (bulk) :contentReference[oaicite:4]{index=4}
        if ($item.entitlements.Count) {
            $Psobj=New-Object -Type psobject
            $Psobj | Add-Member -MemberType NoteProperty -Name "id" -Value $poolid.id -Force
            $Psobj | Add-Member -MemberType NoteProperty -Name "ad_user_or_group_ids" -Value $item.entitlements -Force
            $entSpec ="["
            $entSpec += $Psobj | ConvertTo-Json
            $entSpec += "]"
        
            Invoke-RestMethod -Method Post `
                -Uri "https://$DstServer/rest/entitlements/v1/application-pools" `
                -Headers @{Authorization="Bearer $token"} `
                -ContentType 'application/json' -Body $entSpec -SkipCertificateCheck

            Write-Host "  └─► Entitlement ripristinati: $($item.entitlements.Count) SID - APP ID $($newPool.id)"
        }
    }
}
function DestListFarmsID {
    param(
        [string]$DstServer,  [string]$Domain,
        [string]$User,       [string]$Password,
        [string]$FarmDest
    )
    
    $token = Get-HRToken $DstServer $Domain $User $Password
    $FARMDETAILDST = Invoke-RestMethod -Method Get `
                -Uri "https://$DstServer/rest/inventory/v7/farms?filter=%7B%0A%09%22type%22%3A%20%22Equals%22%2C%0A%09%22name%22%3A%20%22name%22%2C%0A%09%22value%22%3A%20%22$FarmDest%22%0A%7D" `
                -Headers @{Authorization="Bearer $token"} `
                -ContentType 'application/json' 
    Write-host $FARMDETAILDST.id
}

function SourceListFarmsID {
    param(
        [string]$SrcServer,  [string]$Domain,
        [string]$User,       [string]$Password,
        [string]$FarmSrc
    )
$filterhashtable = [ordered]@{}
$filterhashtable.filters = @()
$userfilter= [ordered]@{}
$userfilter.add('type','Equals')
$userfilter.add('name','name')
$userfilter.add('value',$FarmSrc)
$filterhashtable.filters+=$userfilter
$filterflat = $filterhashtable | ConvertTo-Json -Compress
    $token = Get-HRToken $SrcServer $Domain $User $Password
    $FARMDETAILSRC = Invoke-RestMethod -Method Get `
               -Uri "https://$SrcServer/rest/inventory/v3/farms?$filterflat" `
                -Headers @{Authorization="Bearer $token"} `
                -ContentType 'application/json' -skipCertificateCheck
    Write-host $FARMDETAILSRC.id
}
######MAIN PROGRAM###
# Insert Source HCS
$SrcServer = Read-Host -Prompt "Insert Source HCS Server Name"
#$SrcServer = "hcs2111.pollaio.lan"
# Insert Dest HCS
$DstServer = Read-Host -Prompt "Insert Destination HCS Server Name"
#$DstServer = "hcs01.pollaio.lan"
#Insert Domain
$Domain = Read-Host -Prompt "Insert Domain Name (e.g. POLLAIO)"
#$Domain = "pollaio"
# Insert Path to JSON file
$JsonFile = Read-Host -Prompt "Insert Path to JSON file (e.g. c:\attimo\AppPoolsWithEntitlements.json)"
# Insert Credentials 
$Credentials = Get-Credential -Message "Insert Domain Credentials for $SrcServer and $DstServer"
$Username = $Credentials.UserName
$Pass = $Credentials.GetNetworkCredential().Password

# --- EXPORT ---
Export-AppPoolsWithEntitlements `
    -SrcServer $SrcServer -Domain $Domain `
    -User $Username -Password $Pass -OutFile $JsonFile

#
$FarmSrc = Read-Host -Prompt "Insert Source Farm Name"
$SFARM=SourceListFarmsID `
     -SrcServer $SrcServer -Domain $Domain `
    -User $Username -Password $Pass -FarmSrc $FarmSrc 6>&1

$SFARM


$FarmDest = Read-Host -Prompt "Insert Destination Farm Name"
$DFARM=DestListFarmsID `
     -DstServer $DstServer -Domain $Domain `
    -User $Username -Password $Pass -FarmDest $FarmDest 6>&1

$DFARM
(Get-Content -Path $JsonFile) -replace "$($SFARM)", "$($DFARM)" | Set-Content -Path $JsonFile

Read-Host -Prompt "WARNING!! If you import the application in the same HCS change the Name and diplay name in the Json file.  Press Enter to continue"

# --- IMPORT ---
Import-AppPoolsWithEntitlements `
    -DstServer $DstServer -Domain $Domain `
    -User $Username -Password $Pass -JsonFile $JsonFile


Script to export and import Application Pools e i loro entitlements