Microsoft Azure Edge and Omnissa-Managed Enterprise App Registration

My Initial Experience

During the preparation activities for deploying a new Horizon Cloud on Azure environment, I was reading the official documentation at

https://docs.omnissa.com/bundle/UsingManagingHorizonCloud/page/DeployingaMicrosoftAzureEdge.html

and discovered the presence of a new and recommended deployment method: the “Omnissa-managed” mode.

I immediately wanted to test it, but in my Omnissa Connect console, this option wasn’t yet available.
.

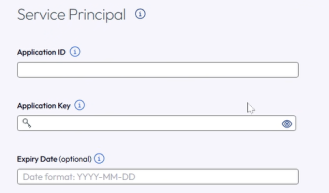
I contacted support and they informed me that the feature would be released soon, but if I wanted to use it immediately, they could enable it through a Feature Flag. Obviously, I couldn’t say no to that opportunity! Once they provided my ORG ID and enabled the flag, the new option appeared while I was creating the EDGE in the Primary Provider section.
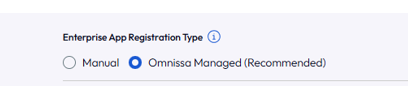
This is my journey with the Omnissa-managed method, and I’d like to share what I learned about this game-changing approach.

.

.

Introduction

Horizon Cloud on Microsoft Azure is evolving, and Omnissa has introduced a significant security enhancement that every administrator should know about. The new Omnissa-managed Enterprise App registration method represents a paradigm shift in how organizations handle service principal credentials. If you’re planning a Horizon Cloud deployment on Azure, understanding the difference between this new approach and the traditional manual method could be crucial for your security posture.

The Security Challenge

Historically, deploying Horizon Edge in Horizon Cloud on Azure required organizations to create and manage their own Azure Enterprise Applications. This approach meant handling sensitive service principal secrets—credentials that need to be carefully managed, rotated, and protected. The more systems that have access to these secrets, the higher the security risk.
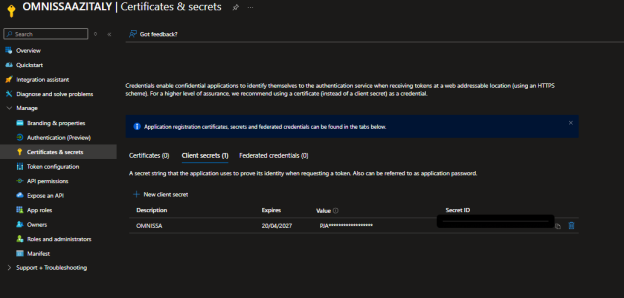
The traditional single-tenant deployment method (Manual Enterprise App registration) placed the responsibility of secret management squarely on the customer organization. While this approach continues to be supported, it introduces additional operational overhead and potential security vulnerabilities.

Enter Omnissa-Managed

Omnissa has introduced a new Enterprise App registration method that fundamentally changes who manages the service principal secrets.

Key Benefits

1. Enhanced Security

Organizations no longer need to provide their sensitive secrets key information to Omnissa or manage it themselves in the context of Horizon Cloud deployment. The credentials remain under Omnissa’s direct management, reducing the attack surface and potential points of compromise.

2. Simplified Administration

Say goodbye to manual Enterprise Application creation and complex permission configurations. With Omnissa-managed registration, the setup process is streamlined. Omnissa handles the heavy lifting—you focus on deployment.

3. Reduced Operational Overhead

No more worrying about secret rotation schedules, credential lifecycle management, or complex authentication flows. Omnissa manages these operational concerns, freeing your team for other critical tasks.

4. Enterprise-Grade Security

By centralizing secret management with Omnissa, organizations benefit from enterprise-grade security practices, regular audits, and dedicated security expertise that Omnissa brings to the table.

Manual Registration: Still Available

For organizations with specific requirements or legacy configurations, the traditional single-tenancy method remains available. This manual Enterprise App registration approach allows organizations to maintain full control over their authentication setup if needed. However, unless you have specific compliance or architectural reasons, the manual approach introduces unnecessary complexity.

The Recommendation

Omnissa-managed is the recommended method for all new Horizon Cloud deployments on Azure. Omnissa has taken the guesswork out of enterprise app management and elevated the security baseline for everyone using Horizon Cloud.

If you’re currently on the manual registration path, consider planning a migration to the Omnissa-managed approach. The transition offers immediate security benefits with reduced administrative overhead.

Getting Started

Ready to leverage Omnissa-managed registration for your deployment? The process is straightforward:
1.Initiate your Horizon Edge deployment in Omnissa Connect
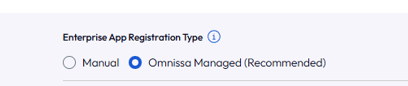
2.Select the Omnissa-managed option during the Primary Provider setup

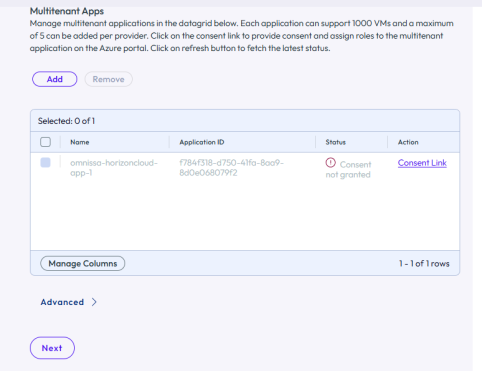
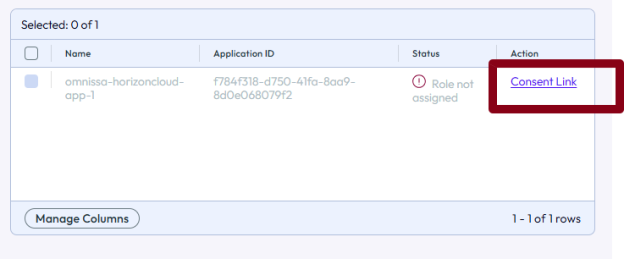
3.Link your Azure subscription using the consent flow (click Consent Link)

4.Authorize Omnissa to create the Enterprise Application

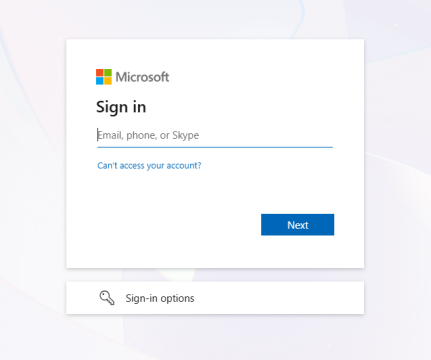
Insert Azure Subscription credentials (in my case Global Admin User)
Now we can see the new enterprise application with Omnissa Logo.

.

.

.

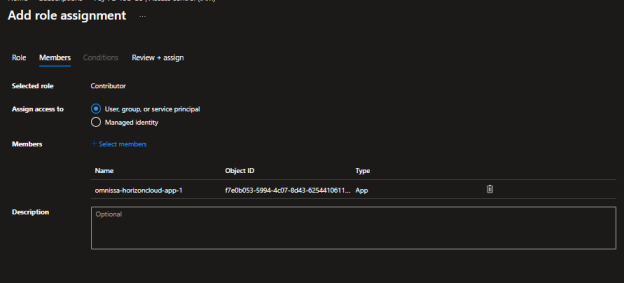
5.Assign necessary roles (Contributor or appropriate custom roles) to the subscription

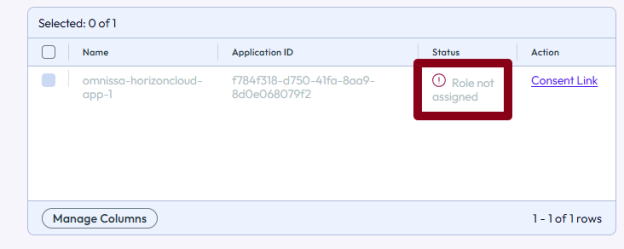
First, verify the role assignment status in Omnissa Connect:
.

.

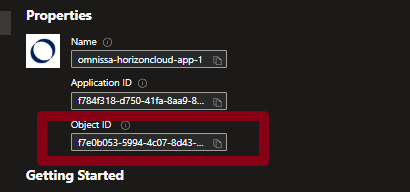
Get the Object ID from the Omnissa Enterprise App:
.

.

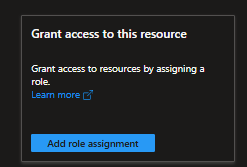
Go to your subscription and select IAM (Identity & Access Management):

.

Select add role assignment

Search Contributor in Previleged admnistrator Role
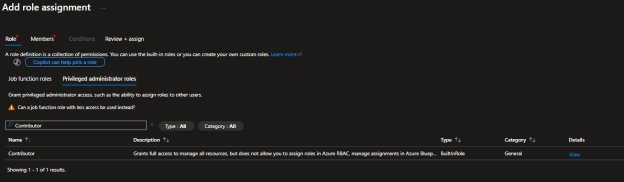
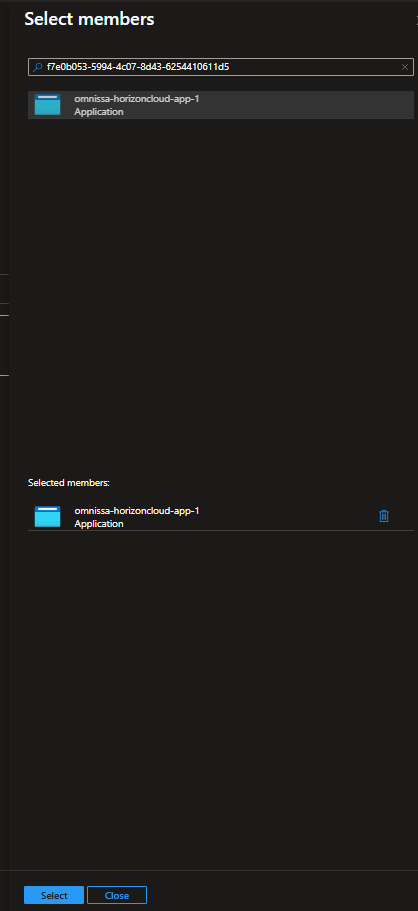
Select Member and ad the Enterprise Application Object ID or name

6.Refresh and verify the role assignment in Omnissa Connect

Return to the Omnissa Connect wizard. If the role is still showing as “Role not Assigned”
.

Go back to the previous step and return to refresh (Omnissa Engineer should add a refresh button)
.

.

.

At this point, you’re ready to choose whether your EDGE will be an AKS (Azure Kubernetes Service) or a Virtual Machine.

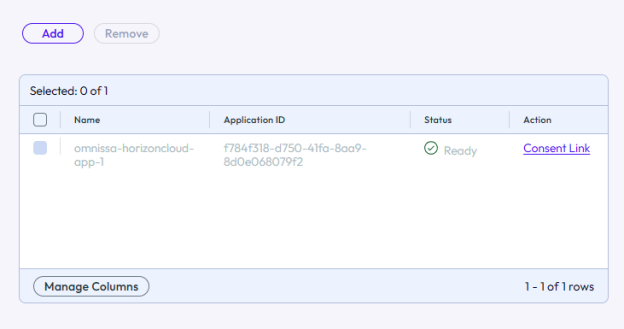
The Omnissa-managed Enterprise Application has been successfully created and configured with the naming convention omnissa-horizoncloud-app-1, marked with Omnissa’s branding for easy identification.

.

.

Conclusion

The shift to Omnissa-managed Enterprise App registration represents a meaningful step forward in cloud security practices. By removing the burden of service principal secret management from customer organizations, Omnissa enables secure, simplified, and scalable Horizon Cloud deployments on Microsoft Azure.

Whether you’re planning a new deployment or evaluating your current infrastructure, the Omnissa-managed method deserves your attention. It’s security and simplicity working in harmony—exactly what modern cloud deployments should be.
Microsoft Azure Edge and Omnissa-Managed Enterprise App Registration

Streamline Your Enterprise with Omnissa Connect and Microsoft Entra ID

A guide to enterprise federation, single sign-on, and modern identity management

What is Omnissa Connect?

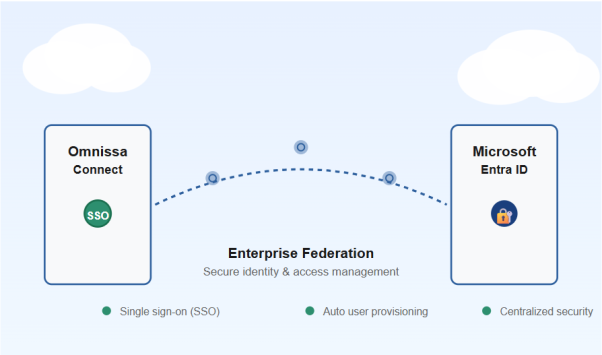
Omnissa Connect is a centralized platform service that provides IT administrators and users with a single sign-on (SSO) gateway to access and manage all Omnissa services, such as Workspace ONE and Horizon. It streamlines workflows by unifying access, identity management, and service onboarding into one intuitive interface.
Key features of Omnissa Connect include:

•Unified Identity: Single sign-on capabilities and seamless integration with third-party identity providers like Microsoft Entra ID and Okta through the Omnissa Identity Service
•Centralized Administration: IT owners can securely assign roles, set multi-factor authentication (MFA) policies, and manage OAuth applications or API tokens across the entire Omnissa ecosystem
•Subscription Management: Visibility into all Omnissa service subscriptions from a single location

What is Microsoft Entra ID?

Microsoft Entra ID (formerly Azure Active Directory) is Microsoft’s cloud-based identity and access management service. It’s the foundation that millions of organizations use to manage employee identities, secure access to applications, and protect their digital assets.
Entra ID is likely already at the heart of your organization if you use:

•Microsoft 365 (Office 365, Teams, SharePoint)
•Azure cloud services
•Dynamics 365 or other enterprise applications
•Single sign-on (SSO) solutions for SaaS applications

Why Integrate Omnissa Connect with Microsoft Entra ID?

Connecting Omnissa Connect with Microsoft Entra ID through enterprise federation creates a powerful identity ecosystem. Here’s what you gain:

Single Sign-On (SSO)

Your users log in once with their corporate credentials and automatically gain access to Omnissa Connect—no separate usernames or passwords to remember.

Automatic User Provisioning

When you add or remove users in Entra ID, they’re automatically synced to Omnissa Connect. No manual account creation, no forgotten deprovisioning, no stale user accounts cluttering your systems.

Centralized Security

Manage all user access, permissions, and security policies from one central location. Apply multi-factor authentication (MFA), enforce password policies, and monitor access across your entire organization from Entra ID.

Reduced IT Overhead

Your IT team spends less time managing separate identity systems, resetting passwords, and troubleshooting access issues. Everything is automated and synchronized.

Improved Compliance

Maintain detailed audit logs of who accessed what and when. Meet regulatory requirements for access control and identity management with confidence.

A Real-World Example

Before Federation:

Sarah joins your company. The IT team manually creates accounts in Omnissa Connect, Microsoft 365, and four other systems. Sarah has to memorize 5 different passwords. When Sarah leaves three years later, the team forgets to deactivate her Omnissa Connect account, leaving a security gap.

After Federation:

Sarah’s first day: HR adds her to Entra ID. Omnissa Connect automatically creates her account and grants the right permissions. She logs in with her corporate email and password—the same one she uses for everything else. On her last day: HR removes her from Entra ID. Within seconds, Omnissa Connect and all other connected systems automatically deactivate her access. No manual steps. No forgotten accounts. No security gaps.

Is This Right for Your Organization?

Enterprise federation between Omnissa Connect and Entra ID is ideal if your organization:

•Already uses Microsoft Entra ID or Azure Active Directory
•Wants to simplify identity management and reduce IT burden
•Has multiple employees and wants to automate user provisioning
•Needs strong security controls and audit capabilities
•Is undergoing digital transformation and standardizing on cloud-based identity solutions

What’s Involved?

Configuring enterprise federation requires several steps—from verifying your domain to setting up the connection between systems to testing everything works smoothly. The process typically involves:

•Domain verification to prove your organization owns the domain
•Creating and configuring an Enterprise Application in Microsoft Entra ID
•Setting up authentication protocols and user attribute mapping
•Testing the setup before activating federation for all users
•Notifying users and helping them transition to the new authentication method

The Complete Step-by-Step Guide

While this overview covers the benefits and concepts, implementing enterprise federation involves detailed technical configuration. The complete guide is a comprehensive document with in-depth instructions, detailed screenshots, and step-by-step walkthroughs for both Omnissa Connect and Microsoft Entra ID configuration. Due to its length and technical depth, I share it directly with clients and organizations ready to implement the solution.

The complete guide includes:

•Detailed screenshots and instructions for each configuration step
•Exact fields to fill in on both Omnissa Connect and Entra ID

.

Ready to streamline your organization’s identity management?

If your organization is ready to implement enterprise federation between Omnissa Connect and Microsoft Entra ID, I’m here to help. Whether you need guidance on setup, troubleshooting during configuration, or best practices for managing the transition, I can provide a complete, step-by-step implementation guide tailored to your needs.

Get in touch to request the full technical guide and start your journey toward simplified, centralized identity management.

.

📧 Contact me for the complete implementation guide

Let’s simplify your organization’s identity and access management together.

Streamline Your Enterprise with Omnissa Connect and Microsoft Entra ID

Using the Omnissa Horizon Agent Upgrade Feature from the Omnissa Connection Server Console

Horizon Agent Upgrade

If you have a Horizon Enterprise Plus or Horizon Universal subscription license, the last Horizon versions have a function to manage the Horizon Agent Update.

You have two scenarios:

  • Automatic map the upgrade to your Connection server infrastructure
  • Manually add the Agent upgrade package

I tested this feature in my Home Lab

Enable Automatic upgrade to your Connection server infrastructure

Enable Omnissa Horizon Cloud Portal form of Horizon Agent Auto Upgrade feature

https://cloud.horizon.omnissa.com/

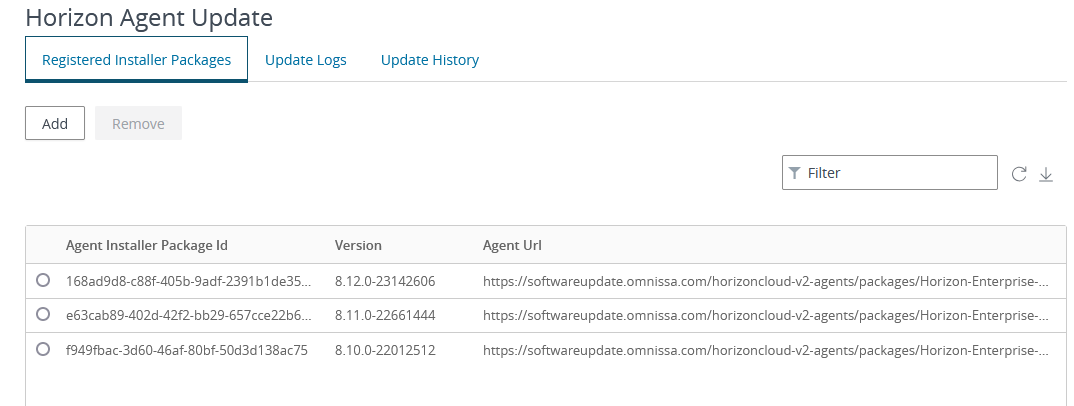
With enabling the Agent Auto Upgrade you can see, without any action, the Horizon package to use for upgrade (this new package is directly downloaded from the Omnissa Site)

A screenshot of a computer

Description automatically generated

If you use this method you can skip the next paragraph and go to Schedule Agent upgrade

Manually loaded the JSON and agent file

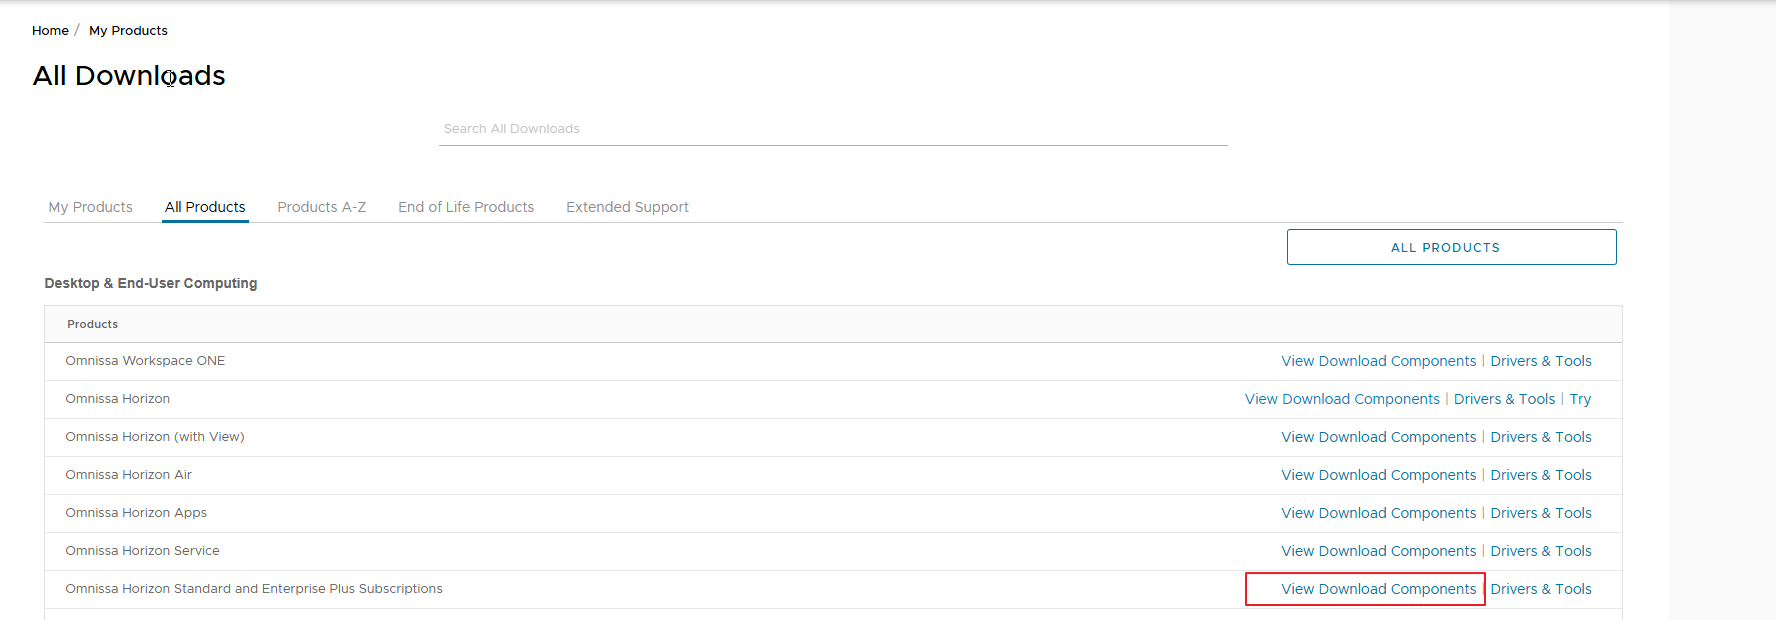
Otherwise, you can manually download the JSON file from the customer portal by Omnissa

Omnissa Horizon Standard and Enterprise Plus Subscriptions

A screenshot of a computer

Description automatically generated

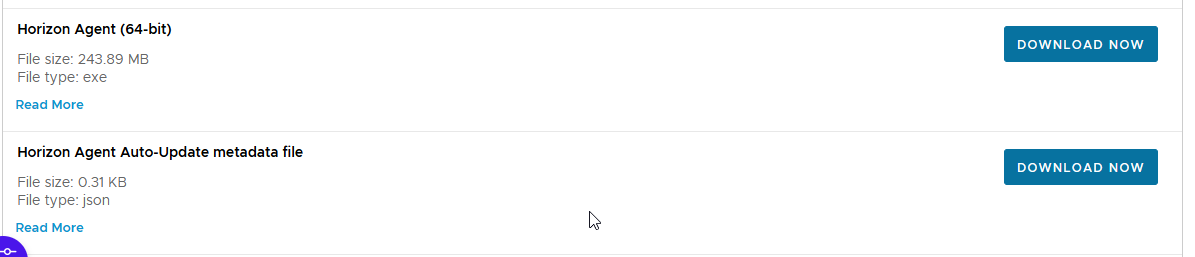
Download the files you need

A white background with a black and white object

Description automatically generated

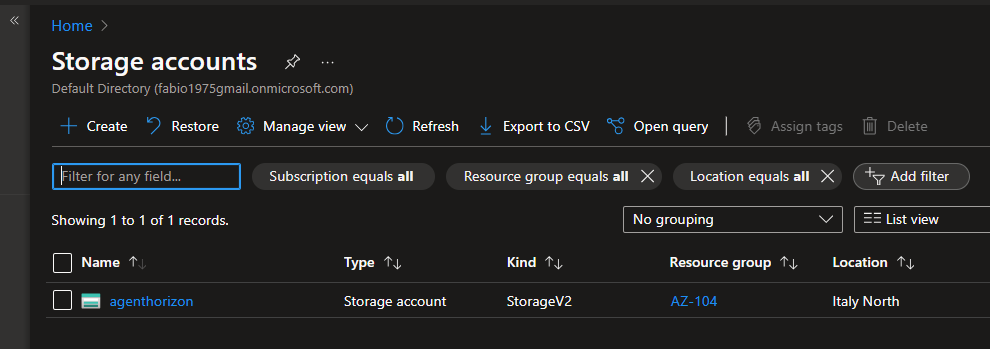
Upload them to a WEB site (Local/Internal or Public), in my case I use an Azure storage account

A screenshot of a computer

Description automatically generated

As blob containers

A screenshot of a computer

Description automatically generated

Which are accessible via WEB (obviously I recommend putting special restrictions)

A screenshot of a computer

Description automatically generated

A screenshot of a computer

Description automatically generated

Let’s configure our POD by entering the appropriate section of the interface via WEB of the connection servers

A screenshot of a computer

Description automatically generated

Enter the URL of our storage account with the name of the JSON file indicated

https://agenthorizon.blob.core.windows.net/agent2312/VMware-Horizon-Agent-x86_64-2312.1-8.12.1-23507832.exe-metadata.json

A screenshot of a computer

Description automatically generated

Schedule Agent upgrade

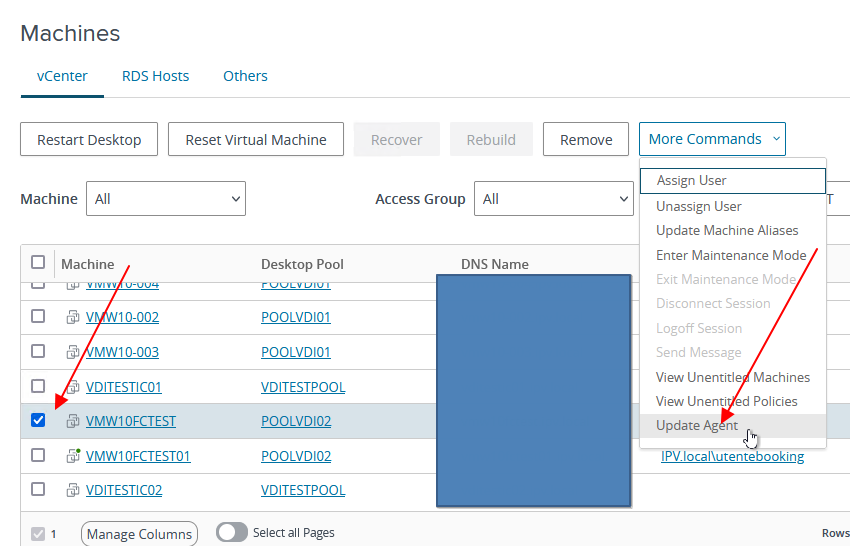
Let’s proceed with updating the Agent of a VDI by going to the list of our VDI.

We select the VDI or VDI on which we want to update the agent

A screenshot of a computer

Description automatically generated

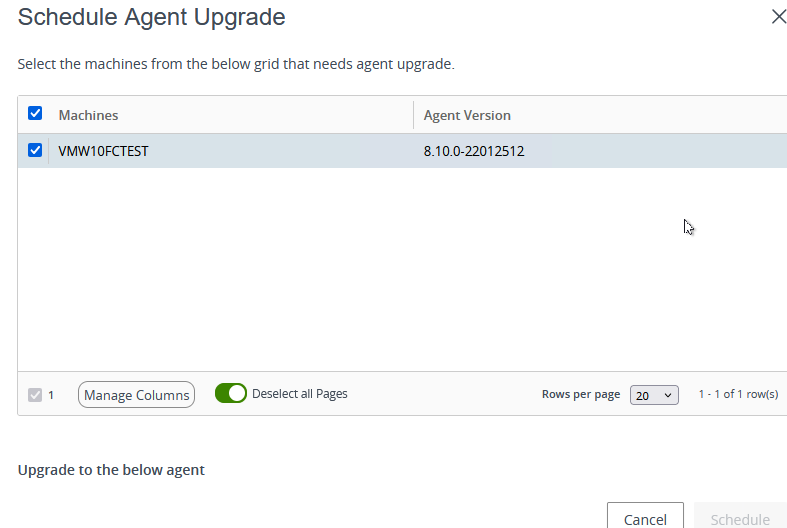
Then select Update Agent

A screenshot of a computer

Description automatically generated

A screenshot of a computer

Description automatically generated

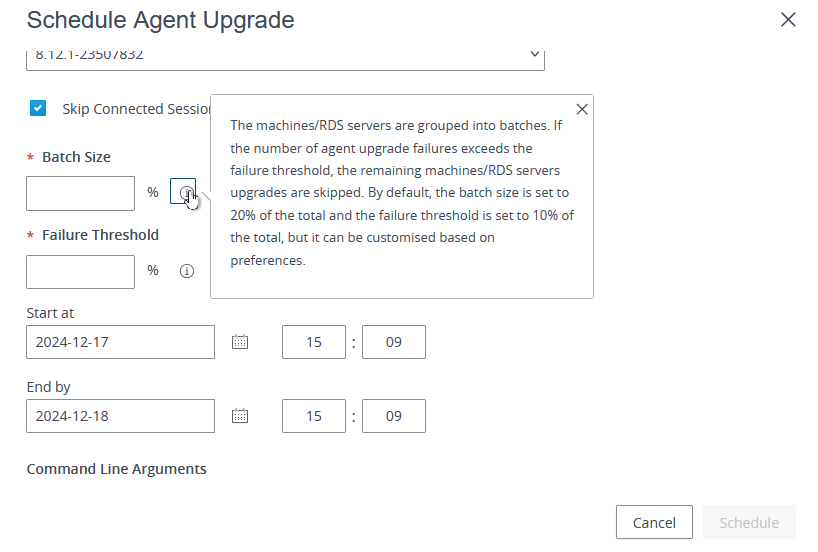
We select the update package (we can also have multiple versions of agents) and proceed with the planning

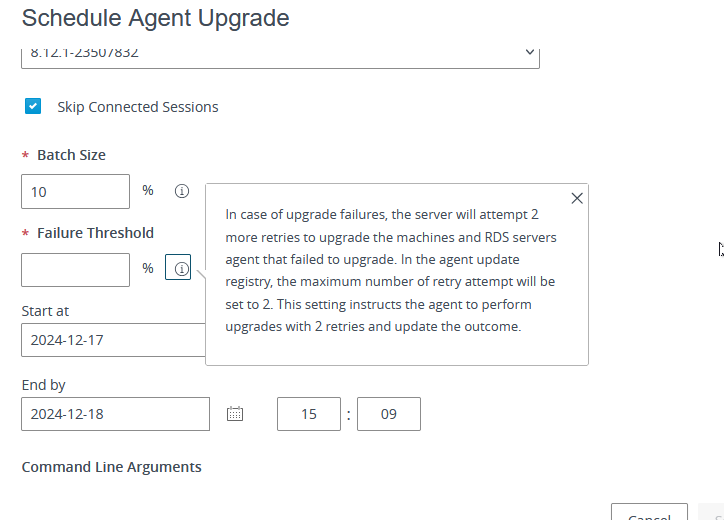
There are some safety rules if you do massive updates

A screenshot of a computer

Description automatically generated

A screenshot of a computer

Description automatically generated

Now schedule when will start the upgrade

A screenshot of a computer

Description automatically generated

From the Horizon agent update section, we see the Scheduled task

A screenshot of a computer

Description automatically generated

When the time is coming the job will start and the task state is “in Progress”

A screenshot of a computer

Description automatically generated

Now from the list of VDI machines, we can check the upgrade process.

The user is currently logged in to the machine and waiting for the user logoff or reboot

A screenshot of a phone

Description automatically generated

Now the VDI machine is ready for the upgrade

A screenshot of a computer

Description automatically generated

A white rectangular object with black text

Description automatically generated

Agent unknown…. Removed and installed the new one

A white rectangular object with a white background

Description automatically generated

Installed the new

The VDI is restarted the process is completed and we have the VDI with the updated agent

A screenshot of a computer

Description automatically generated

And the scheduled update task is completed

Using the Omnissa Horizon Agent Upgrade Feature from the Omnissa Connection Server Console

VMware Horizon 8 2303

At the end of March 2023, new versions of the products that make up the Horizon suite were released. (Connection Server, Volume App, DEM, and Unified Access Gateway)

There are several interesting features, below I report the link to each release note.

I bring to your attention the presence of AppVolume in a preview solution related to the use of AppVolume in the Azure environment. (This deployment option is intended for applications packages and not Writable Volumes)

Horizon

VMware Horizon 8 2303 Release Notes

App Volume on Azure

VMware App Volumes Manager Deployment Guide for Azure –

App Volume 

VMware App Volumes 4, version 2303 Release Notes

DEM

VMware Dynamic Environment Manager 2303 Release Notes

Unified Access Gateway

Unified Access Gateway 2303 Release Notes (vmware.com)

VMware Horizon 8 2303

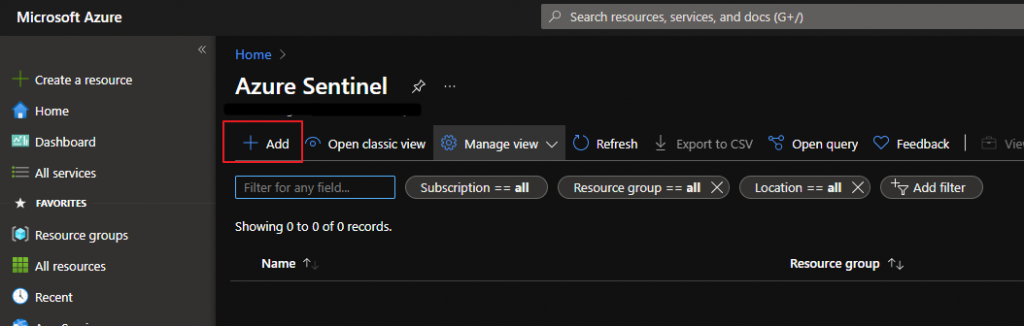
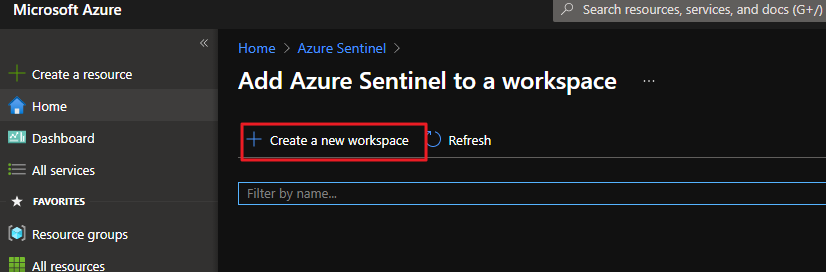
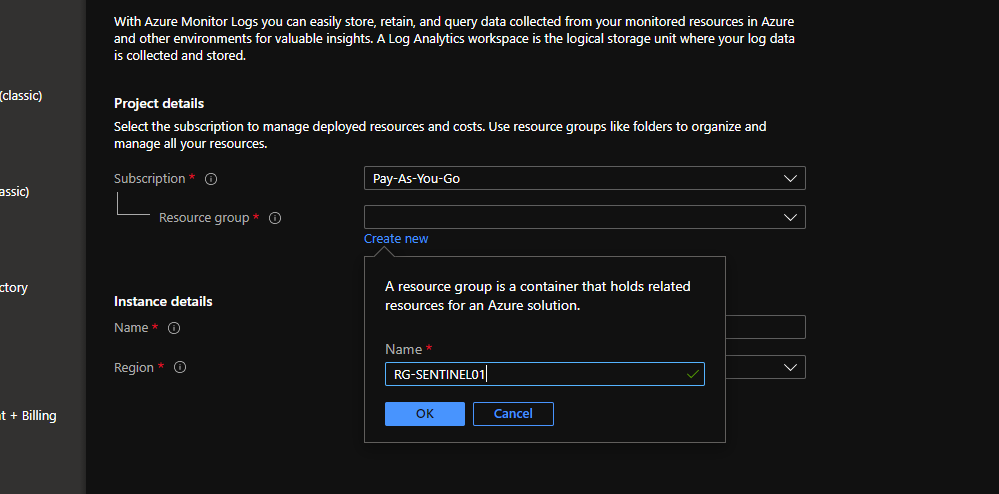
Ingest your VMware ESXi logs into Azure Sentinel

The VMware ESXi connector is currently in PREVIEW

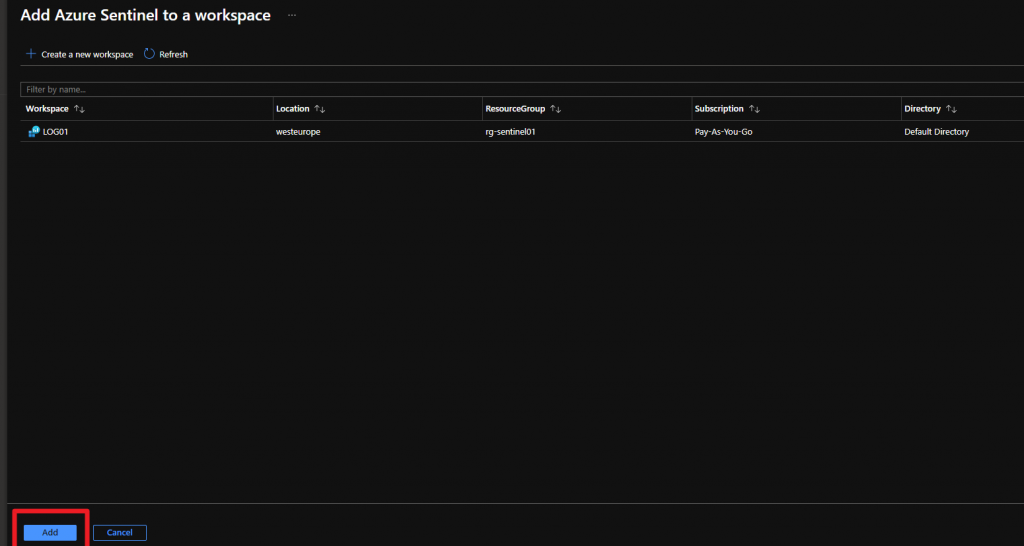
What is Azure Sentinel?

Microsoft Azure Sentinel is a scalable, cloud-native, security information event management (SIEM) and security orchestration automated response (SOAR) solution. Azure Sentinel delivers intelligent security analytics and threat intelligence across the enterprise, providing a single solution for alert detection, threat visibility, proactive hunting, and threat response.

Azure Sentinel ingests data from services and apps by connecting to the service and forwarding the events and logs to Azure Sentinel. For physical and virtual machines, you can install the Log Analytics agent that collects the logs and forwards them to Azure Sentinel. For Firewalls and proxies, Azure Sentinel installs the Log Analytics agent on a Linux Syslog server, from which the agent collects the log files and forwards them to Azure Sentinel.

How connect  VMware ESXi to Azure Sentinel?

Integration between VMware ESXi and Azure Sentinel makes use of a Syslog server with the Log Analytics agent installed. It also uses a custom-built log parser based on a Kusto function.

For the onboarding of ESXi on Azure Sentinel, these are the step:

  • Have up and running a  Azure Sentinel service.
  • Prepare a Linux Syslog Server
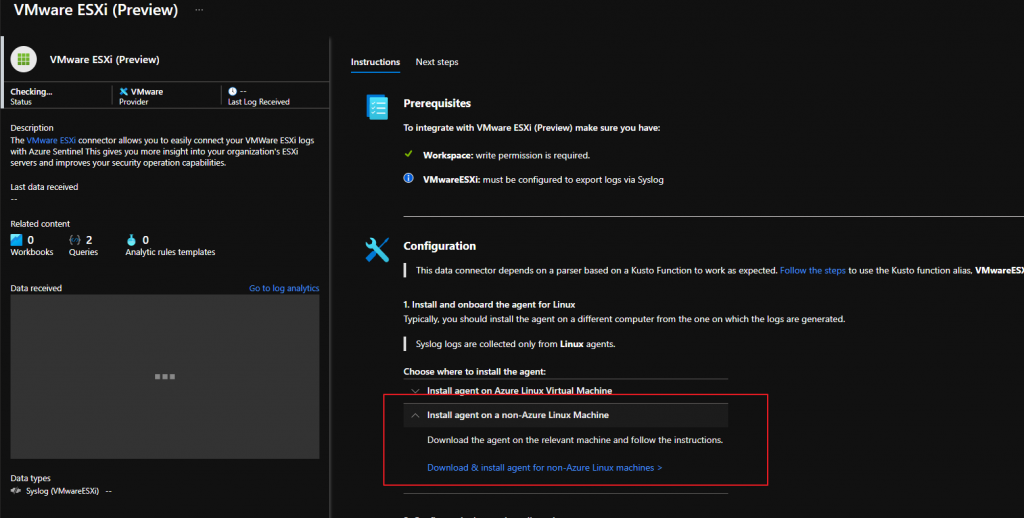
  • Install Log Analytics Agent
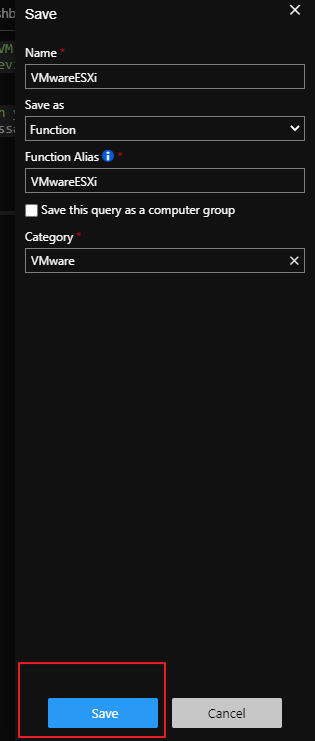
  • Create the VMwareESXi Kusto function
  • Configure your ESXi Hosts to forward log to Syslog server

Create a Azure Sentinel Service 

This example is related to a basic configuration of the Azure Sentinel infrastructure, for more information and details for sizing and costs check in the respective guides from Microsoft.

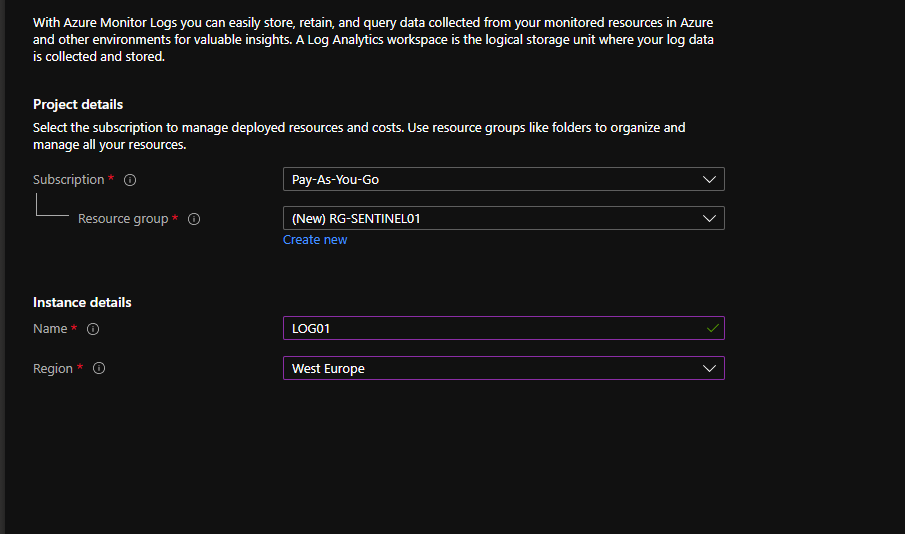
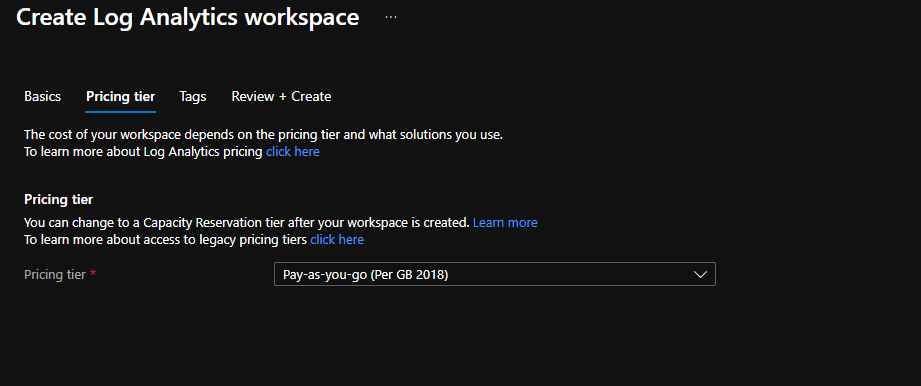
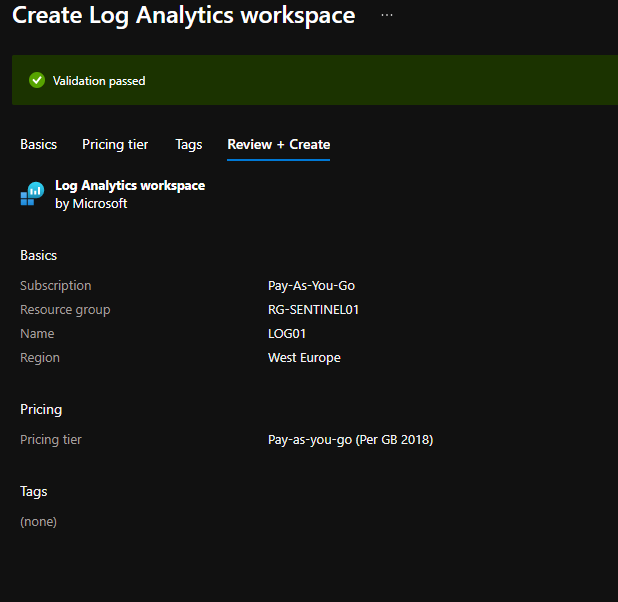
Login to Azure Portal (How to get an Azure subscription?)

Prepare Linux Syslog

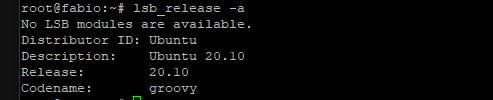
I have installed a virtual machine with Ubuntu Guest OS

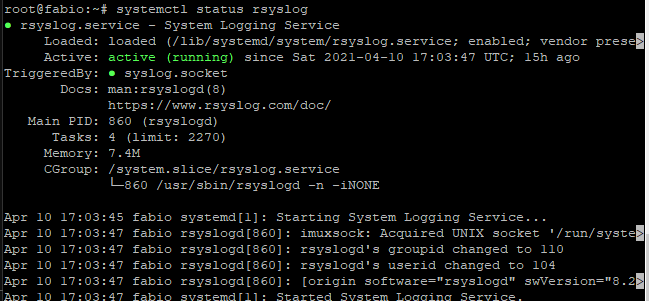
I have checked if rsyslog is installed and running

if rsyslog is not installed run the following installation command

 apt-get install rsyslog

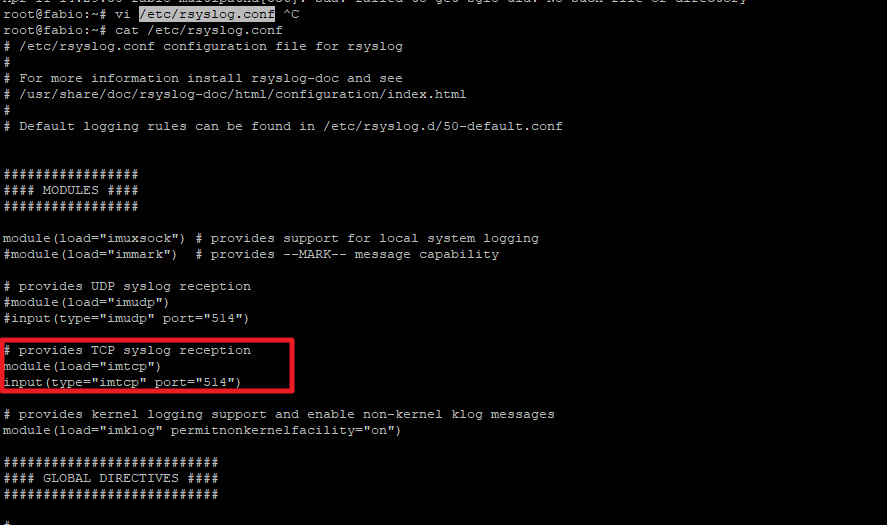
Configure rsyslog

Verify the tcp port used from syslog server

Cat  /etc/rsyslog.conf

Configure Kusto function alias

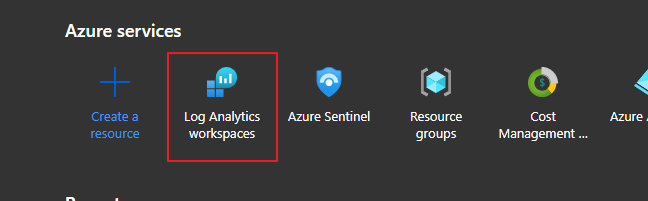
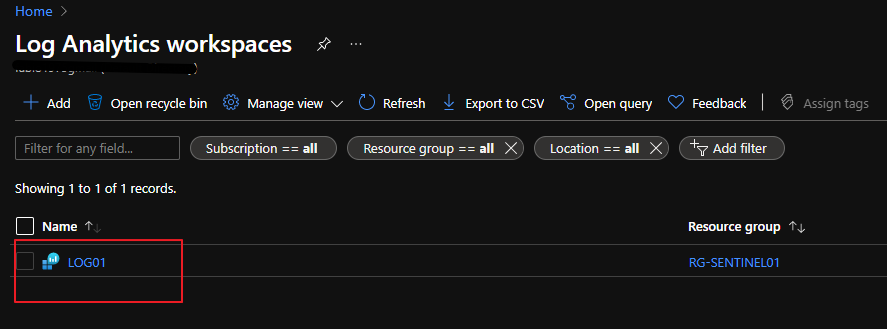
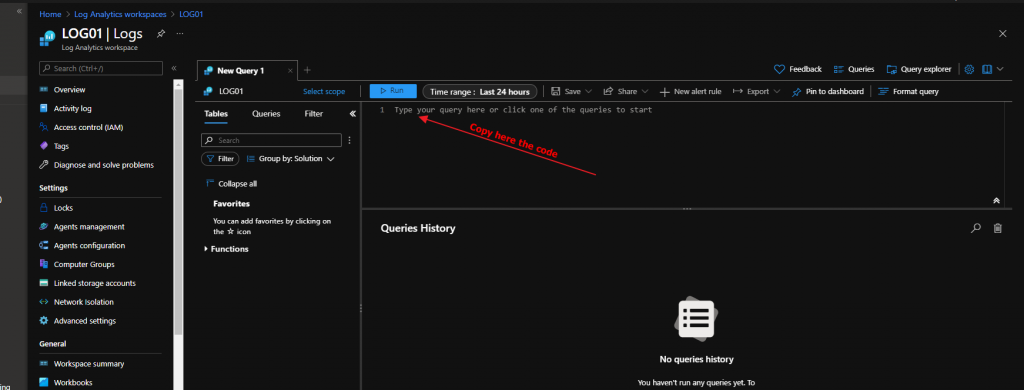
On log analytics workspace

 create this function:

/ Title:           VMWare ESXi
// Author:          Microsoft
// Version:         1.0
// Last Updated:    11/13/2020
// Comment:         Inital Release
//  
// DESCRIPTION:
// This parser takes raw VMWare ESXi logs from a Syslog stream and parses the logs into a normalized schema.
//
// USAGE:
// 1. Open Log Analytics/Azure Sentinel Logs blade. Copy the query below and paste into the Logs query window. 
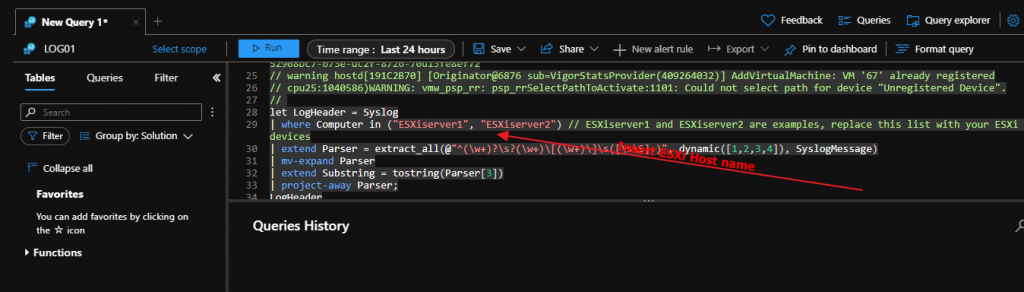
// 2. In the query window, on the second line of the query, enter the hostname(s) of your VMWare ESXi device(s) and any other unique identifiers for the logstream. 
//    For example: | where Computer in ("server1", "server2")
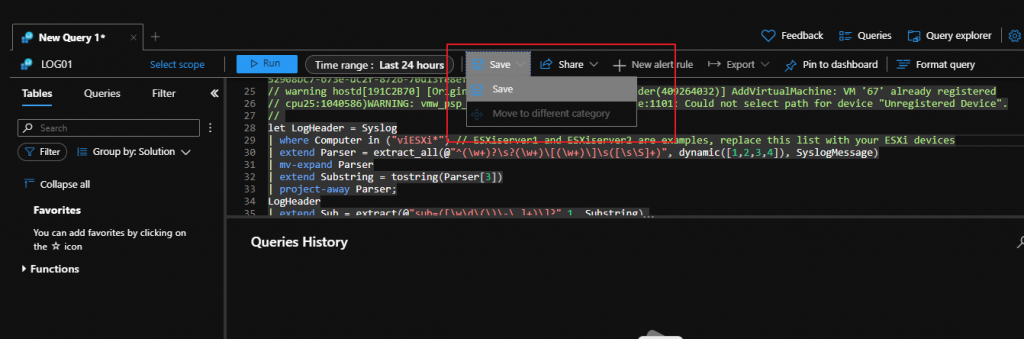
// 3. Click the Save button above the query. A pane will appear on the right, select "as Function" from the drop down. Enter a Function Name.
//    It is recommended to name the Function Alias, as VMwareESXi
// 4. Kusto Functions can typically take up to 15 minutes to activate. You can then use Function Alias for other queries.
//
// REFERENCES: 
// Using functions in Azure monitor log queries: https://docs.microsoft.com/azure/azure-monitor/log-query/functions
// 
// LOG SAMPLES:
// This parser assumes the raw log are formatted as follows:
//
// info vpxa[D089B70] [Originator@6876 sub=vpxLro opID=HB-host-89929@3678594-5d55f348-40] [VpxLRO] -- BEGIN session[52908bc7-673e-dc2f-8726-70d13fe8ef72]521881cd-707e-cf9b-01c4-f0fd16d7444d -- vpxa -- vpxapi.VpxaService.retrieveChanges -- 52908bc7-673e-dc2f-8726-70d13fe8ef72
// warning hostd[191C2B70] [Originator@6876 sub=VigorStatsProvider(409264032)] AddVirtualMachine: VM '67' already registered
// cpu25:1040586)WARNING: vmw_psp_rr: psp_rrSelectPathToActivate:1101: Could not select path for device "Unregistered Device".
// 
let LogHeader = Syslog
| where Computer in ("ESXiserver1", "ESXiserver2") // ESXiserver1 and ESXiserver2 are examples, replace this list with your ESXi devices
| extend Parser = extract_all(@"^(\w+)?\s?(\w+)\[(\w+)\]\s([\s\S]+)", dynamic([1,2,3,4]), SyslogMessage)
| mv-expand Parser
| extend Substring = tostring(Parser[3])
| project-away Parser;
LogHeader
| extend Sub = extract(@"sub=([\w\d\(\)\-\.]+)\]?",1, Substring),
	 OpId = extract(@"opID=([\w\d\(\)\-@]+)\s?\]?",1, Substring),
         UserName = extract(@"\suser=([\w\d\(\)\-]+)\]",1, Substring)
| extend Message = extract(@"\[([\S\s]+)\]\s([\S\s]+)",2, Substring)
| extend Message = iif(isempty(Message),SyslogMessage,Message)
| extend Message = trim(@"^-- ", Message)
| project-away Substring

Install Log Analytics Agent

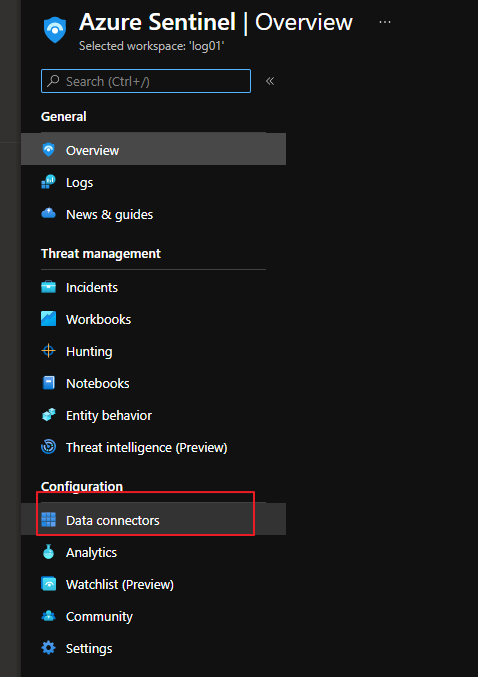
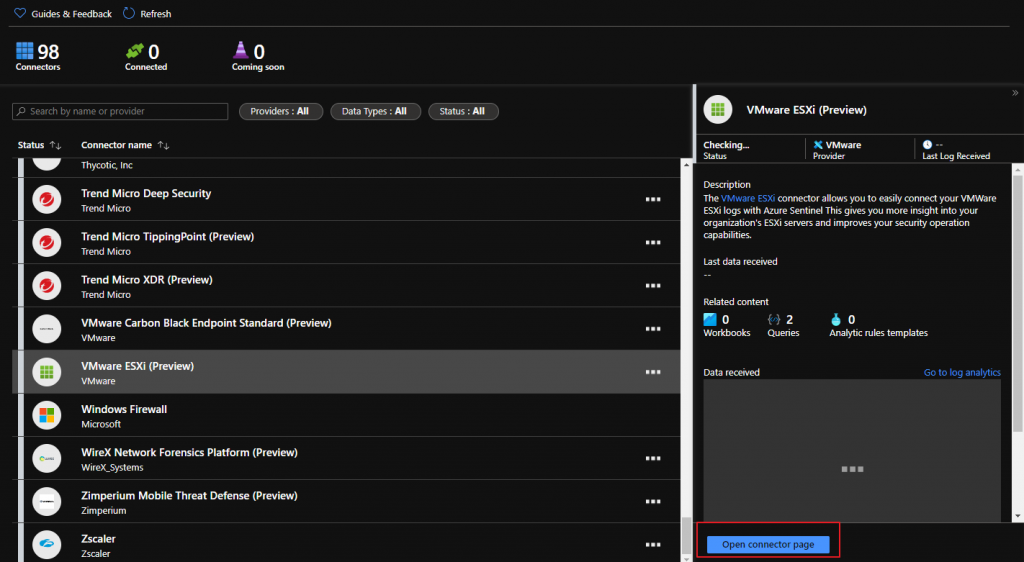
Go to Vmware ESXi Connector on Azure Sentinel

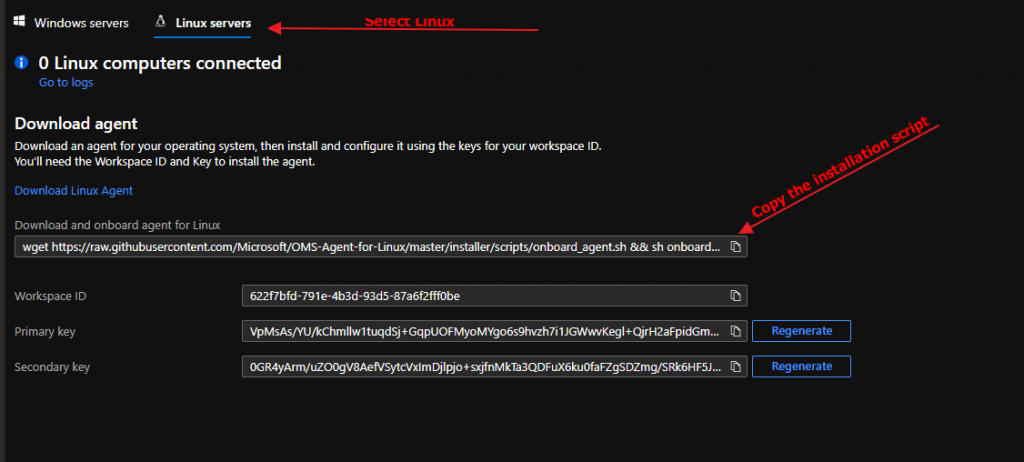
Go to linux syslog server and paste it the code for onboard agent to sentinel

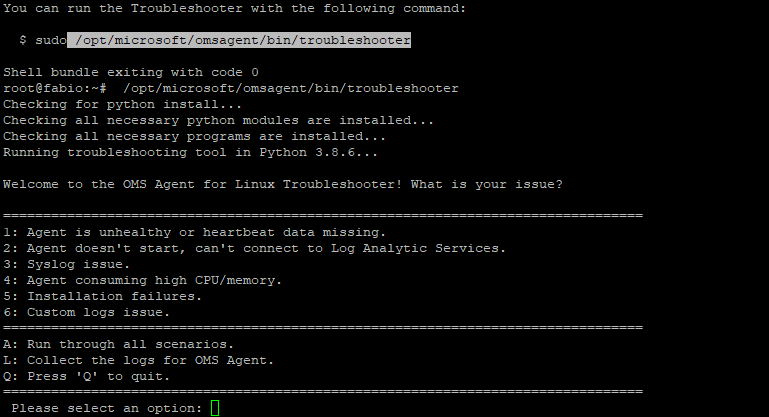
For troubleshooting

/opt/microsoft/omsagent/bin/troubleshooter

In my installation was missing :

And i have installed it

apt-get install gdb

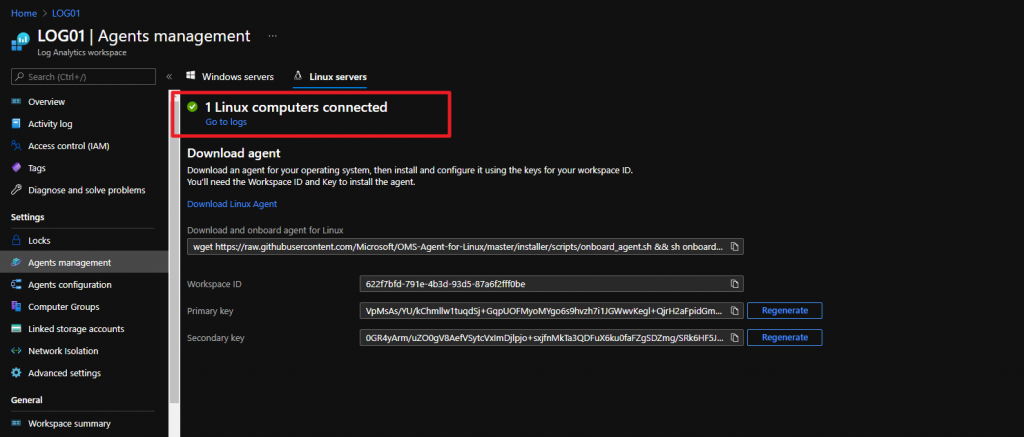
If the installation is ok

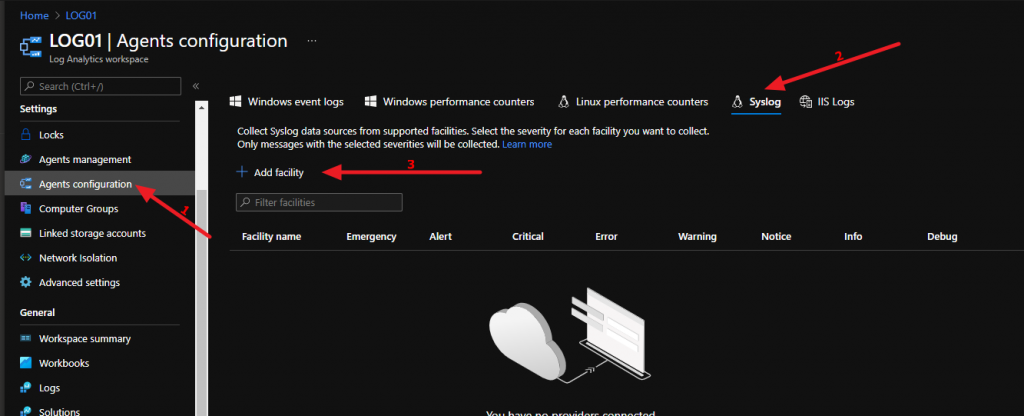
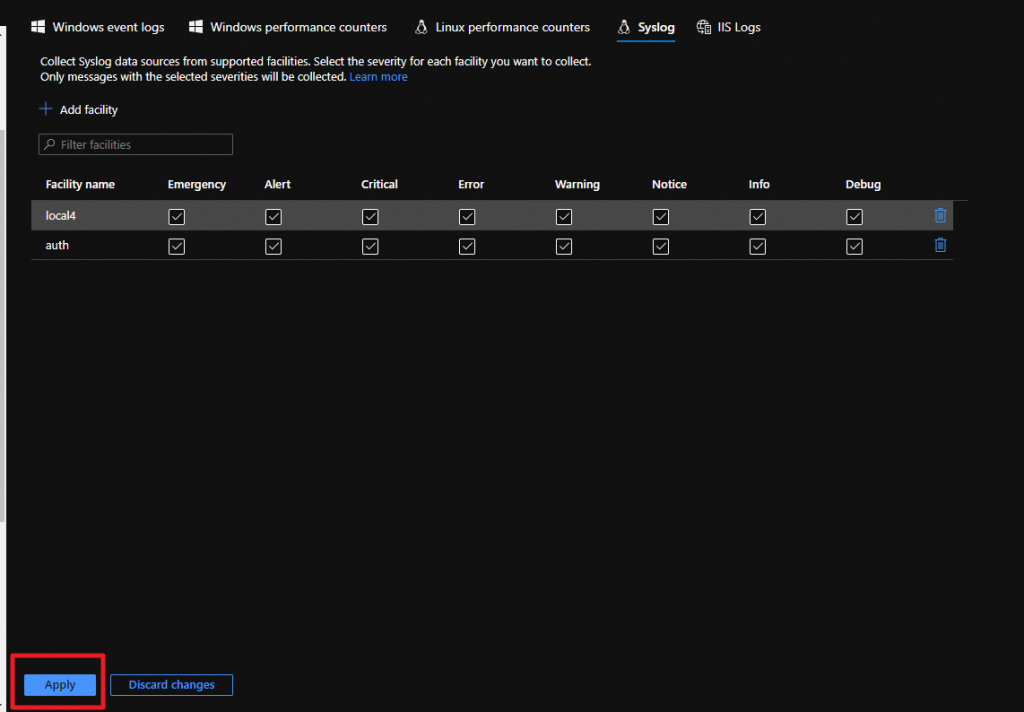
now we set which logs the linux agent must send to our workspace

And add local4 e auth

automatically this information will be sent to our agent

Configure ESXi to send data to Linux Syslog Gateway (Where is installed the Log Analytics Agent)

We configure our esxi hosts to send logs to our linux syslog with this powercli script:

Connect-ViServer 
$vmHosts = Get-VMHost
$remoteSyslog = 'tcp://<linuxlogserver>'
$syslogport = '514'
# Show current config
$vmHosts | ForEach-Object {
    Write-Host $_.Name
    Get-VMHostSysLogServer -VMHost $_
}
# Set syslog config in hypervisors
$vmHosts | ForEach-Object {
    Write-Host $_.Name
    Set-VMHostSysLogServer -SysLogServer $remoteSyslog":"$syslogPort -VMHost $_
}
# Restart syslog and set the allow rules in the ESXi
$vmHosts | ForEach-Object {
    Write-Host $_.Name
    (Get-Esxcli -v2 -VMHost $_).system.syslog.reload.Invoke()
    (Get-Esxcli -v2 -VMHost $_).network.firewall.ruleset.set.Invoke(@{rulesetid='syslog'; enabled=$true})
    (Get-Esxcli -v2 -VMHost $_).network.firewall.refresh.Invoke()
}
# Show current config
$vmHosts | ForEach-Object {
    Write-Host $_.Name
    Get-VMHostSysLogServer -VMHost $_
}

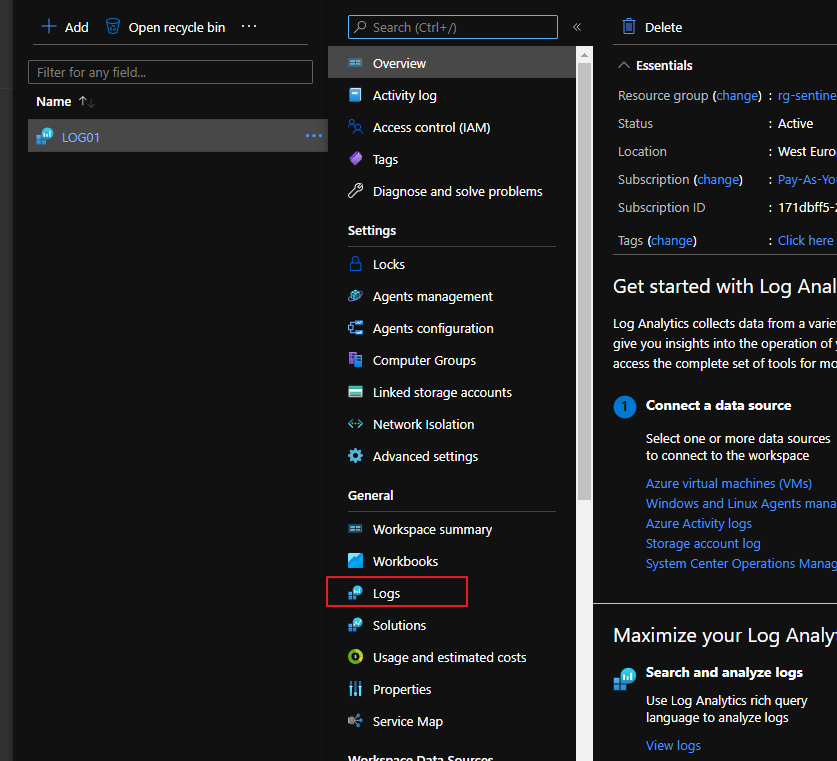
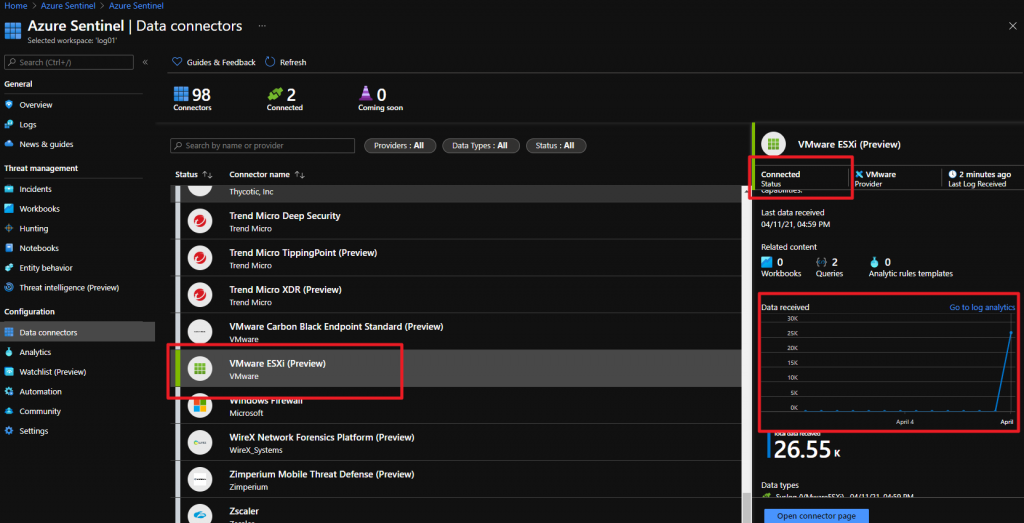
Check if ESXi Sentinel Connector is UP

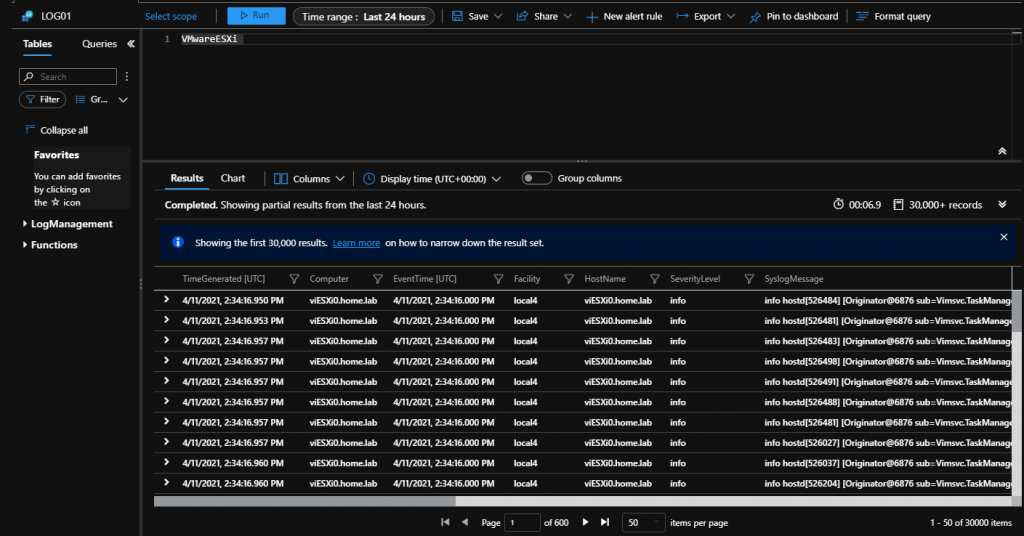
Query to view log

Ingest your VMware ESXi logs into Azure Sentinel

Integrazione VMware Unified Access Gateway con autenticazione Azure MFA

 Per procedere all’integrazione  con Azure MFA è necessario eseguire delle configurazioni su Azure Active Directory  (non entrerò nel dettaglio di queste configurazioni) ma per procedere nell’abilitazione dell’autenticazione a più fattori sull’UAG è necessario accedere all’Enterprise Application creata e scarica il file XML con i metadata. Inoltre verificare che nella Basic SAML Configuration ci siano i riferimenti alla mia infrastruttura UAG pubblica.


Scarico il file XML con i metadata da utilizzare per configurare l’UAG

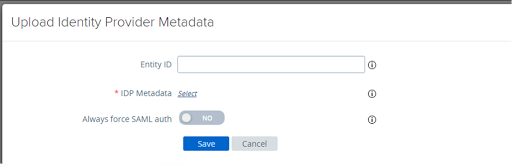
Importo il file XML nella infrastruttura UAG nelle configurazioni manuali in Identity Bridging Settings


Importo il file XML contenente i metadata selezionado Select


Una volta caricato sull’UAG il file XML con i metadata vado negli edge service settings ed entro nei nelle configurazioni

E configuro l’Auth Methods e l’identity Provider (che mi compare in automatico dopo aver caricato il file XML)


A questo punto posso procedere ad accedere e testare l’accesso con MFA.

Integrazione VMware Unified Access Gateway con autenticazione Azure MFA

Azure Load Balancer Change SKU (Basic to Standard)

For increise SLA  I need to change Azure LoadBalancer SKU,

Azure LB Basic don’t have SLA, different is for Standard SKU. 

Don’t is possibile to change the sku with a upgrade, the only solution is create a new LoadBalancer (Standard)  e  configure it with the configuration of old LoadBalancer (Basic).

Luckily Microsoft have release a procedure for made it. 

https://docs.microsoft.com/en-us/azure/load-balancer/upgrade-basic-standard

We need check if our LoadBalancer is Public or Internal (No Outbound or With Outbound)

For any choose we have a script to use. Very easy. 

What are the steps of the script?

1- Save and change (with new free IPs) the frontend IPs of Basic LoadBalancer (the script support only 5 Frontend IPs, for more IPs you manually pass the IPs)

2- Create a new Standard LoadBalancer with the configuration of basic loadbalancer  (Frontend IP, Probe ecc..)

3- Migrate the backend pool 

In my upgrade we have been  a ten minutes of downtime.

Azure Load Balancer Change SKU (Basic to Standard)

AKS – Aggiornamento in arrivo a inzio Luglio

Come ogni 3 Mesi sono in arrivo degli aggiornamenti per il servio AKS (Azure Kubernetes Services):

  • Nuova versione la 1.17  disponibile dal 1 Luglio (Sempre da quella data non saranno più in supporto le versioni 1.14)
  • L’annuncio che a breve verranno rilasciati i nodi AKS con ubuntu 18.04 (Una volta rilasciata la nuova versione dei nodi tutti i successivi aggiornamenti di AKS si porteranno dietro anche l’aggiornamento di versione di Ubuntu)
Tutti i dettagli in questo link
AKS – Aggiornamento in arrivo a inzio Luglio

Horizon Cloud on Azure 1 di 5

Attualmente è disponibile la possibilità di utilizzare una  trial della soluziona Horizon Cloud di VMware su cloud AZURE. 

La trial è disponibile per 90 giorni (prima del covid-19 erano meno estesa). 
Per procedere nell’utilizzo della trial è necessario eseguire una serie di semplici step:
  1. Acquire Horizon Cloud Service on Microsoft Azure
  2. Prepare Microsoft Networking and AD
  3. Azure Deploy Horizon Cloud Service On Microsoft Azure 
  4. Deploy Microsoft Azure-Based RDS Host and VDI Desktop 
  5. Install Applications and Assign Users 
Procediamo con ordine e partiamo da Acquire Horizon Cloud Service on Microsft Azure  dove:
– Attiviamo le licenze Trial e gli step che consiglio sono:
  • Crearsi un account GMAIL 
  • Registrarsi al sito  MyVMware con il nuovo account GMAIL 
  • Compilare l’apposito FORM (Request Form-Horizon Universal License Free Trial*)

       Le credenziali create per accedere MyVMware saranno anche quelle che ci permetteranno l’accesso al portale https://cloud.horizon.vmware.com

Nell’apposito FORM verrà richiesto:
– Tipologia di trial (Azure, On-Premises, AWS, Azure VMware Solutions, Google Cloud VMware Engine)
– Numero e tipologia (Concurrent o user) delle licenze Horizon Universal 
– Location della VMware Horizon Panel (America, Europa ecc..)
– Azure Region del deploy dell’ambiente 
– Utilizziamo una Microsoft Azure Subscription 

 Dal portale azure attiviamo la nostra Subscription dove andremo a crare i servizi necessarei per il deploy dei componenti (Horizon, VM ecc)
*Horizon Universal License sono le nuove licenze Horizon che posso essere utilizzate sia per ambienti on-premises o su cloud
Horizon Cloud on Azure 1 di 5

AKS upgrade come verificare se dobbiamo aggiornare

Cluster Kubernetes, ormai sappiamo tutti di che cosa stiamo parlando.

Questa tipologia di cluster possiamo trovarla in tanti ambienti.. Cloud o on-prem, su VMware ecc.

Come tutte le infrastrutture si devono però mantenere ed è molto importante tenerle aggiornate …anche sotto questo aspetto l’idea del “funziona e quindi perchè aggiornarla” è ormai obsoleta.


Mi è capitato ultimamente di confrontarmi con la soluzione AKS (Azure Kubernetes Services) ed essendo un servizio PaaS  è necessario rimanere al passo delle versioni che Microsoft rilascia per il suo cloud.


Quindi entriamo nel dettaglio:


Ogni 3 mesi vengono rilasciate delle versioni minori (La struttura  d[major].[minor].[patch])  e l’attuale 1.16.x è stata rilasciata a Marzo  2020 per cui:

·         La 1.17 mi aspetto che venga rilasciata a Giugno 2020

·         La 1.18 mi aspetto che venga rilasciata a Settembre 2020

Per verificare che versioni sono disponibili nella region su cui abbiamo il nostro cluster  il comando è il seguente:


   az aks get -versions –location <Region>  –output table


Se ad esempio la nostra infrastruttura è alla versione 1.15.7 e posso verificarlo con il seguente comando:


   az aks get-upgrades –resource-group  <Resource Group>  –name <nome del cluster AKS> –output table


Per la regola del N-2 la nostra versione va fuori supporto a Settembre 2020


A settembre come detto esce la 1.18, la regola del N-2 si applicata alla minor e quinti 18-2 = 16  quindi fino alla 1.16  siamo in supporto per quelle precedenti ( per cui la 1.15) siamo fuori supporto.


Per aggiornare una infrastruttura AKS  da  una versione fuori supporto a una in supporto…..  bisogna reinstallare il nostro cluster !


AKS upgrade come verificare se dobbiamo aggiornare