
Horizon Cloud Service Next Gen Apis – Chapter 2

Immagine che contiene testo, Neon, Segnali luminosi, Insegna al neon Il contenuto generato dall'IA potrebbe non essere corretto.

Set Syslog settings across UAG deployments

In this second article on working with APIs in Horizon Cloud Services, we will focus on a practical, security-relevant use case: configuring Syslog on Unified Access Gateways (UAGs) deployed through Horizon Cloud.

Whether you are running Horizon Cloud Service on Microsoft Azure or Horizon Cloud Service on vSphere, centralized logging is a fundamental component of any secure and well-governed environment. Proper Syslog configuration ensures that security events, authentication logs, and operational data generated by UAG appliances are forwarded to your SIEM or log management platform for monitoring, auditing, and incident response.

Instead of performing manual configuration tasks, we will explore how to leverage Horizon Cloud APIs to automate and standardise Syslog settings across UAG deployments, improving consistency, scalability, and operational efficiency.

Now when can explain the API we need to use and how to apply the syslog configuration on UAG (In this case, I used an HCS on vSphere, the new solution where we don’t deploy the Connection Server, but we use the HCS control panel to configure Pools, Entitlements and other…)

The first step is always the authentication process; I explained how to create the API token in my previous post (Horizon Cloud Service Next Gen Apis – Chapter 1), and now I won’t explain it again.

Let’s go…..

How to show UAG information

This command displays the UAG’s information

Invoke-RestMethod -Uri https://cloud-sg.horizon.omnissa.com/admin/v2/uag-deployments Method Get -Headers $Header

 We have two UAG deployments connected to HCS, and the output displays two deployment ids:
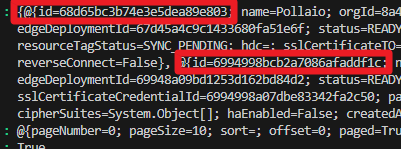
Immagine che contiene testo, schermata, Carattere Il contenuto generato dall'IA potrebbe non essere corretto.

The UAG id for HCS on vSphere is the second id.

Immagine che contiene testo, schermata, Carattere Il contenuto generato dall'IA potrebbe non essere corretto.

Now I need to recover only the UAG IDs and OrgIDs

Invoke-RestMethod -Uri https://cloud-sg.horizon.omnissa.com/admin/v2/uag-deployments -Method Get -Headers $Header | Select-Object -ExpandProperty content | Select-Object id,OrgId

Immagine che contiene testo, schermata, Carattere Il contenuto generato dall'IA potrebbe non essere corretto.

The UAG id that I need to use for identifying the deployment for HCS on vSphere is:

6994998bcb2a7086afaddf1c 

I will use this ID to associate the syslog configuration with the UAG server.


How to set the correct parameters for Syslog configuration

We need to create a Body value like this:

$Body = @{
  orgId  = "8a4931b3-e6ac-44bf-9d25-723f4119e46f"
  projectId = "Pollaio-Project"
  name = "Pollaio-Configuration2"
  syslogEventCategory = "ALL_EVENTS"
  syslogServerProtocolSettingsCreateTO = @{
    sourceToSyslogServerProtocol = "TCP"
  }
  syslogFormat = "TEXT"
  syslogURI = "192.168.111.223:514"
  includeSystemMessages = $true
  sources = @(
    @{
      type = "UAG"
      id   = "6994998bcb2a7086afaddf1c"
    }
  )
}

.

Where:

Value Description Accept value
OrgID It is the OrgId that we recovered with the previous command String
ProjectId ID of theCSP project that owns this data String
Name User defined name of the syslog server configuration String
SyslogEventCategory Events sent from the UAG appliance to the syslog server [ ALL_EVENTS, AUDIT_EVENTS ]
sourceToSyslogServerProtocol The protocol used to send data from the UAG appliance to the syslog server [ UDP, TCP, TLS, MQTT ]
syslogFormat [ JSON_TITAN, TEXT ]
syslogURI Syslog server URI String
includeSystemMessages If true, system messages are sent to the syslog server [ $True]
sources

List of sources associated with the syslog server:

Type = Source for the syslog server. For es: UAG

Id = Id of the source associated with the syslog server (The Id value that we recovered with the previous command


.

.

How to set the configuration for UAG
$Body = @{
  orgId  = "8a4931b3-e6ac-44bf-9d25-723f4119e46f"
  projectId = "Pollaio-Project"
  name = "Pollaio-Configuration2"
  syslogEventCategory = "ALL_EVENTS"
  syslogServerProtocolSettingsCreateTO = @{
    sourceToSyslogServerProtocol = "TCP"
  }
  syslogFormat = "TEXT"
  syslogURI = "192.168.111.223:514"
  includeSystemMessages = $true
  sources = @(
    @{
      type = "UAG"
      id   = "6994998bcb2a7086afaddf1c"
    }
  )
}

#Convert Body to JSON
$JsonBody = $Body | ConvertTo-Json -Depth 5
#Send POST request to create Syslog Server UAG configuration
Invoke-RestMethod -Uri https://cloud-sg.horizon.omnissa.com/admin/v1/syslog-server -Method Post -Headers $Header -Body $JsonBody
HOW to check SYSLOG Configuration on UAG deployment


Invoke-RestMethod -Uri https://cloud-sg.horizon.omnissa.com/admin/v1/syslog-server -Method Get -Headers $Header

The command output is like this:

.

 Now I can see in my SYSLOG server the UAG Log
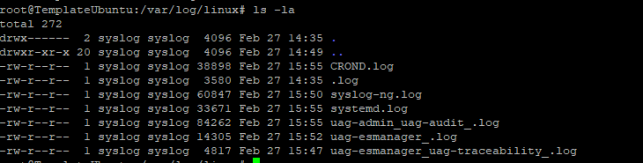
Immagine che contiene testo, schermata, Carattere Il contenuto generato dall'IA potrebbe non essere corretto.

.

.

.

Horizon Cloud Service Next Gen Apis – Chapter 2

Migrate VMware Horizon Client settings to Omnissa Horizon Client with DEM

With the rebranding of VMware Horizon Client to Omnissa Horizon Client, one of the often overlooked aspects is the migration of user settings.

In the context in which I had to operate, the main need was to replicate the Horizon Client settings (from VMware to Omnissa version) in a VDI context. The basic settings to be copied were those of “Drive & Folder Sharing”

In enterprise environments – especially non-persistent VDI managed with Omnissa Dynamic Environment Manager (DEM) – it is critical to ensure that:

• The user’s settings are retained

• The migration takes place only once

• There is no impact on subsequent logons

In this article, we look at how to automatically migrate Horizon client settings:

• by:

%AppData%\VMware\VMware Horizon View Client

•at:

%AppData%\Omnissa\Omnissa Horizon Client

using a PowerShell script that is properly integrated into Omnissa DEM.

Prerequisites

Configuring DEM to export customizations of:

• VMware Horizon Client
• Omnissa Horizon Client
• Audit registry key

Precisely:

.

.

Approach

The solution is based on three key concepts:

1.PowerShell script in user context

2.Logon Task in Flex Configuration (DEM)

3.Condition based on HKCU registry key to ensure one-time execution

The registry key is saved in the user profile and managed by DEM, making the solution compatible with:

• Floating VDI

• Non-persistent desktops

• DEM profiles

.

PowerShell Scripts

The following script:

• Check if the migration has already taken place

• Copy settings, if any

•writes a registry key to block subsequent executions

# ==============================
# Omnissa Horizon Client Migration
# ==============================

$SourcePath = Join-Path $env:APPDATA "VMware\VMware Horizon View Client"
$DestinationPath = Join-Path $env:APPDATA "Omnissa\Omnissa Horizon Client"

# Registry key (per-utente)
$RegPath = "HKCU:\Software\Omnissa\Migrations"
$RegName = "HorizonClientSettingsMigrated"

# ---- Controllo se già eseguito ----
if (Test-Path $RegPath) {
    $Migrated = Get-ItemProperty -Path $RegPath -Name $RegName -ErrorAction SilentlyContinue
    if ($Migrated.$RegName -eq 1) {
        exit 0
    }
}

# ---- Verifica sorgente ----
if (-not (Test-Path $SourcePath)) {
    # Scriviamo comunque la chiave per evitare retry inutili
    New-Item -Path $RegPath -Force | Out-Null
    New-ItemProperty -Path $RegPath -Name $RegName -Value 1 -PropertyType DWORD -Force | Out-Null
    exit 0
}

# ---- Creazione destinazione ----
New-Item -Path $DestinationPath -ItemType Directory -Force | Out-Null

# ---- Copia contenuto ----
Copy-Item -Path "$SourcePath\*" `
          -Destination $DestinationPath `
          -Recurse `
          -Force `
          -ErrorAction SilentlyContinue

# ---- Scrittura chiave di completamento ----
New-Item -Path $RegPath -Force | Out-Null
New-ItemProperty -Path $RegPath -Name $RegName -Value 1 -PropertyType DWORD -Force | Out-Null

exit 0

We place the script in the DEM Config share by creating a folder calling it script. In my case

C:\DEMConfig\Script

.

Configuration in Omnissa DEM

The script must be configured as a Logon Task so from the DEM console:

• User Environment→ Logon Tasks

• Name:

Migrate Horizon Client Settings (VMware → Omnissa)

• Command:

powershell.exe -ExecutionPolicy Bypass -NoProfile -File \\fs02.poultry.lan\DEMConfig\Scripts\Migrate-HorizonClientSettings.ps1

Condition (fundamental)

• Hive: HKEY_CURRENT_USER

• Key: Software\Omnissa\Migrations

• Value: HorizonClientSettingsMigrated

is not equal to 1

This is the video where I try all the steps

.

Migrate VMware Horizon Client settings to Omnissa Horizon Client with DEM

Check TCP port 443

During the maintenance and updating of the Horizon Connection server components, one aspect is the necessary wait for the connection servers to correctly resume responding on TCP port 443.
During one of the many activities on Horizon my customer created a simple and effective door test script.
Even though it is very simple and intuitive, I want to share the code with you:

do {
    $check = netstat -ano | findstr 0.0.0.0:443
    "Waiting 5 seconds and retry" 
    sleep 5
} while (!$check)
$check

Check TCP port 443

Copy file to VMware Datastore using Powercli

https://kb.vmware.com/s/article/2001041

#Mi collego all’Host ESXi dove devo copiare la ISO
Connect-ViServer <hostname>
#Visualizzo l’elenco dei datastore
Get-Datastore
#Seleziono il datastore che mi interessa
$datastore = Get-Datastore “<nome del datastore>”
#Eseguo il mount del PSDrive sotto ds:
New-PSDrive -Location $datastore -Name ds -PSProvider VimDatastore -Root “”
#Lancio la copia
Copy-DatastoreItem -Item c:……Windows2016.iso -Destinatiom ds:ISO

Copy file to VMware Datastore using Powercli

Modifica delle Firewall Rule su Azure SQL Server

ATTENZIONE:
“The PowerShell Azure Resource Manager module is still supported by Azure SQL Database, but all development is now for the Az.Sql module”

Per cui la prima cosa da fare è iniziare ad abbandonare Powershell Azure Resource Manager…. poi:

– Login al tenant dove sono allocati gli Azure SQL Server 

Login-AzAccount -Tenant <ID>

– Esportare le regole in CSV per poi creare i comandi in maniera rapida editando il file XLS 

Get-AzSqlServer | Get-AzSqlServerFirewallRule | Select-Object -Property ResourceGroupName,ServerName,StartIpAddress,EndIpAddress,FirewallRuleName | Export-Csv -Path C:tempAzureSQLServerFirewall.csv -NoTypeInformation

– Modificare le regole 

Rimuovere una regola 

Remove-AzSqlServerFirewallRule -ResourceGroupName <Name> -ServerName <Azure SQL Server> -FirewallRuleName <RuleName>

Aggiungere una regola 


New-AzSqlServerFirewallRule -ResourceGroupName <Name> -ServerName <Azure SQL Server> -FirewallRuleName <Rule Name> -StartIpAddress <IP> -EndIpAddress <IP>

Modifica delle Firewall Rule su Azure SQL Server