NSX Advanced Load Balancer renew/replace SSL certificate


In the production and home lab environments, the SSL Certificate is a point of attention that is especially important when the certificate is nearing its expiration date.

Normally, the expiration date is important to note in an Outlook calendar or other tool as a reminder to renew (a few days before, because if a Public CA generates the certificate, the renew requires waiting some days to have the certificate file). It is important to renew the certificate because some applications can stop running, and for the visibility of our business, it may have a bad reputation.
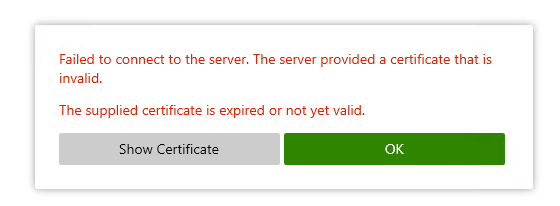
 

A screenshot of a computer error

Description automatically generated

Well in my home lab, where I use the NSX Advanced Load Balancer for Omnissa Horizon, at this time (Christmas Day) my wildcard SSL expired.

Well, I use a Let’s Encrypted certificate (free certificate) and I use Cerbot tool for the renewal.

On my PC where I installed the Cerbot tool I use this command to renew and create the certificate file:

certbot certonly –manual -d *.pollaio.site -d pollaio.site –agree-tos –preferred-challenges dns –server https://acme-v02.api.letsencrypt.org/directory –key-type rsa
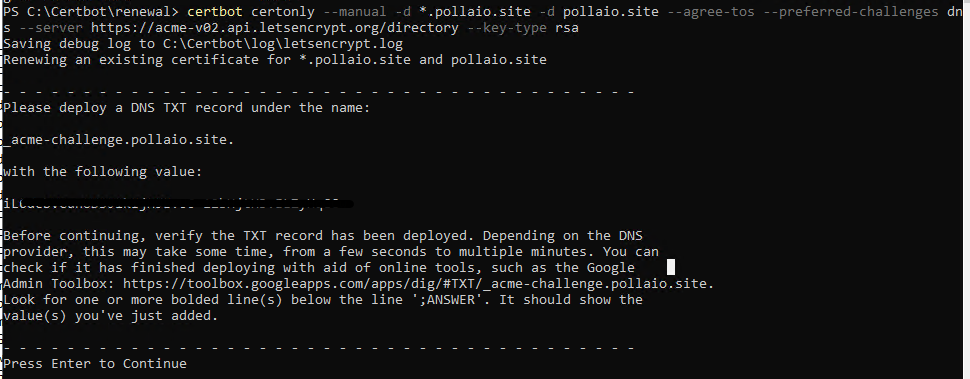
A screenshot of a computer program

Description automatically generated

and I need to add a new TXT record on my DNS provider.

After adding the TXT record I can continue

A computer screen with white text

Description automatically generated

Now I have in my Cerbot directory this new file:
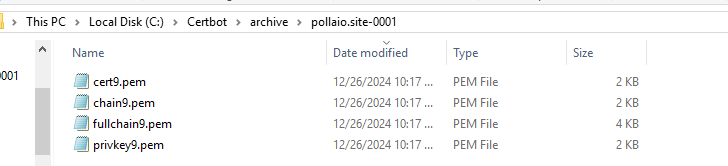
A screenshot of a computer

Description automatically generated

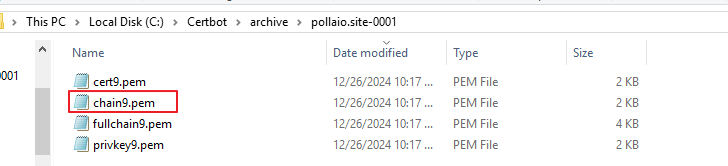
Well, I will use the cer9.pem, chain9.pem and privkey9.pem for the certificate renewal on NSX ALB.

Access NSX ALB console, go to templates zone and under Security select SSL/TLS Certificates

A screenshot of a computer

Description automatically generated

We need to add the new certificate, I suggest to create a new entry and not replace the actual certificate.

Under Create select Application Certificate
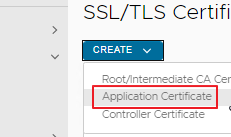
A screenshot of a computer

Description automatically generated

Add the certificate name (I normally add the name and the expiration date or the creation date) and how certificate type select Import
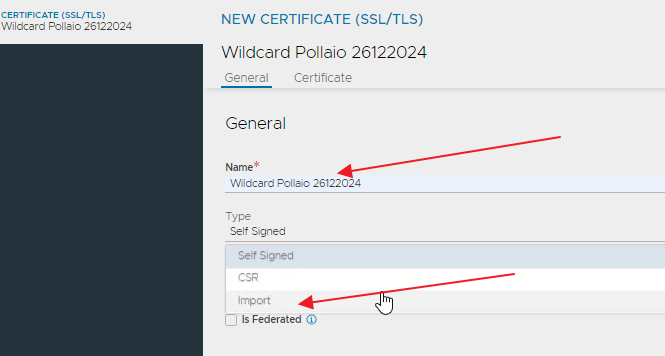
A screenshot of a certificate

Description automatically generated

In the first import select the certificate file, in the second import the private key.
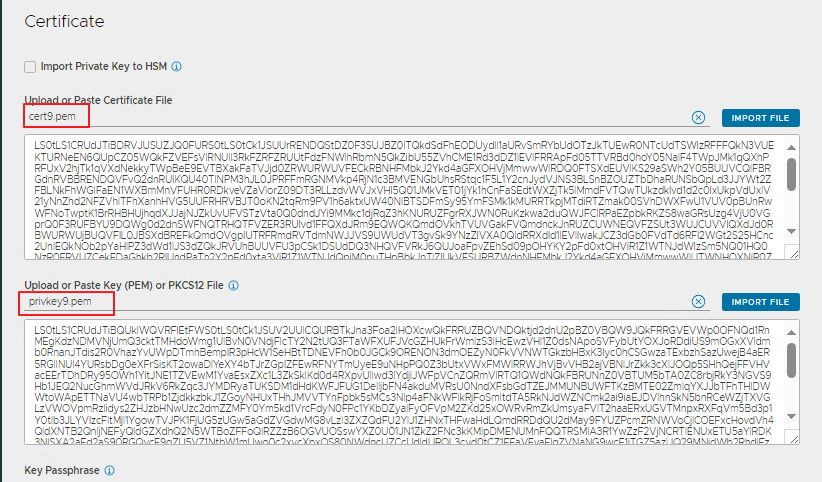
Validate and Save the change.

Now in to the certificate list we have the new SSL certificate

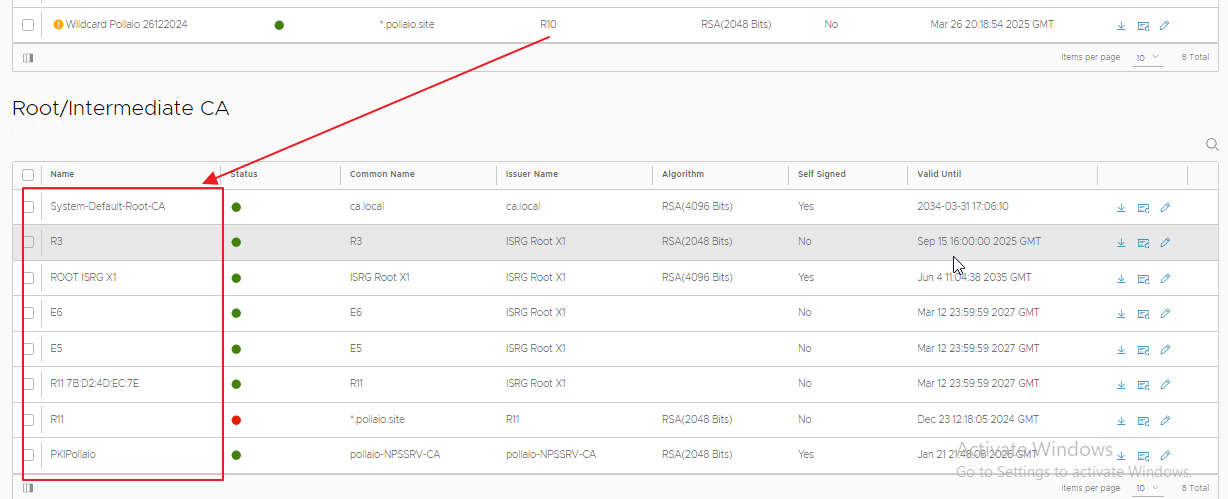
If the certificate has an orange warning it is probably because we don’t have the full certificate chain and we need to load the root and sub ca on NSX ALB.

In the same console page where we show the uploaded SSL certificate we have at the bottom a section where we see the Root and Sub CA and we don’t watch the R10
A screenshot of a computer

Description automatically generated

Ok, no problem we have the chain9.pem file …
A screenshot of a computer

Description automatically generated

Select Create the root/intermediate CA Certificate
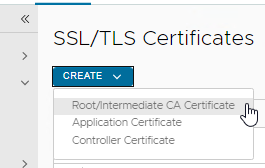
A screenshot of a computer

Description automatically generated

and import the pem chain file, Validate and Save

A screenshot of a computer

Description automatically generated

Now the row with the new certificate doesn’t show any warning or error

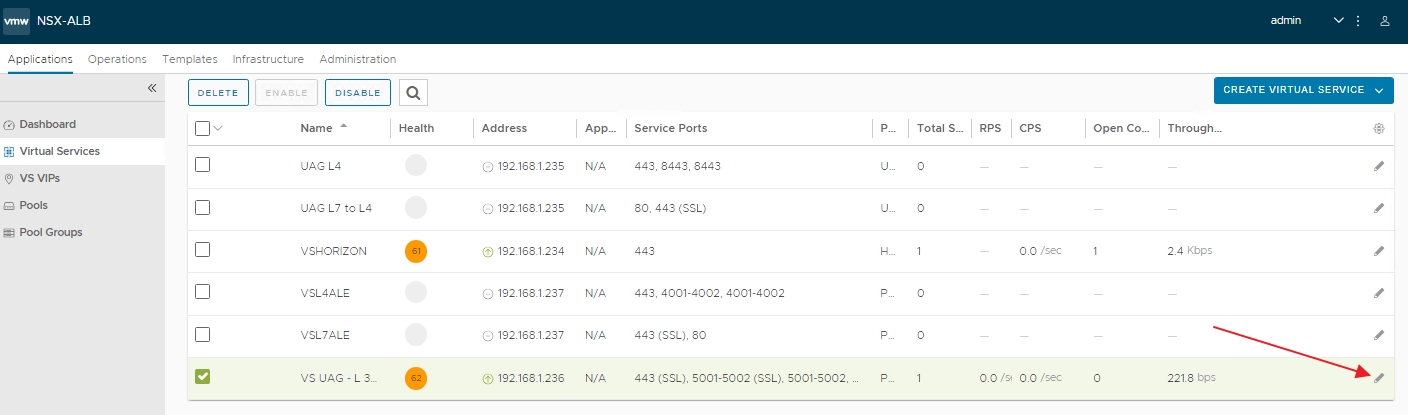
Now we are ready to replace the SSL certificate on Virtual Service.

Go to Application Menu, Virtual Service and edit the VS where we want to change the SSL certificate
A screenshot of a computer

Description automatically generated

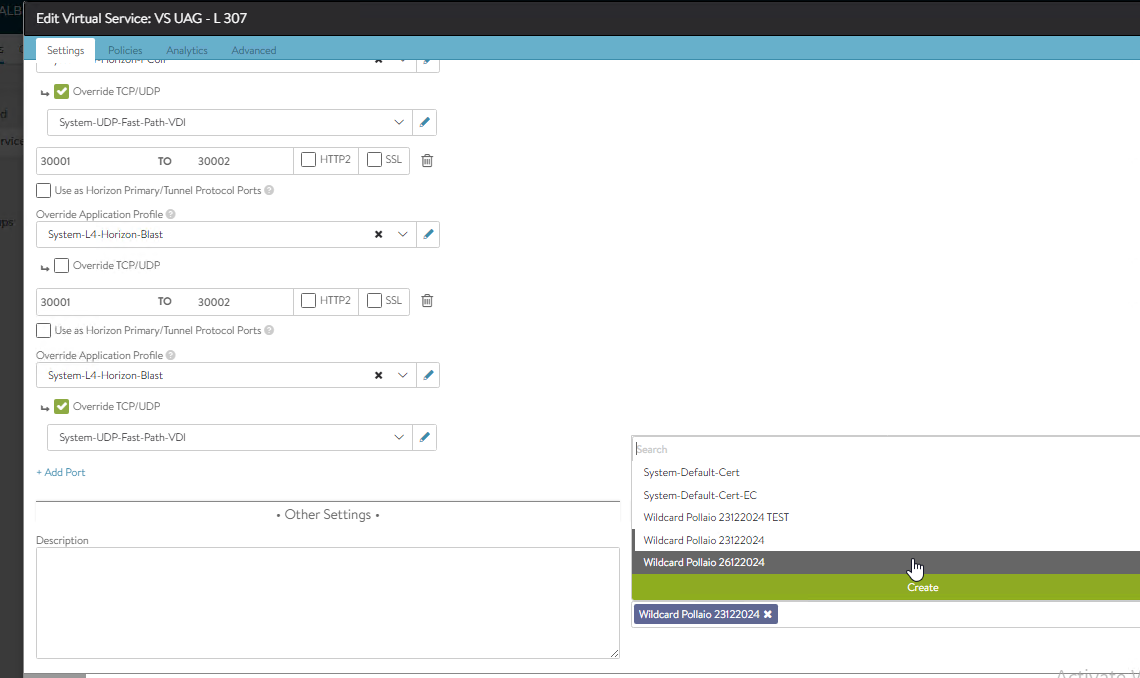
On the bottom select the correct certificate form menu and remove the old certificate, after Save the change.
A screenshot of a computer

Description automatically generated

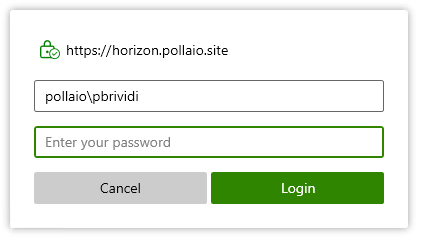
Now the SSL certificate is validated and I can connect to my VDI
A screenshot of a login screen

Description automatically generated

NSX Advanced Load Balancer renew/replace SSL certificate

Move vSAN cluster from a unavailable vCenter to new vCenter

A cartoon character with text

Description automatically generated

Our customer had a big problem with a vCenter that managed a vSAN cluster.

The unique solution was to restore the vCenter form backup……but the customer doesn’t have a backup for this virtual appliance or vCenter backup from VAMI (Argghhhhh…).

We have resolved this with a new vCenter installation and this VMware KB.

Moving a vSAN cluster from one vCenter Server to another

An attention point (step 3 of the KB) is the vDS configuration, for bypassing this attention point we have migrated the vDS (in this situation only the vSAN network for our luck) to vSphere Standard Virtual Switch (vSS).

We have used this command on each ESXi to remove the vmkernel from vDS to vSS.

(You need to change your value, vDS Name…IP address etc..)

#Check the vDS and vSS configuration and identify vmnic

esxcfg-vswitch -l

#Remove a vmnic from vDS
esxcfg-vswitch -Q vmnic5 -V 12 DS1vSAN1

#Create a new vSS
esxcli network vswitch standard add –vswitch-name=VSAN

#Assign a vmnic to vSS
esxcli network vswitch standard uplink add –uplink-name=vmnic5 –vswitch-name=VSAN

#Create a PortGroup to vSS
esxcli network vswitch standard portgroup add –portgroup-name=VMK_VSAN –vswitch-name=VSAN

#Assign a vLAN to PortGroup
esxcli network vswitch standard portgroup set -p VMK_VSAN –vlan-id xxx

This is the critical point, we need to move the vmkernel vSAN (Where there is the vSAN traffic) from vDS to vSS.

It is important to check the vSAN status before and after the vmkernel move with this command and wait for the object to rebuild.

The command is

esxcli vsan health cluster

#Remove vmkernel for the vSAN from vDS
esxcli network ip interface remove –interface-name=vmk2

#Add the vmkernel interface to vSS
esxcli network ip interface add –interface-name=vmk2 –portgroup-name=”VMK_VSAN”

#Assign the IP address to vmkernel interface
esxcli network ip interface ipv4 set –interface-name=vmk2 –ipv4=x.x.x.x –netmask=x.x.x.x –type=static

#Assign the interface for vSAN service
esxcli network ip interface tag add –interface-name=vmk2 –tagname=VSAN

#Check if there is communication to other ESXi vmkernel vSAN interfaces IP with vmkping
vmkping -I vmk2 x.x.x.x

#Verify the vSAN status

esxcli vsan health cluster

When the vSAN cluster is all healthy repeat the same operation on all other vSAN cluster ESXi node

After this, you can continue following the link

Moving a vSAN cluster from one vCenter Server to another

Move vSAN cluster from a unavailable vCenter to new vCenter

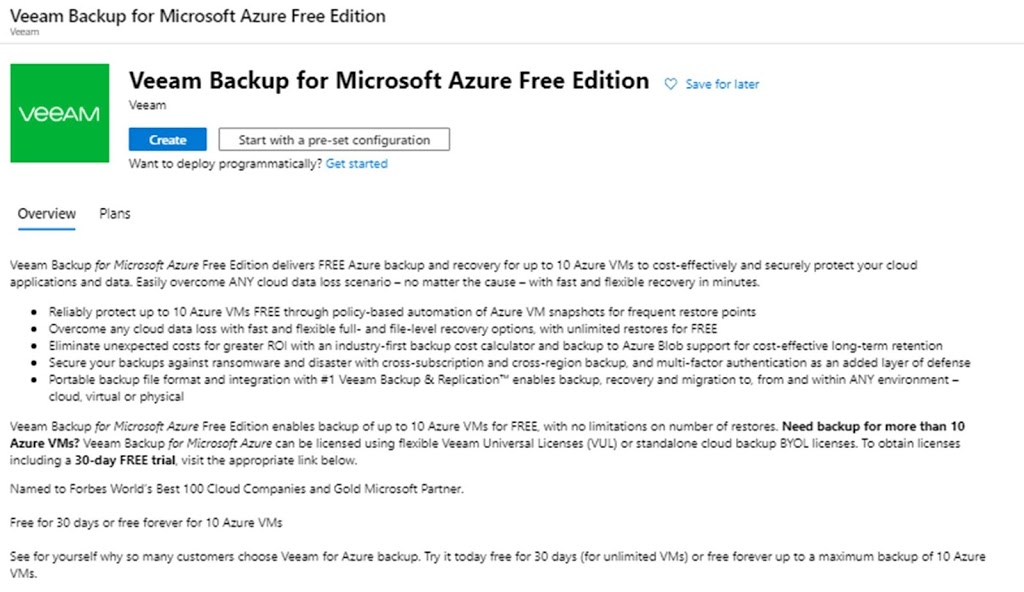
Veeam Backup for Microsoft Azure

Veeam ha rilasciato  una soluzione di backup per proteggere  le Microsoft Azure VM ,  gli aspetti interessanti della soluzione sono:

·       Gratuita fino a proteggere 10 Azure VM

·       integrazione con le snapshot di Azure

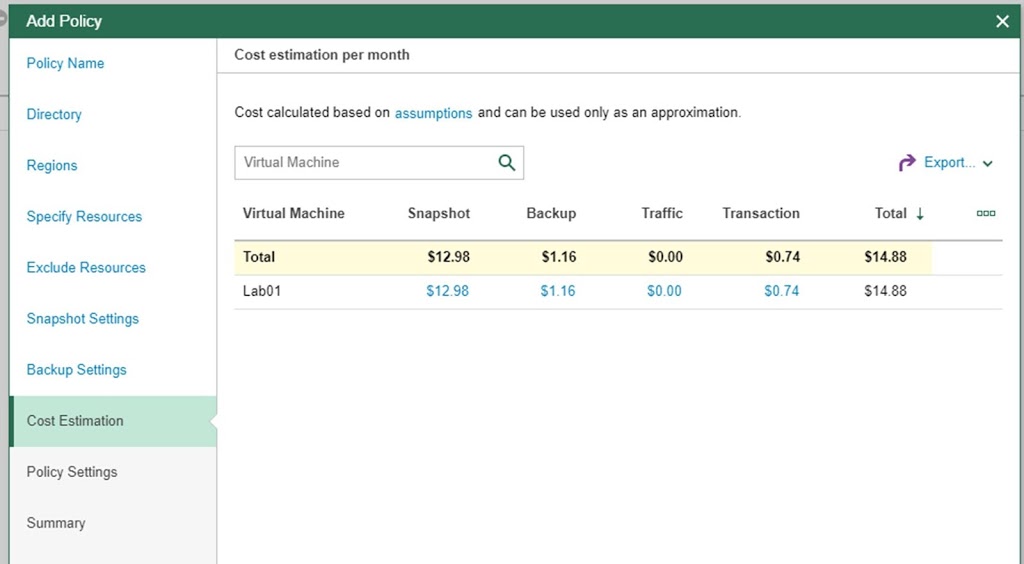
·       La possibilità di avere un stima dei costi  relativamente allo spazio dei container dell’Azure Storage Account  in base alla VM da Proteggere e alla policy implementata.


La  virtual appliance è disponbiile nel MarketPlace di Azure


L’installazione, come tutte le soluzioni Veeam e le infrastrutture Azure sono deployate e configurabili veramente in breve tempo  sopo 15 minuti (Deploy e configurazione) siamo pronti a eseguire il primo backup.


Alcune considerazione relativamente all’installazione:

·      Necessità di tutte le informazioni  che richiedere un deploy di una Azure VM (vNet, Resource Group ecc.)

·       Richieste un’ Azure Storage Account su cui andare ad salvare i dati dei backup.


Aclune considerazioni relative all’implementazione delle policy di backup

·     Differenzazione tra retention per  Snapshot e per Backup 

·     Come la versione di Veeam Backup & Replication v10  oltre al numero di versioni per i backup è presente anche la retention per numero di giorni

·      Come anticipavo precedentemente è possibile sapere in anticipo i costi di utilizzo dell’infrastruttura Azure per lo spazio relativo ai backup (Il costo della Azure VM di Veeam Backup for MIcrosoft Azure è quello del size della VM scelto durante il deploy)


Veeam Backup for Microsoft Azure

After change vcenter hostname and ip error to access TsmVMwareUI

After change vcenter hostname and ip    when  i try to access a TSM Vmware Gui Web interface:

On the machine where the “Tivoli Data Protection for VMware” package is installed, open the Windows Services applet and stop the service: 
Open the file vmcliConfiguration  with notepad  (find the file in my case  on c:IBMtsmtdpvmwarewebserverusrserversveProfiletsmVmGUI) and change the name of old vcenter with the new vcenter
<vcenter_url>https://xxxx.xxx.xx/sdk</vcenter_url>
Now restart the service  “Data Protection for Vmware web Server service” and retry to connect at web interface
After change vcenter hostname and ip error to access TsmVMwareUI

Clone vm without vcenter

For clone disk and clone vm without vcenter :

cd /vmfs/volumes/Datastore01Raid10
 /vmfs/volumes/537dfea4-903a2d25-a8c3-00237da1046c # ls
SRVAPP01      SRVDC02       win2008R2ent

/vmfs/volumes/537dfea4-903a2d25-a8c3-00237da1046c # mkdir template2008
vmfs/volumes/537dfea4-903a2d25-a8c3-00237da1046c # vmkfstools -i SRVDC02/SRVDC02.vmdk template2008/template2008.vmdk
Destination disk format: VMFS zeroedthick
Cloning disk ‘SRVDC02/SRVDC02.vmdk’…
Clone: 100% done.
/vmfs/volumes/537dfea4-903a2d25-a8c3-00237da1046c #

And select custom configuration for add existing disk 

and after select other option for the disk “Use an existing virtual disk”

and select the vmdk create .

Clone vm without vcenter

Antispam in cloud cosa aspettarsi

Negli ultimi anni si sente sempre di più parlare di cloud e di servizi in cloud. In questo post non voglio entrare nel dettaglio di cos’è  il cloud e se esistono veramente dei servizi che si posso definire in cloud, voglio solamente focalizzarmi su un di quei servizi, che con l’avvento del cloud e quindi del suo utilizzo in cloud  aumenta la sua efficacia e aumentano le sue potenzialità.
Stiamo parlando dell’antispam.
L’utilizzo  di un antispam nella nuvola ci permette di parlare non solo di blocco delle mail indesiderate ma anche di
  • Riduzione del traffico in ingresso
  • Mail continuity
  • Backup mail o archive mail
Riduzione del traffico in ingresso
Spostando il servizio di antispam dalla propria infrastruttura al cloud il traffico delle mail viene filtrato prima che raggiunga il nostro server di posta,  e quindi la banda occupata in ingresso  diminuisce annullando quasi del tutto quel traffico indesiderato generato dalla mail di spam. Quindi solo le mail puilite arrivano in ingresso al nostro server interno
Mail continuity (A volte già incluso in altri casi da pagare in aggiunta al servizio di antispam)
Quante volte ci è capitato di avere il server di posta offline (Aggiornamento, crash del sistema operativo etc.. ) e dover rispondere  al nostro amministratore delegato che la mail che sta aspettando  non  può arrivare e  non sappiamo quando arriverà. Con la mail continuity nel  caso  di offline del nostro mail server interno, la posta rimane sul nostro antispam in cloud, e quindi  può essere consultata dall’amministratore di sistema e con alcuni mail security cloud provider  ogni nostro singolo utente può accedere a una web mail e vedere la propria posta (Si può passare da un minimo di 3/4 giorni di “capacità” del servizio in cloud anche a due e piu’ settimane)
Mail Backup o Archive (Servizio che in alcuni casi può essere compreso  oppure  puo’ essere in  aggiunto coma add-on a pagamento)
Il passo di  avere in un datacenter  di altro livello, quindi in un posto “al sicuro”, un contenitore che ci controlla lo spam e ci pemrmette una sorta di HA della mail  ci porta  anche a valutare la possibilità di poter archiviare/salvare la mail  temporaneamente o all’infinito nel cloud. Altro plus, in alcune versioni, la possibilità di delegare al nostro utente finale la visione  e il recupero  delle  mail.
 
Non ho citato, ma ovviamente è da considerare come vantaggio  la diminuzione dell’attivita’ dell’amministratore IT nella gestione del servizio.
 CLOUD = no server da mantenere (che sia fisico o virtuale), no servizio antispam da mantenre (aggiornamento o upgrade di versione)
Mantenendo ovviamente le caratteristiche di base in un classico antispam:
Controllo delle mail in ingresso e in uscita
Controllo antivirus (in molti casi anche con piu’ di un motore)
Gestione personalizzate di blacklist e del livello di filtro dello spam
Gestione della quarantena a livello dell’amministratore ma anche dell’utente finale.
Quindi il cloud è sicuramente per il servizio di antispam un valore aggiunto.
Antispam in cloud cosa aspettarsi

Show session speed real time TSM

I find with google search this query :

select char(client_name,10) as “Sess”,CAST(CAST(bytes_received/1024/1024 as decimal(15,0))/CAST((current_timestamp-start_time)seconds as decimal(15,0)) as decimal(10,2)) as “Receive [MB/s]”,CAST(CAST(bytes_sent/1024/1024 as decimal(15,0))/CAST((current_timestamp-start_time)seconds as decimal(15,0)) as decimal(10,2)) as “Sent [MB/s]” from sessions where session_type=’Node’

output:

Sess             Receive [MB/s]       Sent [MB/s]
———–     —————     ————-
KELLY                   4193.64              0.00
KELLY                      0.00              0.00

Show session speed real time TSM

Error to generate BackupSet TSM 6.3.2

When i try to generate backup set of 8 node i receive this error after
create backup set of 4/5 node:                             
02/13/2013 02:13:39 ANR0157W Database operation FETCH(Many) for table  
Backupset.Temp.Objects failed with result code 1115 and tracking ID:   
0x1455f048. (SESSION: 157845, PROCESS: 1433) 
02/13/2013 02:13:39 ANR0158W Database operation FETCH(Many) for table  
Backupset.Temp.Objects failed with operation code 1115 and tracking id 
0x1455f048. The data for column 0 is: (string, len=4)0x5041554C.       
(SESSION: 157845, PROCESS: 1433)   
02/13/2013 02:13:39 ANR0105E imobjgen.c(7820): Error setting search    
bounds for table “Backupset.Temp.Objects”. (SESSION: 157845, PROCESS:  
1433)                                                                  
02/13/2013 02:13:39 ANR1779I GENERATE BACKUPSET process completed: 6   
backupset(s) were generated or defined out of 8 backupset(s) requested 
by the command’s specifications. (SESSION: 157845, PROCESS: 1433)      
02/13/2013 02:13:39 ANR0986I Process 1433 for GENERATE BACKUPSET       
running in the BACKGROUND processed 350,398 items for a total of       
1,175,298,422,143 bytes with a completion state of SUCCESS at 02:13:39 
AM. (SESSION: 157845, PROCESS: 1433)                                   
02/13/2013 02:13:39 ANR0171I dbiconn.c(1956): Error detected on 0:168, 
database in evaluation mode. (SESSION: 157845)                         
02/13/2013 02:13:39 ANR0162W Supplemental database diagnostic          
information:  -1:08003:-99999 ([IBM][CLI Driver] CLI0106E  Connection  
is closed. SQLSTATE=08003). (SESSION: 157845)                          
02/13/2013 02:13:39 ANR0171I tbtbl.c(2366): Error detected on 31:1,    
database in evaluation mode. (SESSION: 157845)                         
02/13/2013 02:13:39 ANR0104E bfdedup.c(4600): Error 4522 deleting row  
from table “BF.Bitfile.Extents”.                                       
02/13/2013 02:13:39 ANR0171I dbitxn.c(708): Error detected on 0:31,    
database in evaluation mode. (SESSION: 157845)                         
02/13/2013 02:13:39 ANR0162W Supplemental database diagnostic          
information:  -1:08003:-99999 ([IBM][CLI Driver] CLI0106E  Connection  
is closed. SQLSTATE=08003). (SESSION: 157845)                          
02/13/2013 02:13:39 ANR0130E dbitxn.c(1719): Server LOG space          
exhausted. (SESSION: 157845)        

I find this APAR                                                       
                                                                       
IC87090: GENERATE BACKUPSET CAN FAIL AFTER REACHING ACTIVE LOG         
NUM_LOG_SPAN LIMIT.                               

And i try to resolve this problem whit install :

6.3.3.100   or 6.3.4


Error to generate BackupSet TSM 6.3.2