Logs Don’t Lie: Why You Need Syslog Enabled on Omnissa Access SaaS

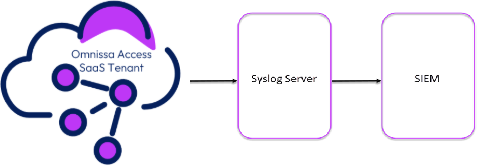
A diagram of a server AI-generated content may be incorrect.

If you’re running Omnissa Access SaaS and you haven’t enabled syslog yet, here’s your gentle-but-firm nudge: do it now. No, seriously. Your SIEM is hungry, and syslog is the buffet.

Let’s dig into why syslog matters, and how you can set it up in less time than it takes to reboot a stubborn printer.

.

Why Should I Enable Syslog?

You might think, “Access logs are already there in the console. Isn’t that enough?”
Short answer:
Nope.

Longer answer:

• Centralized Security Monitoring: Syslog lets you push logs to a SIEM (like Splunk or SYSLOG, I suppose that Omnissa increases the supported SIEM), helping you detect anomalies like brute force attacks, unusual login patterns, or rogue authentication attempts.
• Compliance & Auditing: GDPR, ISO 27001, HIPAA — they all love detailed, timestamped logs.
• Operational Insight: Know exactly who did what, where, and when — across all your users and apps.
• Forensics & Troubleshooting: Ever tried to investigate a login issue without logs? Exactly.

.

What Events Can I Capture?

Omnissa Access can emit audit events, system events, user authentication, and admin actions. Think:

• User logins (successful & failed)
• Policy evaluations
• App launches
• Admin config changes (Policies, Rule etc.)

All this, neatly packaged as syslog messages you can parse, alert on, or just hoard like a proper security engineer.

.

How to Enable Syslog in Omnissa Access SaaS

Requirement

–TLS connection
–Expose to internet our syslog or SIEM. (For now it is only possible configuration, OK this are a point of attention for the Security… but you can manage with firewall rule and other configuration to increase the security)

Setting up syslog in Omnissa Access SaaS is surprisingly painless.

1.Login to the Omnissa Access SaaS Admin Console
Navigate to the
Integrations section in the Omnissa Access SaaS Admin UI.
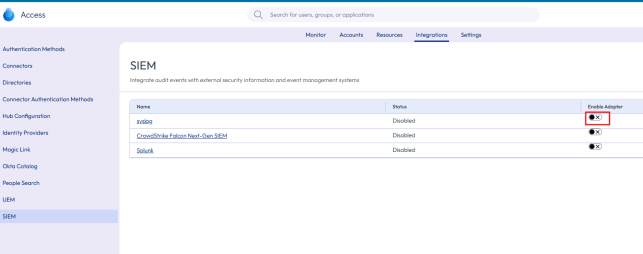
2.Go to SIEM
You’ll find the syslog settings under
SIEM

A screenshot of a computer AI-generated content may be incorrect.

3.Enable Syslog Forwarding
Toggle it
on, and enter your syslog destination (IP or FQDN), port, and protocol (TCP or UDP).

A screenshot of a computer AI-generated content may be incorrect.

Where

◦ Appname

A tag appends to the syslog raw

◦ Chose Facility
◦ Choose the Severity
Select which log levels
◦ Hostname
Currently the syslog server needs to be published on the internet (this might cause some headaches) in order for the Access SaaS solution to be able to send logs.
◦ TCP Port
◦ Client Certificate
◦ Client Private Key
◦ Syslog Certificate
4.Save & Monitor
Save your settings and check your syslog server for incoming logs. A quick
tcpdump or tail on your syslog endpoint can help confirm delivery.

.

Bonus Tip: Test It!

Try logging in as a test user, change a policy, or simulate a failed login — and watch the logs roll in. If your SIEM lights up, congrats — you’ve just levelled up your visibility game.

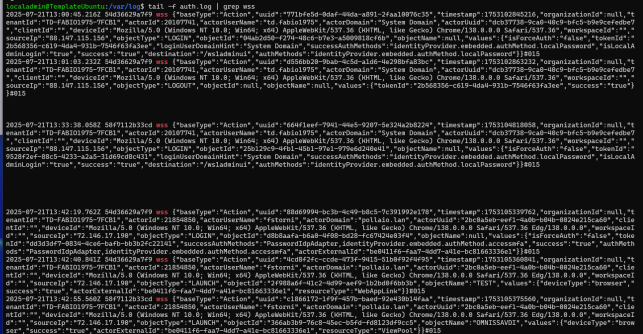
My syslog, in this case for the test, is a normal RSYSLOG installed on UBUNTU OS.

I can see a lot of information:

A screen shot of a computer screen AI-generated content may be incorrect.

Where can we see this action:

–LOGIN (Failed or Successful) -> Administrator account or user account and the type of login (MFA/Local Password …)
–LAUNCH -> Application launched and the name of the application/VDI.
–LOGOFF

And many other information like configuration changes, deleted or viewed objects (such as policies).

.

Pro Tips

• TCP with TLS over UDP for reliable, encrypted delivery. (it is a requirement)
• Use log tagging or filtering on the SIEM side to categorise Omnissa logs separately.
• Integrate with alerting tools like PagerDuty or Slack for real-time reactions.

.

🏁 Final Thoughts

Syslog isn’t just for compliance checkboxes — it’s your window into what’s happening inside Omnissa Access. Whether you’re defending against intrusions or just troubleshooting a login issue on a Friday at 5 PM, you’ll thank yourself for turning it on.

So go ahead — feed your SIEM. You know it’s hungry. 🍽️

.

Logs Don’t Lie: Why You Need Syslog Enabled on Omnissa Access SaaS

Enhancing VDI Security and User Experience with FIDO2/WebAuthn and Omnissa Horizon

In today’s hybrid work environments, Virtual Desktop Infrastructure (VDI) solutions like Omnissa Horizon are critical to ensuring secure and flexible access to corporate resources. Yet, as we continue to shift towards distributed workforces, traditional authentication methods such as passwords and OTP tokens increasingly show their limitations — in both security and user experience.

This is where FIDO2/WebAuthn comes into play. By integrating FIDO2/WebAuthn into your Horizon deployment, you can deliver passwordless, phishing-resistant authentication that simplifies end-user access while dramatically improving security posture.

What is FIDO2/WebAuthn?

FIDO2 is an open standard developed by the FIDO Alliance and W3C. WebAuthn (Web Authentication) is the core API that enables browsers and web applications to leverage strong authenticators such as security keys, biometric devices (like fingerprint readers), or built-in platform authenticators (like Windows Hello or Apple Face ID).

In simple terms: it replaces passwords with secure, device-bound credentials that can’t be phished or reused.

Why combine FIDO2/WebAuthn with VMware Horizon?

Here are the key benefits for Horizon administrators and end users:

1. Stronger Security

Traditional passwords are susceptible to phishing, credential stuffing, and breaches. FIDO2/WebAuthn credentials are cryptographically unique and never leave the user’s device. Even if attackers obtain user data, they cannot reuse it to gain access.

2. Seamless User Experience

Users authenticate with something they have (a device) and something they are (biometrics) or something they know (PIN). The process is fast, intuitive, and eliminates password fatigue. No more forgotten passwords or frequent resets.

3. Simplified Endpoint Management

In distributed VDI environments, especially with BYOD policies, managing traditional credentials across devices is a challenge. FIDO2/WebAuthn allows users to authenticate securely from any compliant device, reducing helpdesk workload and administrative complexity.

4. Phishing Resistance

Unlike OTP or SMS-based 2FA, FIDO2/WebAuthn authentication is bound to the specific origin (domain). Credentials cannot be used on malicious lookalike websites, significantly reducing phishing attack vectors.

5. Future-Proof Compliance

Many modern security frameworks and regulatory guidelines encourage or require phishing-resistant MFA. Deploying FIDO2/WebAuthn puts your organization ahead of compliance mandates.

How does it work with Horizon?

With Horizon’s support for modern authentication protocols (including SAML and integration with identity providers that support FIDO2/WebAuthn), you can deploy passwordless authentication workflows seamlessly:

  • Users access Horizon Client or Workspace ONE with their FIDO2 device (security key, biometrics, or platform authenticator).
  • The identity provider (IdP) validates the FIDO2/WebAuthn credentials.
  • Once authenticated, users are securely provisioned into their Horizon VDI sessions.

No passwords exchanged. No phishable credentials. Just fast, secure, and frictionless access.

Ready to try it?

Integrating FIDO2/WebAuthn with VMware Horizon is a clear step toward a more secure, modern, and user-friendly VDI environment. Whether you’re looking to reduce helpdesk tickets, strengthen security, or improve user experience, this technology is worth exploring.

Now is the time to test and adopt FIDO2/WebAuthn.

(If you want to use FIDO2 for login to VDI, see my post VMware Workspace One Access, VMware Horizon, and FIDO2 device – BIOLNX)

Environment:

  • Horizon 2503
  • Yubikey
  • Windows 11 24H2 (Guest OS for VDI)
  • Firefox and Edge
  • Horizon GPO
  • Use https://webauthn.io for authentication test

0 – Configure an account on WebAuthn.io

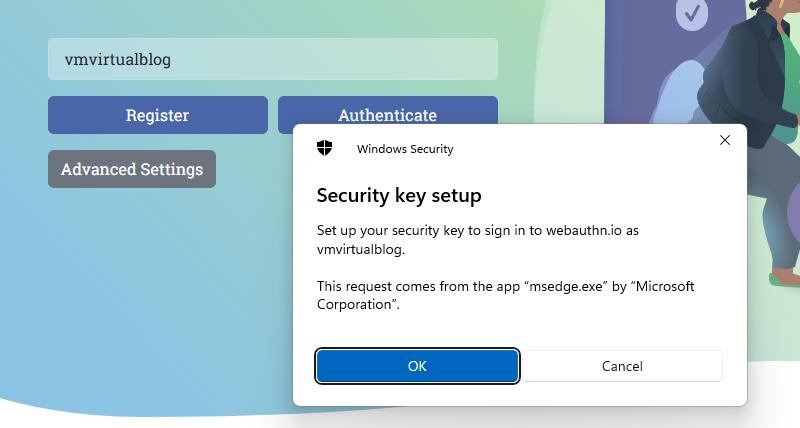
Insert the Yubikey on a physical PC

Go to https://webauthn.io

Insert the username and set the preferred authentication method

Select a security key (Yubikey)

Enter the security key assigned to Yubikey

A finger pressing a usb drive into a computer AI-generated content may be incorrect.

1 – Check  Active Directory GPO

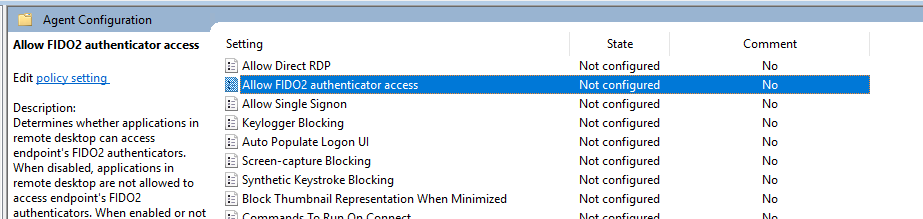
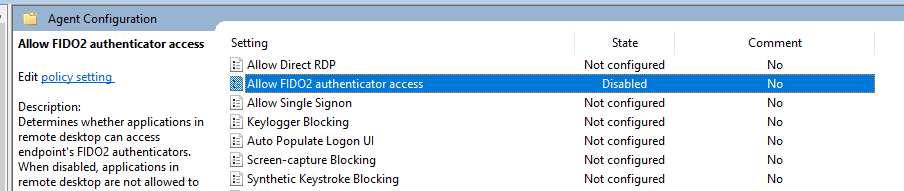
The default configuration for “Allow FIDO2 authenticator access” (under Agent Configuration) is Not Configured, and with this configuration, the FIDO2 WebAuthn is enabled.
2 – Test authentication 

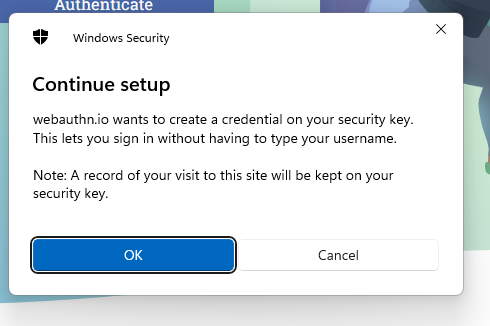
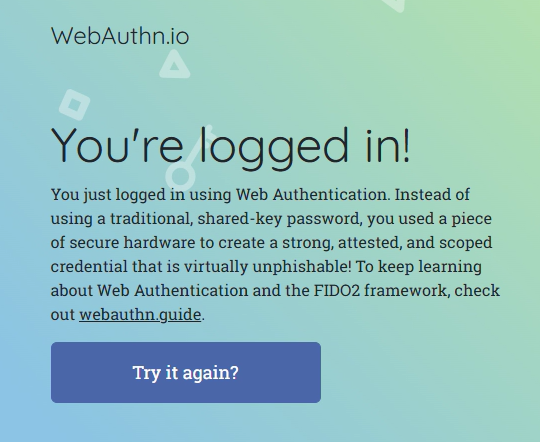
Now we can connect to VDI and access with edge to https://webauthn.io
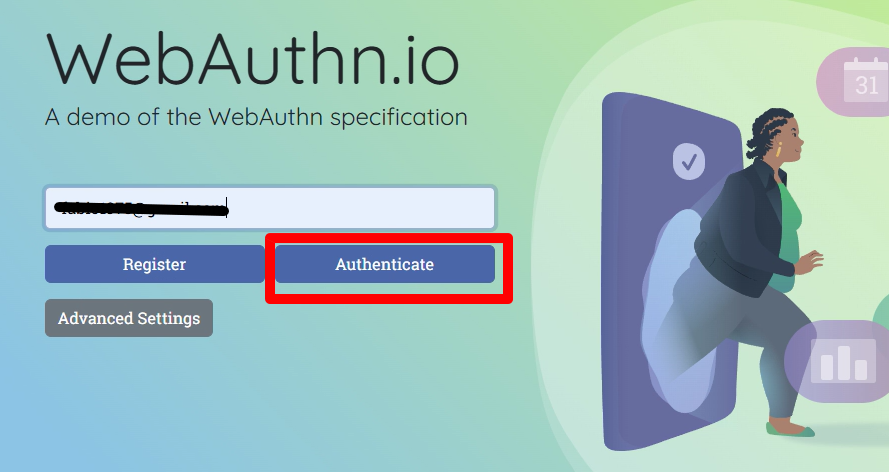
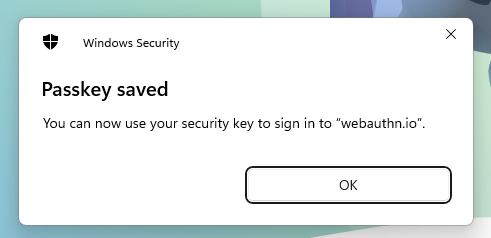
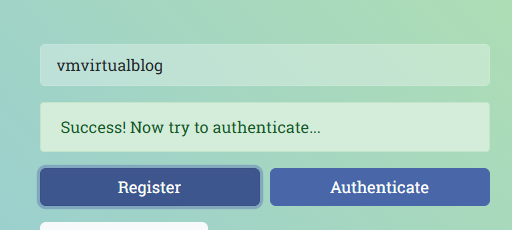
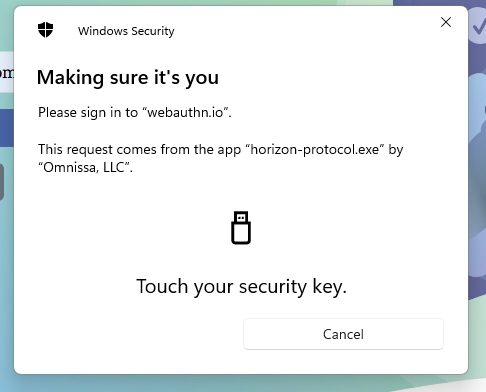
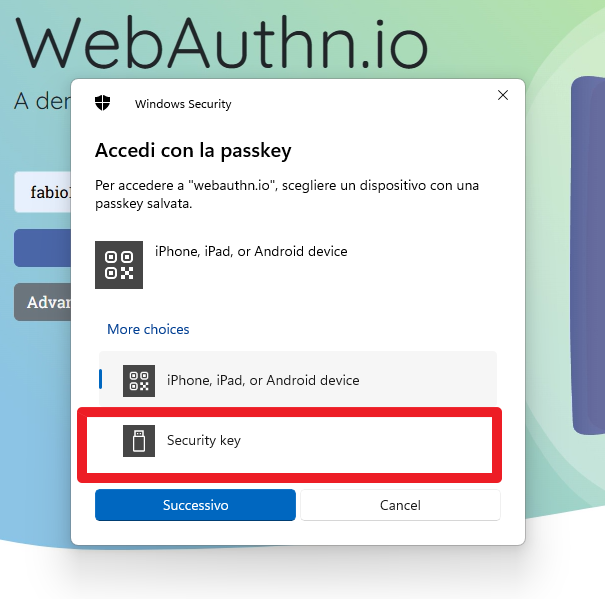
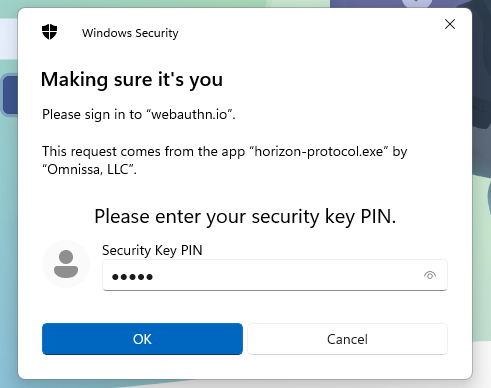
After selecting, authenticate in the next window, select the security key. (This window is up from your client (PC), not from VDI)
A finger pressing a usb drive into a computer AI-generated content may be incorrect.

Spoiler 1

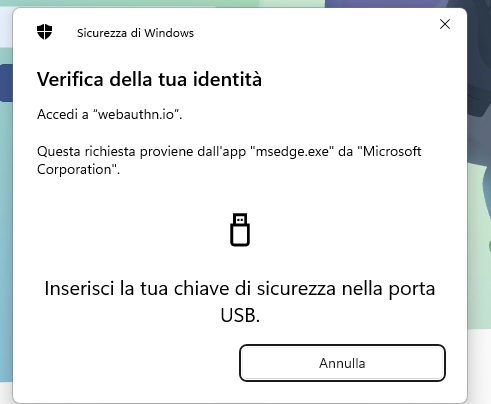
If you want to disable this function, you need to set the Allow FIDO2 authenticator access GPO with the value “Disabled”
And when you try to connect
Spoiler 2

We can use the “FIDO2 allow list” GPO to select which browser to use with the WebAuthN and disable another browser.
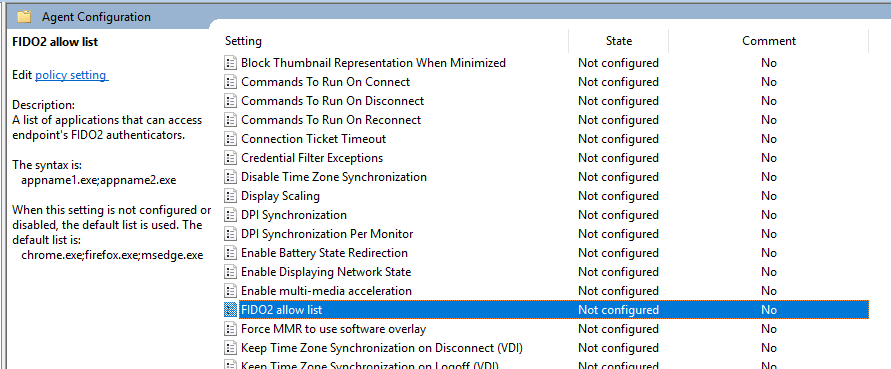
For example, enable only Firefox application

In this video, I show you how FIDO2 WebAuthN works and how to exclude certain browsers

https://youtu.be/cWKBxt8BVXU
 

Enhancing VDI Security and User Experience with FIDO2/WebAuthn and Omnissa Horizon

How to Test an NVIDIA Video Card with Omnissa VDI: A How-To Guide

Have you just set up a VDI and want to see if your cool NVIDIA video card is doing its job? Don’t worry, I understand you. There’s nothing more frustrating than spending a fortune on hardware and then finding that the GPU sleeps while the processor does all of it. In this article, I explain in a simple (and fast) way how to test the Nvidia video card within a VDI.

Tested environment

NVIDIA Tesla M10 (not the latest model, but still supported by vSphere and NVIDIA and limited cost for my homelab)

vSphere 8.x (thanks to licenses as vExpert)

Omnissa Horizon 2503 (Thanks to licenses like Omnissa Tech Insider and Omnissa community)

Supermicro as HW

Guest OS Windows 11 2412

NVIDIA drivers installed on ESXi and Windows 11 guest VDI

Configuring the NVIDIA Card: Configuring the Card as Direct Shared

Virtual machine HW: Add the desired cut of the NVIDIA card size

In this link, there are more details on the NVIDIA cards’ size

Virtual GPU Software

First question: But can it be done?

Yes, and it must be done. With modern VDI – we are talking about environments such as those managed with Omnissa (formerly VMware EUC) – it is possible to assign GPUs to virtual machines using technologies such as vGPUs. The problem? It is not always clear if the GPU is really used.

Step 1: Verify that the GPU is mapped

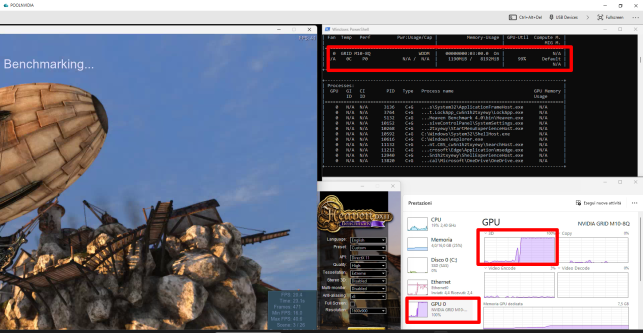
First of all, log in to your VDI (Windows or Linux, little changes) and open the Task Manager or a terminal. In Windows, go to GPU > Performance. If you see “NVIDIA” somewhere, you’re on the right track.

Or use nvidia-smi (yes, it also works in VDI if the drivers are in good shape). It will tell you everything: from the memory used to the temperature, passing through the active processes. It’s like the GPU use.

Step 2: Make the video card work

At this point, test it seriously. What?

  • Open an app that uses graphics acceleration (e.g., a CAD, a 4K video, or even just YouTube at full quality).

A screenshot of a computer AI-generated content may be incorrect.

A screenshot of a computer AI-generated content may be incorrect.

  • On Linux or more closed environments, you can use command-line tools or scripts to make test renders.

During these tests, keep an eye on nvidia-smi or the Task Manager. If the GPU stays at 0%, there’s something wrong (spoiler: it’s often a driver or vGPU assignment issue).

Step 3: Monitor WHIT style

For continuous monitoring, you can install the NVIDIA System Management Interface or use third-party tools built into the Omnissa environment, such as those included in Horizon (Horizon Performance Tracker) or management plug-ins.

Bonus: Don’t forget the logs

Check the host machine and VM logs. Often, there you will find clues to understand if the GPU passage was successful or if there is something blocking everything.

Ultimately?

Testing an Nvidia GPU on a VDI is not complicated, but it takes a method. With the right tools and a keen eye, you can make sure that your graphics assets are really being used, and that the end user (or yourself) doesn’t have to put up with unnecessary lag or jerking.

Want help scripting an automated test? Write. Or… Launch nvidia-smi (with the -l parameter, it goes into automatic refresh) and see if the vGPU wakes up.


Some suggestions


  • To perform top benchmarks, you have to remove the cap present by default on vSphere for FPS (I would recommend keeping FPS equal to or lower than the Hz value of your monitor, otherwise, we may have a non-optimal fluidity of the images). The cap is deactivated by putting this value in the Advanced settings of the VM’s pciPassthru0.cfg.frame_rate_limiter=0

How to Test an NVIDIA Video Card with Omnissa VDI: A How-To Guide

Horizon Published Applications and Office 365 – Error TAG [4ruy5]

After public Office 365 App with Horizon 8 (the backend is a RDS FARM and we used this indication for the installation Deploy Microsoft 365 Apps by using Remote Desktop Services – Microsoft 365 Apps | Microsoft Learn) we have this issue when the users start the Office 365 remote apps

I found this info:

O365 via Horizon : r/sysadmin

To resolve this problem, we started an additional program (shellapptunime.exe added a Scripts logon) when the user’s access to the RDS infrastructure.

A screenshot of a computer

AI-generated content may be incorrect.

Horizon Published Applications and Office 365 – Error TAG [4ruy5]

EUC Omnissa components are changing look and design…

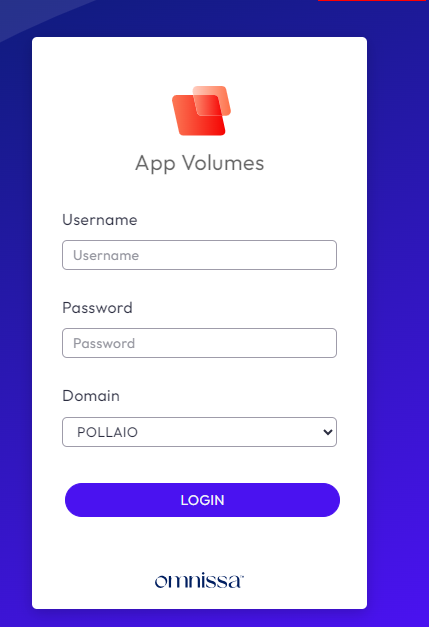
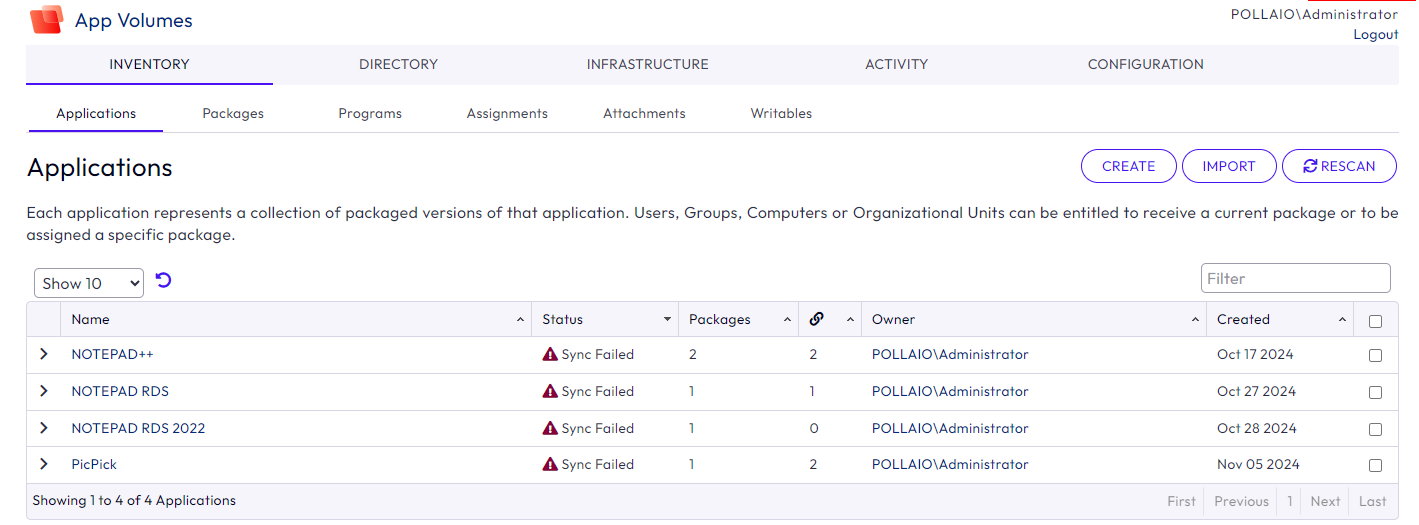
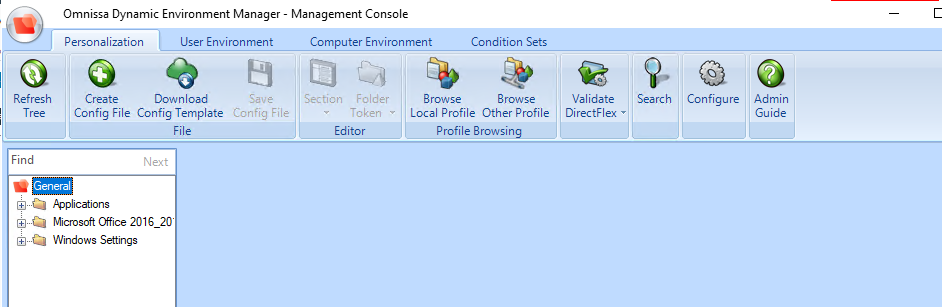
Omnissa engineers worked very hard at last end of 2024 year-end in 2025 start year to rebrand the application (Connection Server, Dynamic Environment Manager, App Volumes … ) to remove all VMware logo and info (It is necessary to Broadcom request for Copyright. .)

Now we have the first effect with the new look and design for App Volumes Manager (Version 2412) and

Dynamic Environment  Manager (2412)

Immagine che contiene testo, schermata, Sistema operativo, software

Descrizione generata automaticamente

Immagine che contiene testo, numero, Carattere, software

Descrizione generata automaticamente

Immagine che contiene testo, schermata, Blu elettrico, Carattere

Descrizione generata automaticamente

Immagine che contiene testo, software, Icona del computer, Pagina Web

Descrizione generata automaticamente

EUC Omnissa components are changing look and design…

Upgrade/Install Horizon Edge Gateway


The Horizon Edge Gateway allows Omnissa Horizon 8 environments to connect to the Omnissa Horizon® Cloud Service™. Deploying a Horizon Edge Gateway Appliance for Horizon 8 deployments on vSphere is accomplished by accessing the Horizon Universal Console, which is the administrative interface for the Horizon Cloud Service.

Horizon Edge Gateway Appliance is required to entitle your environment to Horizon subscription licenses, services, and management features hosted in the Horizon Control Plane Services. To enable subscription license entitlement, Horizon Edge Gateway Appliance must be deployed in each Horizon Pod.

(https://techzone.omnissa.com/resource/deploying-horizon-edge-gateway)

How any virtual appliance it is necessary to upgrade to a new version.

In my situation, I had a customer with an old version of Horizon Edge Gateway (2.3.4.1) and on the Horizon Cloud portal we saw info that said a new version of Edge

The procedure to upgrade is very simple and is like to the procedure for the first install

After click to view

A screenshot of a computer

Description automatically generated

We are redirected to the maintenance tab where it is displayed some information.

After selecting “Upgrade” we can start with the activity.

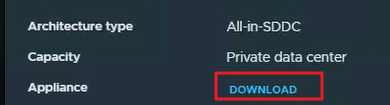
First, we need to download the last Horizon Edge Gateway Appliance.

A screen shot of a computer

Description automatically generated

We had collected the information of actual Edge deploy like

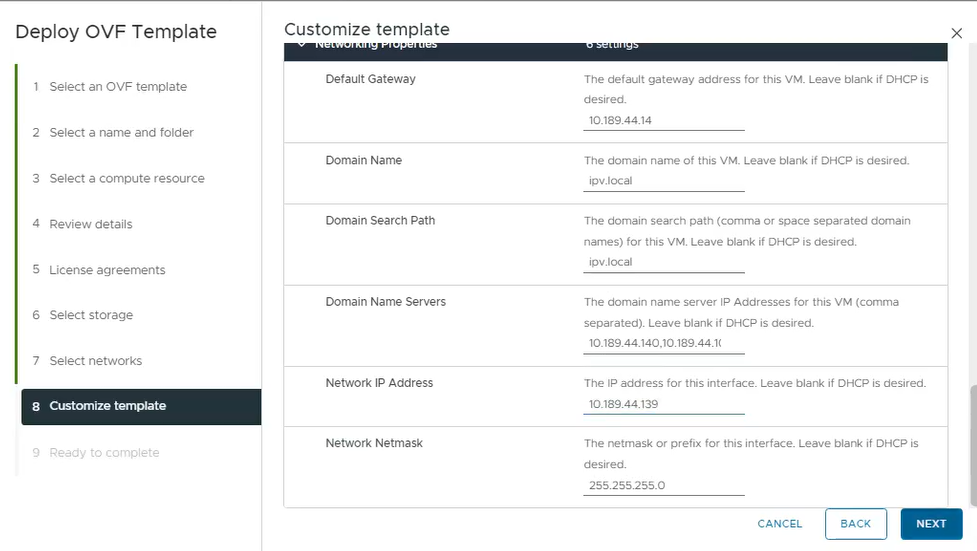
Network Configuration (such as IP Address, Gateway, NetMask and PortGroup)

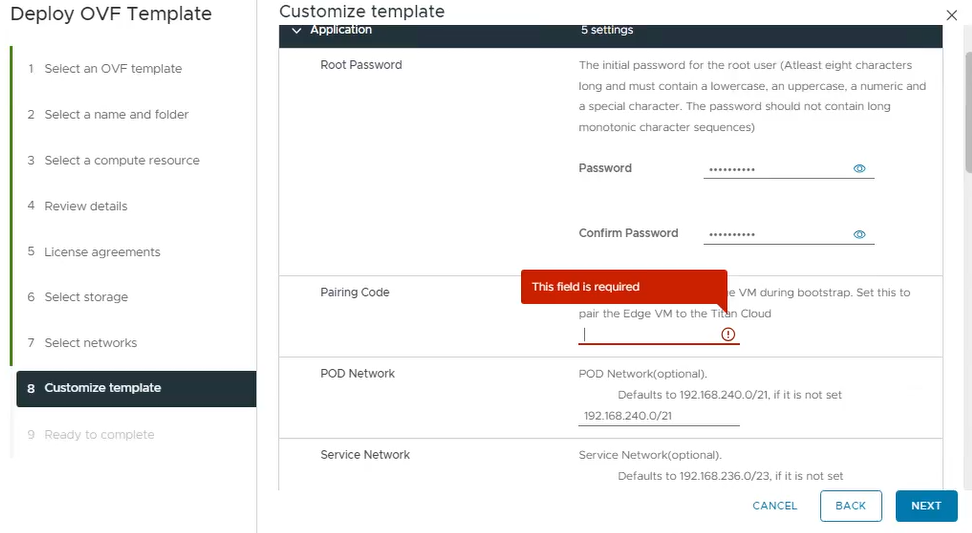
Now we are ready to log in to Virtual Center where we want to deploy the Appliance with insert some information, including the fundamental paring code that we can find on this screen:

A screenshot of a computer

Description automatically generated

Shut down the old Edge Gateway.

Deploy the OVA appliance:

A screenshot of a computer

Description automatically generated

We need to insert the standard information for ova deploy and insert the paring code and the network information

A screenshot of a computer

Description automatically generated

A screenshot of a computer

Description automatically generated

After deploying, on the Horizon Cloud portal under Resources and Capacity, we found that the Horizon Edge is Disconnected.

A screenshot of a computer

Description automatically generated

Now it is only a question of time…. or we can force with re-validate the info by clicking on edit configuration.

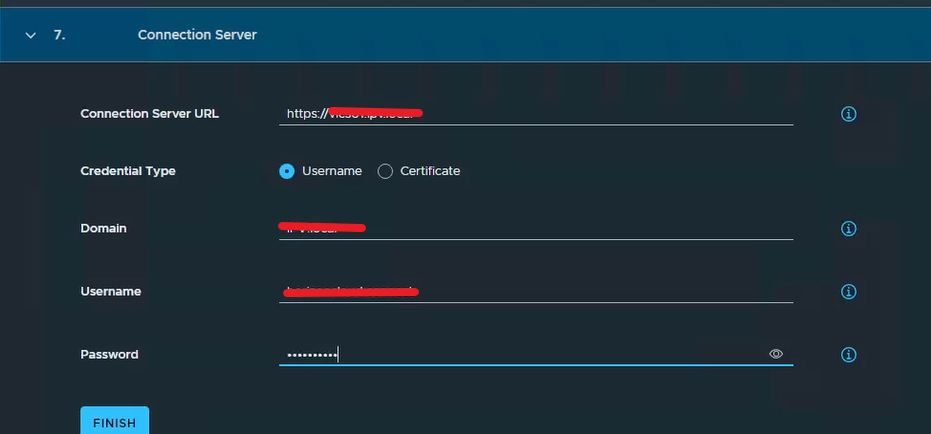
The last step is to insert the information to connect the Horizon Edge to the Connection Server (on-prem deployment)

Enter on the actual Horizon Edge

A screenshot of a computer error

Description automatically generated

We need to edit the Horizon Connection Server information because it is necessary to validate the trust with the Connection Server SSL certificate and insert the password for the service User.

A screenshot of a computer

Description automatically generated

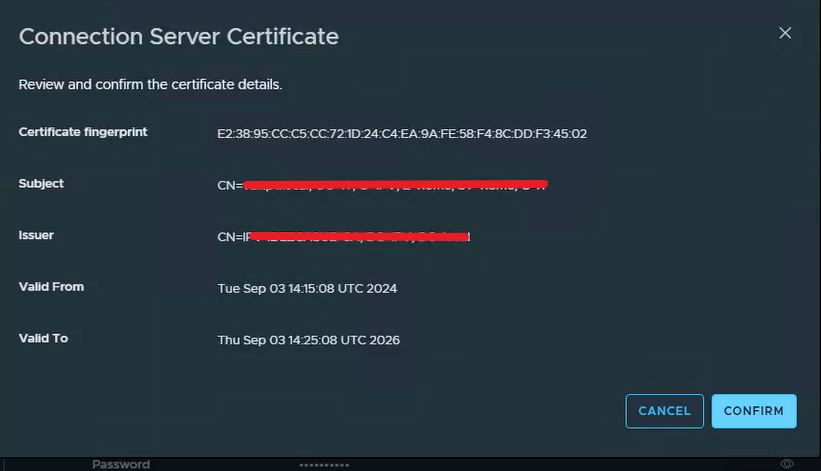
Confirm the certificate trust

A screenshot of a computer

Description automatically generated

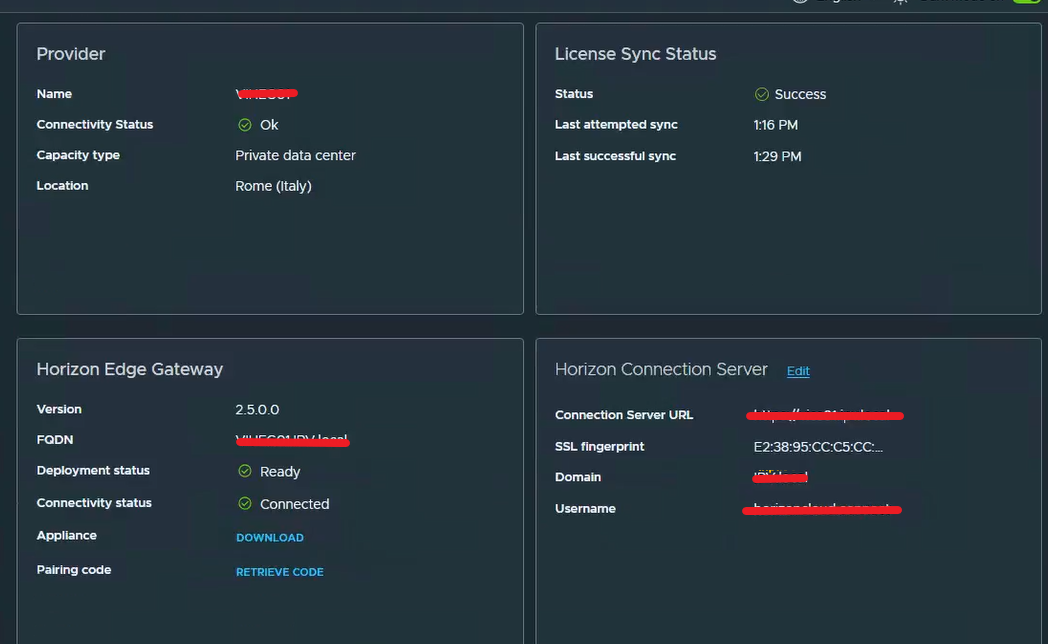
We are waiting or forcing a refresh.

A screenshot of a computer

Description automatically generated

Upgrade/Install Horizon Edge Gateway

Using the Omnissa Horizon Agent Upgrade Feature from the Omnissa Connection Server Console

Horizon Agent Upgrade

If you have a Horizon Enterprise Plus or Horizon Universal subscription license, the last Horizon versions have a function to manage the Horizon Agent Update.

You have two scenarios:

  • Automatic map the upgrade to your Connection server infrastructure
  • Manually add the Agent upgrade package

I tested this feature in my Home Lab

Enable Automatic upgrade to your Connection server infrastructure

Enable Omnissa Horizon Cloud Portal form of Horizon Agent Auto Upgrade feature

https://cloud.horizon.omnissa.com/

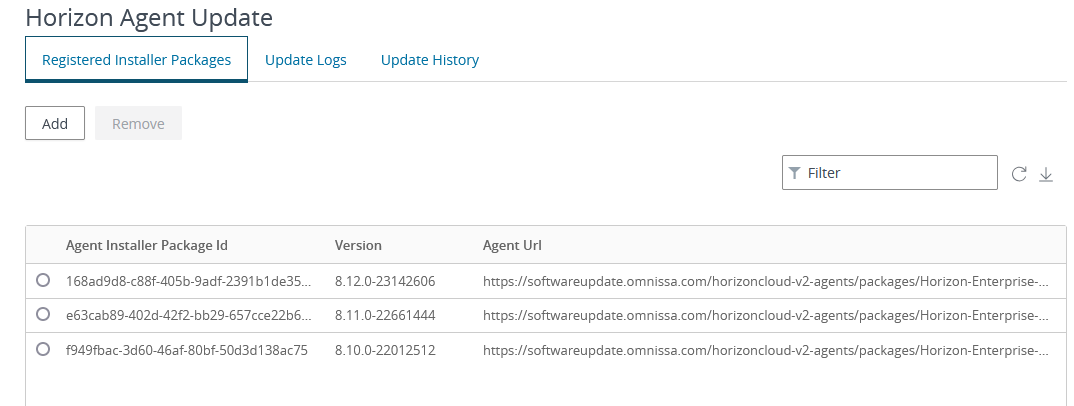
With enabling the Agent Auto Upgrade you can see, without any action, the Horizon package to use for upgrade (this new package is directly downloaded from the Omnissa Site)

A screenshot of a computer

Description automatically generated

If you use this method you can skip the next paragraph and go to Schedule Agent upgrade

Manually loaded the JSON and agent file

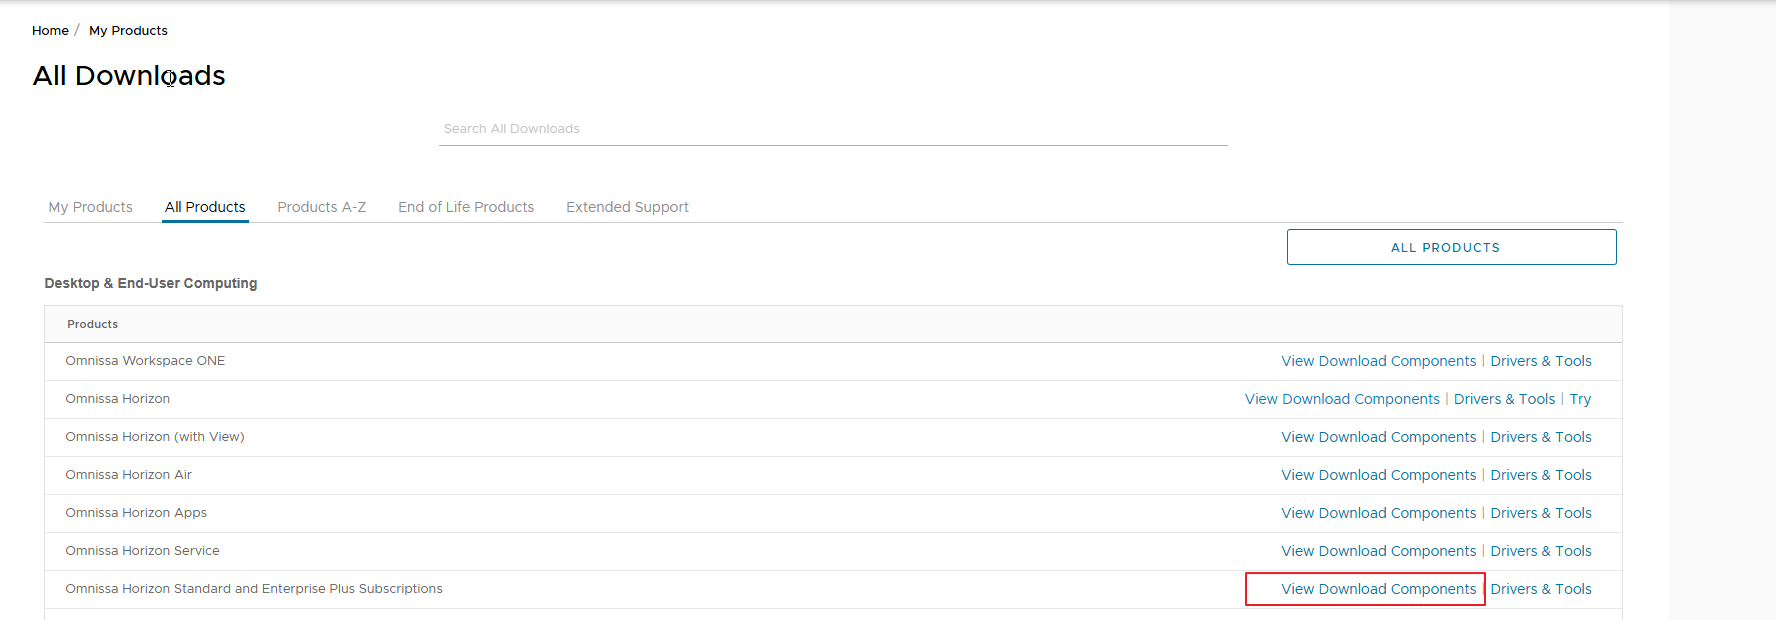
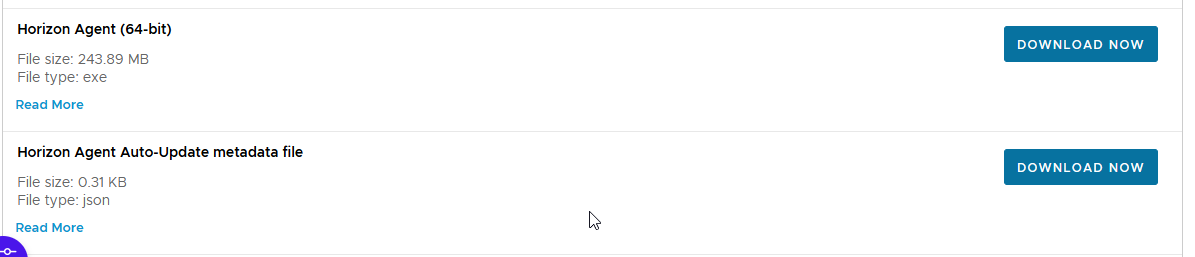
Otherwise, you can manually download the JSON file from the customer portal by Omnissa

Omnissa Horizon Standard and Enterprise Plus Subscriptions

A screenshot of a computer

Description automatically generated

Download the files you need

A white background with a black and white object

Description automatically generated

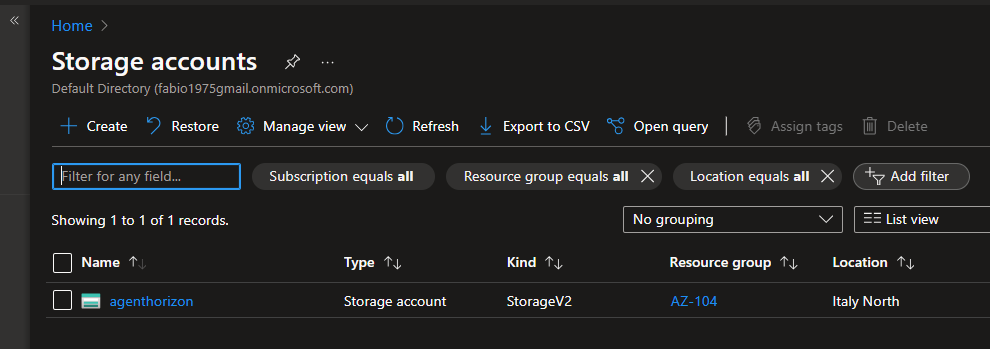
Upload them to a WEB site (Local/Internal or Public), in my case I use an Azure storage account

A screenshot of a computer

Description automatically generated

As blob containers

A screenshot of a computer

Description automatically generated

Which are accessible via WEB (obviously I recommend putting special restrictions)

A screenshot of a computer

Description automatically generated

A screenshot of a computer

Description automatically generated

Let’s configure our POD by entering the appropriate section of the interface via WEB of the connection servers

A screenshot of a computer

Description automatically generated

Enter the URL of our storage account with the name of the JSON file indicated

https://agenthorizon.blob.core.windows.net/agent2312/VMware-Horizon-Agent-x86_64-2312.1-8.12.1-23507832.exe-metadata.json

A screenshot of a computer

Description automatically generated

Schedule Agent upgrade

Let’s proceed with updating the Agent of a VDI by going to the list of our VDI.

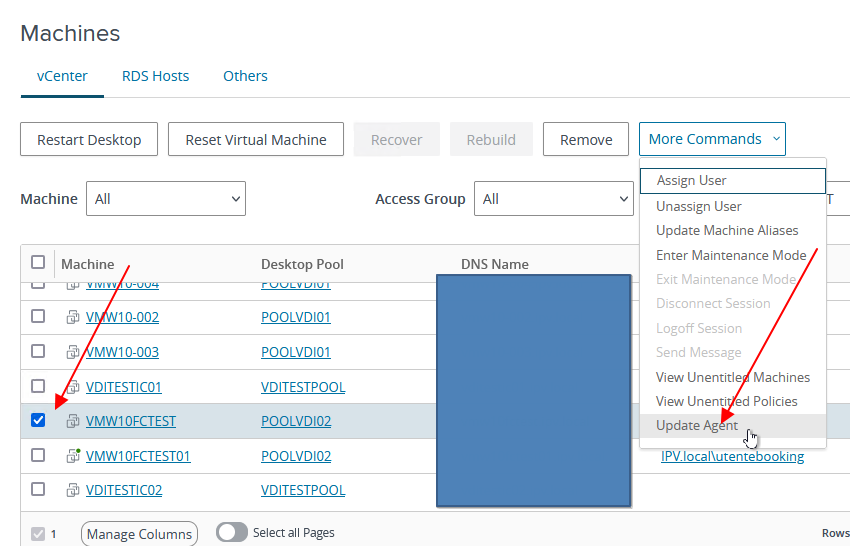
We select the VDI or VDI on which we want to update the agent

A screenshot of a computer

Description automatically generated

Then select Update Agent

A screenshot of a computer

Description automatically generated

A screenshot of a computer

Description automatically generated

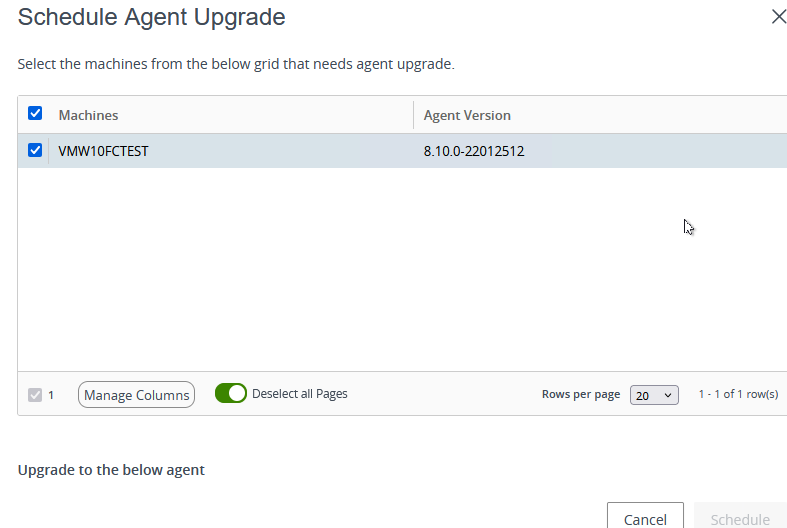
We select the update package (we can also have multiple versions of agents) and proceed with the planning

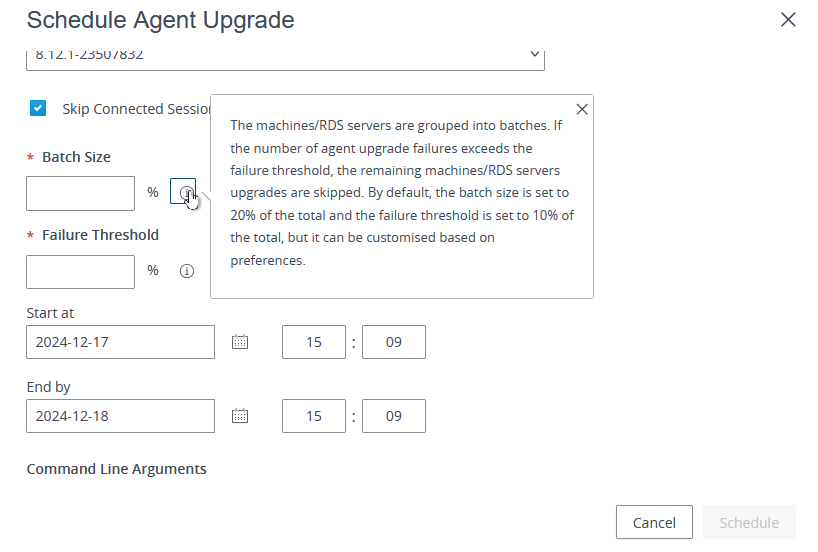
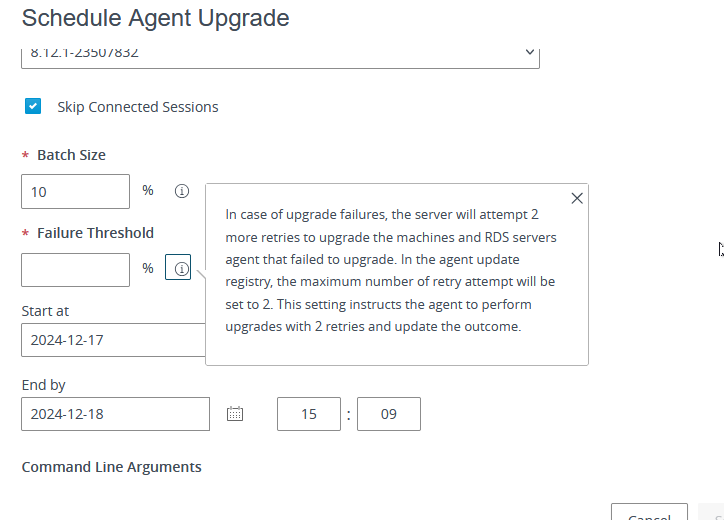
There are some safety rules if you do massive updates

A screenshot of a computer

Description automatically generated

A screenshot of a computer

Description automatically generated

Now schedule when will start the upgrade

A screenshot of a computer

Description automatically generated

From the Horizon agent update section, we see the Scheduled task

A screenshot of a computer

Description automatically generated

When the time is coming the job will start and the task state is “in Progress”

A screenshot of a computer

Description automatically generated

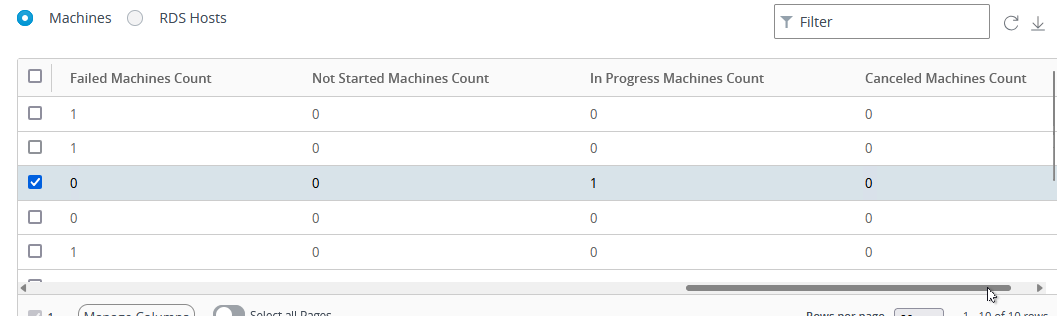
Now from the list of VDI machines, we can check the upgrade process.

The user is currently logged in to the machine and waiting for the user logoff or reboot

A screenshot of a phone

Description automatically generated

Now the VDI machine is ready for the upgrade

A screenshot of a computer

Description automatically generated

A white rectangular object with black text

Description automatically generated

Agent unknown…. Removed and installed the new one

A white rectangular object with a white background

Description automatically generated

Installed the new

The VDI is restarted the process is completed and we have the VDI with the updated agent

A screenshot of a computer

Description automatically generated

And the scheduled update task is completed

Using the Omnissa Horizon Agent Upgrade Feature from the Omnissa Connection Server Console

Use NSX Advanced Load Balancer for Omnissa Unified Access Gateway (Omnissa Horizon VDI)

In the various activities carried out in the year that is ending, load balancing and the other availability of Horizon solutions for both access from the Internet and from the company LAN were among the activities that required multi-handed work between the teams that deal with IT technologies within the company (Security, Network, EUC, Servers …).

While these synergies are easy to manage in the context of small companies, when working with large companies, timely planning and design become very important to avoid infrastructural changes (even minimal) that can convert into delays in the delivery of the infrastructure due to the need to re-engage a different team.

One of solutions used to balance access to Omnissa Horizon services is NSX Advanced Load Balancer.

Normally, the publication of Omnissa VDI solutions is carried out using the virtual appliances Unified Access Gateway (UAG) where “Omnissa Unified Access Gateway enables secure remote access from an external network to a variety of internal resources provided by Omnissa Workspace ONE and Horizon deployments.”

Natively UAGs have their own HA solution, but it has the requirement of having 3 Public IP Addresses and creating three public FQDNs.

The use of NSX Advanced Load balancer allows various UAG balancing solutions:

Single VIP with Two Virtual Services

Single L4 Virtual Service

(n+1) VIP

In my HomeLab I have tested the various solutions indicated above,

the most interesting is the one that I propose you try for the following reasons:

• Robust enough to handle the persistence issues

• Works well in environments where users come behind the NAT

• Ease of configuration

• Better visibility and logs

Additionally, the standard ports of the Blast and PCo protocols will not be used, as this can easily expose the solutions to potentially malicious individuals.

The infrastructure that I will propose also requires a change to the “classic” UAG configurations on the URLs used for the Blast and PCOIP protocols.

In the implementation that we will do, we will take as an example only the part of the Blast protocol

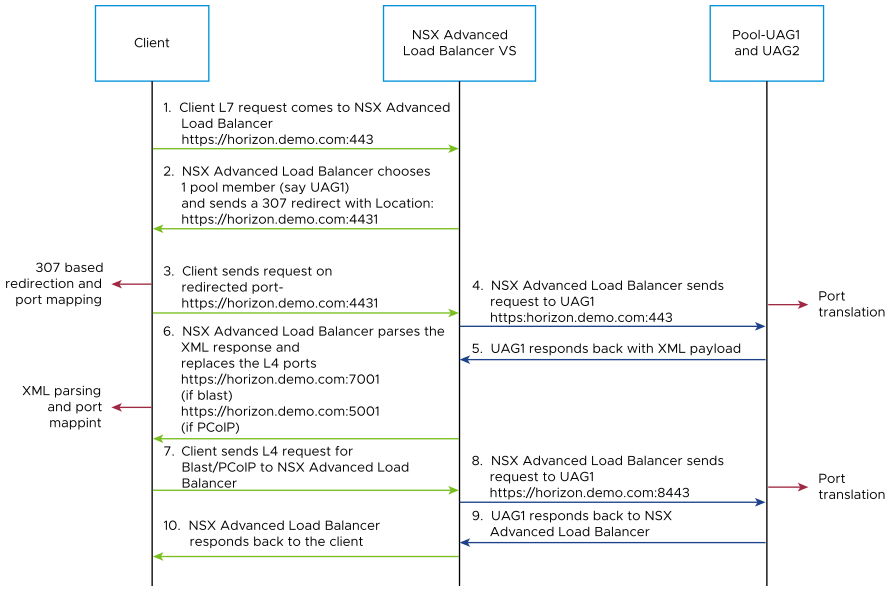
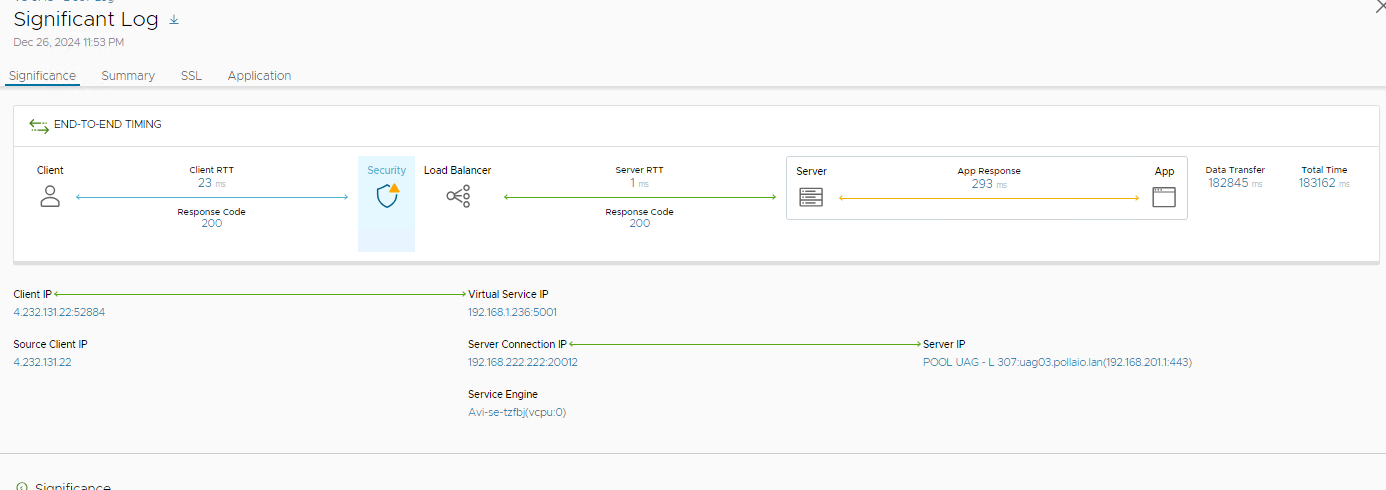
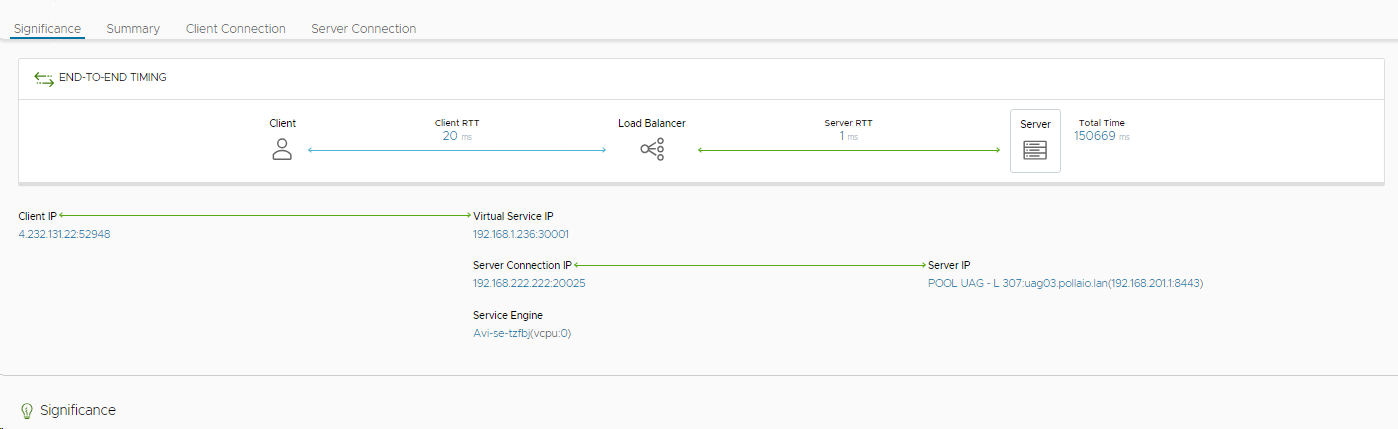
The following flow explains the step when a user tries to access Omnissa VDI, the flow has two ports opened for primary and secondary traffic:

    • Port 443 – This is for XML API traffic
    • Ports 5001 to 5002 – Horizon internal ports opened for L7 primary XML traffic to handle redirected traffic
    • Ports 30001 to 30002 – Blast

Where:

  1. Client L7 request comes to AVI LB
    https://horizon.pollaio.site/ 
  2. AVI LB chooses 1 pool member (say UAG1) and send back to client a 307 redirect Location
    https://horizon.pollaio.site:5001 
  3. Client sends request on redirected port
    https:// horizon.pollaio.site:5001 
  4. AVI LB (L7) sends requests to UAG1
    https:// horizon.pollaio.site:5001
    (Port Traslation)*
  5. UAG1 responds back with XML payload
  6. AVI LB parses the XML response and replace the L4 ports (to client)
    https:// horizon.pollaio.site:30001 (blast) 
  7. Client sends L4 request for Blast to AVI LB
  8. AVI LB sends request to UAG
    https:// horizon.pollaio.site:30001*
  9. UAG1 responds back to AVI LB
  10. AVI LB responds back to client

The main aspect is the correct configuration of TCP and UDP ports between the various corporate network segments:

Source

Destination

Protocol

Port

Unified Access Gateway

Horizon Agent

UDP

22443

Unified Access Gateway

Horizon Agent

TCP

22443

Unified Access Gateway

Horizon Connection Server

TCP

443

Horizon Client

Virtual Service AVI

TCP

443

Horizon Client

Virtual Service AVI

UDP

443

Horizon Client

Virtual Service AVI

TCP

5001

Horizon Client

Virtual Service AVI

UDP

5001

Horizon Client

Virtual Service AVI

TCP

5002

Horizon Client

Virtual Service AVI

UDP

5002

Horizon Client

Virtual Service AVI

TCP

30001

Horizon Client

Virtual Service AVI

UDP

30001

Horizon Client

Virtual Service AVI

TCP

30002

Horizon Client

Virtual Service AVI

UDP

30002

Configurazione NSX ALB

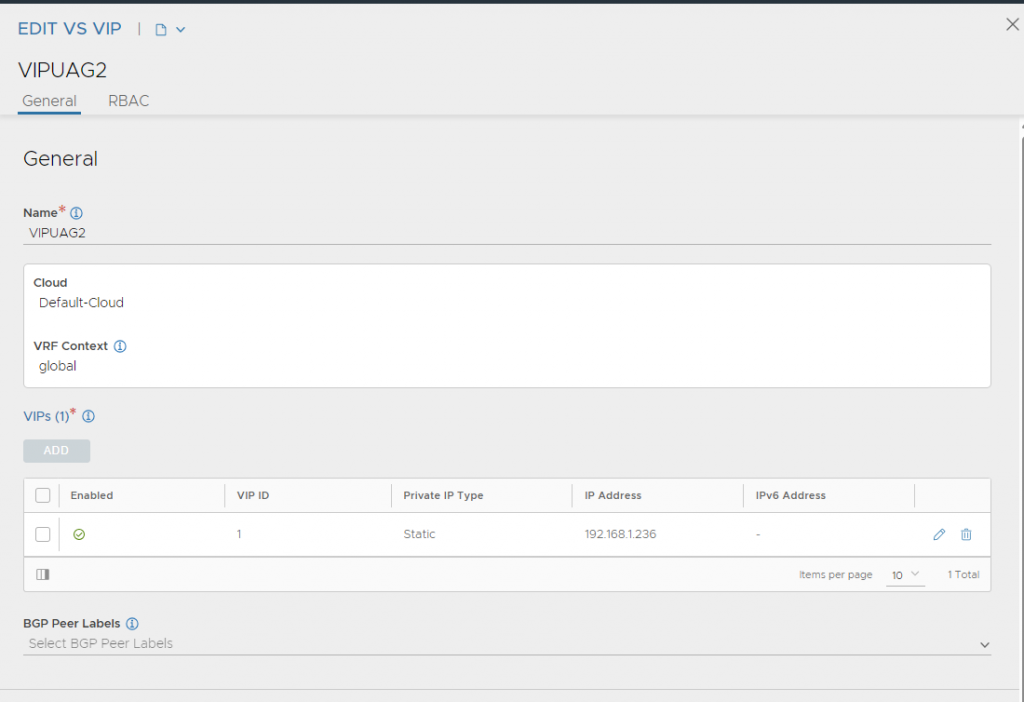
  1. Create a Virtual IP
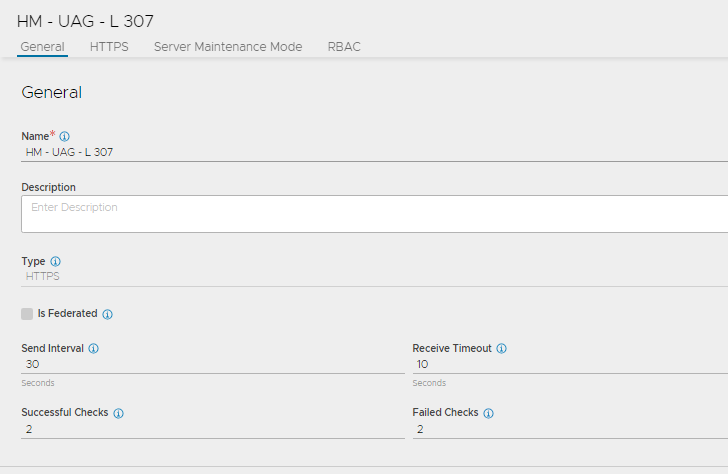
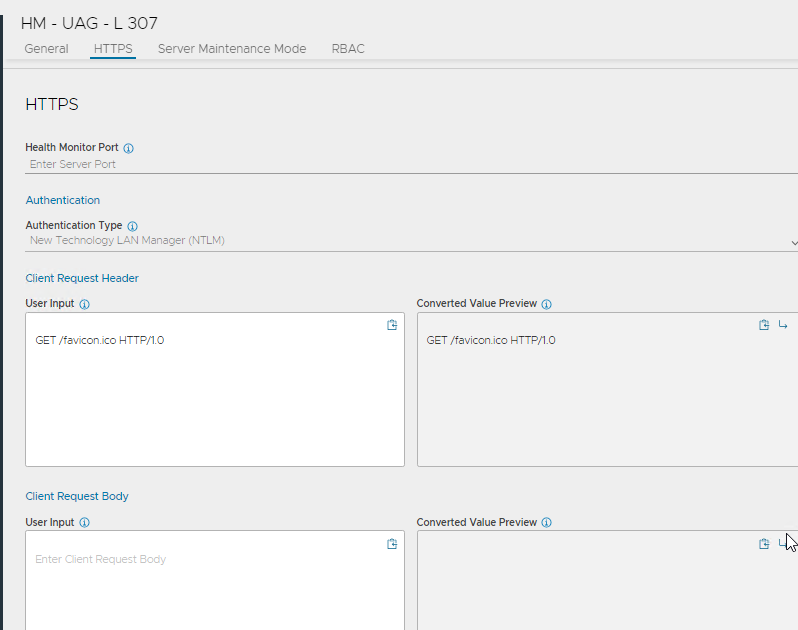
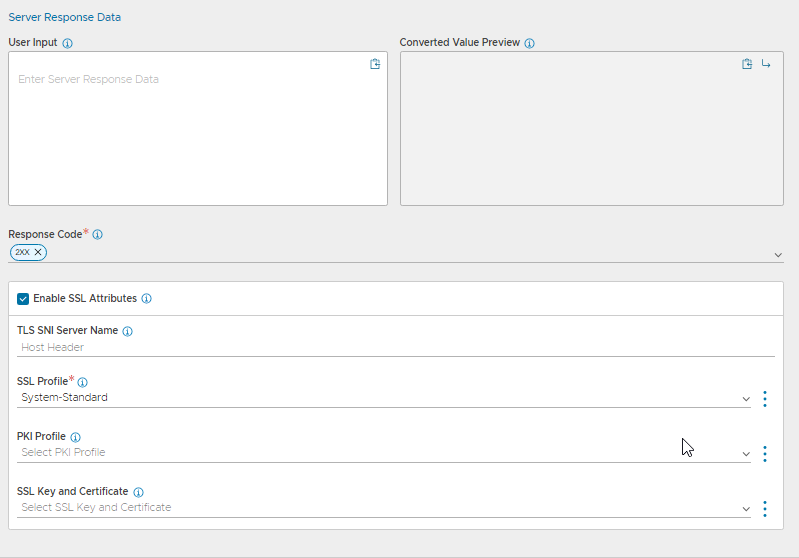
  2. Create a Custom Health Monitor for UAG
  3. Create a UAG Pool
  4. Install the SSL certificate Required for L7 VIP
  5. Create a Virtual Service for UAG
  6. Binding DataScripts to the Virtual Service

Create a Virtual IP

  1. To create a custom health monitor, navigate to Applications > VS VIPs.
  2. Click Create.

Create a Custome Health Monitor

  1. To create a custom health monitor, navigate to Templates > Profiles > Health Monitors.
  2. Click Create.
  3. Select the VMware Cloud that was created for Horizon.

Enter the following details in the New Health Monitor screen

A screenshot of a computer

Description automatically generated

A screenshot of a computer

Description automatically generated

A screenshot of a computer

Description automatically generated

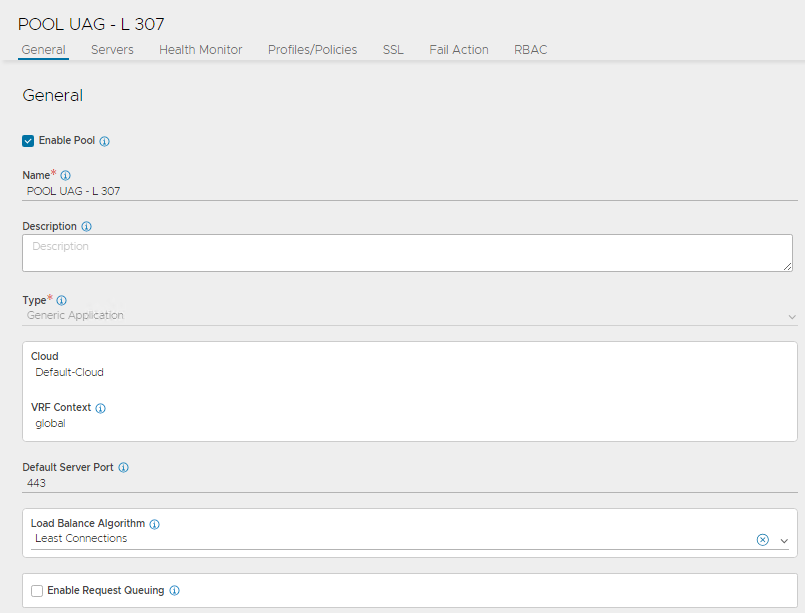
Create UAG Pool

  1. Navigate to Applications > Pools.
  2. Select the cloud from the Select Cloud window.
  3. Click Next.
  4. Click Create Pool.
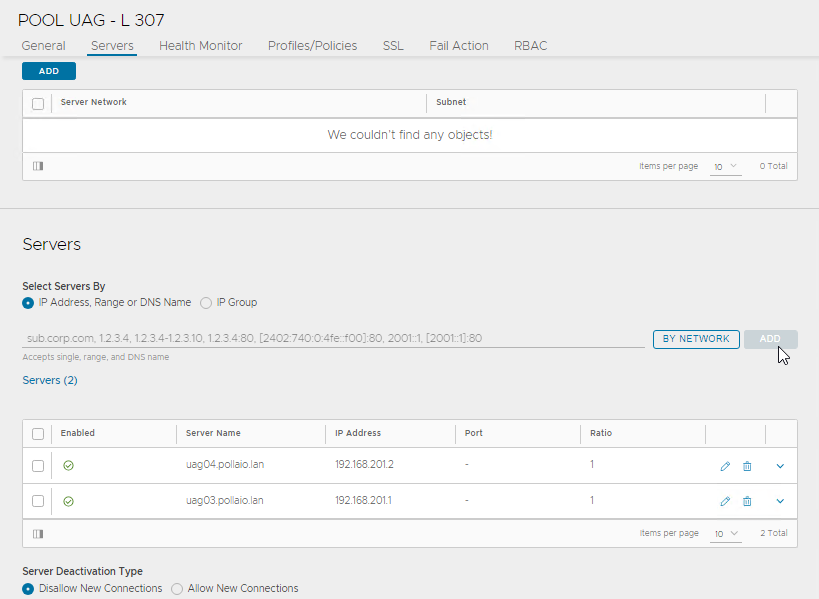
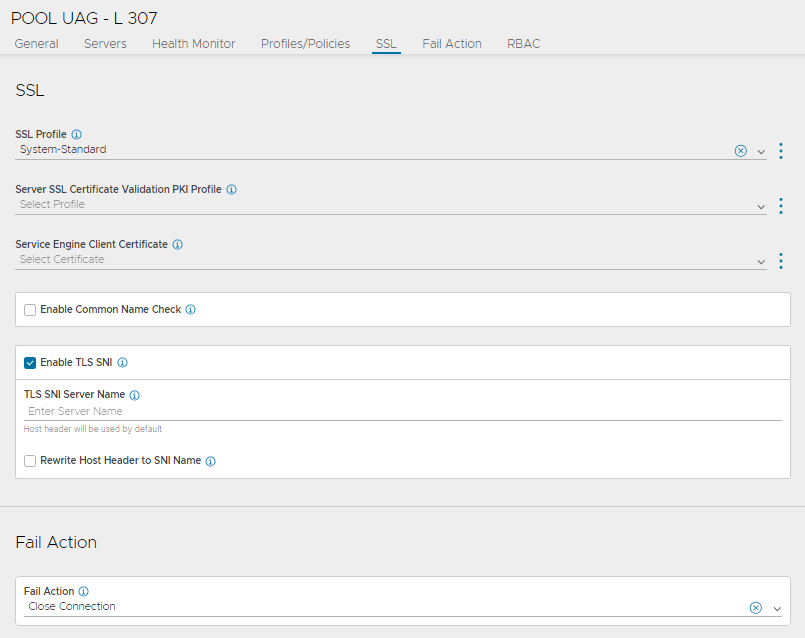
  5. In the CREATE POOL screen, update the details as shown below:
A screenshot of a computer

Description automatically generated

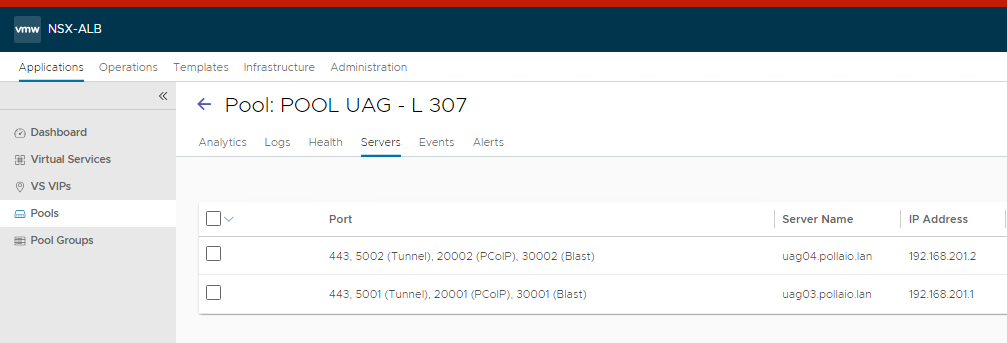
  1. In the Servers tab, add the Server IP Address of the UAG servers.
A screenshot of a computer

Description automatically generated

A screenshot of a computer

Description automatically generated

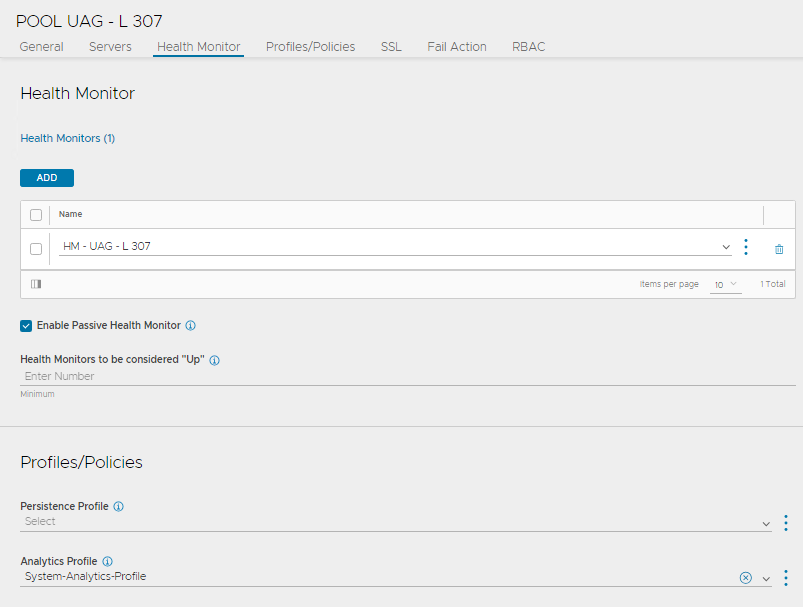
  1. In Health Monitor tab, select the appropriate Health profile as shown below:
A screenshot of a computer

Description automatically generated

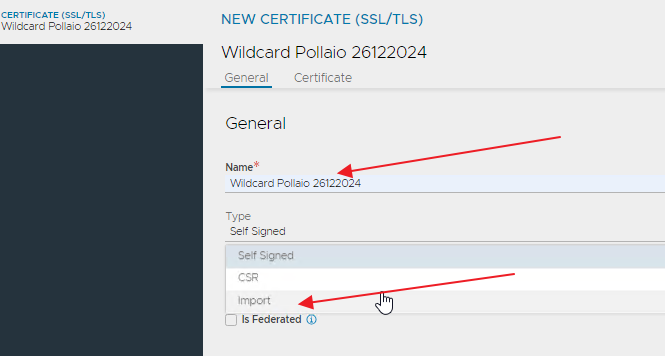
Installing the SSL certificate Required for L7 VIP

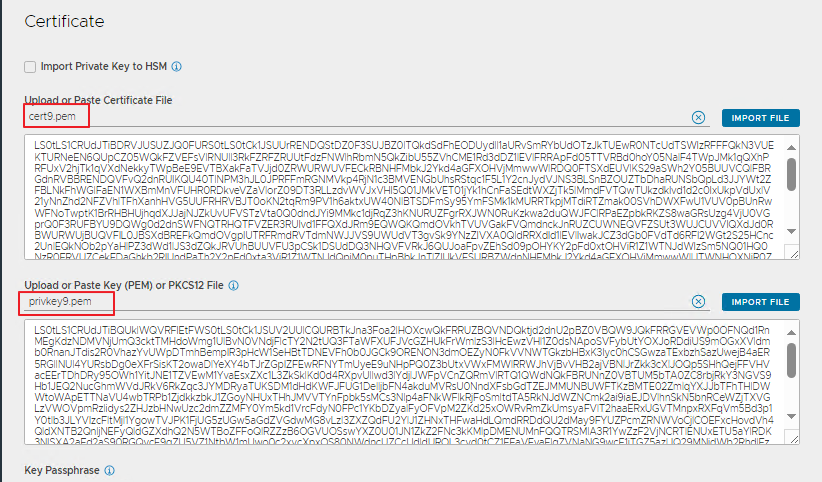
The public certificate must be imported into AVI LB it need the same imported in to UAG.

The certificate to be imported must be in PEM format.

Once imported, ensure that the CA certificate is properly linked.

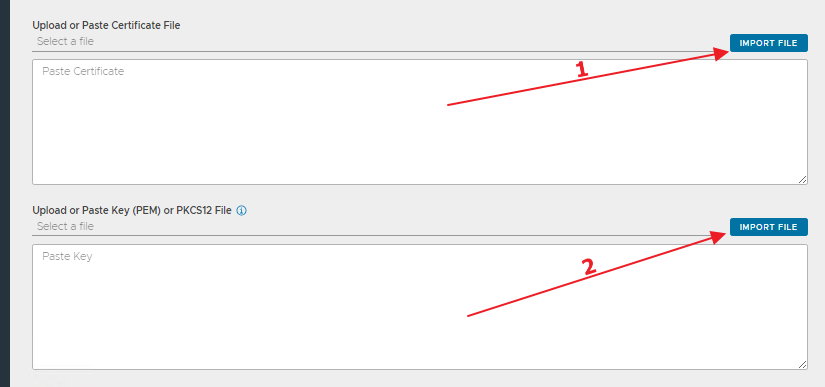
Here are the steps to import the certificate

  1. To import a CA Certificate, navigate to Templates > Security > SSL/TLS Certificates.
  2. Click Create.
  3. Select Root/Intermediate CA Certificate.
  4. Provide a name to identify the certificate later
  5. Upload or Paste Certificate File

VALIDATE and SAVE

A screenshot of a certificate

Description automatically generated

A screenshot of a computer

Description automatically generated

A screenshot of a computer screen

Description automatically generated

Creating Virtual Service for UAG

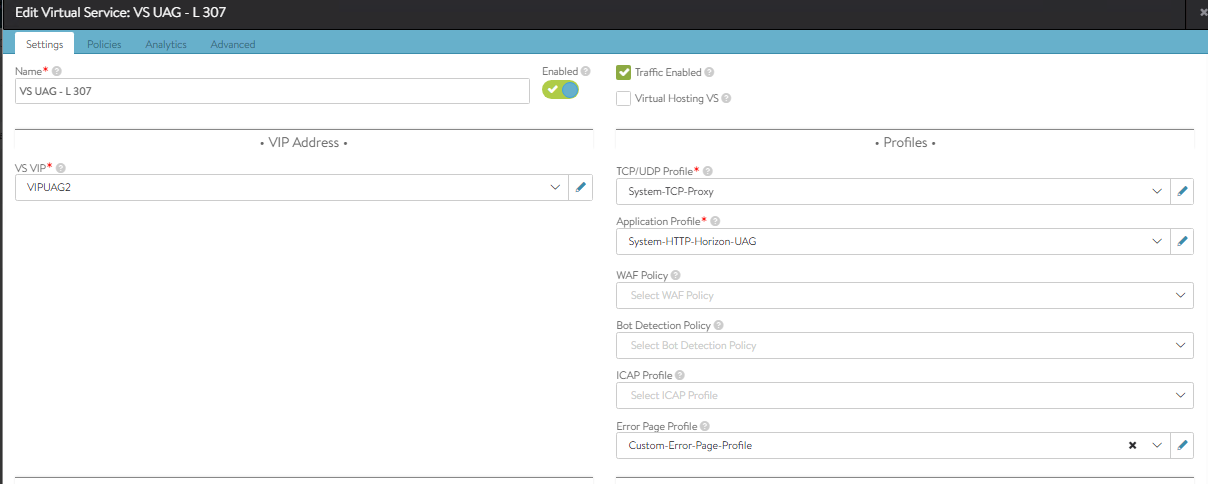
To create the new virtual service,

  1. Navigate to Applications > Virtual Services.
  2. Click CREATE VIRTUAL SERVICE > Advanced Setup.
  3. Bind the virtual service VIP.
  4. Use the System-HTTP-Horizon-UAG as the Application Profile.
  5. Configure the virtual service as shown below:
A screenshot of a computer

Description automatically generated

A screenshot of a computer

Description automatically generated

A screenshot of a computer

Description automatically generated

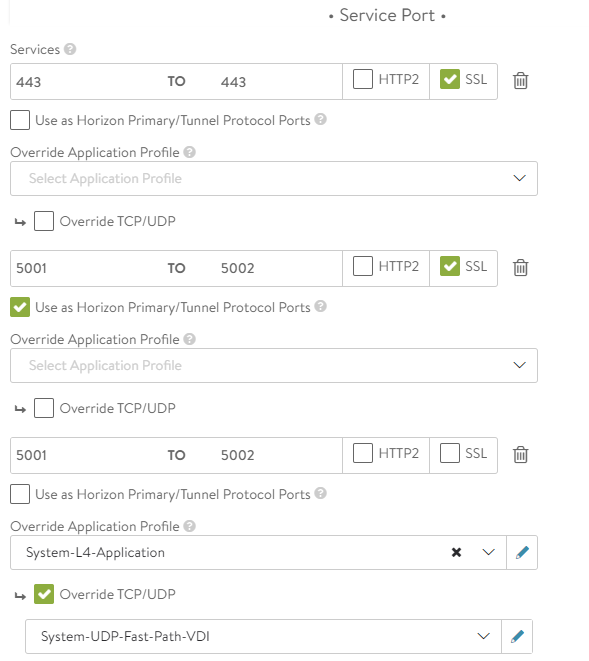
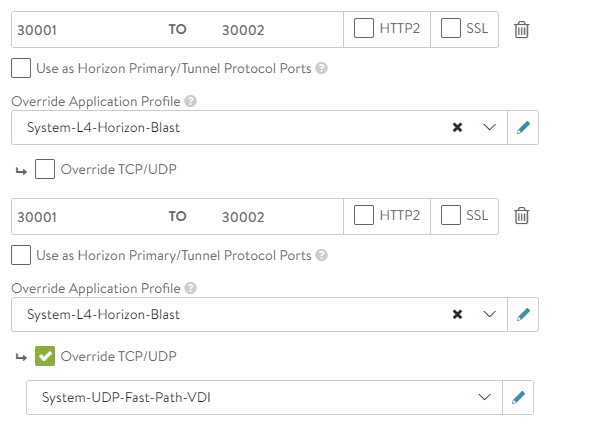
  1. In the Service Port section, click Switch to Advanced and configure the service ports.
A screenshot of a computer

Description automatically generated

A screenshot of a computer

Description automatically generated

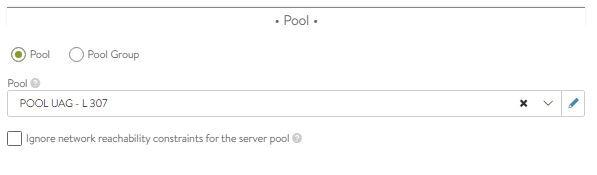
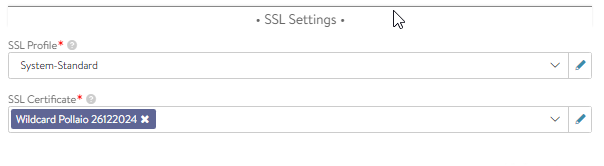
  1. Bind the pool and the SSL certificate added,
  2. Click Next.

Click Next and Save the configuration.

NOTE:

Two ports are opened for primary and secondary traffic:

    • Port 443 – This is for XML API traffic
    • Ports 5001 to 5002 – Horizon internal ports opened for L7 primary XML traffic to handle redirected traffic
    • Ports 30001 to 30002 – Blast

Configure DataScript

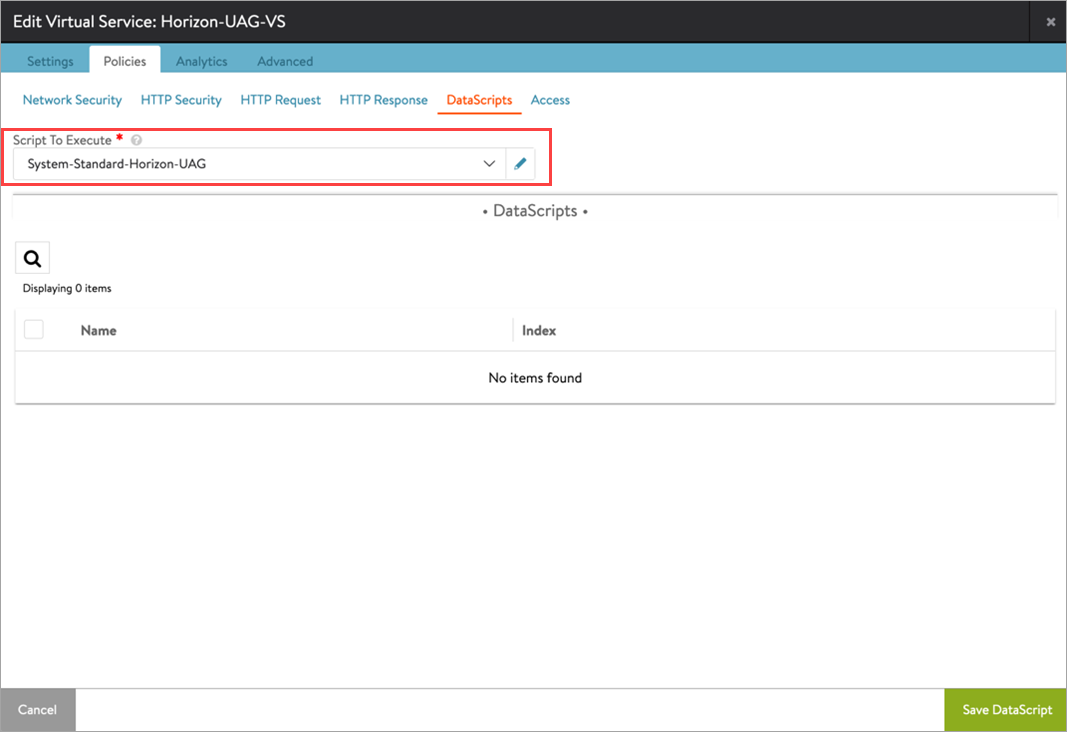
  • Binding the Horizon DataScript on the Virtual Service
  • From the UI, navigate to Applications > Virtual Services.
  • Edit the virtual service that was created.
  • Go to Policies > DataScripts.
  • Click Add DataScripts.
  • Under Script To Execute, select System-Standard-Horizon-UAG.
  • Click Save DataScript and click Save.

System-Standard-Horizon-UAG is embedded AVI Load Balancer Datascript

A screenshot of a computer

Description automatically generated

UAG Configuration

Modify each UAG’s Blast and PCoIP external URL fields to use the custom ports added in the NSX Advanced Load Balancer port map (From the UI, Edit Pool > Servers tab under New Pool or Edit Pool page).

A screenshot of a computer

Description automatically generated

Modify the Blast external URL to include the custom port for UDP.

For example, https://<ENAV_PUBLIC_FQDN>.com:<BLAST-CUSTOM-PORT>/?UDPPort=<BLAST-CUSTOM-PORT>.

https://horizon.pollaio.site/:30001?udpport=30001

https://horizon.pollaio.site/:30002?udpport=30002

A green check mark and a green box

Description automatically generated

Verify the Tunnel External URL

A green check mark and a green box

Description automatically generated

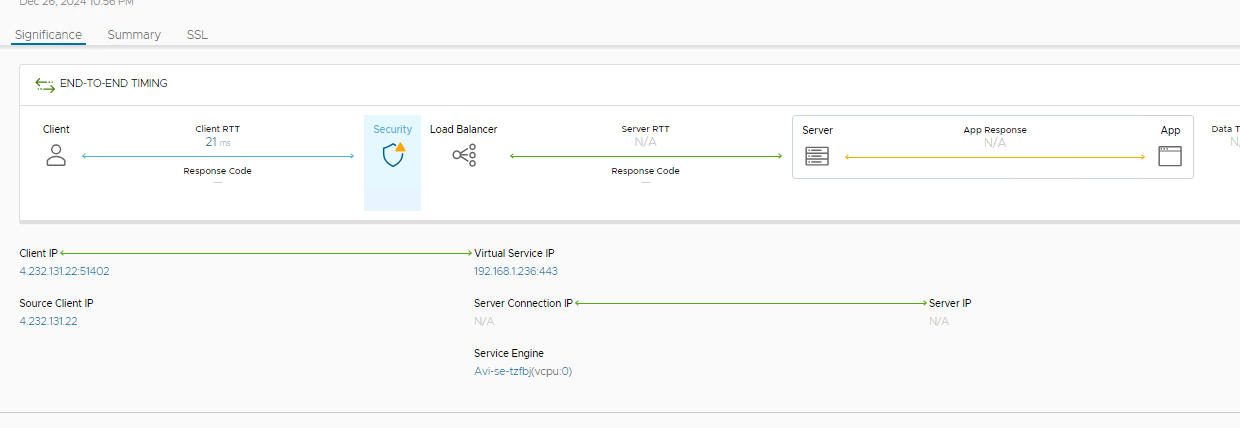
Now we are ready to test and verify the access flow to my VDI.

    • Port 443 – This is for XML API traffic
    • Ports 5001 to 5002 – Horizon internal ports opened for L7 primary XML traffic to handle redirected traffic
    • Ports 30001 to 30002 – Blast

Where:

    • Port 443 – This is for XML API traffic
    • Ports 5001 to 5002 – Horizon internal ports opened for L7 primary XML traffic to handle redirected traffic
    • Ports 30001 to 30002 – Blast
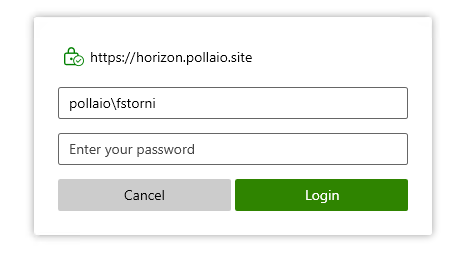
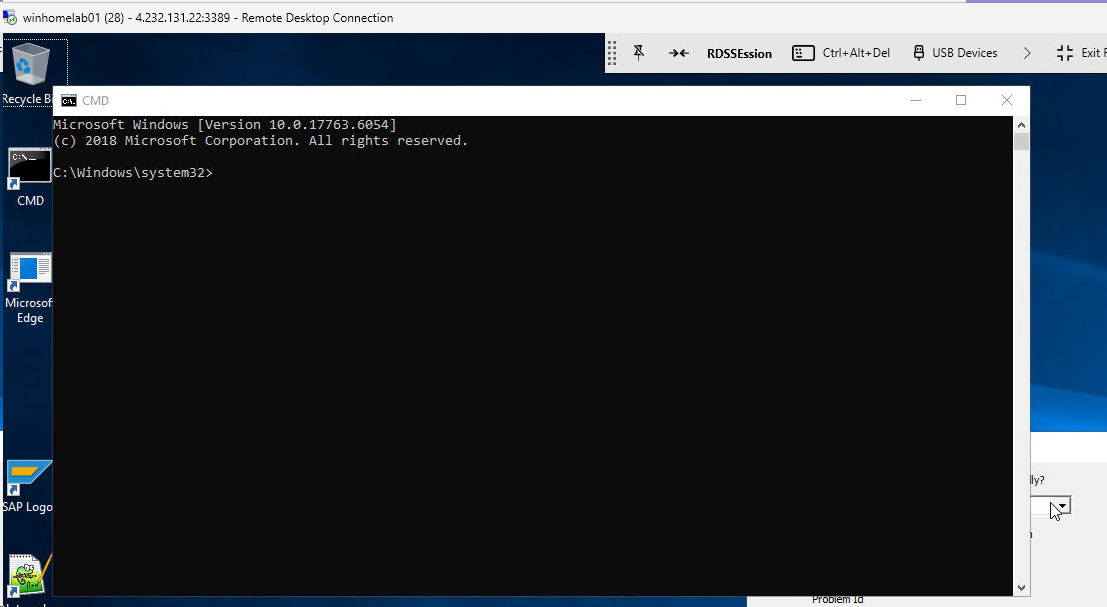
A screenshot of a login screen

Description automatically generated

A screenshot of a computer

Description automatically generated

A screenshot of a computer

Description automatically generated

A computer screen shot of a black screen

Description automatically generated

A screenshot of a computer

Description automatically generated

Refer:

NSX Advanced Load Balancer for Load Balancing UAG Servers

Use NSX Advanced Load Balancer for Omnissa Unified Access Gateway (Omnissa Horizon VDI)

Omnissa App Volumes 2406 – Select from multiple packages to launch

The App Volumes  2406 has many new functions, we can read all the info about this version in the following link:

Omnissa App Volumes Release Notes

I want to write about this:

To use this new function it is necessary to:

  • upgrade App Volumes Managers to 2406

App Volumes Manager Upgrade

  • upgrade App Volumes Agent to 2406

App Volumes Agent Upgrade

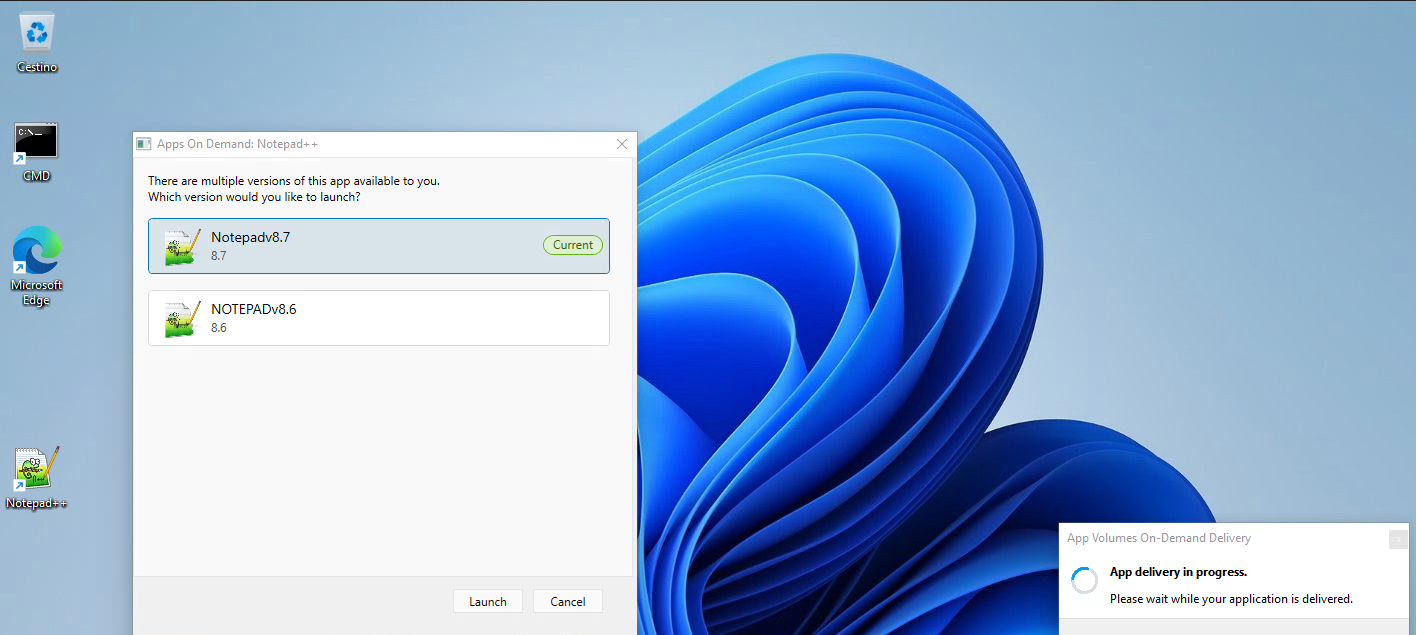
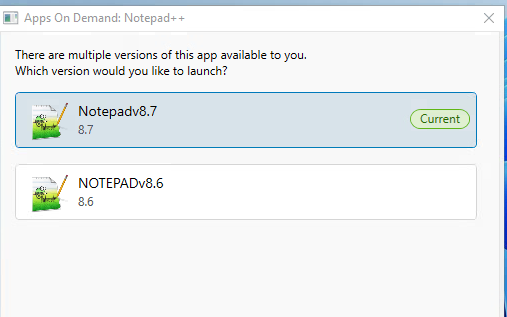
Now in the new App volumes Manager version, when I assign to the user a news package, I can select:

A screenshot of a computer

Description automatically generated

Now when the user “Fabio Storni” tries to start Notepad appstack from her VDI, he can select which Notepad version wants to start….

A screenshot of a computer screen

Description automatically generated

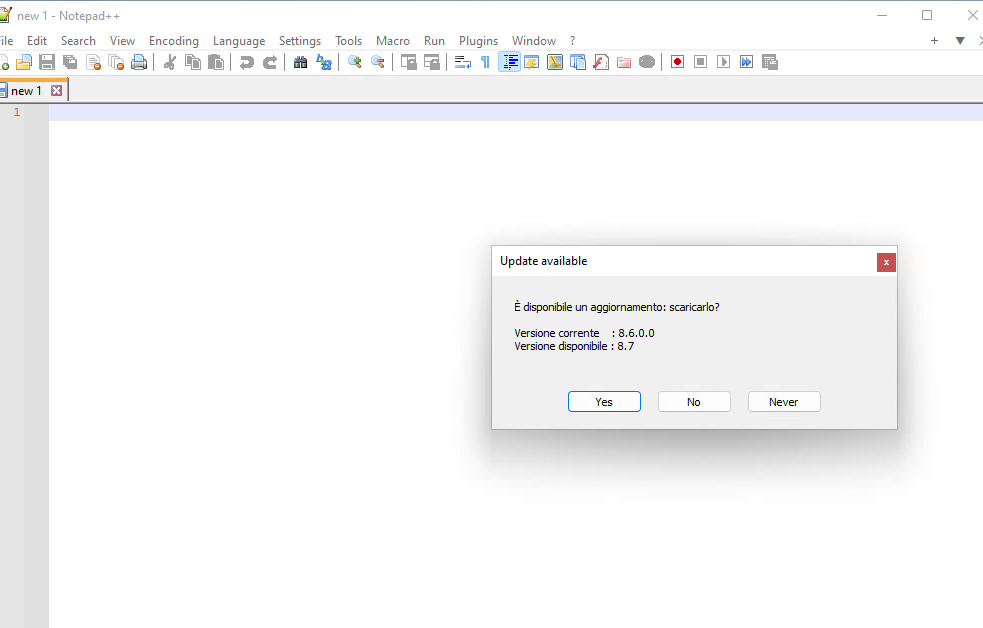
And I can select the application version to launch, in this case, I select the not current version

A screenshot of a computer

Description automatically generated

A screenshot of a computer

Description automatically generated

Omnissa App Volumes 2406 – Select from multiple packages to launch

Omnissa Dynamic Environment Manager 2406 and User-Managed Auto-Start Shortcuts


The Dynamic Environment Manager 2406 has many new functions, we can read all the info about this version in the following link:

Omnissa Dynamic Environment Manager Release Notes


I want to write about the “User-Managed Auto-Start Shortcuts”.

To use this new function it is necessary to:

  1. upgrade FlexEngine Agent to 2406 on VDI (Master Image or VDI Full Clone):
  • For AD agent install -> update the ADMX template (On Active Directory Central Store)

                   We need to modify or create a GPO (assigned to the OU where the VDI are allocated) and                           enable the “User-Managed Auto-Start Shortcuts”

                   User Configuration -> Policies -> Administrative Templates: Policy Definitions -> VMware                       DEM -> FlexEngine -> Self-Support -> Allow managing auto-start shortcuts and set it to                         Enable

  • For NOAD agent Install -> Use this parameter ManageAutoStartShortcuts, on the upgrade step, and set it to 1 to configure properly the self-support tools
  1. upgrade DEM console to 2406

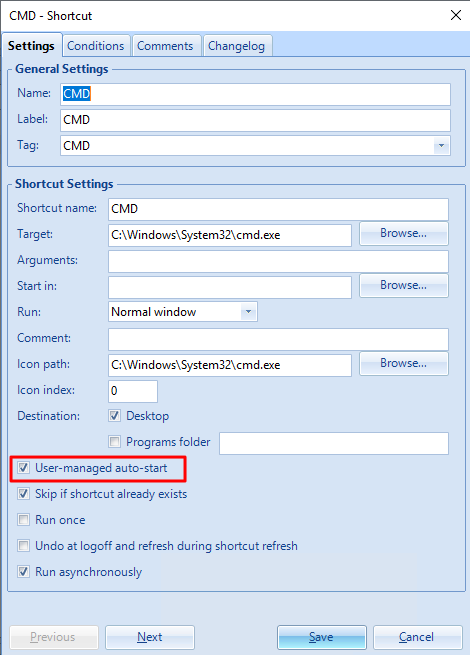
Now in DEM Console (under User Environment), we need to create ShortCuts like this

A screenshot of a computer

Description automatically generated

We need to enable “User-managed auto-start”

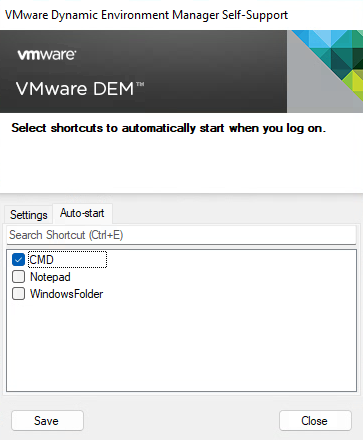
Now when the users log in to their VDI and launch the DEM Self-support program, they can select which shortcut applications automatically start when they log on:

A screenshot of a computer

Description automatically generated

Click SAVE and Close

Now at the next login……

A screenshot of a computer

Description automatically generated

Omnissa Dynamic Environment Manager 2406 and User-Managed Auto-Start Shortcuts