Have you just set up a VDI and want to see if your cool NVIDIA video card is doing its job? Don’t worry, I understand you. There’s nothing more frustrating than spending a fortune on hardware and then finding that the GPU sleeps while the processor does all of it. In this article, I explain in a simple (and fast) way how to test the Nvidia video card within a VDI.
Tested environment
NVIDIA Tesla M10 (not the latest model, but still supported by vSphere and NVIDIA and limited cost for my homelab)
vSphere 8.x (thanks to licenses as vExpert)
Omnissa Horizon 2503 (Thanks to licenses like Omnissa Tech Insider and Omnissa community)
Supermicro as HW
Guest OS Windows 11 2412
NVIDIA drivers installed on ESXi and Windows 11 guest VDI
Configuring the NVIDIA Card: Configuring the Card as Direct Shared


Virtual machine HW: Add the desired cut of the NVIDIA card size
In this link, there are more details on the NVIDIA cards’ size
First question: But can it be done?
Yes, and it must be done. With modern VDI – we are talking about environments such as those managed with Omnissa (formerly VMware EUC) – it is possible to assign GPUs to virtual machines using technologies such as vGPUs. The problem? It is not always clear if the GPU is really used.
Step 1: Verify that the GPU is mapped
First of all, log in to your VDI (Windows or Linux, little changes) and open the Task Manager or a terminal. In Windows, go to GPU > Performance. If you see “NVIDIA” somewhere, you’re on the right track.
Or use nvidia-smi (yes, it also works in VDI if the drivers are in good shape). It will tell you everything: from the memory used to the temperature, passing through the active processes. It’s like the GPU use.

Step 2: Make the video card work
At this point, test it seriously. What?
- Open an app that uses graphics acceleration (e.g., a CAD, a 4K video, or even just YouTube at full quality).

- If you’re on Windows, you can also use a lightweight benchmark like Unigine Heaven or Blender
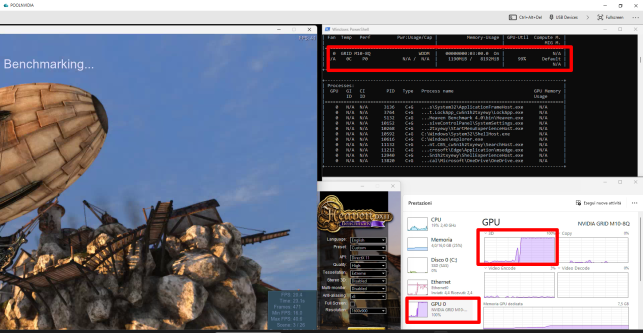

- On Linux or more closed environments, you can use command-line tools or scripts to make test renders.
During these tests, keep an eye on nvidia-smi or the Task Manager. If the GPU stays at 0%, there’s something wrong (spoiler: it’s often a driver or vGPU assignment issue).
Step 3: Monitor WHIT style
For continuous monitoring, you can install the NVIDIA System Management Interface or use third-party tools built into the Omnissa environment, such as those included in Horizon (Horizon Performance Tracker) or management plug-ins.
Bonus: Don’t forget the logs
Check the host machine and VM logs. Often, there you will find clues to understand if the GPU passage was successful or if there is something blocking everything.
Ultimately?
Testing an Nvidia GPU on a VDI is not complicated, but it takes a method. With the right tools and a keen eye, you can make sure that your graphics assets are really being used, and that the end user (or yourself) doesn’t have to put up with unnecessary lag or jerking.
Want help scripting an automated test? Write. Or… Launch nvidia-smi (with the -l parameter, it goes into automatic refresh) and see if the vGPU wakes up.
Some suggestions
- To get the most out of NVIDIA GPUs in a VDI environment, you need to sign a license agreement. Here is the link Virtual GPU (vGPU) Software Free 90Days Trial | NVIDIA for a 90-day trial (the one I used for testing)
- To perform top benchmarks, you have to remove the cap present by default on vSphere for FPS (I would recommend keeping FPS equal to or lower than the Hz value of your monitor, otherwise, we may have a non-optimal fluidity of the images). The cap is deactivated by putting this value in the Advanced settings of the VM’s pciPassthru0.cfg.frame_rate_limiter=0
