SSL Certificates in an Omnissa Horizon + Omnissa Access World: Why They Matter More Than You Think

.

A red lock on a blue background

AI-generated content may be incorrect.Let’s be honest: certificates are not the most exciting thing in IT. They don’t sparkle, they don’t blink, and they rarely impress your CIO in a slide deck. But if you’re running an Omnissa Horizon environment (also with Omnissa Access integration), SSL certificates are the unsung heroes that make your infrastructure secure, trusted, and usable.

In this post, let’s break down why certificates matter, where they should live in your Horizon world, and how they unlock some pretty cool features like True SSO.

.

.

The Basics: Why SSL Certificates?

At their core, SSL/TLS certificates do three things:

1.Encrypt traffic – so that nobody can sniff your users’ RDP or Blast traffic.
2.Prove identity – so your clients know they’re talking to the real Horizon server, not some sneaky impostor.
3.Build trust – because “untrusted certificate” pop-ups are the fastest way to kill user confidence.

In Horizon, these are not “nice to haves”—they’re essential.

.

Public vs Internal CA: Which Flavor Do You Need?

In most deployments, you’ll be juggling two kinds of certificates:

• Public CA Certificates: Perfect for components exposed to the internet—like your Unified Access Gateways (UAGs). Public certs ensure that external clients (home users, contractors, BYOD devices) connect without scary warnings.
• Internal Microsoft CA Certificates: Handy for internal components—like Connection Servers—especially if all your clients are domain-joined and trust your Microsoft enterprise CA. They’re cheaper (sometimes free) and give you tighter control.

Pro tip: You don’t have to pick one or the other. Most production environments mix both.

.

Certificates in the Horizon Architecture (The Big Picture)
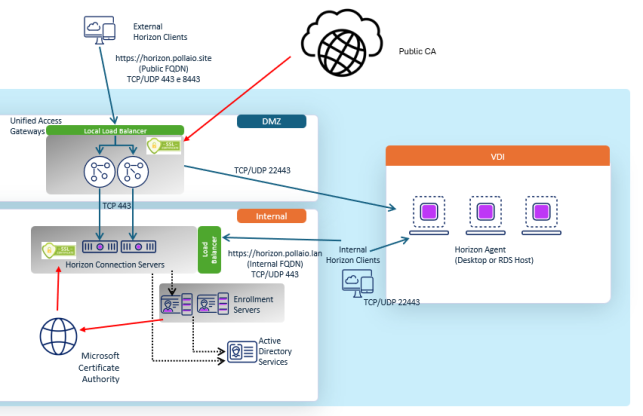
.

A screenshot of a computer

AI-generated content may be incorrect.

.

Think of the certificates as passports:

• The UAG needs a passport recognized globally (public CA).
• The Connection Servers can survive with a local passport (internal CA).
• True SSO hands out temporary passports at the border (short-lived certs) so users don’t need to fumble with passwords.

.

Certificates on Connection Servers

Your Horizon Connection Servers are the brains of the operation. By default, they come with a self-signed certificate. That’s fine for a lab, but in production it’s a recipe for distrust and compatibility issues.

Replacing it with either:

• An internal CA-issued cert (for domain-only environments)

means your Horizon Clients and web browsers connect seamlessly and securely. Bonus: no frantic helpdesk calls about “why does Horizon keep saying untrusted connection?”

Here are more details on how to install the certificates

.

.

Certificates on Unified Access Gateways (UAGs)

The UAG is your secure doorway to Horizon from the outside world (more time behind a load balancer). And here, public CA certs are king. Imagine asking a remote contractor to install your company’s internal root CA certificate just to connect—that’s not going to fly.

With a trusted public certificate:

• Users get smooth experience from the get-go.
• Browsers, Horizon Clients, and even thin clients connect without any fuss.
• You avoid troubleshooting nightmares tied to certificate trust chains.

Here are more details on how to install the certificates

.

The Secret Sauce: Certificates and True SSO

Now, let’s talk about one of Horizon’s coolest features: True SSO.

True SSO lets users log into Horizon desktops and apps with their identity from Omnissa Access—no extra password prompts or integrate with other SAML idP. Behind the scenes, Horizon uses short-lived, smart card-like certificates to authenticate the user to the desktop.

Guess what makes this magic possible? Certificates.

• A trusted internal CA (usually Microsoft AD CS) issues these ephemeral certificates.
• The Horizon infrastructure validates them and grants access seamlessly.
• The user just experiences fast, passwordless login.

So, without properly set up certificates, True SSO doesn’t fly.
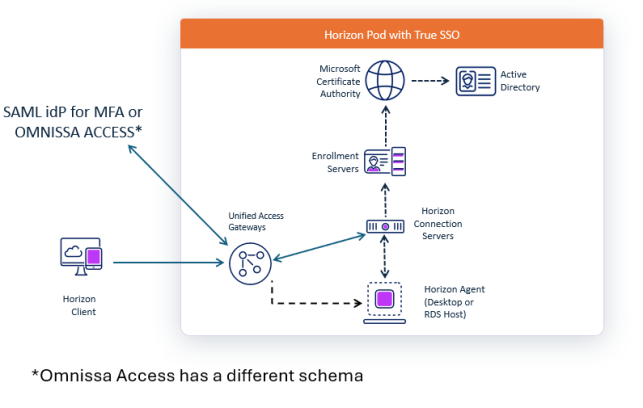
A diagram of a network

AI-generated content may be incorrect.

Here are more details on how to install the certificates (coming soon)

.

.

Wrapping It Up

Certificates might not be glamorous, but in an Omnissa Horizon + Omnissa Access environment they are foundational:

• They secure Connection Servers for internal trust.
• They harden UAGs with public-facing credibility.
• They power True SSO, giving users a smooth, passwordless experience.

Think of them as the quiet guardians of your virtual desktops: invisible when done right, but disastrous if ignored.

So next time you see a certificate renewal reminder, don’t sigh. Smile. Because your Horizon users—and your future self—will thank you.

.

SSL Certificates in an Omnissa Horizon + Omnissa Access World: Why They Matter More Than You Think

Replacing the Public Certificate on Your Omnissa Unified Access Gateways

.
Close-up of a screen with a lock and text

AI-generated content may be incorrect.So, you’ve got your shiny new public SSL certificate, and it’s time to make your Unified Access Gateways (UAGs) happy. Excellent choice — a properly installed certificate keeps your users safe, your browser warnings quiet, and your security team smiling.

.

In this post, I’ll walk you through how to replace or install a new public certificate on your Omnissa Unified Access Gateways.
We’ll use a
PFX (PKCS#12) certificate file, since it neatly bundles the private key, certificate, and intermediates in one convenient package.

.

My Preferred Setup

I like to keep things clean and consistent, so instead of juggling multiple certificates, I use a single public certificate for all Unified Access Gateways in my deployment.

Here’s the trick:
When generating or requesting your certificate, make sure the
Subject Alternative Name (SAN) section includes:

• The VIP used to access the UAGs through the load balancer (Normally, a public FQDN)

If you use the UAGs for internal access (for network segmentation), I suggest adding to SAN the internal UAG FQDN.

.

🔧 Step-by-Step: Installing the Certificate

(Insert screenshots of each step here)

1.Log in to the UAG admin console
Open your browser and connect to the UAG admin interface:
2.https://<UAG-FQDN>:9443/admin

A screenshot of a login form

AI-generated content may be incorrect.

Sign in with your admin credentials.

A screen shot of a computer

AI-generated content may be incorrect.

3.Go to the TLS/SSL Settings
From the left menu, navigate to:

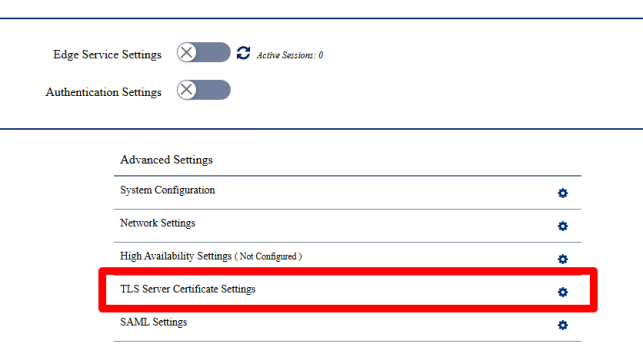
System Configuration → TLS Server Certificate Settings

A screenshot of a computer

AI-generated content may be incorrect.

4. Prepare your PFX file
You should already have your .
pfx file ready, containing:
◦ Your public certificate
◦ Any intermediate certificates
◦ Your private key

You’ll also need the PFX password you set when exporting the file.

5 .Import the new certificate
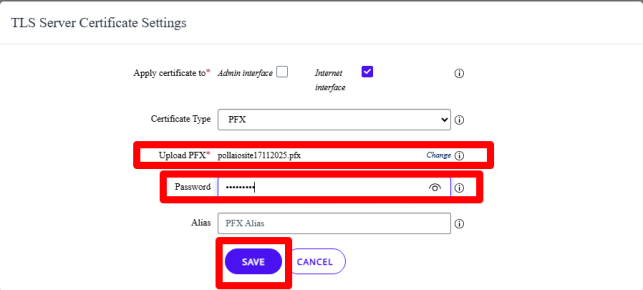
In the TLS configuration page, click
Select PFX, browse to your certificate file, and enter the password.
Then hit
Save at the bottom of the page.

A screenshot of a computer

AI-generated content may be incorrect.

A green rectangle with black text

AI-generated content may be incorrect.

6. Wait for the magic
The Unified Access Gateway will automatically restart the Edge service to apply the new certificate.

Grab a coffee ☕ — it only takes a few seconds.
7 .Verify everything works
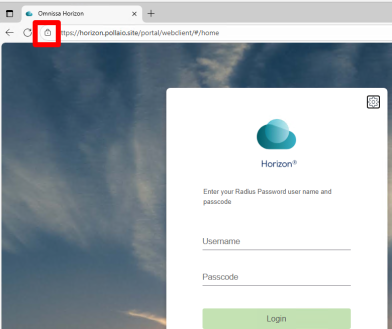
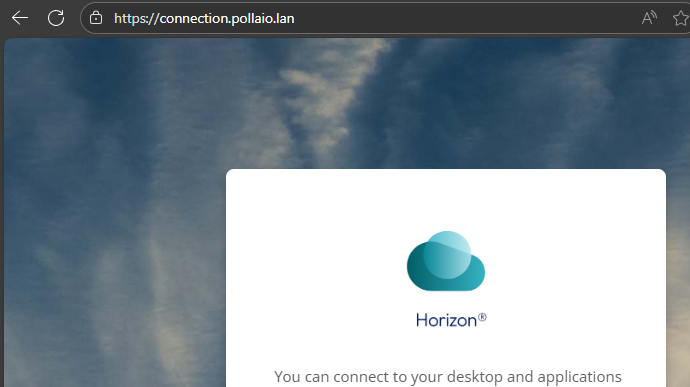
Once the UAG is back online, open the VIP URL in your browser
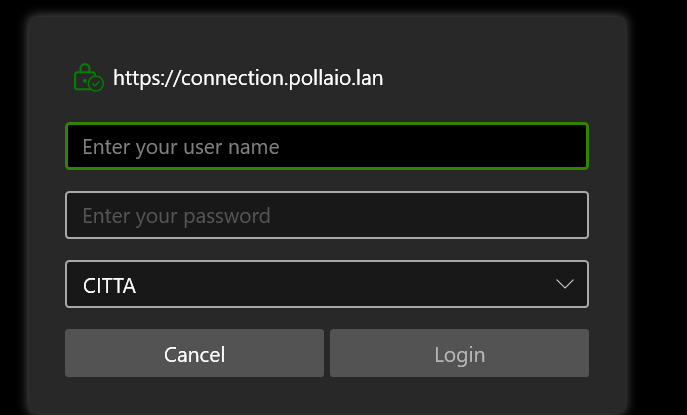
or Horizon Client and check the certificate details.
Browser

A screenshot of a computer

AI-generated content may be incorrect.

Horizon Client

A screenshot of a login screen

AI-generated content may be incorrect.

.

Bonus Tips

• Consistency is key: Replace the certificate across all your UAGs (behind the same Public FQDN).
• Backup the old cert: Always keep a copy of the previous working certificate — just in case something goes sideways.
• Keep a note of the certificate expiration date and plan your next renewal ahead of time (trust me, future-you will thank you).
IMPORTANT: Once you’ve changed the certificate, always verify that it works. Especially if you have thin clients, make sure they have loaded the necessary certificates (RootCA and SubCA) to validate the new certificate.

. That’s It!

You’ve successfully installed a new public certificate on your Omnissa Unified Access Gateways.
Your users now enjoy secure, trusted access — and you get the satisfaction of another clean green padlock in the browser.

.

Replacing the Public Certificate on Your Omnissa Unified Access Gateways

Replacing the Self-Signed Certificate on Omnissa Connection Server with a Microsoft CA-Issued Certificate (or replacing the certificate to end to validation date)

.

Let’s be honest — that shiny self-signed certificate your Omnissa Connection Server came with is fine… until your browser or Horizon client starts screaming “Untrusted!” at every login. 😅

A screenshot of a computer error AI-generated content may be incorrect.


It’s time to fix that properly — by replacing it with a trusted certificate issued by your internal Microsoft CA.

In this guide, we’ll walk through the process step-by-step, ending up with a PFX certificate you can deploy to all your Connection Servers.

.

Why One Certificate for All Connection Servers?

Because simplicity is beautiful.
Maintaining a single certificate across all your Connection Servers reduces management overhead and avoids those awkward “name mismatch” warnings.

In the certificate, we’ll include all relevant hostnames as Subject Alternative Names (SANs):

• The hostname and FQDN of each Connection Server
• The VIP name (if you’re using a load balancer for internal access)

Example SAN list (2 Connection Servers and 1 VIP):

connection01.company.local

connection02.company.local

horizon-vip.company.local

connection01

connection02

horizon-vip

.

.

Step 1: Require the certificate as a PFX File

1. The certificate will be exported into a PFX file with:
◦ Exporting the private key
◦ Protect it with a strong password
◦ Save it somewhere safe (seriously, treat it like a password)

.

Step 2: Deploy the Certificate on All Connection Servers

Now that you have your shiny, trusted .pfx file, it’s time to put it to work.

Repeat the following steps on each Connection Server:

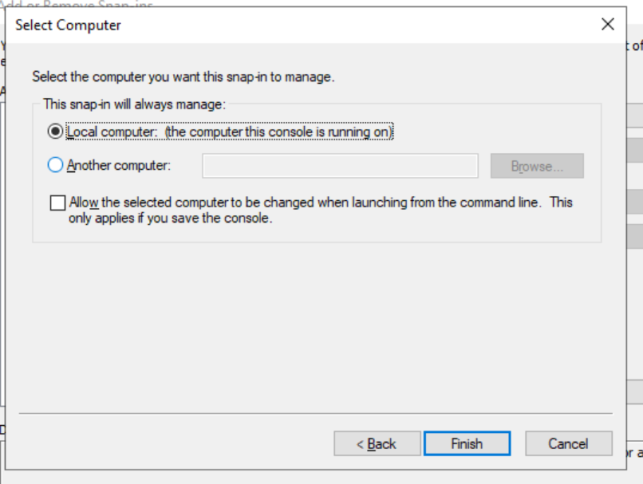
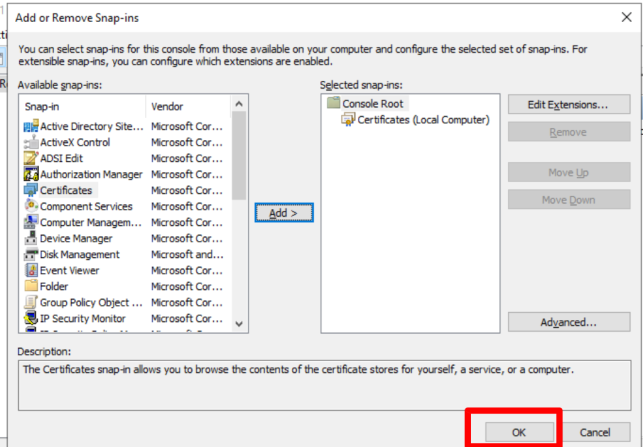
1.Open MMC → Certificates (Local Computer) again.

A screenshot of a computer AI-generated content may be incorrect.

A screenshot of a computer program AI-generated content may be incorrect.

A screenshot of a computer AI-generated content may be incorrect.

A screenshot of a computer AI-generated content may be incorrect.

A screenshot of a computer AI-generated content may be incorrect.

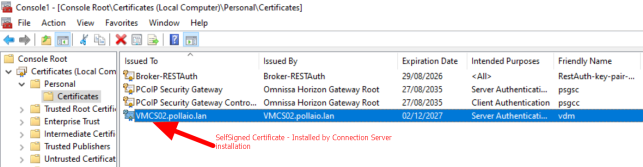
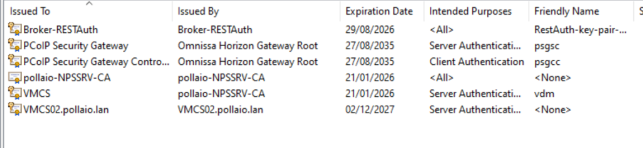
In Personal, there is a self-signed certificate (or an old certificate) installed by the Connection Server installation process

A screenshot of a computer AI-generated content may be incorrect.

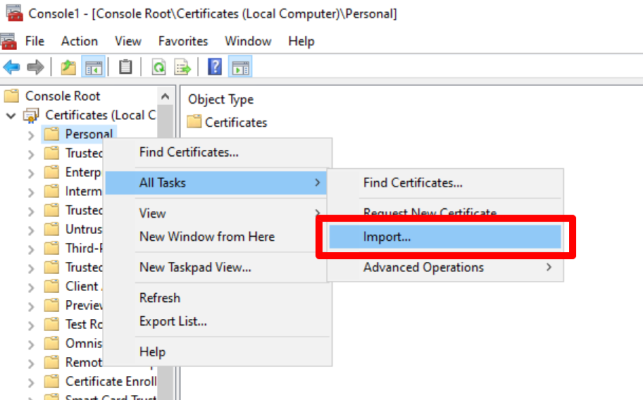
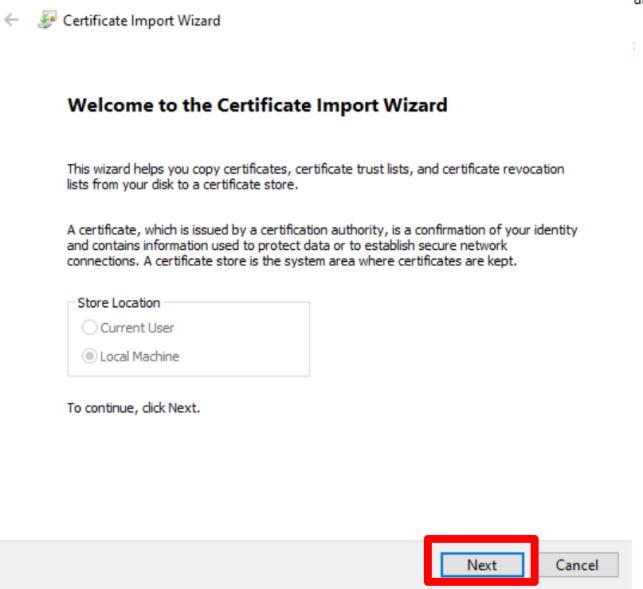
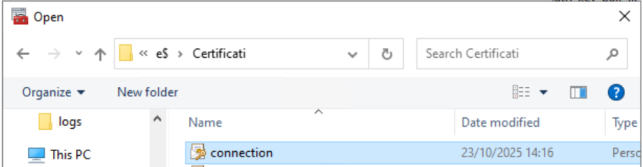
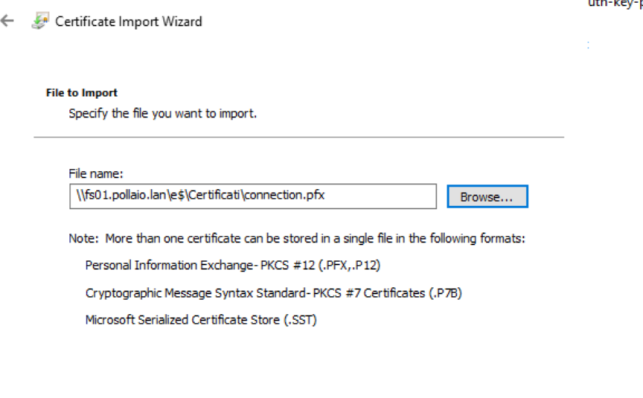
2. Import the .pfx file under:

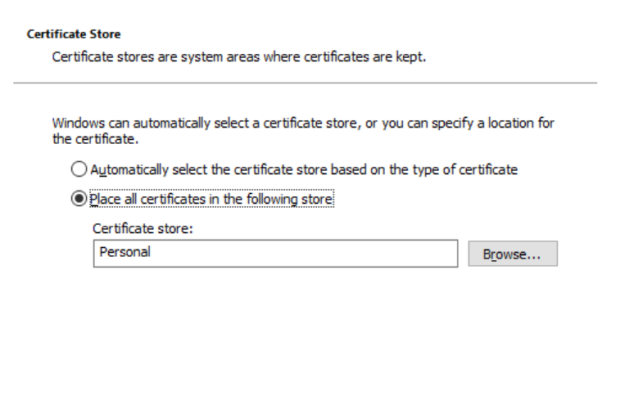
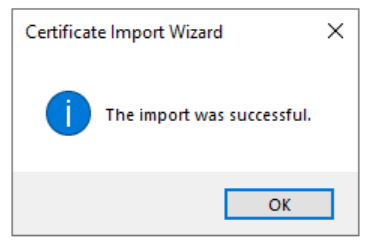
Personal > CertificatesA screenshot of a computer AI-generated content may be incorrect.

.

A screenshot of a certificate AI-generated content may be incorrect.

A screenshot of a computer AI-generated content may be incorrect.

A screenshot of a computer AI-generated content may be incorrect.

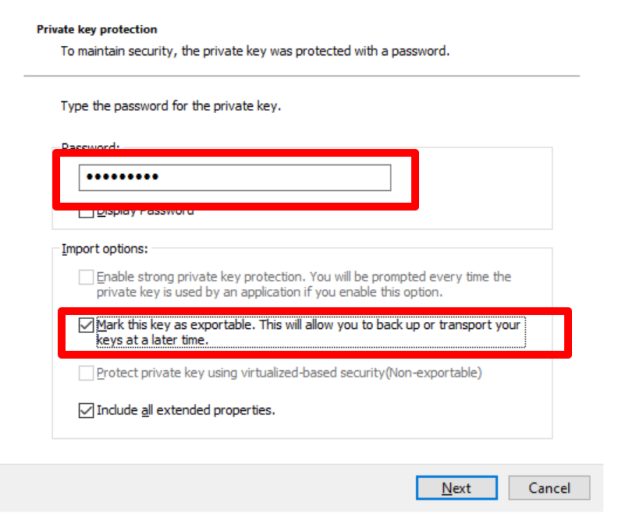
3. When prompted, provide the password you used during export and select “Mark this key as exportable….”

A screenshot of a computer screen AI-generated content may be incorrect.

A screenshot of a certificate AI-generated content may be incorrect.

4. Verify that the certificate appears in the list with the private key (the certificate icon has a key)

A screenshot of a computer AI-generated content may be incorrect.

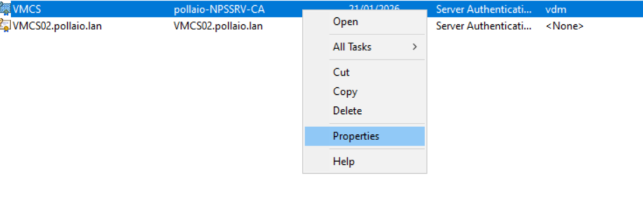
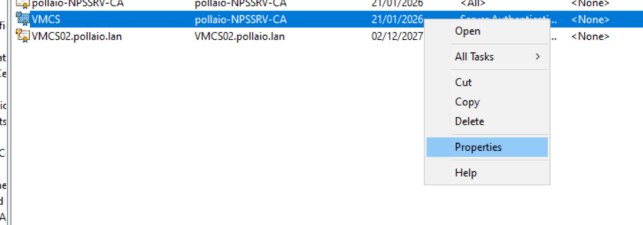
5. Remove the friendly name VDM from the self-signed certificate or the old certificate

A screenshot of a computer AI-generated content may be incorrect.

A screenshot of a computer AI-generated content may be incorrect.

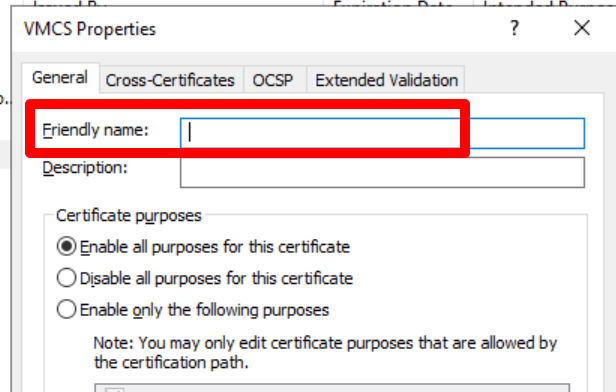
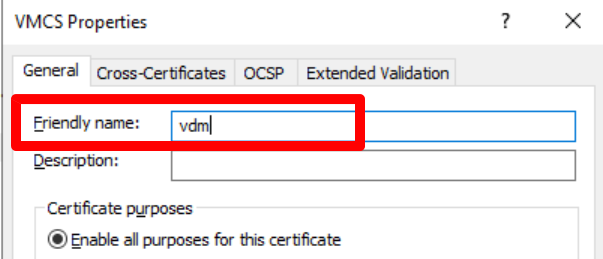
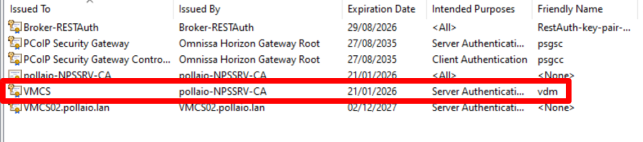
6.Add friendly name VDM to new certificate

A screenshot of a computer AI-generated content may be incorrect.

A screenshot of a computer AI-generated content may be incorrect.

A red lines with black text AI-generated content may be incorrect.

.

.

Step 3: Restart the Horizon Connection Server Service

To make the change effective:

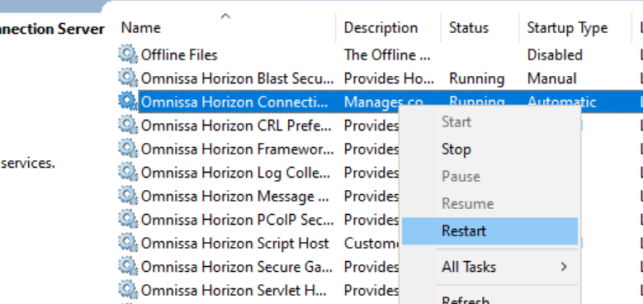
1. Open Services.msc
2 . Restart the VMware Horizon Connection Server service.
3 . Alternatively, you can simply reboot the server if you’re feeling extra cautious.

A screenshot of a computer screen AI-generated content may be incorrect.

Once restarted, the Connection Server should automatically pick up the new certificate.

You can confirm by opening the Horizon Administrator Console in your browser and checking that your connection is now secure and trusted ✅

We need to repeat steps 4 and 5 on all Omnissa Connection servers

.

Bonus: Keeping Things Clean

• Make sure all old or expired certificates are removed from the Personal store.
• Keep a note of the certificate expiration date and plan your next renewal ahead of time (trust me, future-you will thank you).
• If the Horizon is behind the Unified Access Gateway (for external connection and network segmentation, remember to change the Thumbprint on the UAG configuration)
IMPORTANT: Once you’ve changed the certificate, always verify that it works. Especially if you have thin clients, make sure they have loaded the necessary certificates (RootCA and SubCA) to validate the new certificate.

.

Done!

You’ve successfully banished the self-signed gremlin and brought your Horizon environment into the trusted world of PKI.

From now on, your users will enjoy clean, warning-free connections — and your security team will silently thank you for doing things the right way.

.

Replacing the Self-Signed Certificate on Omnissa Connection Server with a Microsoft CA-Issued Certificate (or replacing the certificate to end to validation date)

Using Windows Server 2025 in a Horizon Brownfield Setup (Yes, You Can)

.

Attention, I am experiencing some anomalies after activating the hybrid environment… I advise you to wait for news before proceeding.

LDAP replication fix: The April 8, 2025 update (KB5055523) introduced an LDAP replication issue when Windows Server 2025 is mixed with older Windows versions. The November 11, 2025 patch (kb5068861) resolves this issue

Hey, good news!

As of early August 2025, Horizon now supports Windows Server 2025 in brownfield environments. If you’re already running Horizon and thinking about tossing in a Server 2025 box, here’s the breakdown: what you need, what to tweak, and some handy commands to make it happen.

All information is taken from the official Omnissa KB (Windows 2025 support for Horizon brownfield installations (6000960) )

A jump into the past

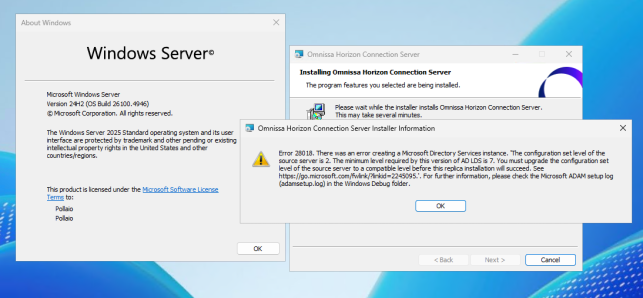
Before… when trying to install the Connection Server Replica role on Windows Server 2025 and trying to insert it into a pod containing Windows Server 2016, 2019, and 2022, you would get this error:

A screenshot of a computer error AI-generated content may be incorrect.

.

Requirements

• Horizon version: Must be Horizon 8 v2503 or later. This is what enables full support for Windows Server 2025 in brownfield setups
• Windows Server Update

Ensure all Connection Server machines within the pod are updated with the Microsoft Windows 2025 February update or later release (for more details, check the official Omnissa KB)

All Windows 2025 machines hosting the Connection Server must have the Microsoft November 11, 2025 patch (or later) installed. This is required for:

  1. AD LDS functional level update: Without the required patch, updating the AD LDS functional level will cause the AD LDS instance to fail. Refer to Microsoft’s documentation: AD LDS service startup fails if updated without required patches.
  2. LDAP replication fix: The April 8, 2025 update (KB5055523) introduced an LDAP replication issue when Windows Server 2025 is mixed with older Windows versions. The November 11, 2025 patch (kb5068861) resolves this issue
• AD LDS Functional Level: This is the kicker:
◦ Windows Server 2025 uses AD LDS functional level 7 by default
◦ Older WS versions (2016–2022) often default their AD LDS to level 2, which is incompatible with WS 2025 replicas

Fresh installs on WS 2025 with Horizon v2503 will default to FL-7 for AD LDS. But if you’re joining WS 2025 to older Horizon Connection Servers that haven’t had their FL bumped, you’ll hit a replica error (“minimum level required by this version… is 7”)

Omnissa has released a script to upgrade FL to version 7 (Supported from Windows Server 2016 onwards)

.

.

Step-by-Step: What to Do

1. Verify you’re on Horizon 8 v2503+:
◦ Go to your Connection Server > About > Confirm version.
2. Check the current AD LDS functional level and Windows Server patch
◦ Download the PowerShell script (UpdateFunctionalLevel-v1.ps1) attached to the Omnissa KB and run it on all Connection Servers
◦ The script can be checked:
1. Windows Operating System and Patch Level of the Connection Server machines
2 . Current Functional Level of local and Global AD LDS
3. Upgrade the FL to 7 (Remember to create a VM snapshot and do a backup….)
◦ The same Omnissa script can upgrade the FL from 2 to 7:
1. Update the Functional Level of the current Pod
2 .Update the Functional Level of CPA
A screen shot of a computer AI-generated content may be incorrect.

.

All check and upgrade steps in my YouTube video:

https://www.youtube.com/watch?v=aR2qvvlY9gc

.

.

.

What You’re Looking At

Component

Requirement

Horizon version

v2503 or later

AD LDS Functional Level

Must be 7 (WS 2025 default), not 2

Action Required

Check and update FL before pod join

.

A Quick Tech Tip

“Horizon 2503 or later will set functional level to 7 for fresh install of the connection server on Windows 2025 and to 2 for anything before Windows 2025.”
— Omnissa internal forum 

So yeah—if you’ve done a fresh install on WS 2025 after Horizon 2503, you’re golden. But mixing in older AD LDS configs? That’s when things break… but this post is the answer.

.

Using Windows Server 2025 in a Horizon Brownfield Setup (Yes, You Can)

Securing Horizon Event DB to SQL Server with TLS

.

Because Who Likes Sniffers Anyway?

So you’ve installed Horizon (2503 is last version) and got your Event Database humming along on a shiny SQL Server. But hold on a sec — did you remember to lock down that traffic with TLS encryption? Or are you letting your event logs float around in plain text like it’s still 1999?

Let’s fix that.
Here’s how to set up
SSL/TLS encryption between Horizon and your SQL Server, with a proper certificate from your Microsoft CA, and make sure your event data isn’t the low-hanging fruit on your network.

.

 Why bother?

Because:

• Anyone with Wireshark can eavesdrop on your events and see user logins, VM power actions, etc.
• Your security team will buy you more coffee if you’re nice to them.

.

The Plan

1.Request & issue a certificate from your Microsoft CA infrastructure.
2.Install the certificate on your SQL Server.
3.Configure SQL Server to force encryption using that cert.
4.Enable Horizon to use SSL for SQL connection
5.Test it and sleep better.

.

1. Request a certificate from your Microsoft CA

On your SQL Server, create a certificate request:

Use certreq or just the MMC GUI.
Here’s the quick-and-dirty via MMC:

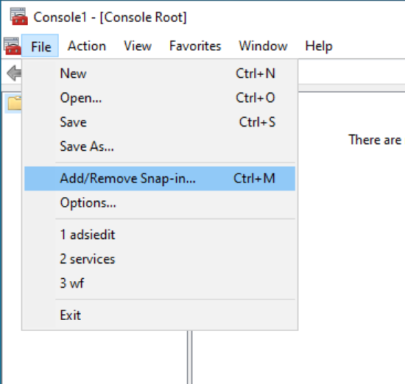
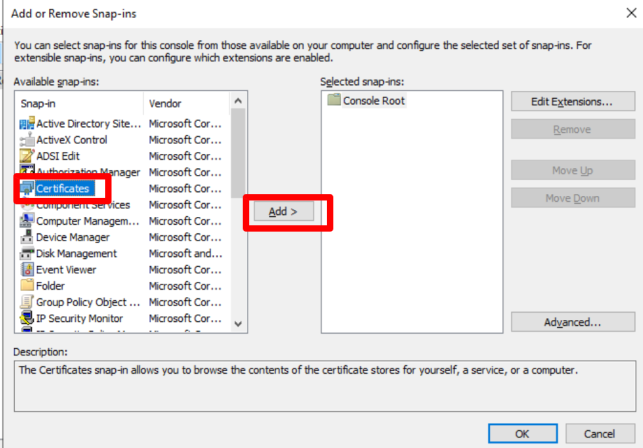
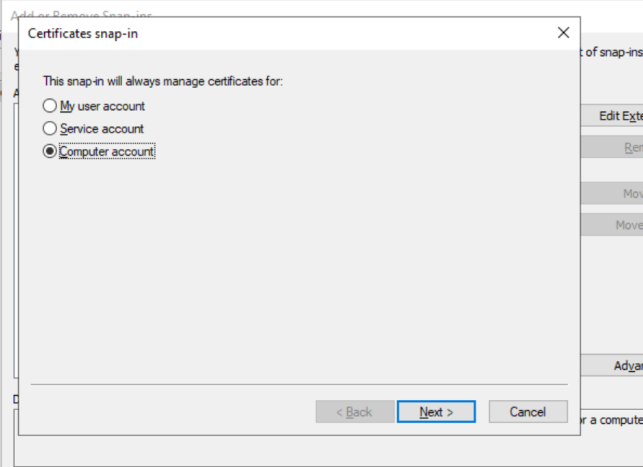
1.Open mmc.exe ➔ Add the Certificates snap-in for Computer account.
2.Right-click Personal ➔ Certificates ➔ All Tasks ➔ Request New Certificate.
3.Select your Active Directory Enrollment Policy.
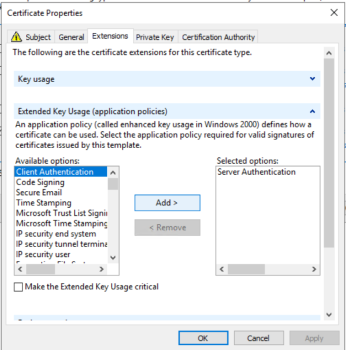
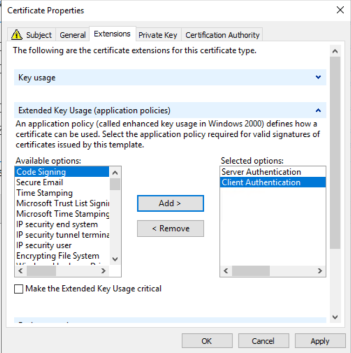
4.Choose a template that includes “Server Authentication” EKU (typically Web Server template).
5.Fill in the common name (CN) with your SQL Server’s FQDN (must match exactly what clients connect to).

(Example: sql01.contoso.local)

6.Enable that private Key is exportable
7.Finish and you’re done. Your cert should show up in Personal ➔ Certificates.

.

2. Install, verify and assign right permission to the cert

Technically it’s already installed, but verify:

• It’s under Computer -> Personal ➔ Certificates on your SQL Server .
• It has Server Authentication (1.3.6.1.5.5.7.3.1) EKU.
• The private key is present (little key icon when you look at the cert).

.

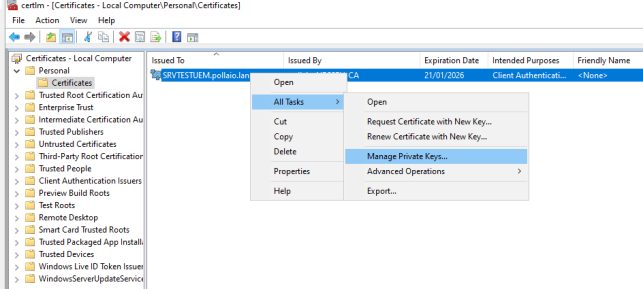
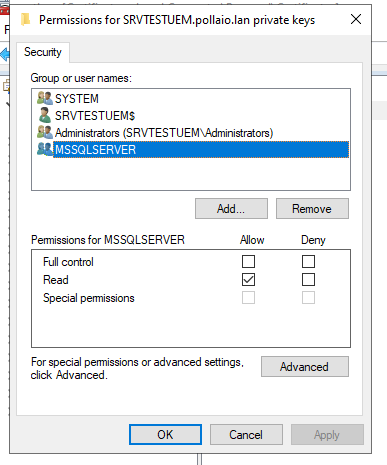
Now we need to assign to the user that starts the SQL server service the permissions to read the private key.

A screenshot of a computer AI-generated content may be incorrect.

.

A screenshot of a computer screen AI-generated content may be incorrect.

.

3. Tell SQL Server to use it

Configure SQL Server

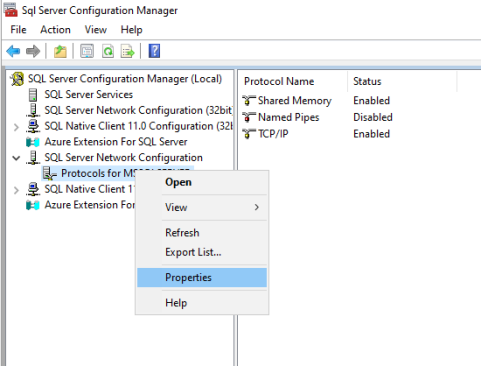
1.Open SQL Server Configuration Manager.
2.Go to SQL Server Network Configuration ➔ Protocols for MSSQLSERVER ➔ Properties ➔ Certificate tab.

A screenshot of a computer AI-generated content may be incorrect.

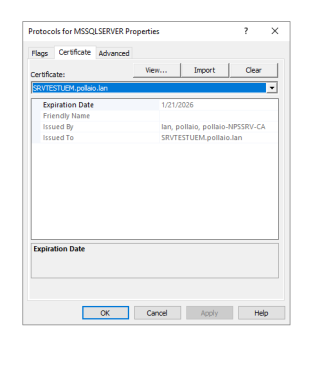
3.Select your cert from the dropdown.

.

A screenshot of a computer AI-generated content may be incorrect.

If it doesn’t show up:

• Check that CN matches the machine’s FQDN.
• Make sure it has Server Authentication EKU.
• Ensure it’s in LocalMachine\My (Personal store).

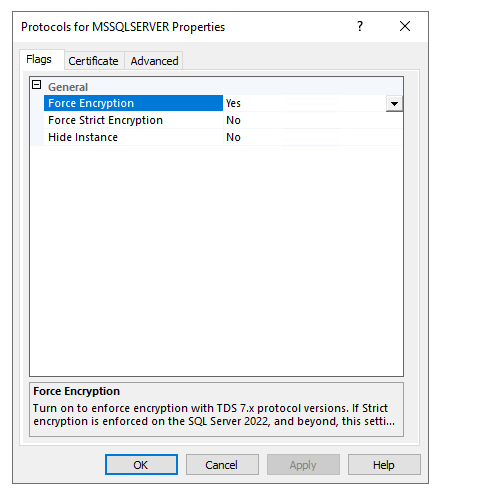
Force encryption (optional but recommended)

Still in Protocols for MSSQLSERVER ➔ Flags tab ➔ Set Force Encryption = Yes.

A screenshot of a computer AI-generated content may be incorrect.

.

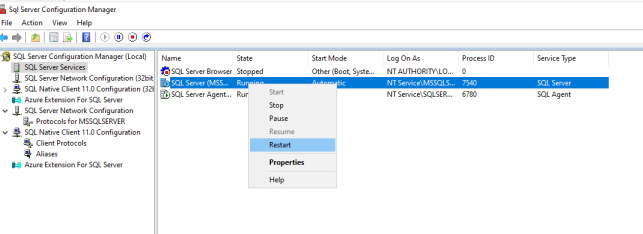
Restart SQL Service

You knew this was coming:

Restart-Service MSSQLSERVER

A screenshot of a computer AI-generated content may be incorrect.

.

Testing time

Use SQL Server Management Studio (SSMS) to connect, then run:

SELECT session_id, encrypt_option

FROM sys.dm_exec_connections

WHERE session_id = @@SPID;

If encrypt_option says TRUE, congrats! 🎉

.

What about Horizon?

Enable SSL with modification in the ADAM DB pae-enableDbSSL and set it to 1

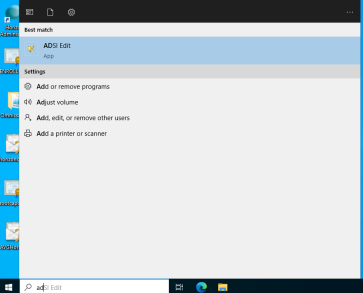
1. Start ADSI Edit

A screenshot of a computer AI-generated content may be incorrect.

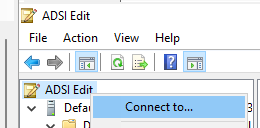
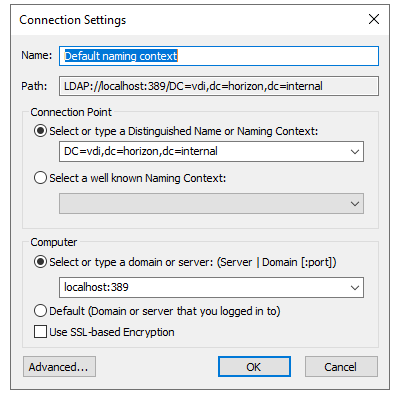
2.Connect to the ADAM DB

A screenshot of a computer AI-generated content may be incorrect.

A screenshot of a computer AI-generated content may be incorrect.

Remember that the Distinguished Name is different if you use the OLD ADAM Schema or the new Schema (the DN indicated in the image is the new schema with the rebranding Omnissa)

3.Go to OU=Properties > OU=Global > CN=Common and set the pae-enableDbSSL flag to 1 .

A screenshot of a computer AI-generated content may be incorrect.

4. Restart the omnissa Horizon Connection Server Service

A screenshot of a computer AI-generated content may be incorrect.

.

When you configure your Event Database settings in Horizon Administrator, it’ll negotiate TLS automatically if your SQL Server is set up for it.

Just make sure:

• Horizon connects via the FQDN matching the cert CN.
• The client OS trusts your CA (install the CA root cert if needed).

.

Done! Enjoy encrypted peace of mind.

Now your Horizon events are zipped up nice and secure in transit.
No more plain-text passwords, no more nosey packet sniffers. You
can go brag to your security team and earn those extra donuts.

.

.

Bonus topic!

Now I check the traffic from Horizon Connection Server and SQL Server

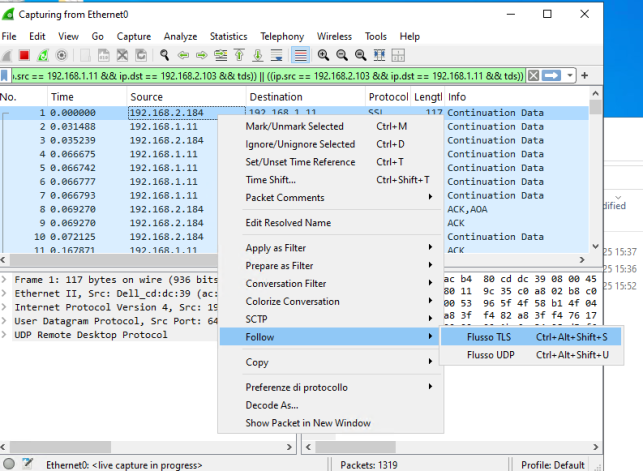
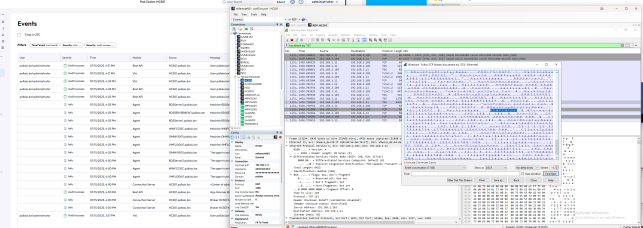
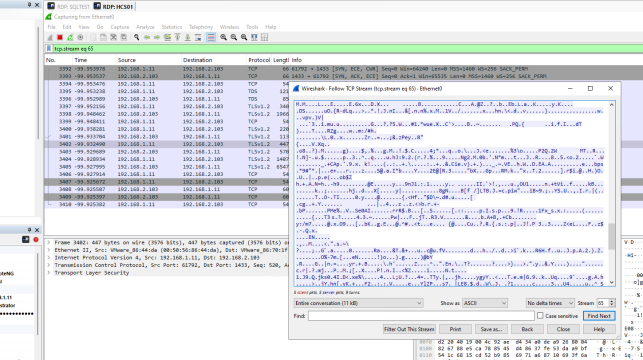
With Wireshark, we can check if the traffic is encrypted:

1. Install Wireshark and Npcap on the Windows server of one of your connection servers
2.Enable filter ((ip.src == <IP CS> && ip.dst == <IP SQL SERVER>)) || ((ip.src == <IP SQL SERVER> && ip.dst == <IP CS>))
3. Start the capture
4. Log in to the connection server and create an Event filter
5 . Check

A screenshot of a computer AI-generated content may be incorrect.

.

Whitout encryption

A screenshot of a computer AI-generated content may be incorrect.

With Encrypted


A screenshot of a computer AI-generated content may be incorrect.

Securing Horizon Event DB to SQL Server with TLS

Enhancing VDI Security and User Experience with FIDO2/WebAuthn and Omnissa Horizon

In today’s hybrid work environments, Virtual Desktop Infrastructure (VDI) solutions like Omnissa Horizon are critical to ensuring secure and flexible access to corporate resources. Yet, as we continue to shift towards distributed workforces, traditional authentication methods such as passwords and OTP tokens increasingly show their limitations — in both security and user experience.

This is where FIDO2/WebAuthn comes into play. By integrating FIDO2/WebAuthn into your Horizon deployment, you can deliver passwordless, phishing-resistant authentication that simplifies end-user access while dramatically improving security posture.

What is FIDO2/WebAuthn?

FIDO2 is an open standard developed by the FIDO Alliance and W3C. WebAuthn (Web Authentication) is the core API that enables browsers and web applications to leverage strong authenticators such as security keys, biometric devices (like fingerprint readers), or built-in platform authenticators (like Windows Hello or Apple Face ID).

In simple terms: it replaces passwords with secure, device-bound credentials that can’t be phished or reused.

Why combine FIDO2/WebAuthn with VMware Horizon?

Here are the key benefits for Horizon administrators and end users:

1. Stronger Security

Traditional passwords are susceptible to phishing, credential stuffing, and breaches. FIDO2/WebAuthn credentials are cryptographically unique and never leave the user’s device. Even if attackers obtain user data, they cannot reuse it to gain access.

2. Seamless User Experience

Users authenticate with something they have (a device) and something they are (biometrics) or something they know (PIN). The process is fast, intuitive, and eliminates password fatigue. No more forgotten passwords or frequent resets.

3. Simplified Endpoint Management

In distributed VDI environments, especially with BYOD policies, managing traditional credentials across devices is a challenge. FIDO2/WebAuthn allows users to authenticate securely from any compliant device, reducing helpdesk workload and administrative complexity.

4. Phishing Resistance

Unlike OTP or SMS-based 2FA, FIDO2/WebAuthn authentication is bound to the specific origin (domain). Credentials cannot be used on malicious lookalike websites, significantly reducing phishing attack vectors.

5. Future-Proof Compliance

Many modern security frameworks and regulatory guidelines encourage or require phishing-resistant MFA. Deploying FIDO2/WebAuthn puts your organization ahead of compliance mandates.

How does it work with Horizon?

With Horizon’s support for modern authentication protocols (including SAML and integration with identity providers that support FIDO2/WebAuthn), you can deploy passwordless authentication workflows seamlessly:

  • Users access Horizon Client or Workspace ONE with their FIDO2 device (security key, biometrics, or platform authenticator).
  • The identity provider (IdP) validates the FIDO2/WebAuthn credentials.
  • Once authenticated, users are securely provisioned into their Horizon VDI sessions.

No passwords exchanged. No phishable credentials. Just fast, secure, and frictionless access.

Ready to try it?

Integrating FIDO2/WebAuthn with VMware Horizon is a clear step toward a more secure, modern, and user-friendly VDI environment. Whether you’re looking to reduce helpdesk tickets, strengthen security, or improve user experience, this technology is worth exploring.

Now is the time to test and adopt FIDO2/WebAuthn.

(If you want to use FIDO2 for login to VDI, see my post VMware Workspace One Access, VMware Horizon, and FIDO2 device – BIOLNX)

Environment:

  • Horizon 2503
  • Yubikey
  • Windows 11 24H2 (Guest OS for VDI)
  • Firefox and Edge
  • Horizon GPO
  • Use https://webauthn.io for authentication test

0 – Configure an account on WebAuthn.io

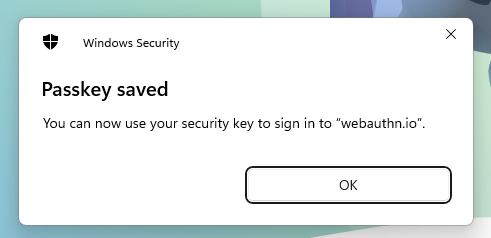
Insert the Yubikey on a physical PC

Go to https://webauthn.io

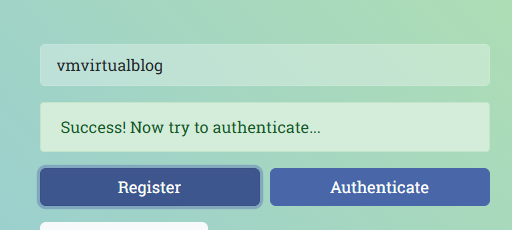
Insert the username and set the preferred authentication method

Select a security key (Yubikey)

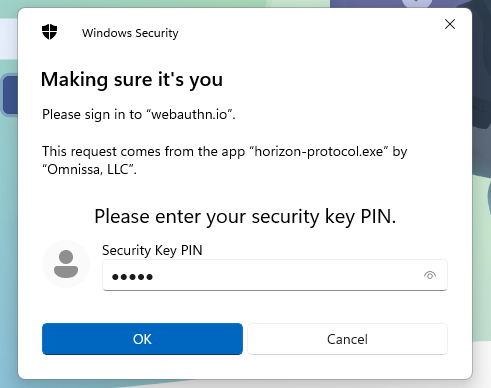
Enter the security key assigned to Yubikey

A finger pressing a usb drive into a computer AI-generated content may be incorrect.

1 – Check  Active Directory GPO

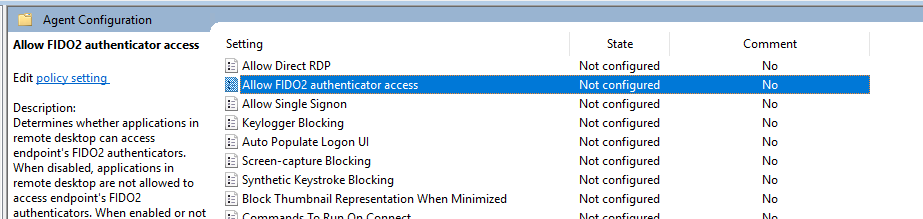
The default configuration for “Allow FIDO2 authenticator access” (under Agent Configuration) is Not Configured, and with this configuration, the FIDO2 WebAuthn is enabled.

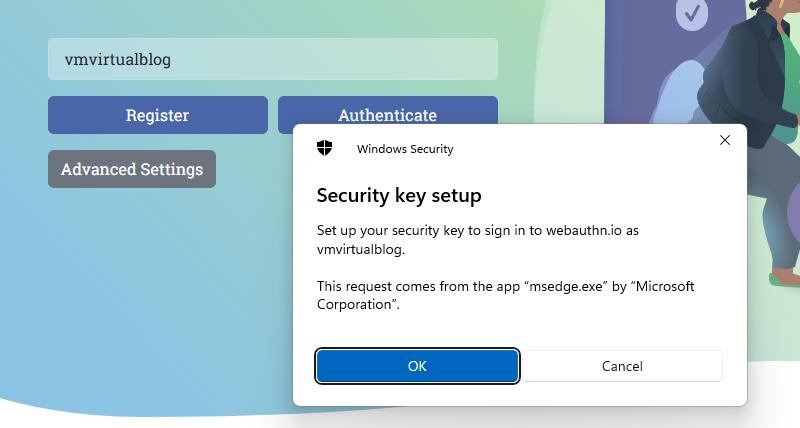
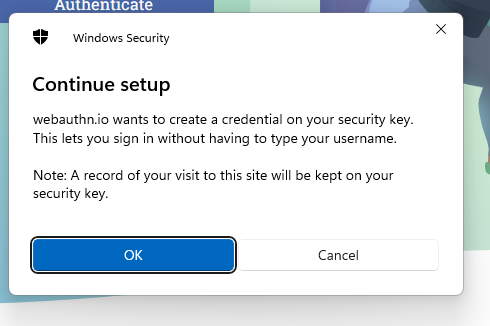
2 – Test authentication 

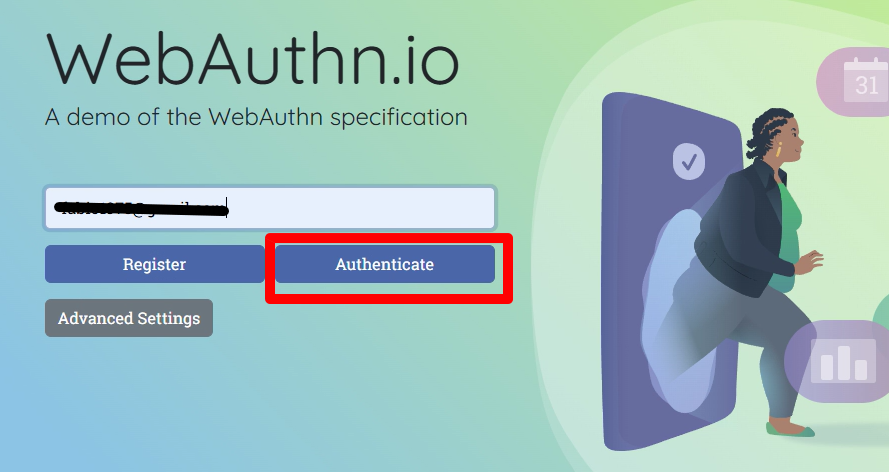
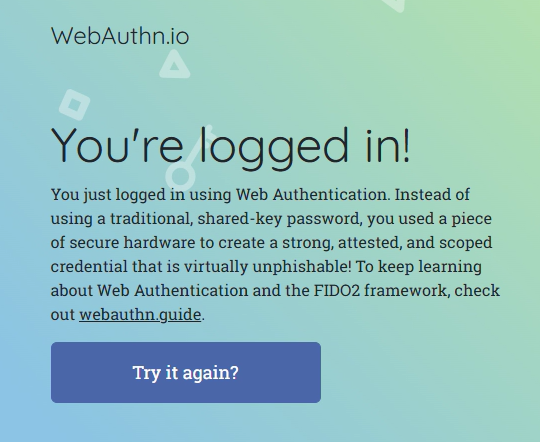
Now we can connect to VDI and access with edge to https://webauthn.io

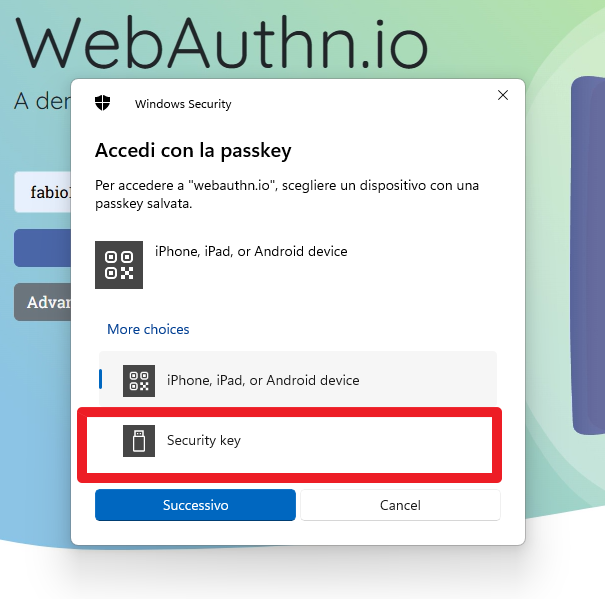
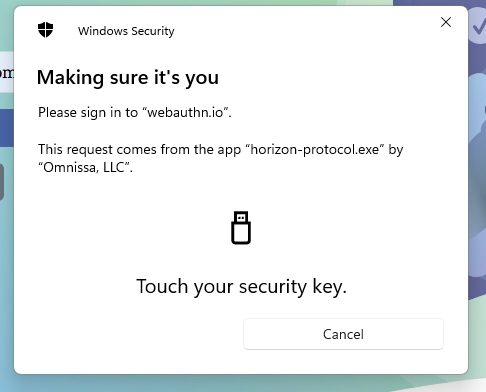
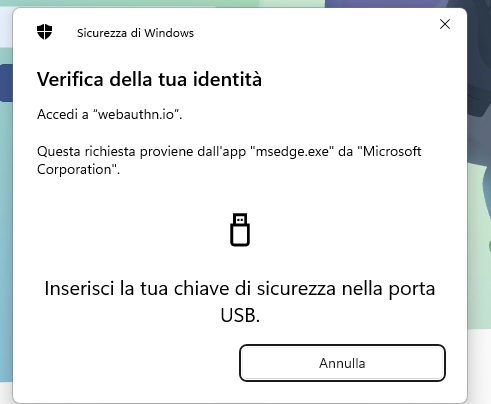
After selecting, authenticate in the next window, select the security key. (This window is up from your client (PC), not from VDI)

A finger pressing a usb drive into a computer AI-generated content may be incorrect.

Spoiler 1

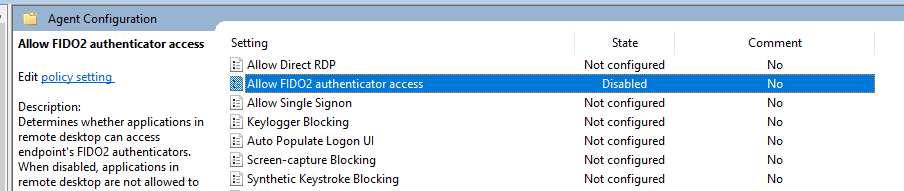
If you want to disable this function, you need to set the Allow FIDO2 authenticator access GPO with the value “Disabled”

And when you try to connect

Spoiler 2

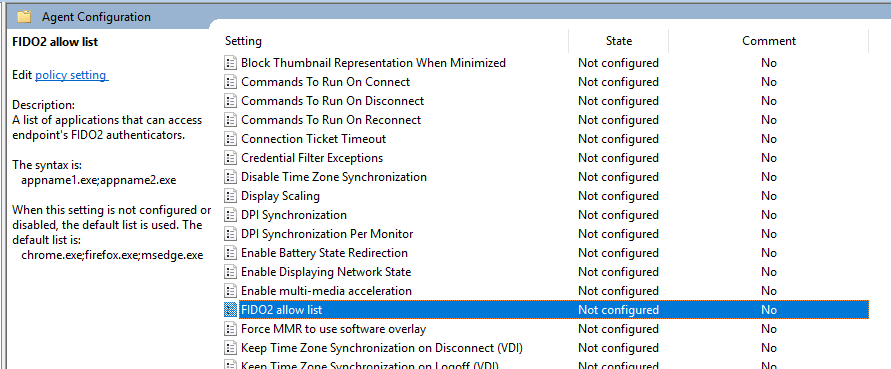
We can use the “FIDO2 allow list” GPO to select which browser to use with the WebAuthN and disable another browser.

For example, enable only Firefox application

In this video, I show you how FIDO2 WebAuthN works and how to exclude certain browsers

https://youtu.be/cWKBxt8BVXU


Enhancing VDI Security and User Experience with FIDO2/WebAuthn and Omnissa Horizon

Upgrade to 2503 and migrate ADAM Partition

The new version of Horizon (version 2503) continues the renaming started by Omnissa in version 2412 to remove references to the VMware name.

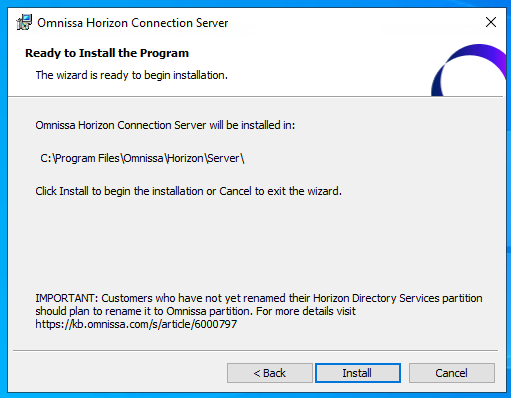
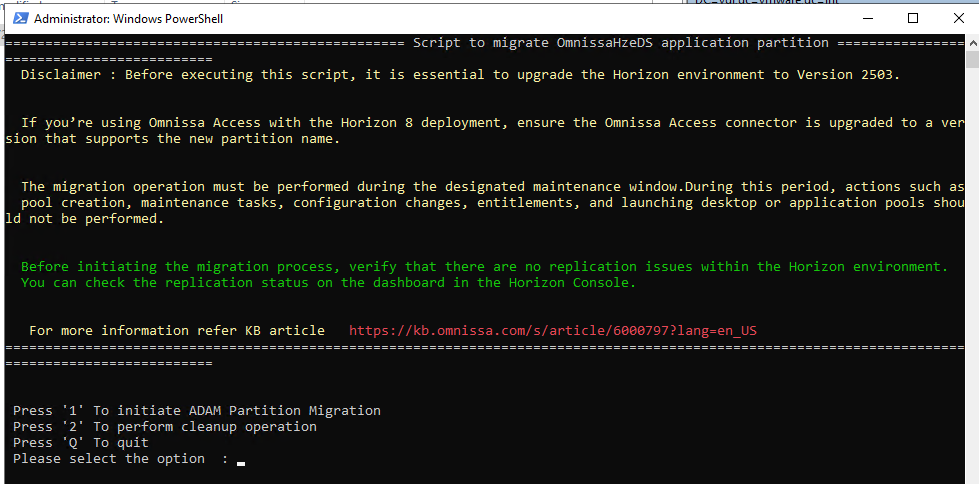
Let’s see in this guide (with a simple environment consisting of a single connection server) the update to version 2503 (from 2412) and the AD LDS Application Partition Migration (to remove references to VMware as well).

It is important to follow the instructions in this KB for partition migration:

Omnissa Horizon ADLDS Migration (6000797)

Upgrade to the 2503

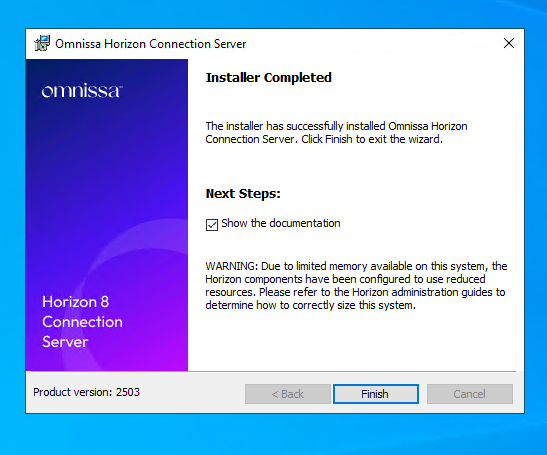
Upgrade to Horizon 2503 from 2412 (I recommend if you are coming from previous versions, to a new installation, whether the target version is 2412 or 2503)

  • Backup ADAM DB
  • Snapshot Connection Servers

A screenshot of a computer AI-generated content may be incorrect.

A screenshot of a computer AI-generated content may be incorrect.

A screenshot of a computer AI-generated content may be incorrect.

A screenshot of a computer program AI-generated content may be incorrect.

A screenshot of a computer error AI-generated content may be incorrect.

A screenshot of a computer AI-generated content may be incorrect.

A screenshot of a computer AI-generated content may be incorrect.

AD LDS Application Partition Migration

Migration of the AD LDS partition (WARNING: at this time, if you have Omnissa Access in your infrastructure, you must wait for the new version of Access before proceeding with the partition migration)

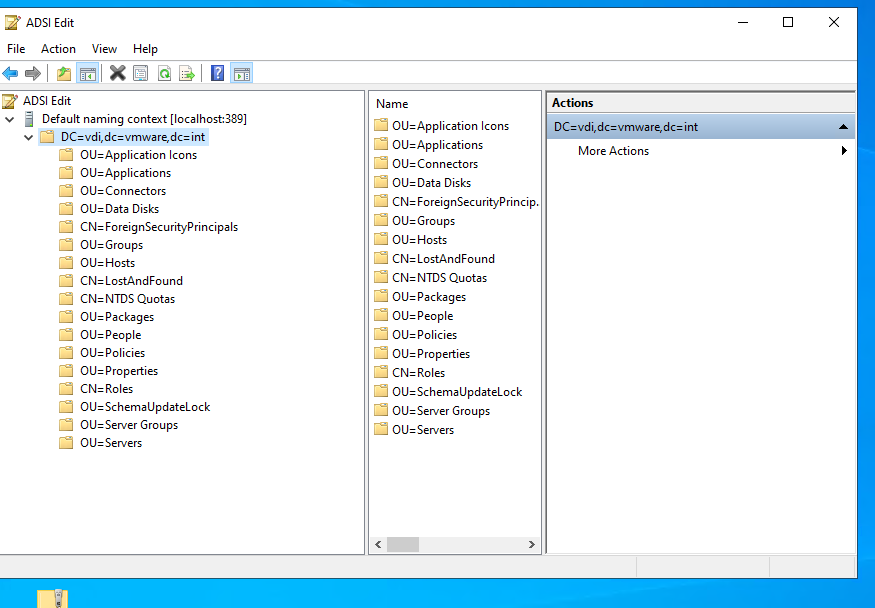
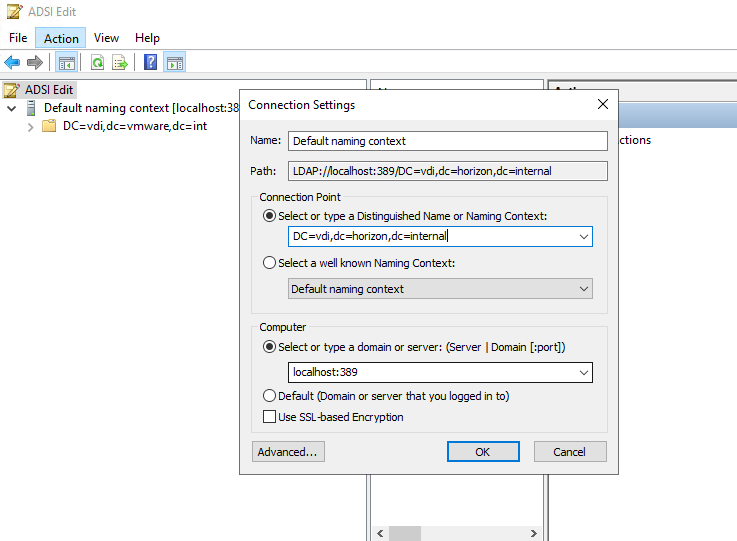
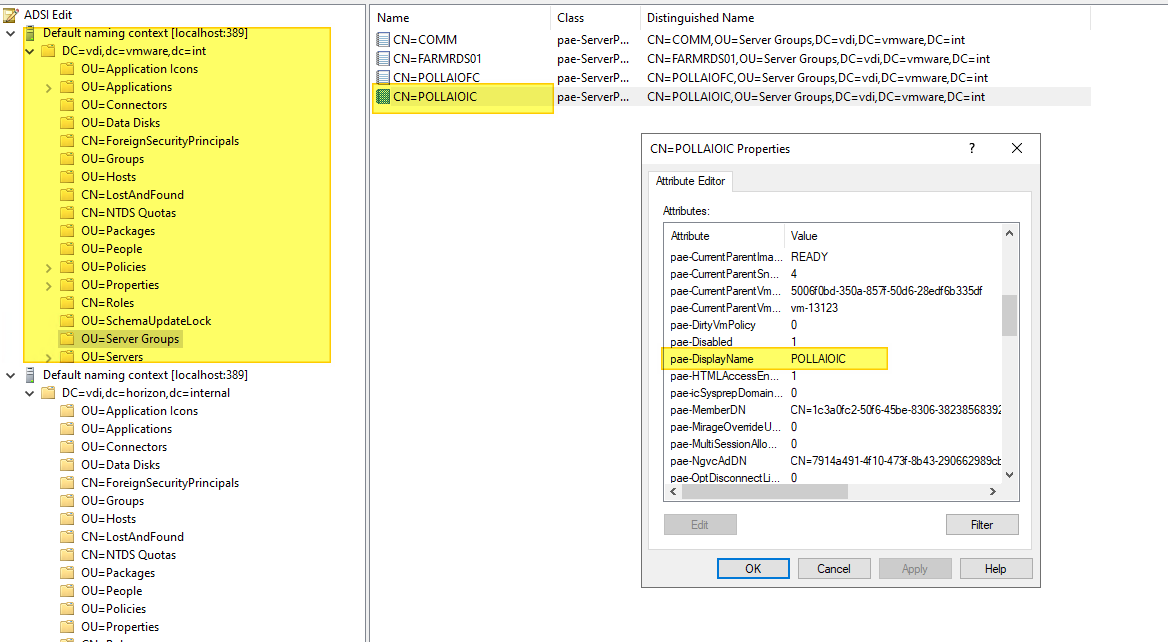
We connect to the LDS AD using the classic references dc=vdi,dc=vmware,dc=int

A screenshot of a computer AI-generated content may be incorrect.

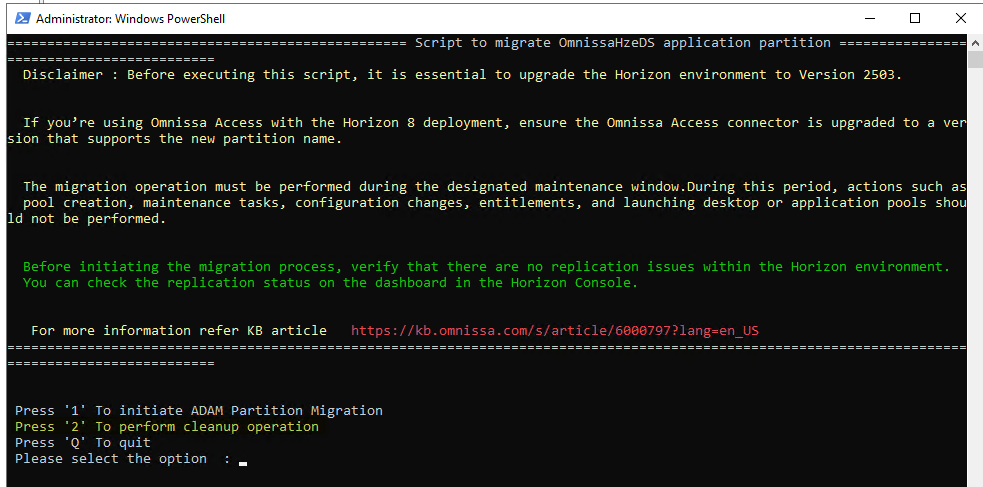
We use the script (OmnissaHorizonPartitionMigration-v1.ps1) attached to the KB previously mentioned (WARNING: you must have a maintenance window)

Run as admin

A black and white text on a black background AI-generated content may be incorrect.

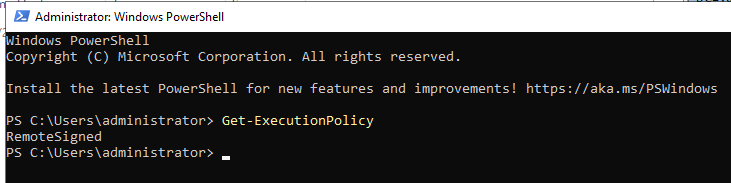
We test script execution at the policy level (must be RemoteSigned)

A screen shot of a computer AI-generated content may be incorrect.

Let’s run the script

A screen shot of a computer AI-generated content may be incorrect.

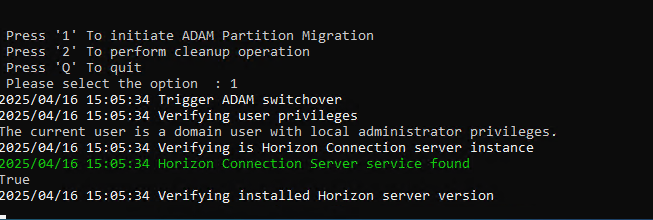
We have the choice whether to migrate or clean the old partition (obviously, we do the cleaning of the old partition only after the migration and only after verifying that everything is ok)

A screenshot of a computer screen AI-generated content may be incorrect.

We select 1

A screen shot of a computer AI-generated content may be incorrect.

A computer screen with white and green text AI-generated content may be incorrect.

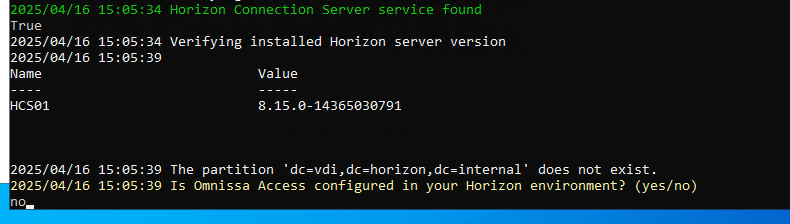
We are asked if we have an Omnissa Access configured in our environment, and in this example, we do not have it (in case you need to update it to the latest version before doing this update)

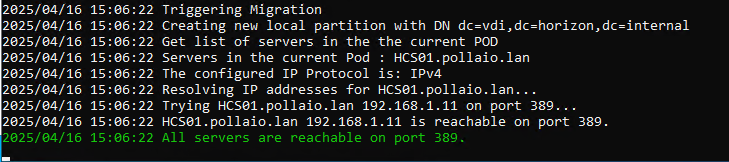
Then check that all the Connection servers are reachable (we have only one, in the case of multiple connection servers in a single POD, it is enough to run the script only once)

A screen shot of a computer AI-generated content may be incorrect.

Backs Up

A computer screen with text on it AI-generated content may be incorrect.

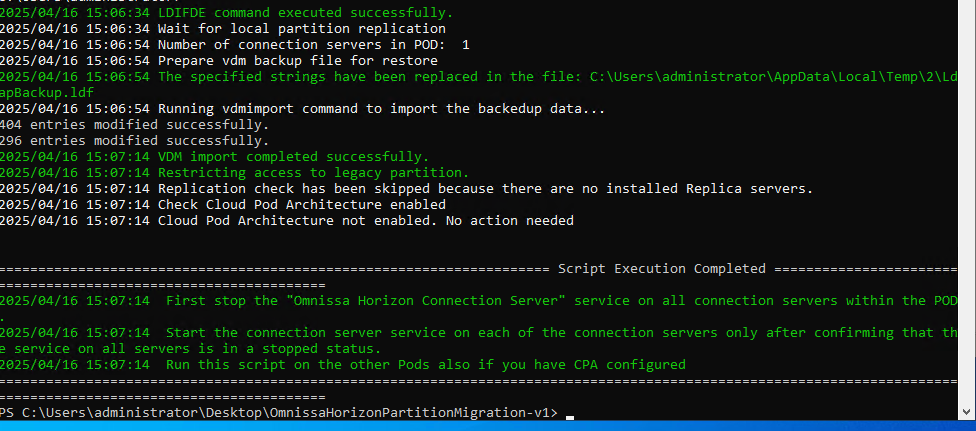
And import the information into the new schema

A screenshot of a computer program AI-generated content may be incorrect.

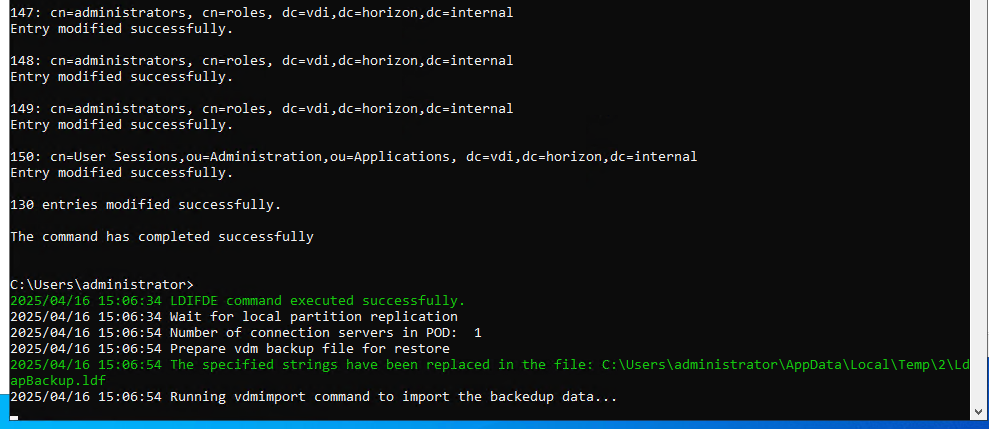
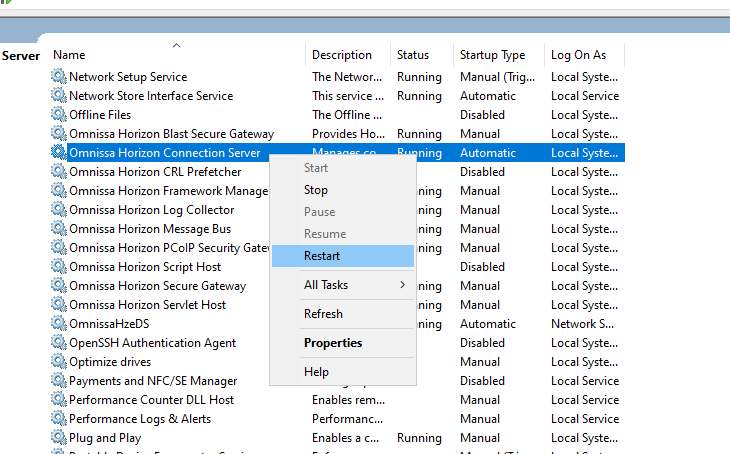
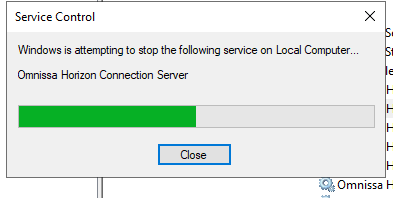
“Once the Script completes execution, stop the “Omnissa Horizon Connection Server” Windows Service on all Connection Servers in the POD. Only once the services on all servers in the pod are stopped, proceed to the next step. Note that rolling service restarts are NOT supported and will result in instability! 

Start the Connection Server Service one at a time on all Connection Servers in the POD.   You do not need to wait for the Connection server service to fully start up to before finish starting of services on remaining servers in the pod. The first service can wait up to 15 minutes per server in the pod to check back in for replication before allowing the service to start up. “

A screenshot of a computer AI-generated content may be incorrect.

A screenshot of a computer error AI-generated content may be incorrect.

Let’s wait for it to come back up

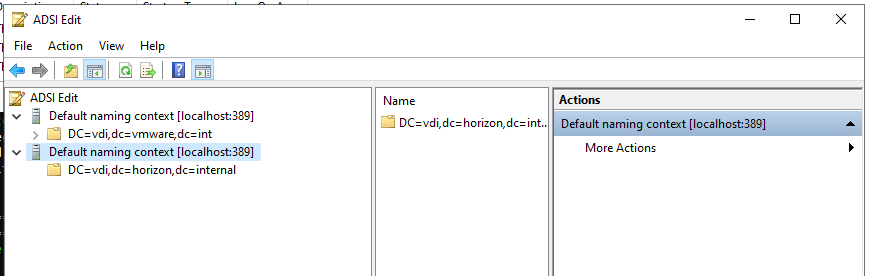
We connect with the ADSI edit using the new scheme dc=vdi,dc=horizon,dc=internal

A screenshot of a computer AI-generated content may be incorrect.

A screenshot of a computer AI-generated content may be incorrect.

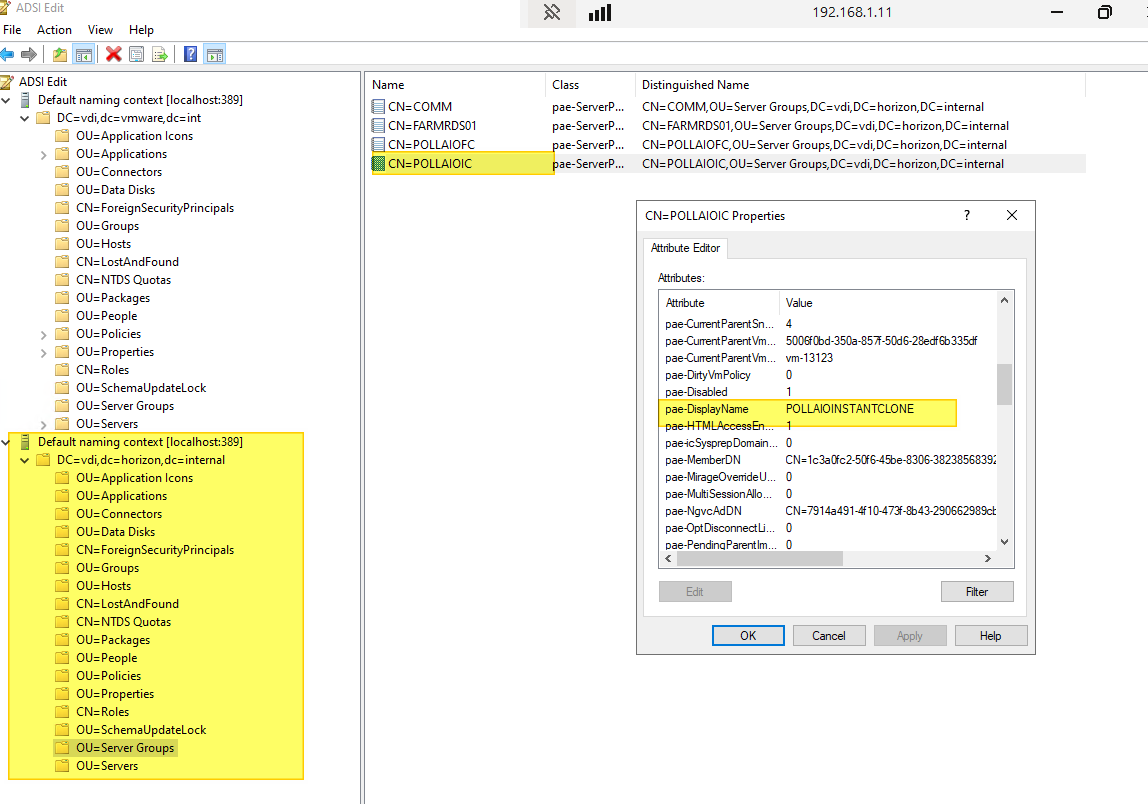
As a test, let’s try to remove a non-existent domain and see which one the change actually applies to (I expect the second)

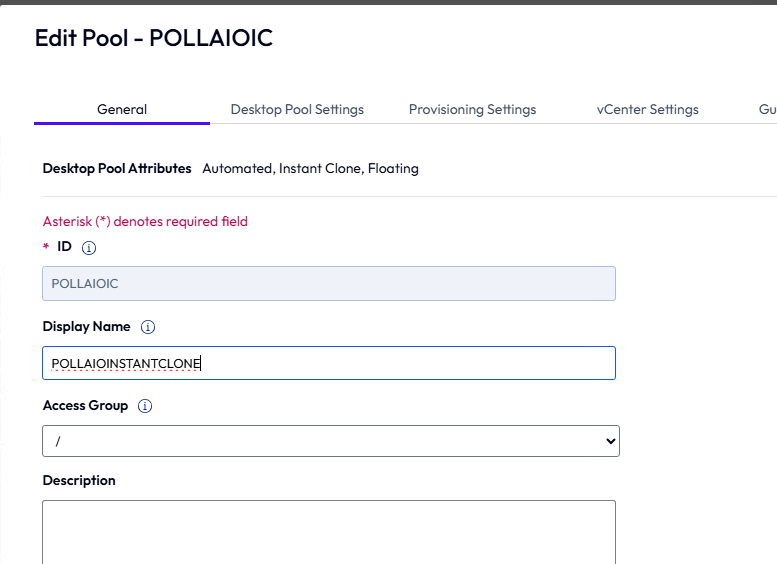
Let’s change the display name of a pool

A screenshot of a computer AI-generated content may be incorrect.

A screenshot of a computer AI-generated content may be incorrect.

The new has changed

A screenshot of a computer AI-generated content may be incorrect.

The old has not changed

A screenshot of a computer AI-generated content may be incorrect.

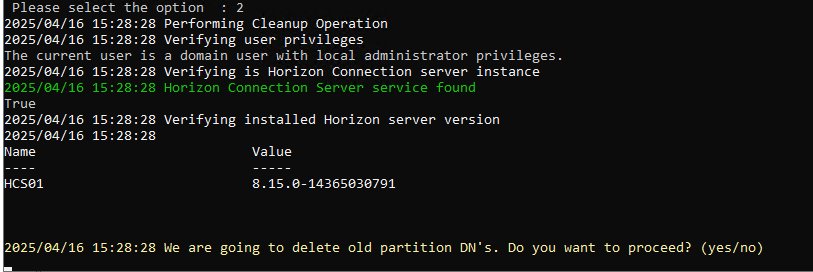
Once we finish the tasks and see that everything is stable, we erase the old pattern

A screenshot of a computer program AI-generated content may be incorrect.

A computer screen with white text AI-generated content may be incorrect.

A computer screen with text AI-generated content may be incorrect.

A screen shot of a computer screen AI-generated content may be incorrect.

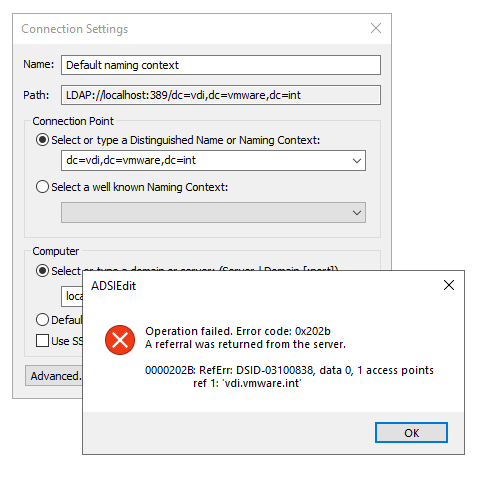
The old scheme no longer exists

A screenshot of a computer error message AI-generated content may be incorrect.

Upgrade to 2503 and migrate ADAM Partition

Horizon Applications and strange icon – Horizon client

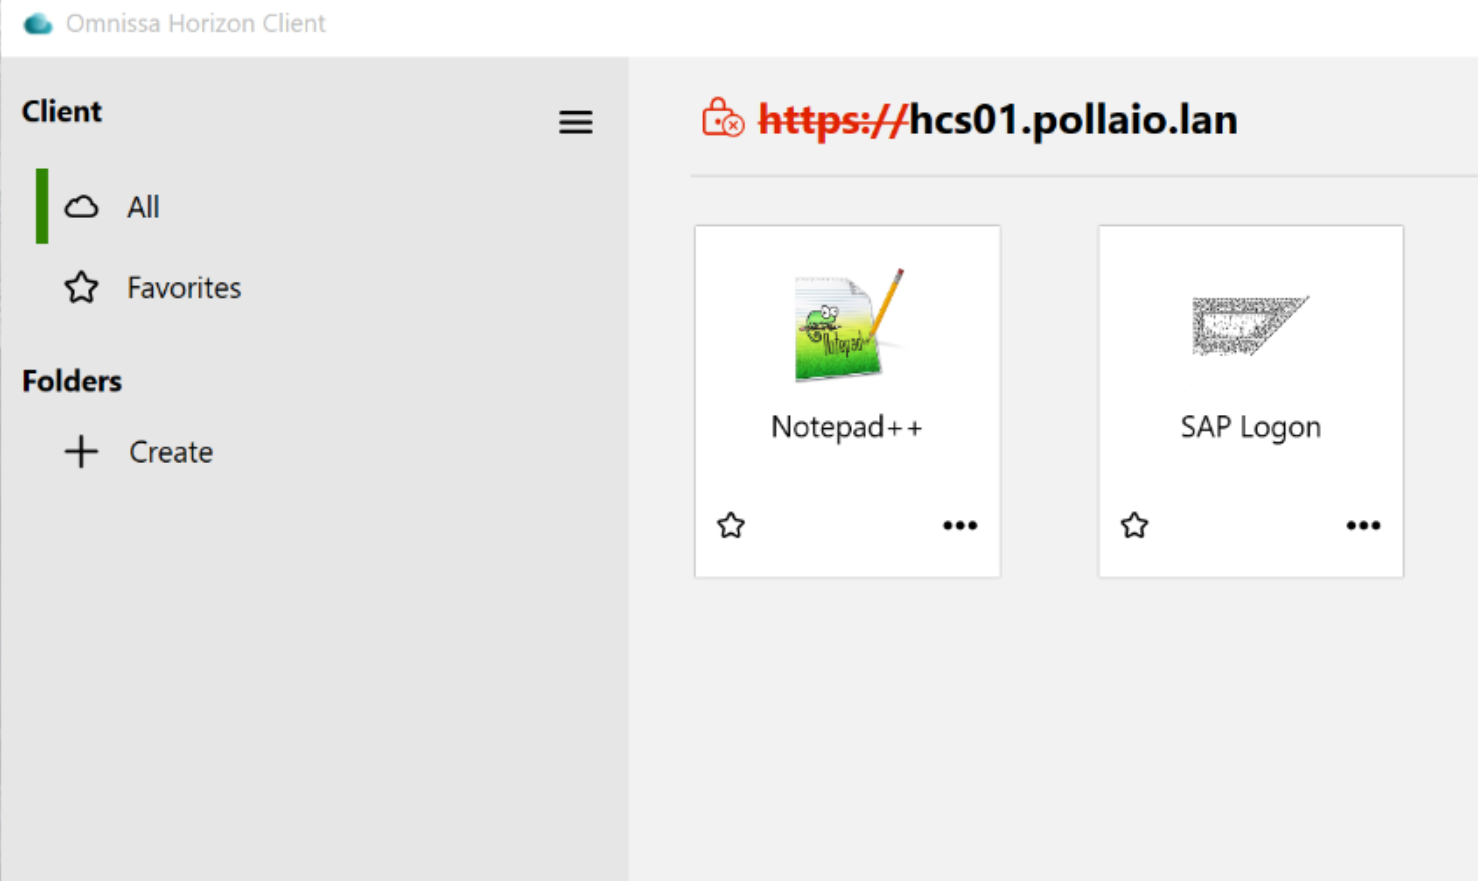
I have encountered an anomaly from a customer regarding the icons displayed for applications published by an RDS farm via Horizon. Specifically SAP LOGON.

The situation was as follows:

A screenshot of a computer

AI-generated content may be incorrect.

Where the SAP LOGON icon was grayed out and not well defined, the same situation was present with access via WEB.

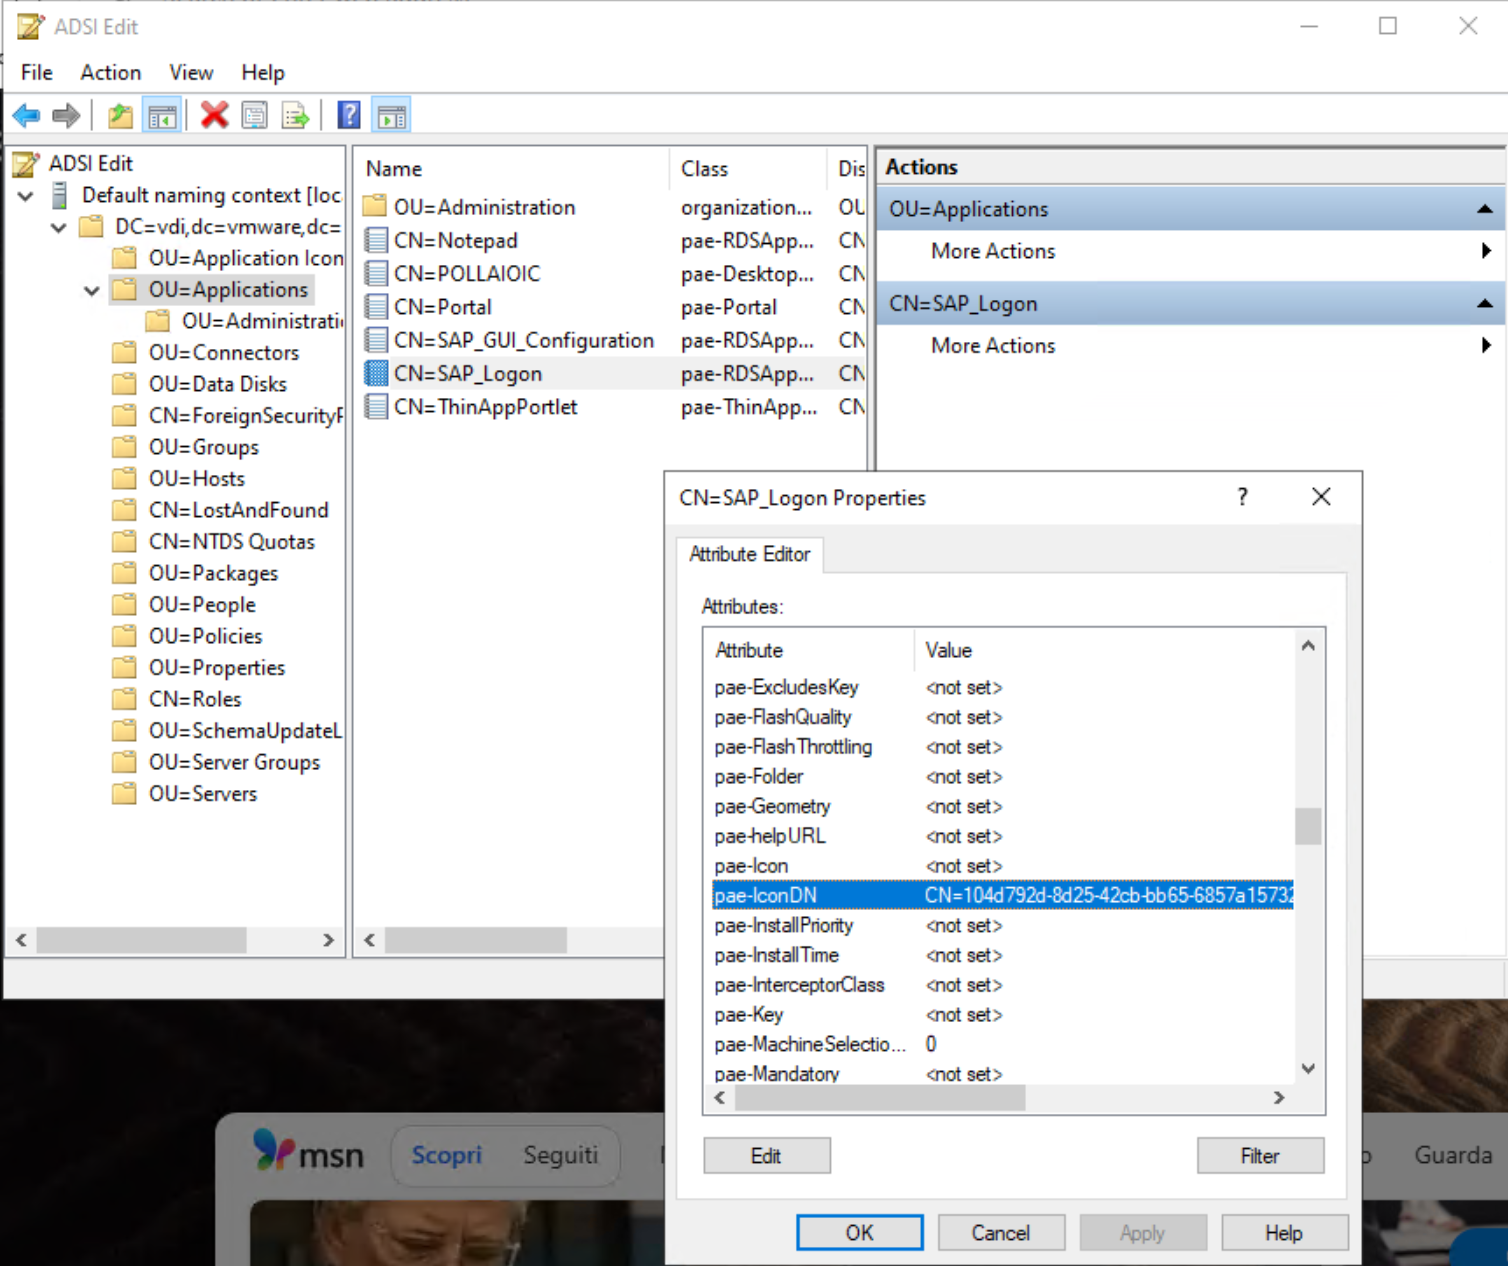
After various analyses and attempts to solve it, I identified in the Horizon ADAM LDAP DB the presence of a mapping between the published application and the icons used

To access the ADAM LDAP DB, follow the instructions in this KB

Connecting to the Horizon Connection Server Local ADAM Database (2012377)

Once connected to the DB, we will be able to find our published application under Applications and check the associated icon or icons in the properties.

A screenshot of a computer

AI-generated content may be incorrect.

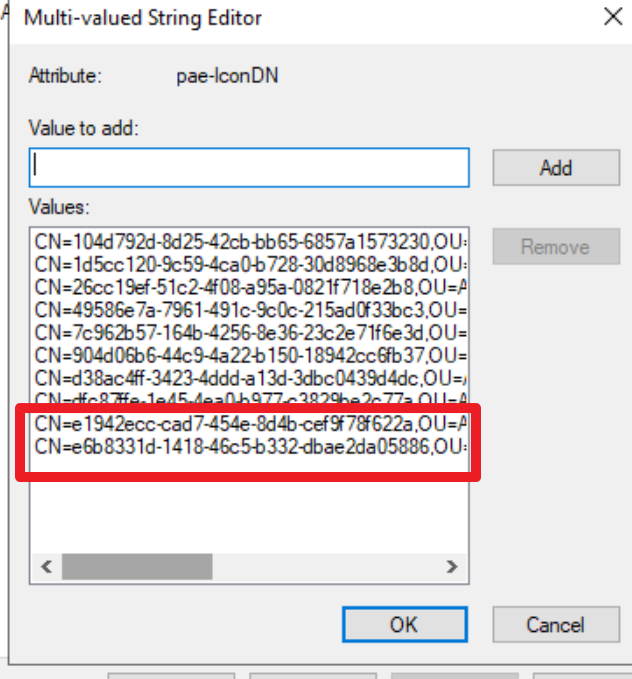
In my case, the pae-IconDN field was populated by 10 entries. In the image below, I show the status of the field

A screenshot of a computer

AI-generated content may be incorrect.

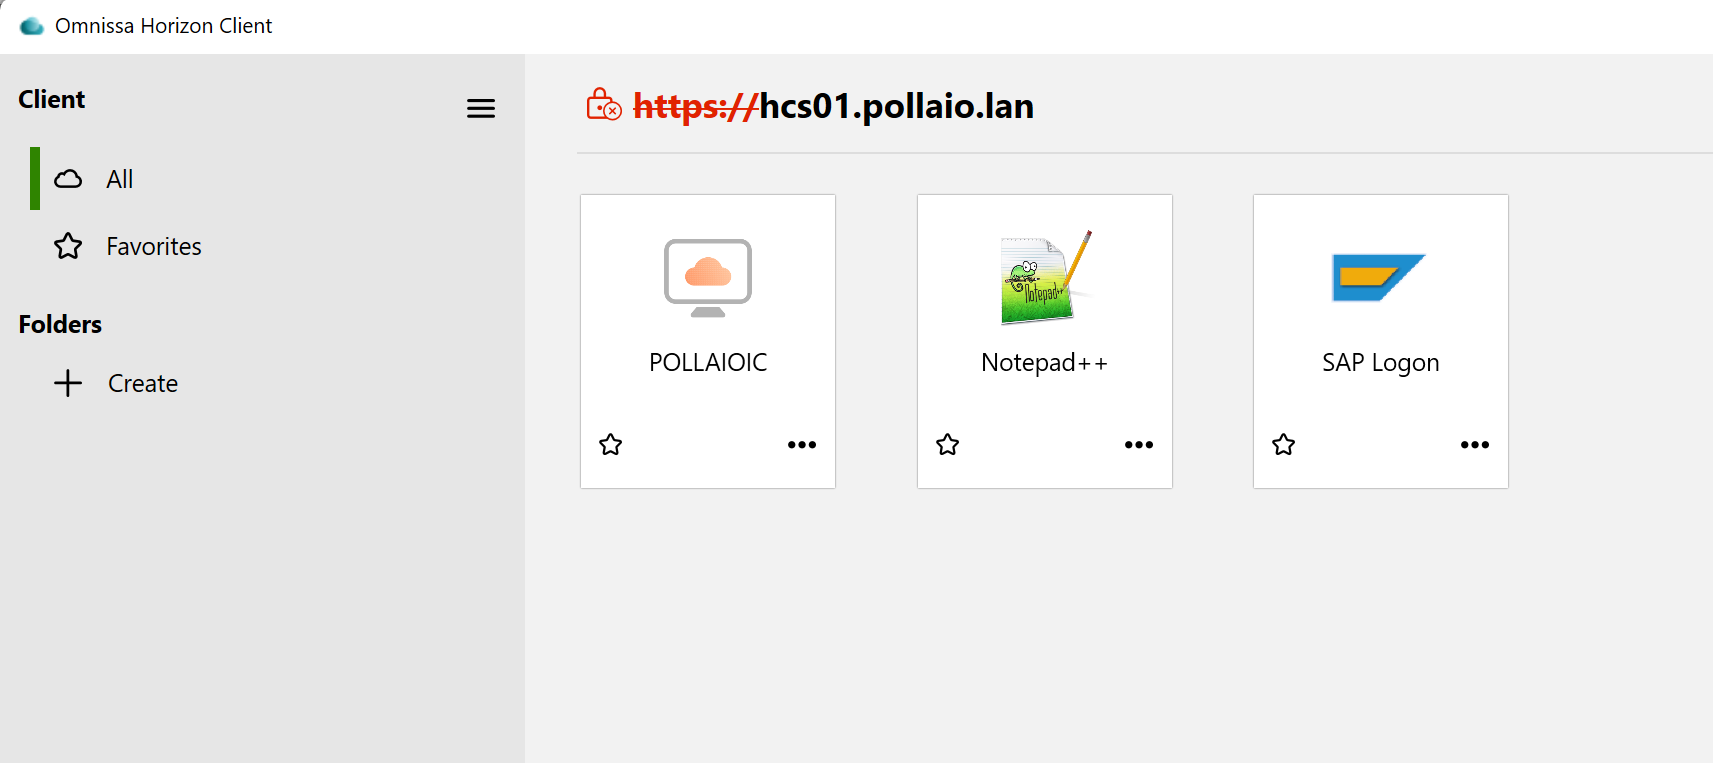
By removing the first 8 Entries (by trial and error), I was able to restore the correct situation

A screenshot of a computer

AI-generated content may be incorrect.

Some points of attention:

  • The icons in question (for example, the 10 of SAP LOGON) are all downloaded to the Horizon client cache located in C:\Users\%USERNAME%\AppData\Local\Omnissa\Omnissa Horizon Client\Icon Cache, but there is no link between the file name with the icon image and the ADAM LDAP DB (at least, I didn’t find it)
  • If we publish another SAP GUI or remove and republish the current one, the problem may recur, and it is necessary to intervene in the same way

Horizon Applications and strange icon – Horizon client

Horizon Published Applications and Office 365 – Error TAG [4ruy5]

After public Office 365 App with Horizon 8 (the backend is a RDS FARM and we used this indication for the installation Deploy Microsoft 365 Apps by using Remote Desktop Services – Microsoft 365 Apps | Microsoft Learn) we have this issue when the users start the Office 365 remote apps

I found this info:

O365 via Horizon : r/sysadmin

To resolve this problem, we started an additional program (shellapptunime.exe added a Scripts logon) when the user’s access to the RDS infrastructure.

A screenshot of a computer

AI-generated content may be incorrect.

Horizon Published Applications and Office 365 – Error TAG [4ruy5]