NSX Advanced Load Balancer renew/replace SSL certificate


In the production and home lab environments, the SSL Certificate is a point of attention that is especially important when the certificate is nearing its expiration date.

Normally, the expiration date is important to note in an Outlook calendar or other tool as a reminder to renew (a few days before, because if a Public CA generates the certificate, the renew requires waiting some days to have the certificate file). It is important to renew the certificate because some applications can stop running, and for the visibility of our business, it may have a bad reputation.
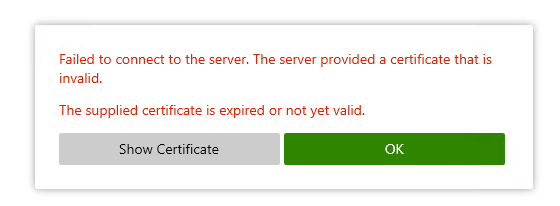
 

A screenshot of a computer error

Description automatically generated

Well in my home lab, where I use the NSX Advanced Load Balancer for Omnissa Horizon, at this time (Christmas Day) my wildcard SSL expired.

Well, I use a Let’s Encrypted certificate (free certificate) and I use Cerbot tool for the renewal.

On my PC where I installed the Cerbot tool I use this command to renew and create the certificate file:

certbot certonly –manual -d *.pollaio.site -d pollaio.site –agree-tos –preferred-challenges dns –server https://acme-v02.api.letsencrypt.org/directory –key-type rsa
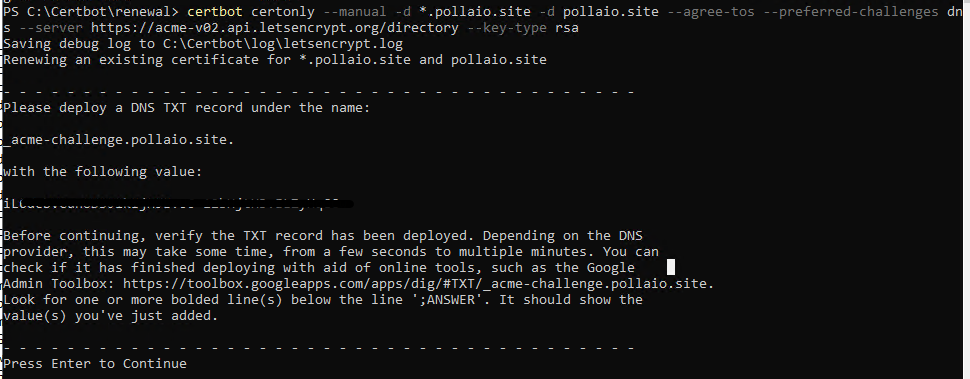
A screenshot of a computer program

Description automatically generated

and I need to add a new TXT record on my DNS provider.

After adding the TXT record I can continue

A computer screen with white text

Description automatically generated

Now I have in my Cerbot directory this new file:
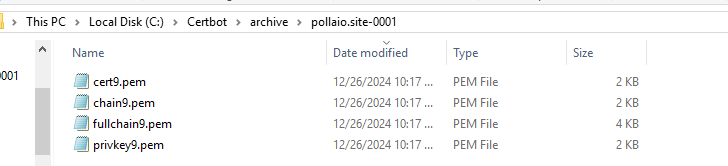
A screenshot of a computer

Description automatically generated

Well, I will use the cer9.pem, chain9.pem and privkey9.pem for the certificate renewal on NSX ALB.

Access NSX ALB console, go to templates zone and under Security select SSL/TLS Certificates

A screenshot of a computer

Description automatically generated

We need to add the new certificate, I suggest to create a new entry and not replace the actual certificate.

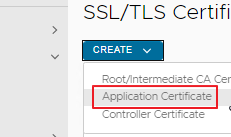
Under Create select Application Certificate
A screenshot of a computer

Description automatically generated

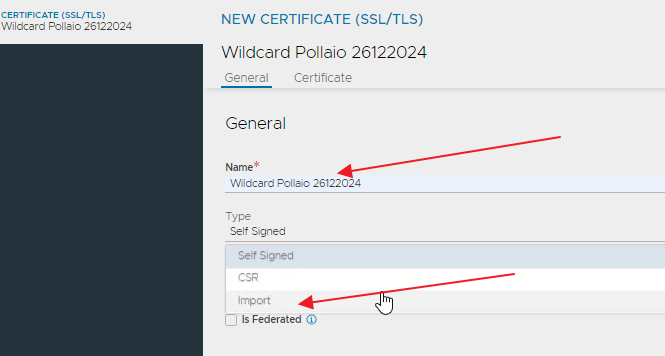
Add the certificate name (I normally add the name and the expiration date or the creation date) and how certificate type select Import
A screenshot of a certificate

Description automatically generated

In the first import select the certificate file, in the second import the private key.
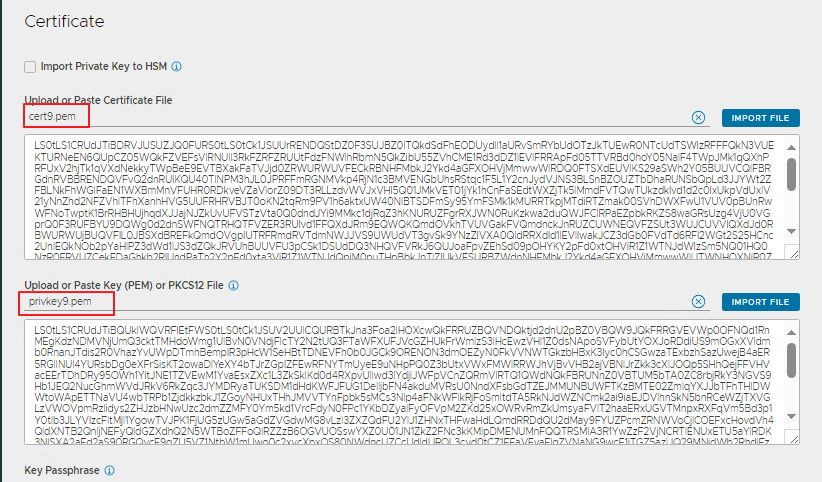
Validate and Save the change.

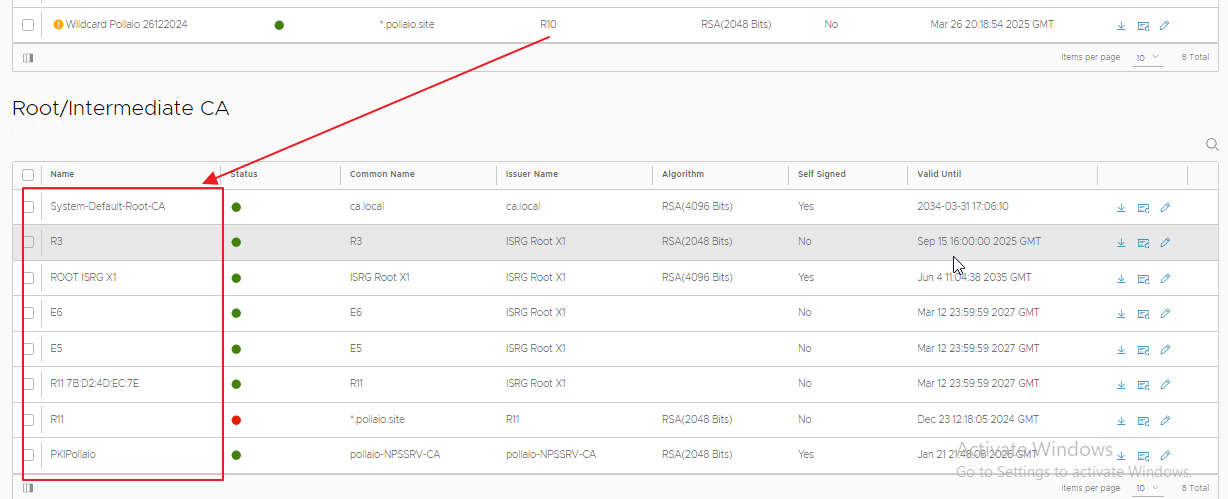
Now in to the certificate list we have the new SSL certificate

If the certificate has an orange warning it is probably because we don’t have the full certificate chain and we need to load the root and sub ca on NSX ALB.

In the same console page where we show the uploaded SSL certificate we have at the bottom a section where we see the Root and Sub CA and we don’t watch the R10
A screenshot of a computer

Description automatically generated

Ok, no problem we have the chain9.pem file …
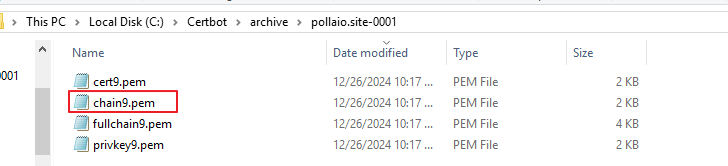
A screenshot of a computer

Description automatically generated

Select Create the root/intermediate CA Certificate
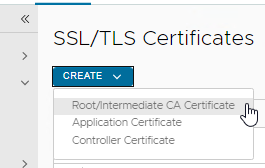
A screenshot of a computer

Description automatically generated

and import the pem chain file, Validate and Save

A screenshot of a computer

Description automatically generated

Now the row with the new certificate doesn’t show any warning or error

Now we are ready to replace the SSL certificate on Virtual Service.

Go to Application Menu, Virtual Service and edit the VS where we want to change the SSL certificate
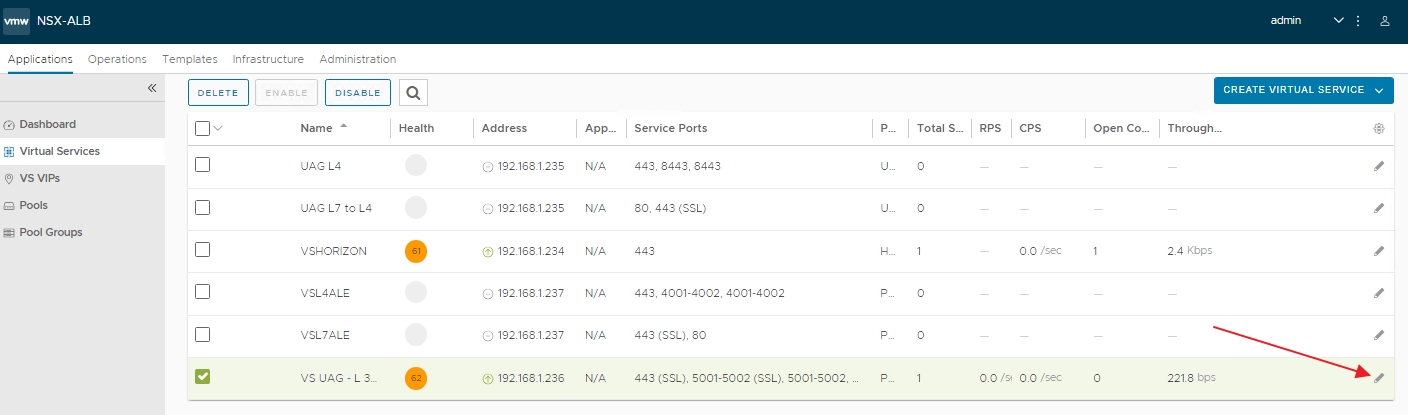
A screenshot of a computer

Description automatically generated

On the bottom select the correct certificate form menu and remove the old certificate, after Save the change.
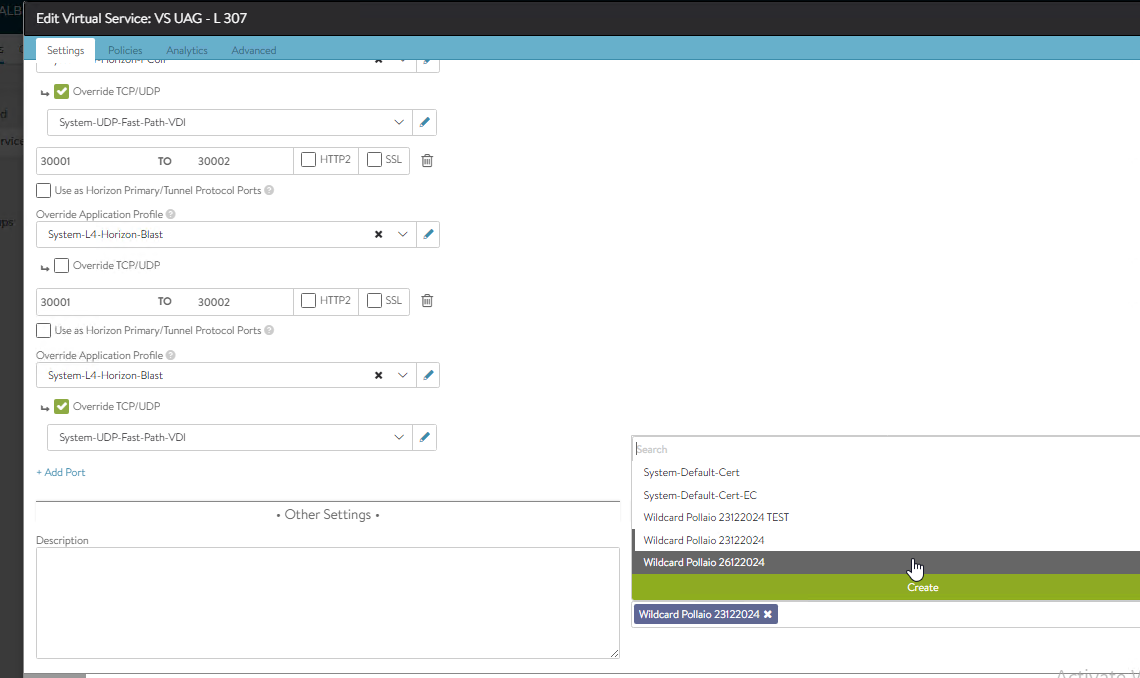
A screenshot of a computer

Description automatically generated

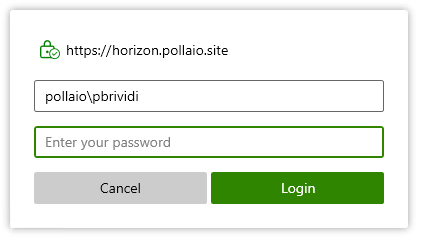
Now the SSL certificate is validated and I can connect to my VDI
A screenshot of a login screen

Description automatically generated

NSX Advanced Load Balancer renew/replace SSL certificate

Omnissa Unified Access Gateway and headersToBeLogged

A close-up of a sign

Description automatically generated

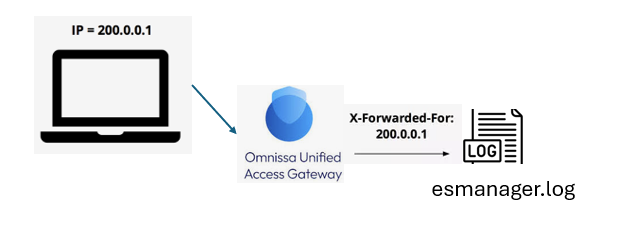
About the 2312 Unified Access Gateway version there is a new log function to increase the Readable of the esmanager.log (default log level).

This function is HeadersToBeLogged and is enabled by default from 2312. The default value for this field is set to X-Forwarded-For and includes the details for Username, Client build, and Client version.

These details will be added to the esmanager.log file.

For example for connection to VDI from the Internet :

Where:

  • 4.232.131.22 is the public IP of my OS from I try to connect
  • 192.168.222.222 is the IP of My LB in front of UAG
  • pbrividi is my username
  • VMware-Horizon-Client-Win32-Windows is the type of client
  • 8.13.0-9986028157 is the Horizon Client Build

To modify the logged information I need to change the JSON or ini file:

This is the default configuration for headersToBeLogged

A screenshot of a computer

Description automatically generated

I can add this value :

And I can see more info

Omnissa Unified Access Gateway and headersToBeLogged

Move vSAN cluster from a unavailable vCenter to new vCenter

A cartoon character with text

Description automatically generated

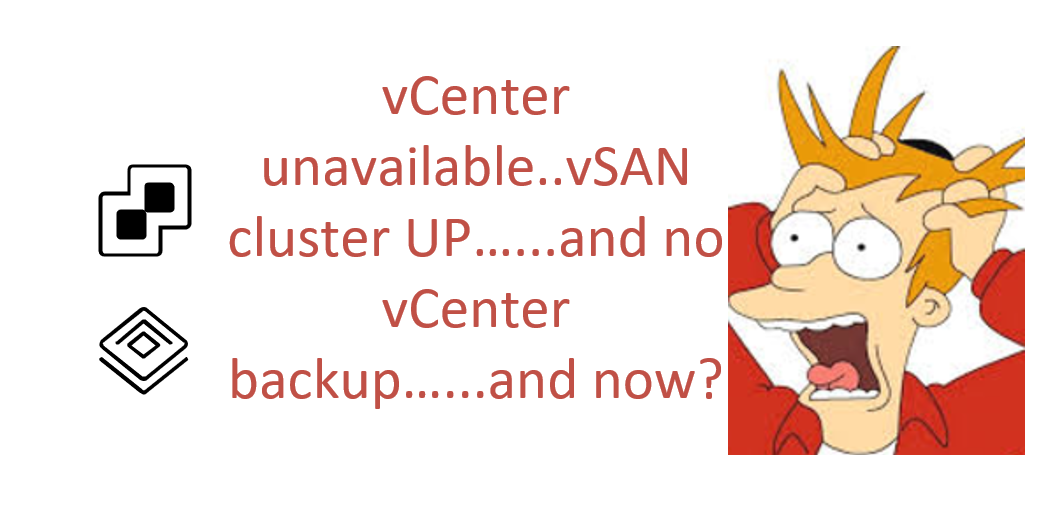
Our customer had a big problem with a vCenter that managed a vSAN cluster.

The unique solution was to restore the vCenter form backup……but the customer doesn’t have a backup for this virtual appliance or vCenter backup from VAMI (Argghhhhh…).

We have resolved this with a new vCenter installation and this VMware KB.

Moving a vSAN cluster from one vCenter Server to another

An attention point (step 3 of the KB) is the vDS configuration, for bypassing this attention point we have migrated the vDS (in this situation only the vSAN network for our luck) to vSphere Standard Virtual Switch (vSS).

We have used this command on each ESXi to remove the vmkernel from vDS to vSS.

(You need to change your value, vDS Name…IP address etc..)

#Check the vDS and vSS configuration and identify vmnic

esxcfg-vswitch -l

#Remove a vmnic from vDS
esxcfg-vswitch -Q vmnic5 -V 12 DS1vSAN1

#Create a new vSS
esxcli network vswitch standard add –vswitch-name=VSAN

#Assign a vmnic to vSS
esxcli network vswitch standard uplink add –uplink-name=vmnic5 –vswitch-name=VSAN

#Create a PortGroup to vSS
esxcli network vswitch standard portgroup add –portgroup-name=VMK_VSAN –vswitch-name=VSAN

#Assign a vLAN to PortGroup
esxcli network vswitch standard portgroup set -p VMK_VSAN –vlan-id xxx

This is the critical point, we need to move the vmkernel vSAN (Where there is the vSAN traffic) from vDS to vSS.

It is important to check the vSAN status before and after the vmkernel move with this command and wait for the object to rebuild.

The command is

esxcli vsan health cluster

#Remove vmkernel for the vSAN from vDS
esxcli network ip interface remove –interface-name=vmk2

#Add the vmkernel interface to vSS
esxcli network ip interface add –interface-name=vmk2 –portgroup-name=”VMK_VSAN”

#Assign the IP address to vmkernel interface
esxcli network ip interface ipv4 set –interface-name=vmk2 –ipv4=x.x.x.x –netmask=x.x.x.x –type=static

#Assign the interface for vSAN service
esxcli network ip interface tag add –interface-name=vmk2 –tagname=VSAN

#Check if there is communication to other ESXi vmkernel vSAN interfaces IP with vmkping
vmkping -I vmk2 x.x.x.x

#Verify the vSAN status

esxcli vsan health cluster

When the vSAN cluster is all healthy repeat the same operation on all other vSAN cluster ESXi node

After this, you can continue following the link

Moving a vSAN cluster from one vCenter Server to another

Move vSAN cluster from a unavailable vCenter to new vCenter

Omnissa Horizon – Pre-Launch Option


When implementing and publishing an application with Horizon infrastructure a classic situation is the request from the users to reduce the time of waiting until the application is ready to use.

Well we have a feature to speed up the application start, this functionality is the “Pre-Launch option”

A little recap:

When a user start a Publish Application we have two step:

  • The first step, the login to the RDS host assigned
  • The Second step, the application start

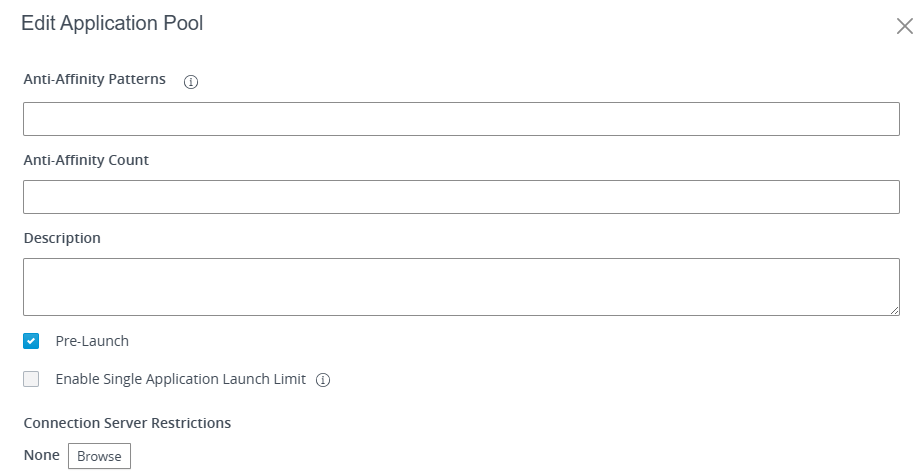
With the “Pre-Launch” Option we can remove the First step because this option does that when the user login to Horizon Infrastructure, if the user is entitled to Application Pool (with the pre-launch option enabled), an automatic session (login) starts on a RDS Host.

We

A screenshot of a login page

Description automatically generated

This improves the start of the application because the RDS user Session is just running on the RDS farm.

We can see my video where I tested this function (Sorry it is in the Italian language, but it is very clear with only seeing the video)

https://youtu.be/qL7opgoXQaM

Omnissa Horizon – Pre-Launch Option

vSAN ESA and vSAN File Service

Requirements

Enable vSAN File Service

Limitations and Considerations

Limitations and Considerations of vSAN File Service

Networking Considerations for vSAN File Service

After deploying and configuring the vSAN ESA we are ready to enable and configure the vSAN file services.

Enable File Service

A screenshot of a computer

Description automatically generated

A screenshot of a computer service

Description automatically generated

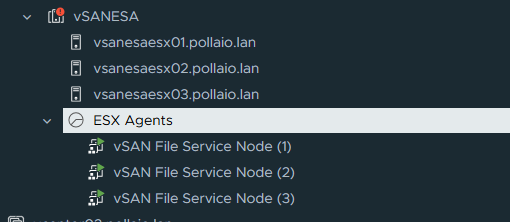
After Enabling the service we will see on the vCenter a new Resource Pool to allocate the File Service Node VM. (One for Each host ESXi)

A screenshot of a computer

Description automatically generated

Configure vSAN File service

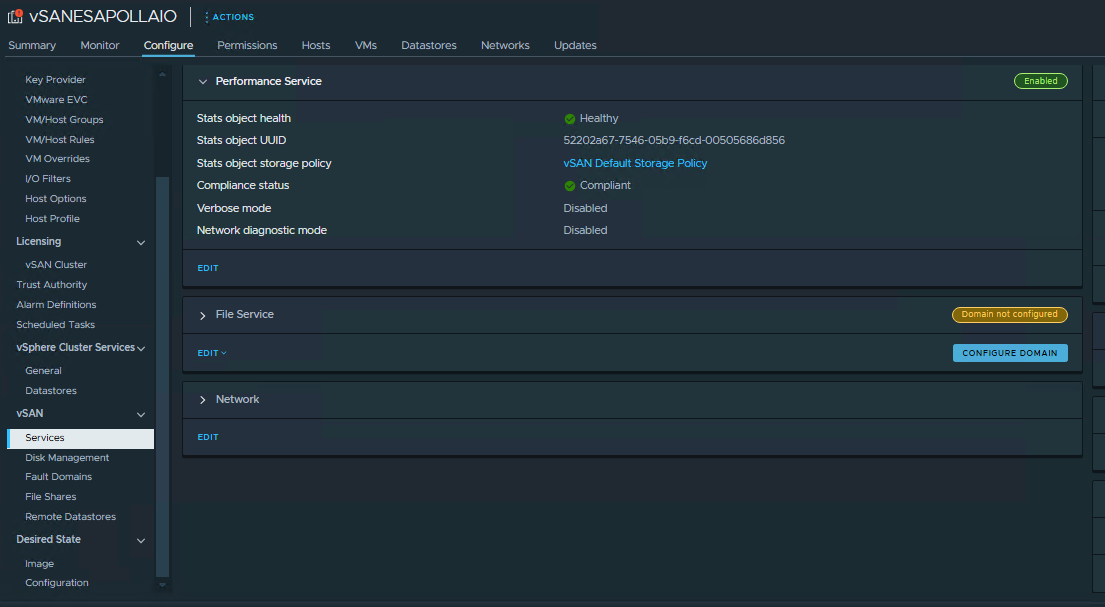
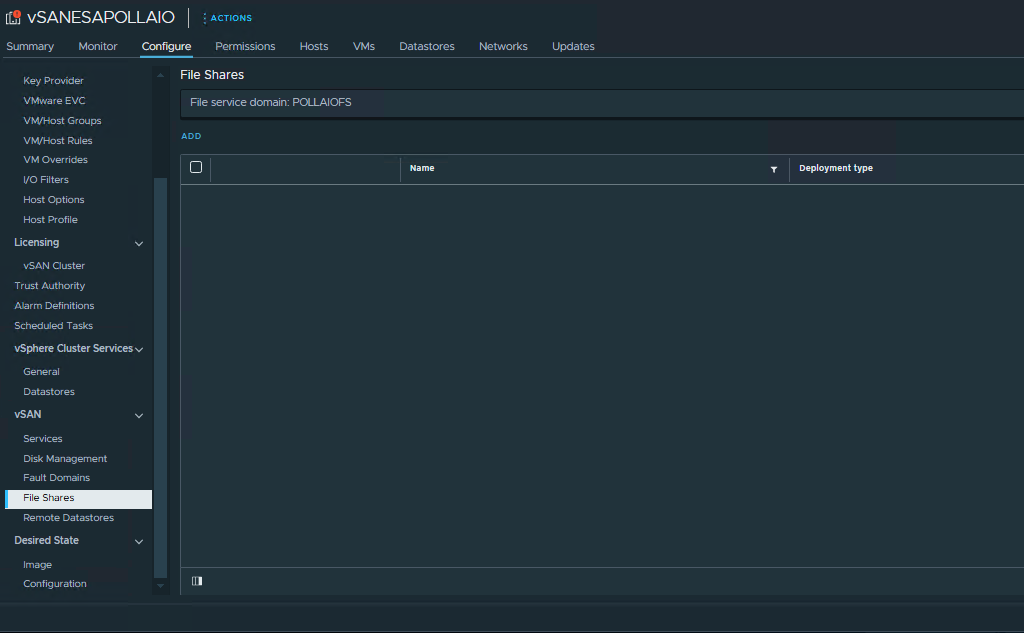
Go to vSAN, Services and under File Service click CONFIGURE DOMAIN

A screenshot of a computer

Description automatically generated

A screenshot of a computer

Description automatically generated

A screenshot of a computer

Description automatically generated

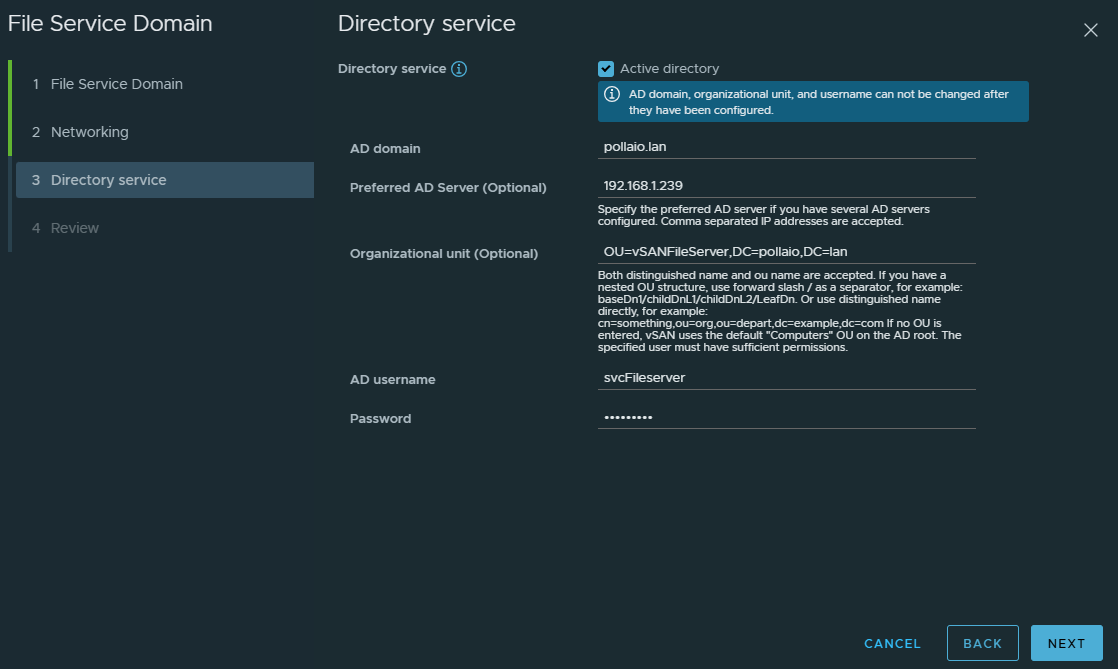
We need to configure the Directory Service to enable SMB share and NFS Kerberos Authentication.

The user identity for configuring the directory service must have the correct permission to do a join AD.

A screenshot of a computer

Description automatically generated

A screenshot of a computer

Description automatically generated

A screenshot of a computer

Description automatically generated

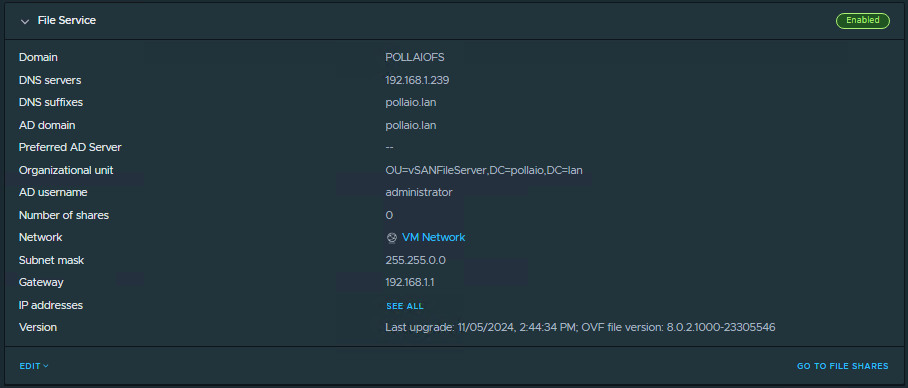
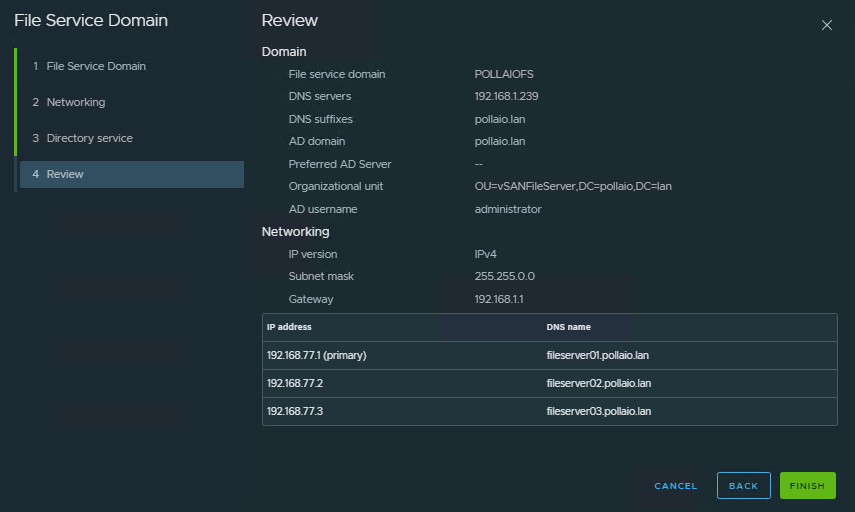
After completing the domain configuration we see the computer accounts in the OU select.

A screenshot of a computer

Description automatically generated

Create File Share

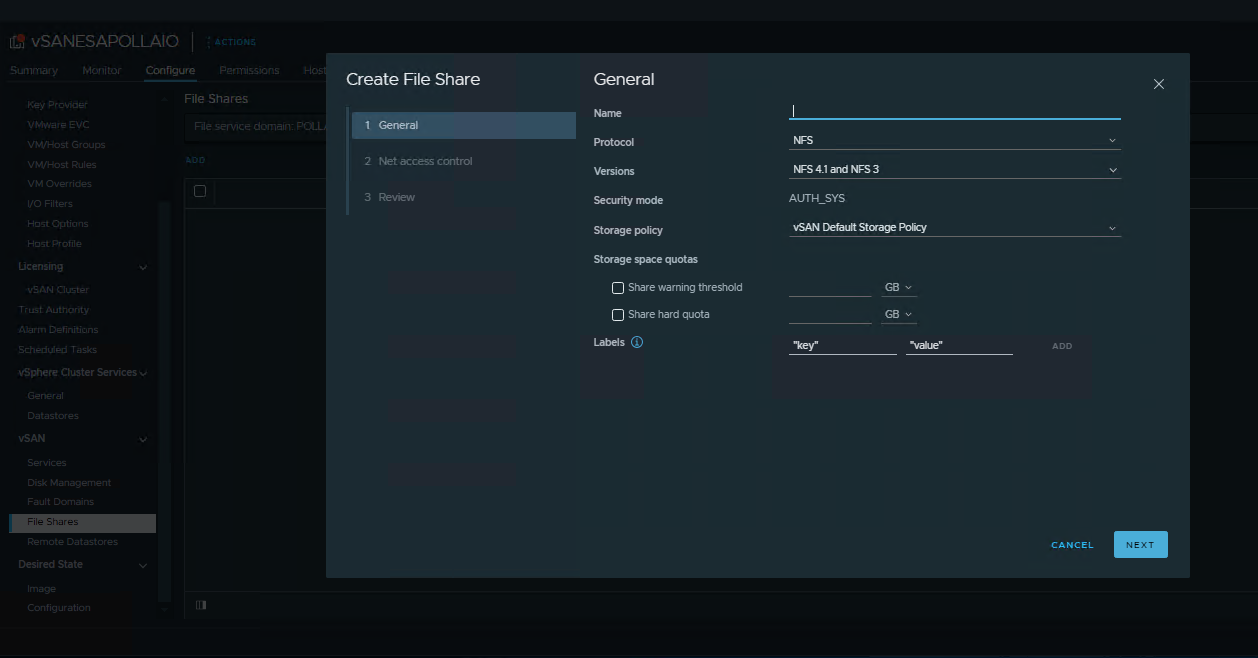
Now we can create the file share

A screenshot of a computer

Description automatically generated

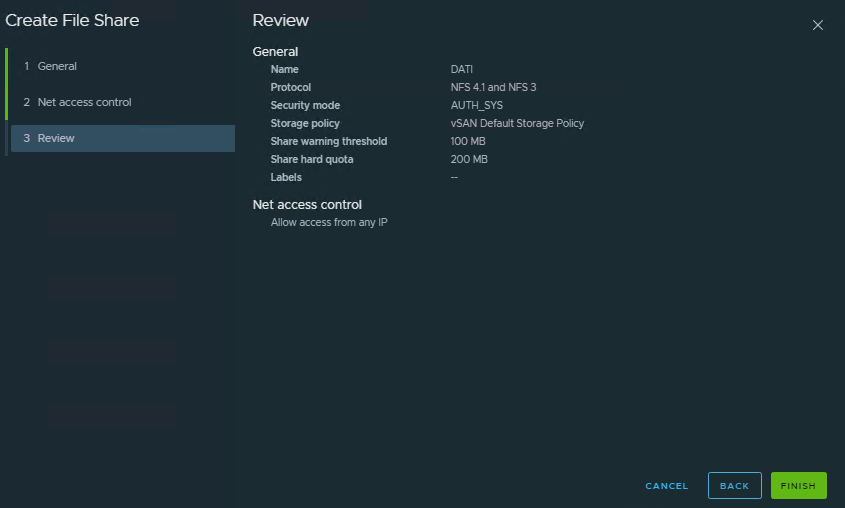
Will can create a NFS share with AUTH_SYS or Kerberos Authentication

A screenshot of a computer

Description automatically generated

A screenshot of a computer

Description automatically generated

A screenshot of a computer

Description automatically generated

A screenshot of a computer

Description automatically generated

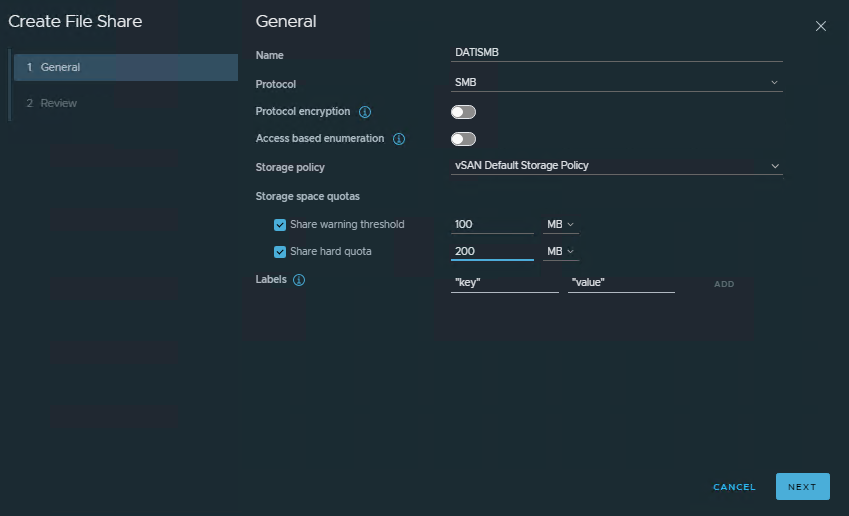
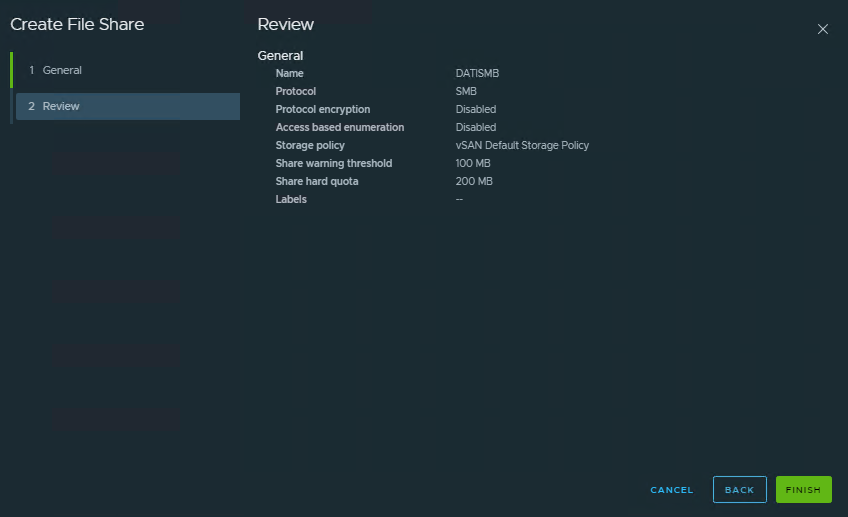
Will can create an SMB share

A screenshot of a computer

Description automatically generated

A screenshot of a computer

Description automatically generated

Configure ACL permission

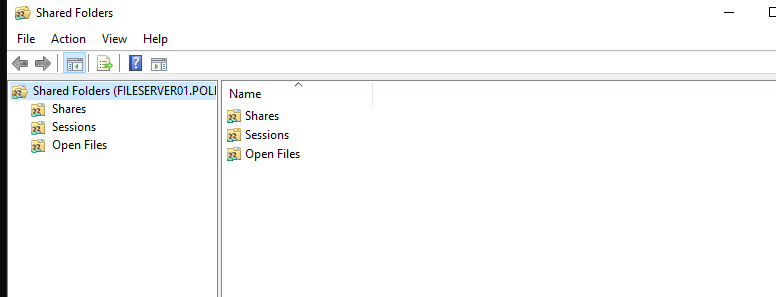
SMB SHARE can configure ACL for access use the FSM MMC from a windows OS.

A screenshot of a computer

Description automatically generated

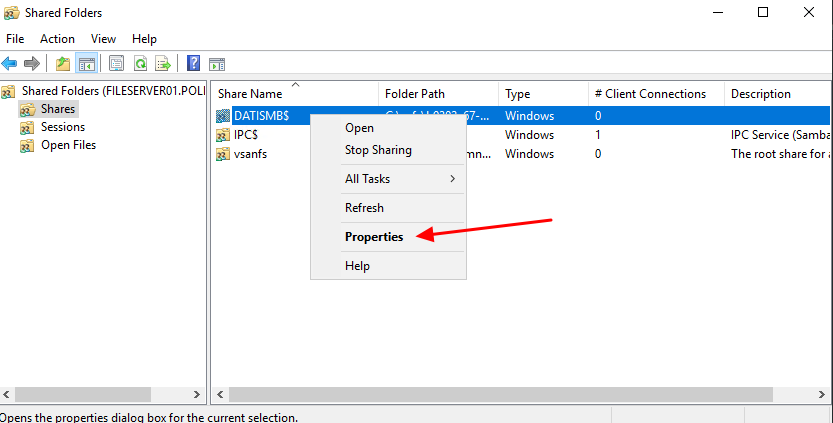
A black background with white text

Description automatically generated

A screenshot of a computer

Description automatically generated

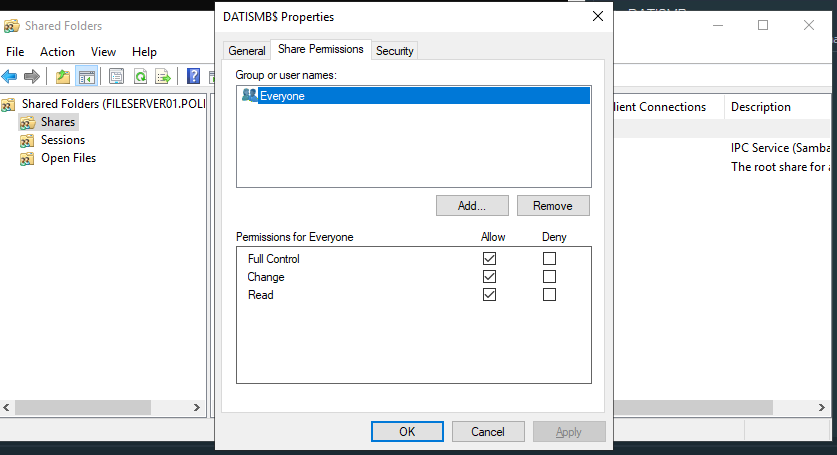
From best practices Microsoft it suggest to user Everyone on Share permission

A screenshot of a computer screen

Description automatically generated

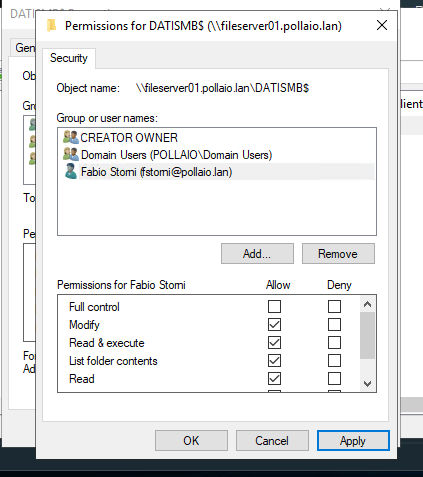
And set the permission on File Level (Security TAB)

A screenshot of a computer screen

Description automatically generated

Mount Share

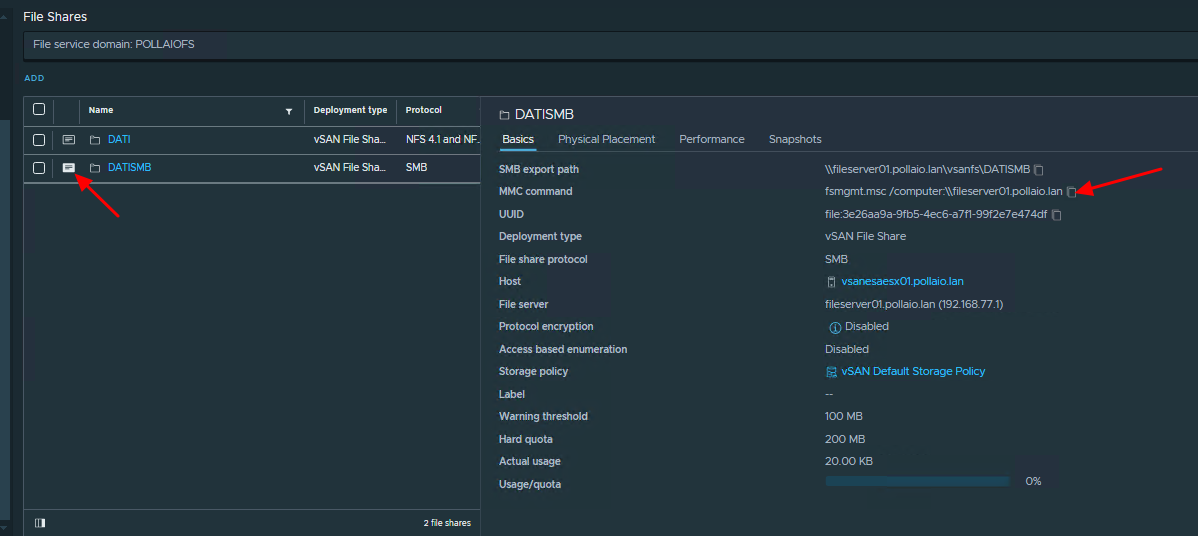
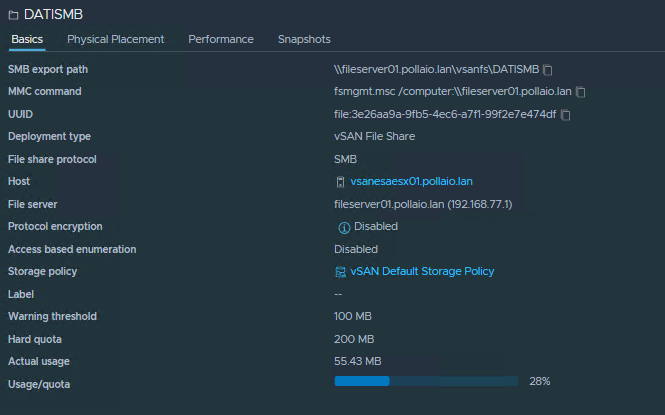
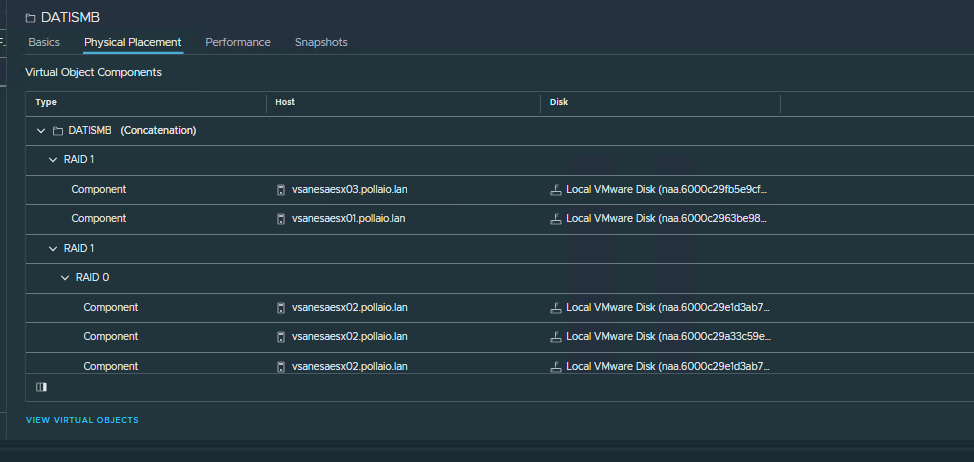
On every share proprieties, we can find the path to use for mounting the share (The SMB Export Path)

A screenshot of a computer

Description automatically generated

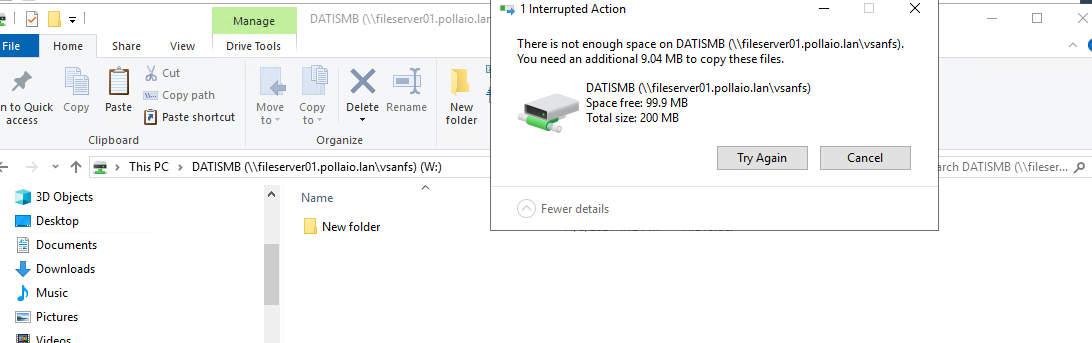
Share quota

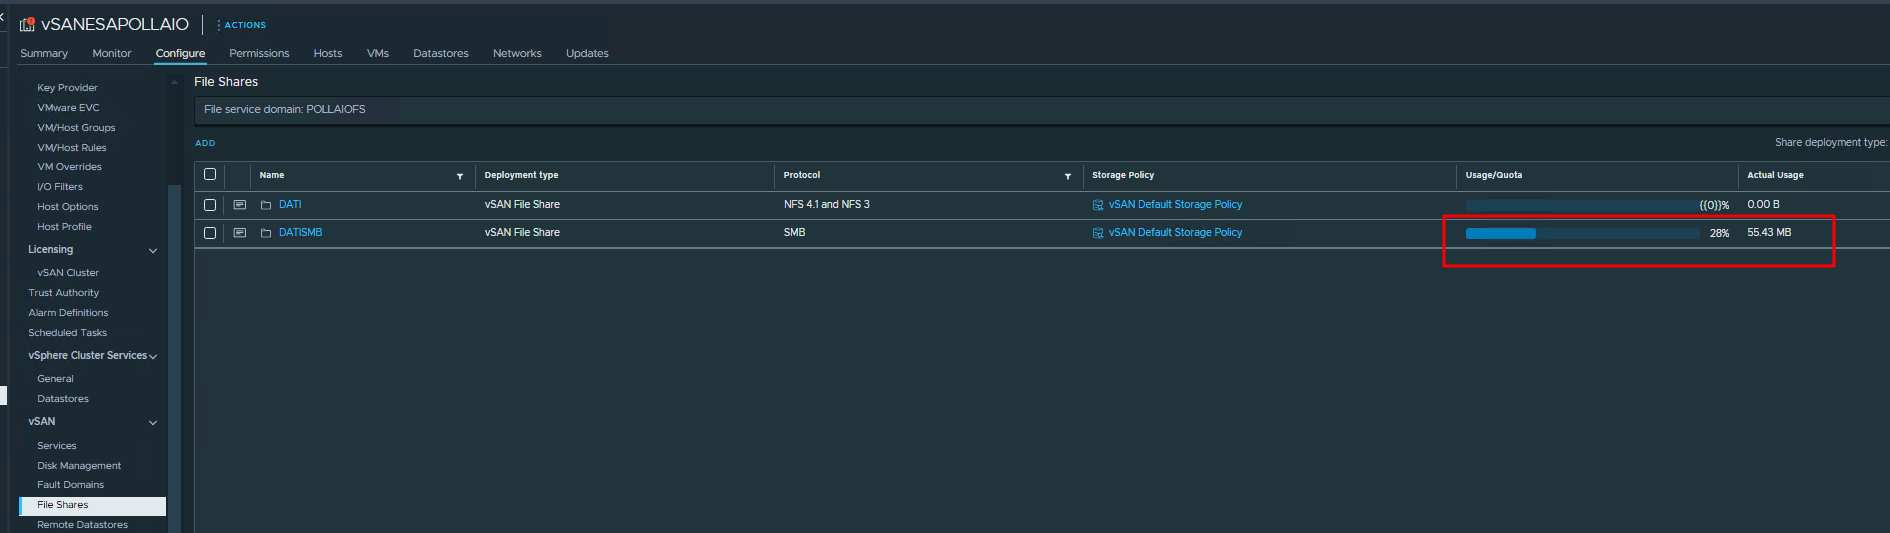
The quota control if a specified Share exceed the max space add for it.

A screenshot of a computer

Description automatically generated

We can control the state of all share quotas from the vSphere console.

A screenshot of a computer

Description automatically generated

A screenshot of a computer

Description automatically generated

SMB Export Path -> The path to use for mounting the share

MMC Command -> The command to use for configuring the ACL

A screenshot of a computer

Description automatically generated

vSAN ESA and vSAN File Service

Omnissa App Volumes 2406 – Select from multiple packages to launch

The App Volumes  2406 has many new functions, we can read all the info about this version in the following link:

Omnissa App Volumes Release Notes

I want to write about this:

To use this new function it is necessary to:

  • upgrade App Volumes Managers to 2406

App Volumes Manager Upgrade

  • upgrade App Volumes Agent to 2406

App Volumes Agent Upgrade

Now in the new App volumes Manager version, when I assign to the user a news package, I can select:

A screenshot of a computer

Description automatically generated

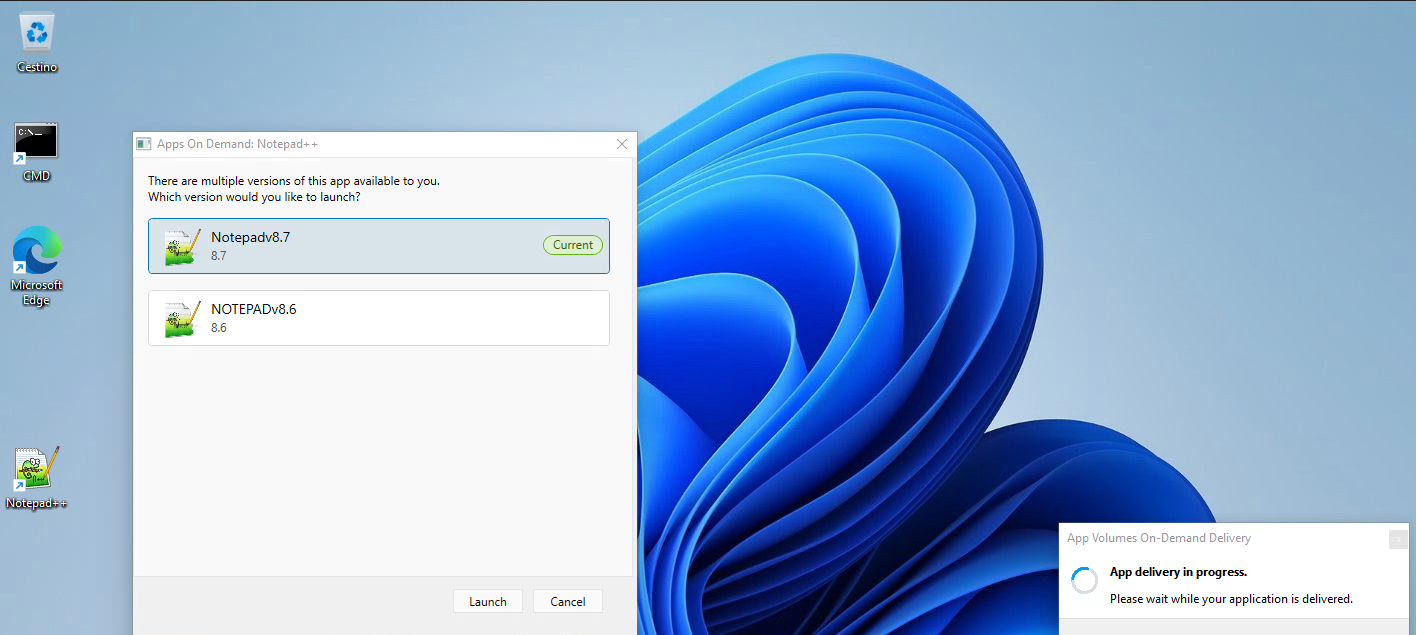
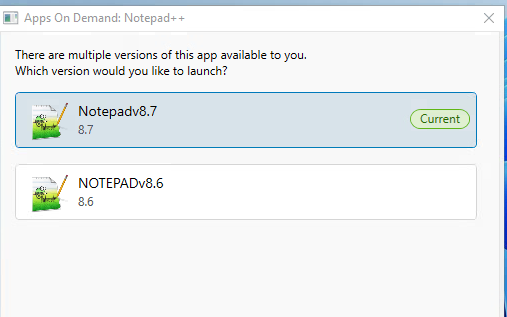
Now when the user “Fabio Storni” tries to start Notepad appstack from her VDI, he can select which Notepad version wants to start….

A screenshot of a computer screen

Description automatically generated

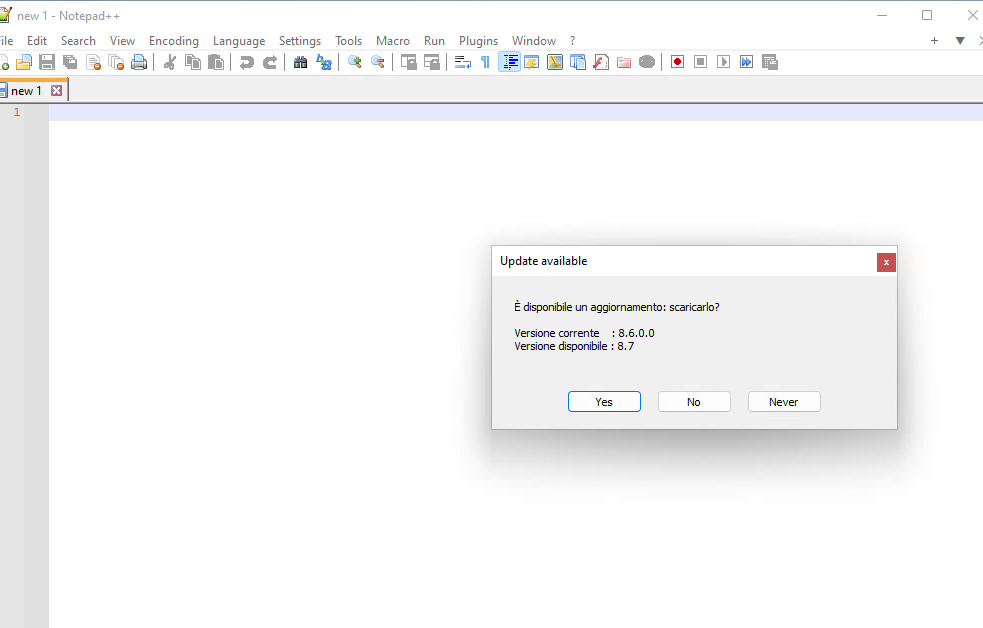
And I can select the application version to launch, in this case, I select the not current version

A screenshot of a computer

Description automatically generated

A screenshot of a computer

Description automatically generated

Omnissa App Volumes 2406 – Select from multiple packages to launch

Omnissa Dynamic Environment Manager 2406 and User-Managed Auto-Start Shortcuts


The Dynamic Environment Manager 2406 has many new functions, we can read all the info about this version in the following link:

Omnissa Dynamic Environment Manager Release Notes


I want to write about the “User-Managed Auto-Start Shortcuts”.

To use this new function it is necessary to:

  1. upgrade FlexEngine Agent to 2406 on VDI (Master Image or VDI Full Clone):

  • For AD agent install -> update the ADMX template (On Active Directory Central Store)

                   We need to modify or create a GPO (assigned to the OU where the VDI are allocated) and                           enable the “User-Managed Auto-Start Shortcuts”

                   User Configuration -> Policies -> Administrative Templates: Policy Definitions -> VMware                       DEM -> FlexEngine -> Self-Support -> Allow managing auto-start shortcuts and set it to                         Enable

  • For NOAD agent Install -> Use this parameter ManageAutoStartShortcuts, on the upgrade step, and set it to 1 to configure properly the self-support tools
  1. upgrade DEM console to 2406

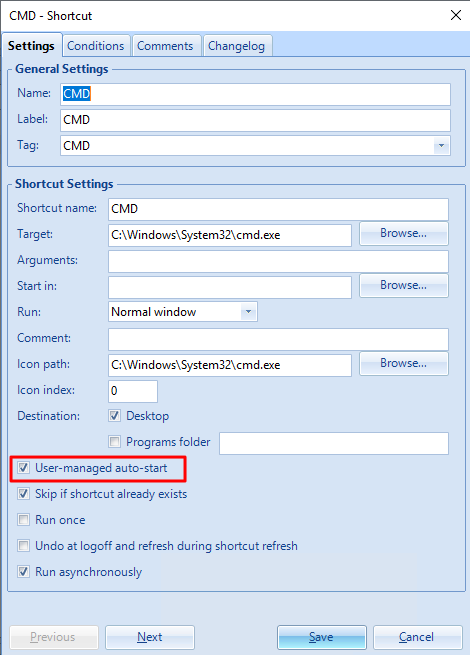
Now in DEM Console (under User Environment), we need to create ShortCuts like this

A screenshot of a computer

Description automatically generated

We need to enable “User-managed auto-start”

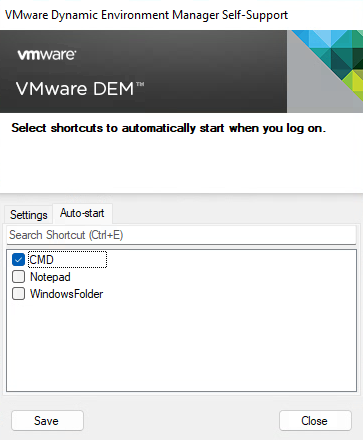
Now when the users log in to their VDI and launch the DEM Self-support program, they can select which shortcut applications automatically start when they log on:

A screenshot of a computer

Description automatically generated

Click SAVE and Close

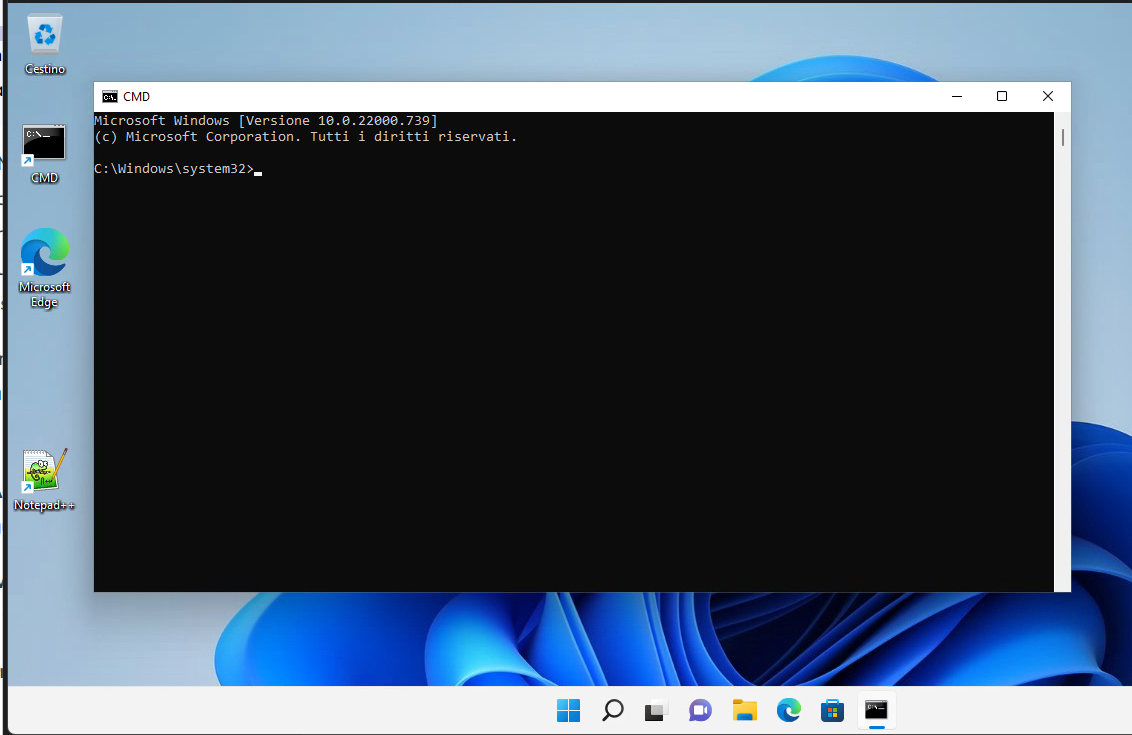
Now at the next login……

A screenshot of a computer

Description automatically generated

Omnissa Dynamic Environment Manager 2406 and User-Managed Auto-Start Shortcuts

Horizon 2406 License and Edge Gateway

I have updated Horizon to 2406 and I see the following banner?

I upgraded Horizon to 2406 and have a subscription license, do I have to install the Edge Gateway to activate the licenses?

Well, I recommend you read this post of mine.

New features in Horizon version 2406 include changes to license management, including:

  • The ability to activate subscription Plus and HUL licenses even without deploying the EDGE Gateway (we will see the details in a future post)
  • The degraded mode

Activation without EDGE Gateway

we will have the following advantages:

  • Due to corporate or administrative policies, some customers cannot have production environments that send data to the cloud. With this new feature, they will be able to enjoy the benefits of subscription Plus licenses to HUL without sending data
  • They will not have to dedicate resources to the Edge Gateway (8 vCPUs and 32 GB RAM)

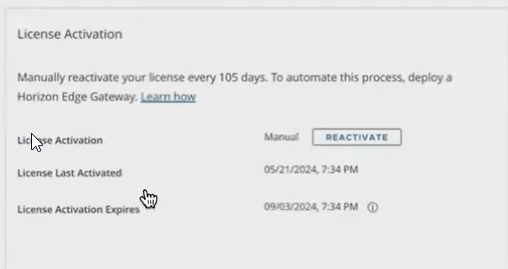
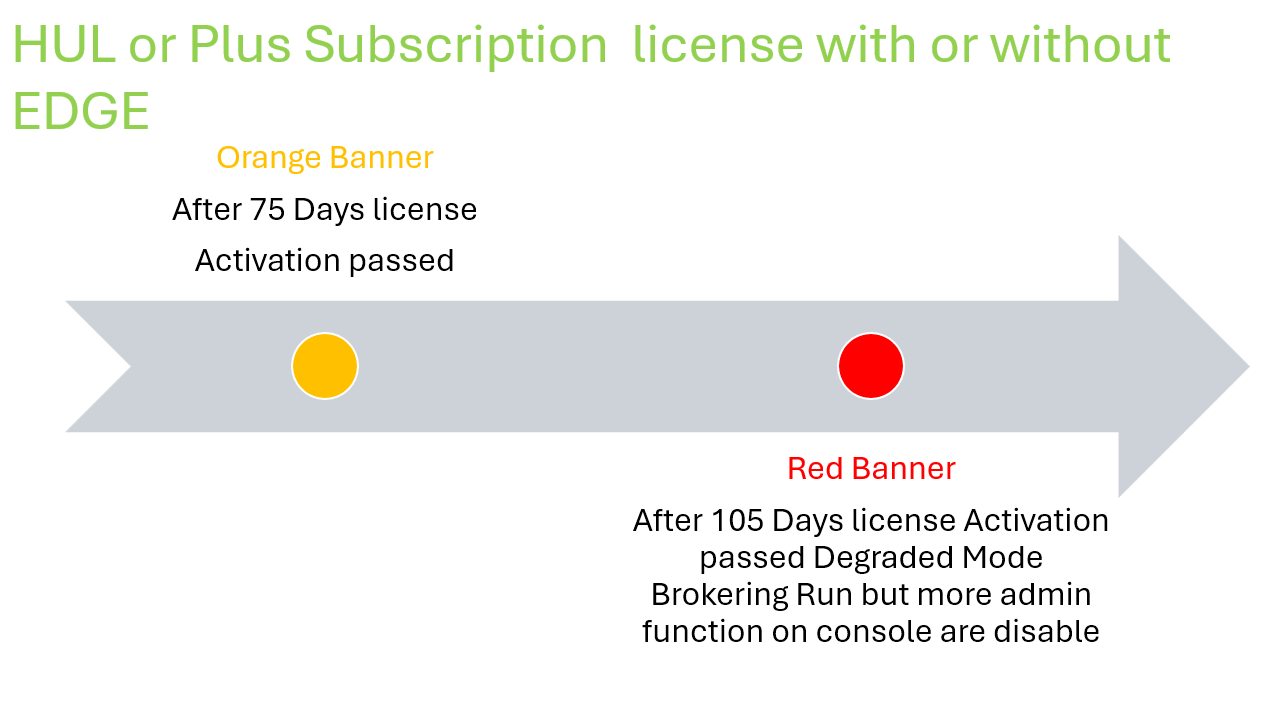
The only activity to do, if you do not have the EDGE gateway installed, is to remember to reactivate the license every 105 days in a very simple way by clicking on the button on the licenses page

Degraded Mode

When Horizon console switch to degraded mode?

  • When there are no Horizon licenses installed (see first-time installation)
  • When a perpetual customer upgrades their connection server to version 2406
  • When the term/subscription license expires

What does it involve?

Entering the degraded state involves the following situations:

  • In the Inventory -> Desktops – Add button will be disabled
  • In the Inventory -> Farms – Add button will be disabled
  • In the Inventory -> Desktops -> Automated Desktop Pool -> Edit -> Provisioning Settings -> Desktop Pool Sizing – Maximum Machines input field will be disabled
  • In the Inventory -> Farms -> Automated Farms -> Edit -> Provisioning Settings -> Farm Sizing – Maximum Machines input field will be disabled
  • In the Inventory -> Desktops -> Pools Summary -> Maintain -> Schedule button will be disabled
  • In the Inventory -> Farms -> Farms Summary -> Maintain -> Schedule button will be disabled
  • In the Inventory -> Desktops -> Duplicate button will be disabled.

The features will be re-enabled when you adjust the license

So you ask me, what happens if we upgrade the version of Horizon to version 2406 and have perpetual licenses?

The following banner appears on the first access (the status is degraded mode with the restrictions indicated above)

You will need to reactivate your license by opting for one of the following options:

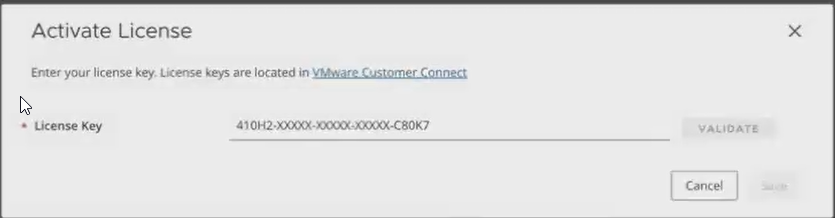
In the case of perpetual licenses, select Term or Perpetual license and enter the code

A screenshot of a computer

Description automatically generated

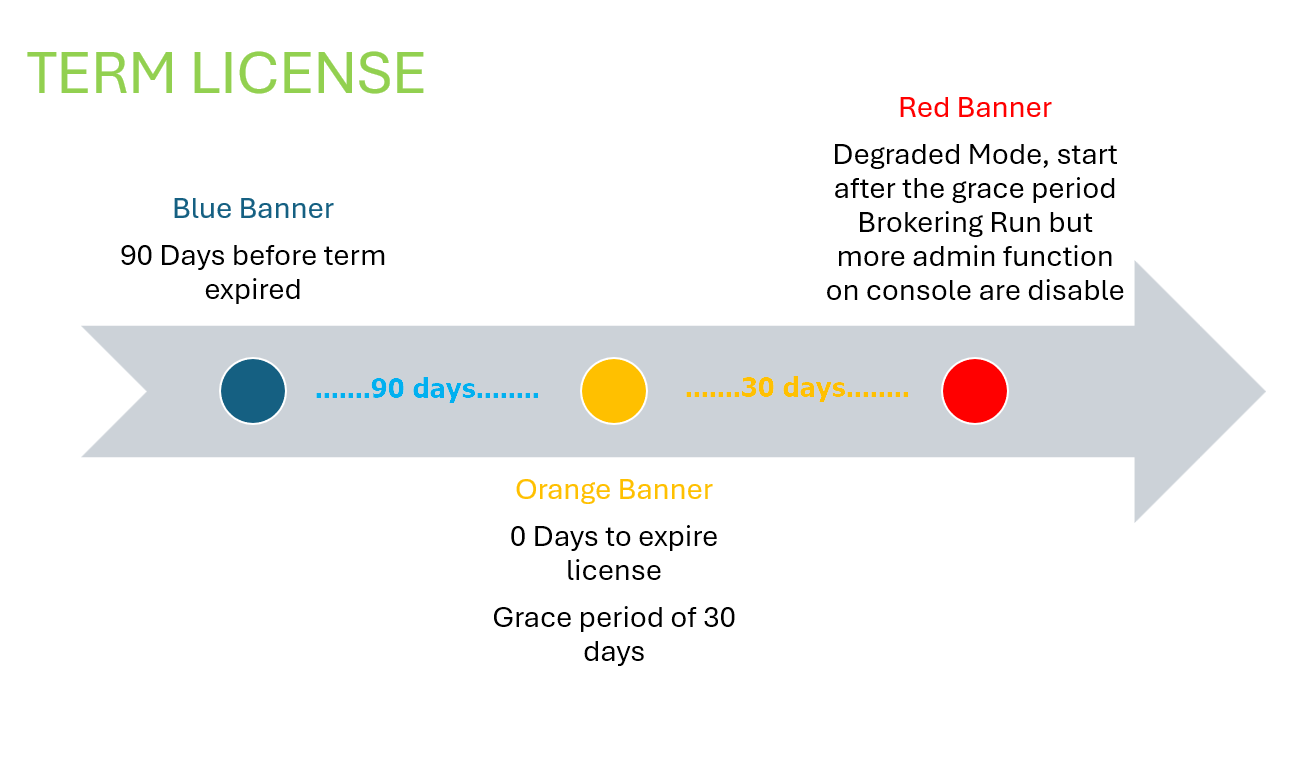
The inclusion of the degraded mode also changes the management of the expiration of the so-called TERM licenses from version 2406:

A diagram of a number of days

Description automatically generated with medium confidence

While for subscription HUL or Plus licenses it is also necessary to think about the failure to verify licenses through the EDGE or manual reactivation without the EDGE.

A white background with red and yellow circles and black text

Description automatically generated

Horizon 2406 License and Edge Gateway

App Volumes 2406

As anticipated in my previous posts, version 2406 of Omnissa’s EUC products (the company that took over VMware’s EUC products) has been released. New versions of the following are present:

  • App Volumes
  • Horizon
  • Unified Access Gateway
  • Dynamic Environment Manager

In the next posts I present some of the most interesting new features that are present in these new releases.

Let’s start with App Volumes and talk about:

  • Volumes App for Persistent Desktop
  • Extending the App Volumes solution to other platforms
  • Assign different versions of the same application to a user

Volumes App for Persistent Desktop

  • The solution until the version before 2406 was only available for non-persistent desktops (Instant Clone)
  • From the 2406 it is also possible to use it with persistent desktops

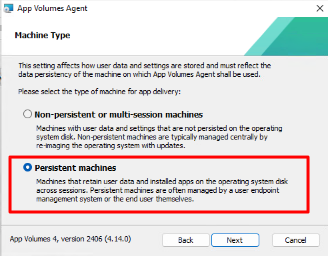
The main difference is present in the installation of the agent where it is asked on which type of desktop we are installing the App Volumes agent

A screenshot of a computer

Description automatically generated

In its nature of profile management, the use of App Volumes on a persistent machine is only possible with App Stacks and not with Writable Volumes

Extending the App Volumes solution to other platforms

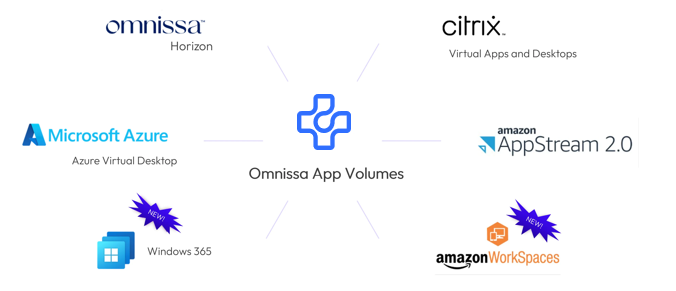
The ability to use App Volumes with VDI is not only of Horizon infrastructure, from version 2406 it is possible to use with Windows 365 and with Amazon WorkSpaces

A group of logos on a white background

Description automatically generated

Assign different versions of the same application to a user

Leveraging Apps on Demand, end users can now select from multiple packages of an application at launch, providing flexibility to try out new versions or launch specific ones

Other assignment options: “Marker,” and “Package,”, now we are the “Multiple,” option enhancing application management and deployment flexibility.

App Volumes 2406

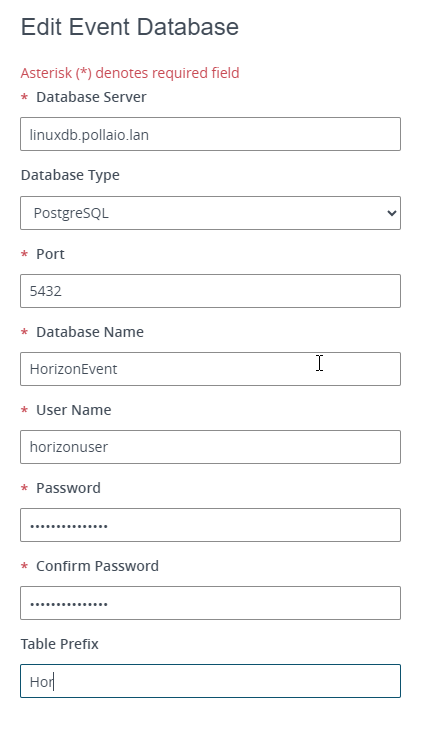
Use PostgreSQL for Horizon DB events

In most Horizon infrastructure Microsoft SQL is used to host the event DB. It is possible to use Oracle and also PostgreSQL, this last possibility allows us to reduce the costs by using a free Linux version as OS (See Oracle Linux) and not add costs for the DB. 

Requirements

Horizon Connection Server infrastructure

Oracle Linux v9 virtual machine

PostgreSQL Installation on Oracle Linux

On Oracle Linux

#Check last version of all packages

sudo dnf update

#Install PostgreSQL

sudo dnf install postgresql-server postgresql-contrib

sudo postgresql-setup –initdb

sudo systemctl start postgresql

sudo systemctl enable postgresqls

#Create PostgreSQL User and DB

sudo -u postgres createuser horizonuser –pwprompt

sudo -u postgres createdb -O horizonuser HorizonEvent

#Enable remote access to PostgreSQL

netstat -nlp | grep 5432

cd /var/lib/pgsql/data/

vi postgresql.conf

Access with postgres user

su – postgres

cd data

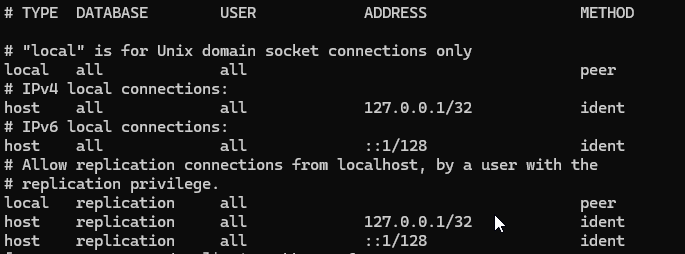
cat pg_hba.conf

A screen shot of a computer

Description automatically generated

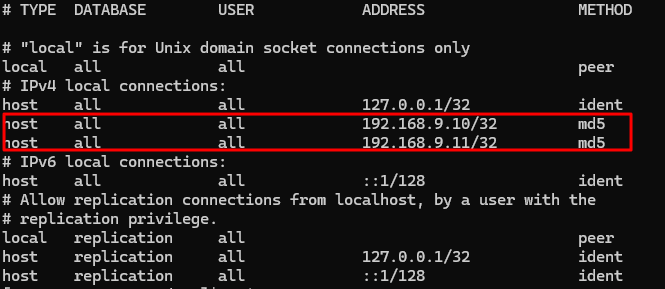
Modify the pg_hba.conf file and add the Connection Server IP address. Follow this documentation

Prepare a PostgreSQL Database for Event Reporting in Horizon Console (omnissa.com)

vi pg_hba.conf

A screen shot of a computer

Description automatically generated

firewall-cmd –zone=public –add-port=5432/tcp –permanent

firewall-cmd –reload

PostgreSQL Service restart

systemctl restart postgresql.service

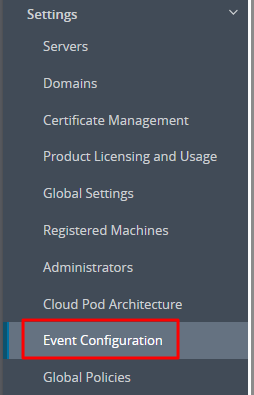
#Configure the Horizon infrastructure to use the PostgreSQL DB for the event

A screenshot of a computer

Description automatically generated

A screenshot of a login form

Description automatically generated

Use PostgreSQL for Horizon DB events