Horizon Client Linux, Domain User, and USB Redirect issue

We have a problem with USB redirection on the Linux client, the issue is present when a Linux guest OS (UBUNTU 20.04 in my case) is joined at the domain and we try to use a domain user to access the Linux to start a Horizon session with the Horizon client

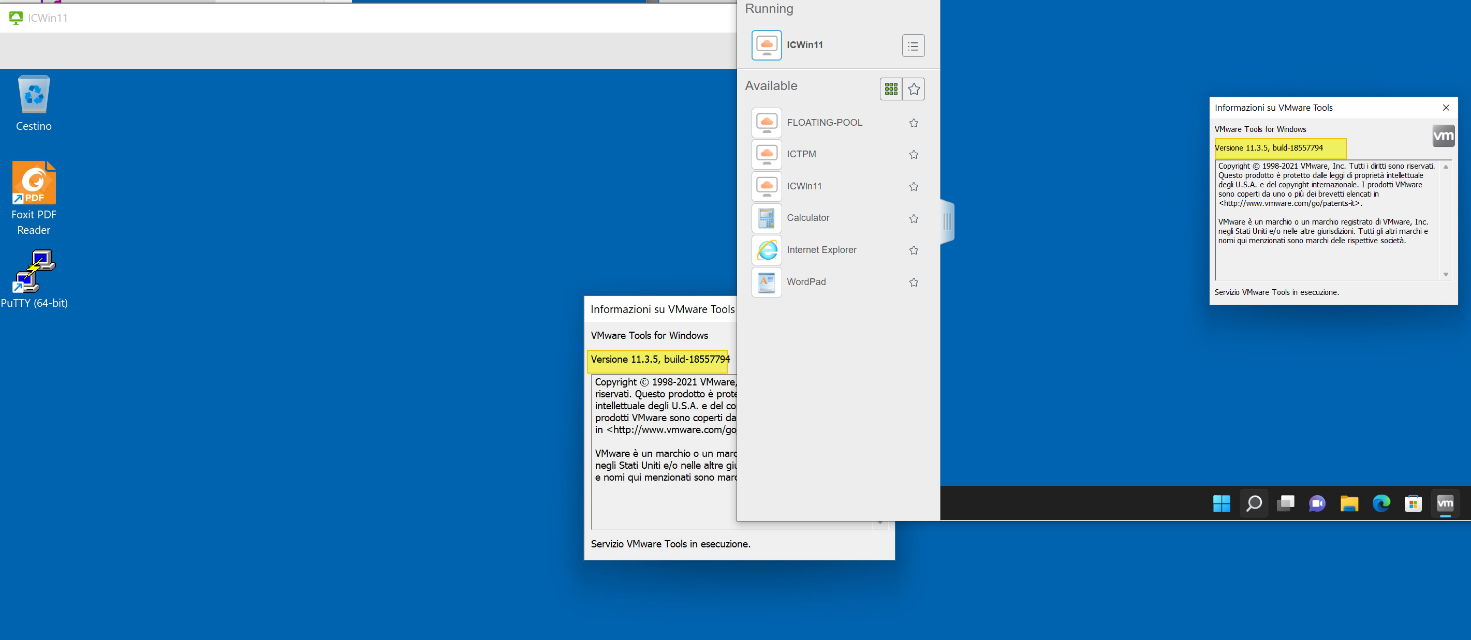
The issue is “ USB initializing…” remain for all time and no USB device is redirected

A screenshot of a computer

Description automatically generated

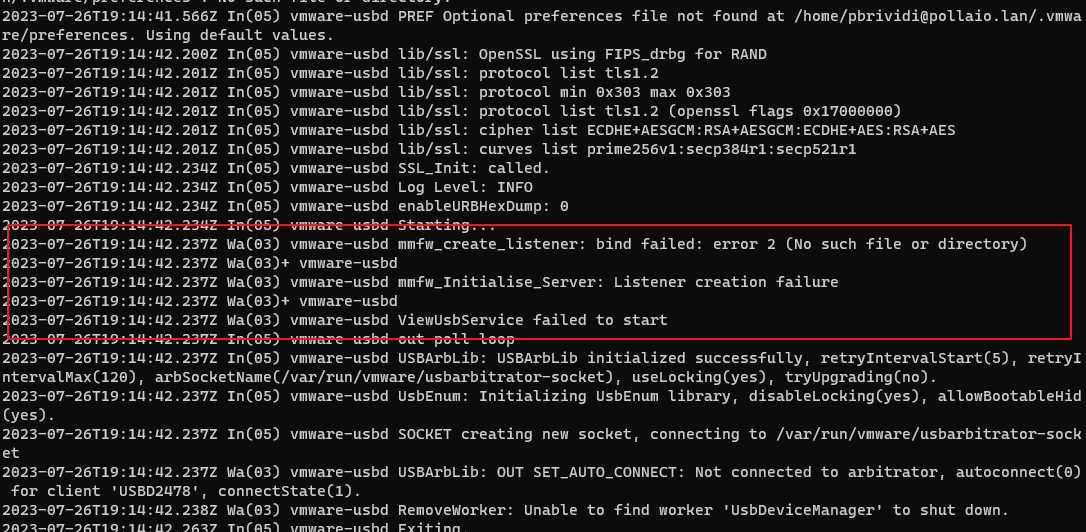
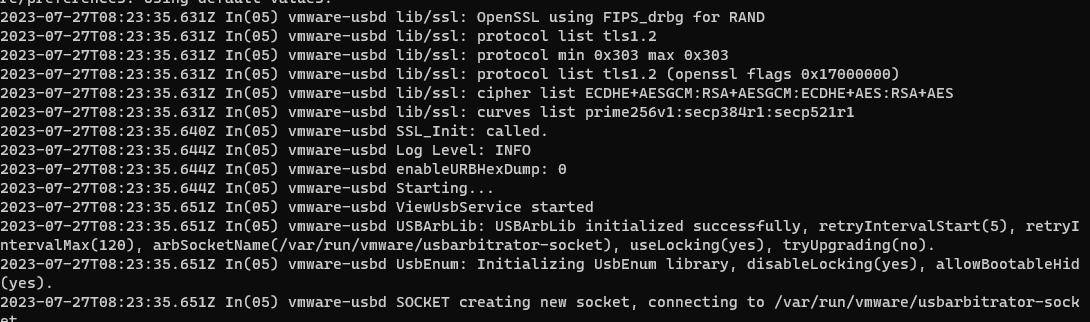
In the log file /tmp/vmware-<user>/vmware-view-usbd-<pid session>.log we found

A screenshot of a computer program

Description automatically generated

With a Linux local user, the problem is not present.

Workaround

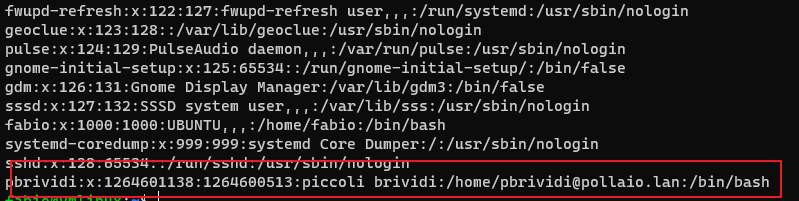
Add to /etc/passwd the domain user, for recover GID e UID use the command id <username>

A screen shot of a computer

Description automatically generated

After this, we need to restart the USB Arbitrator

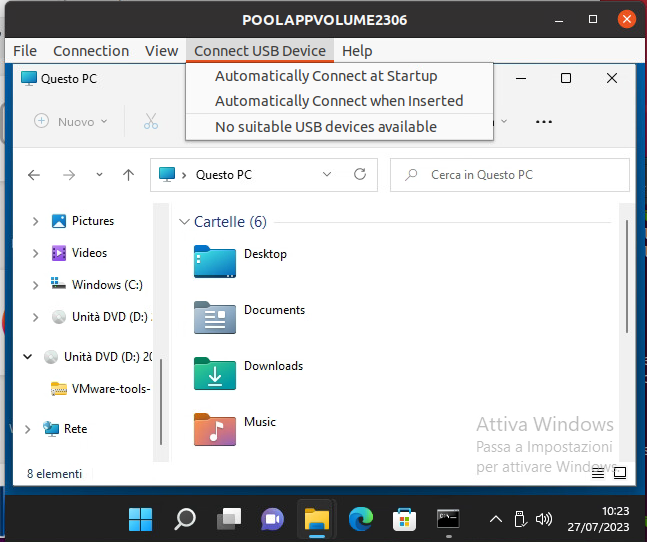
After applying the workaround the problem is resolved

A screenshot of a computer

Description automatically generated

And I don’t have any error in the log file

A screenshot of a computer

Description automatically generated

Horizon Client Linux, Domain User, and USB Redirect issue

Remove an instant clone desktop pool in a deleting state

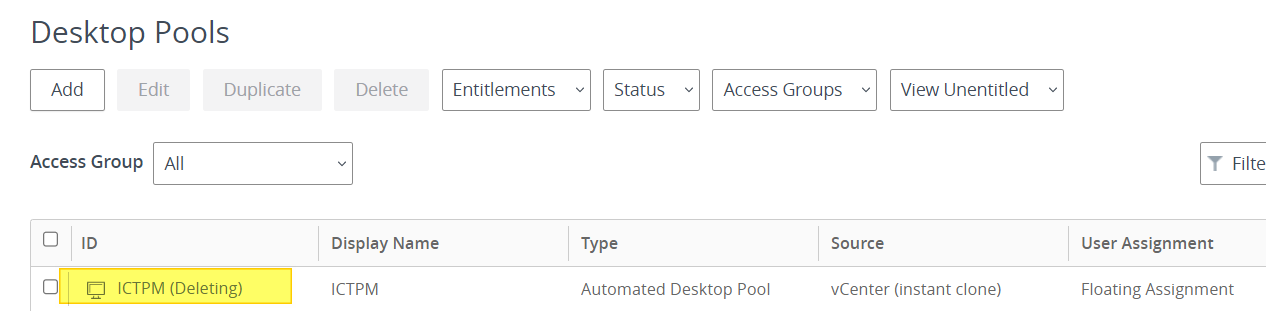
If we are removing a desktop pool from a Horizon infrastructure and we find ourselves in a situation that remains in a deleting state:

Graphical user interface, text, application

Description automatically generated

We can force the removal as follows:

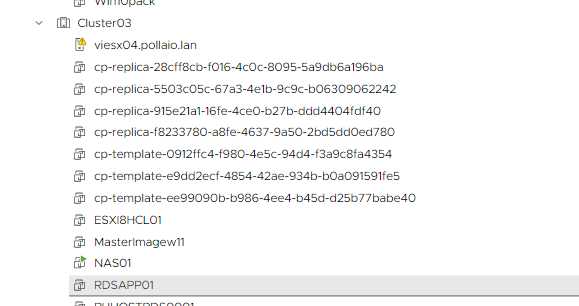
  • Remove any VDI VMs still in your vSphere infrastructure.
  • Remove VM template, replication and parent.

In my example, we have the following situation

Graphical user interface, text, application

Description automatically generated

To remove them we use the tool iccleanup.cmd, we find te command on the connection servers by launching the following command to access:

iccleanup.cmd -vc <ome of vcenter> -uid < admin user of vcenter>

We enter the account password

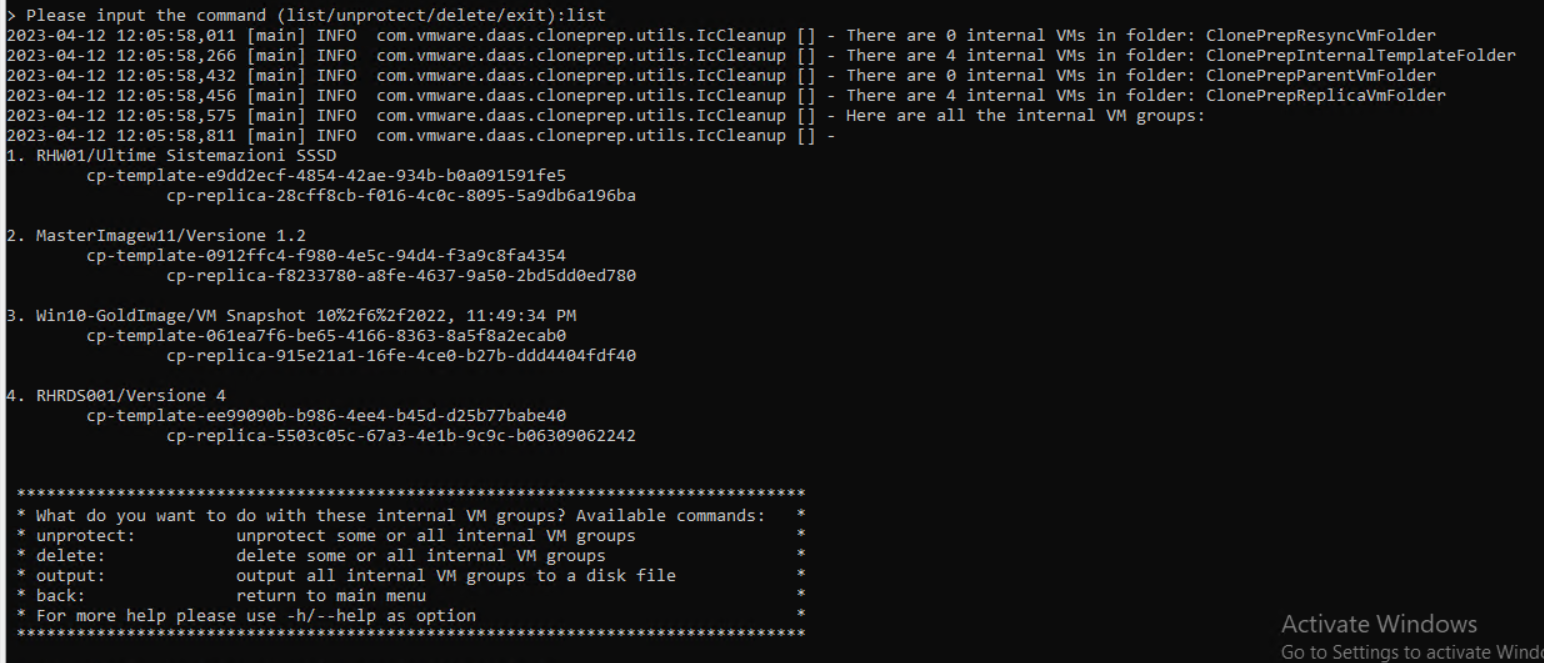
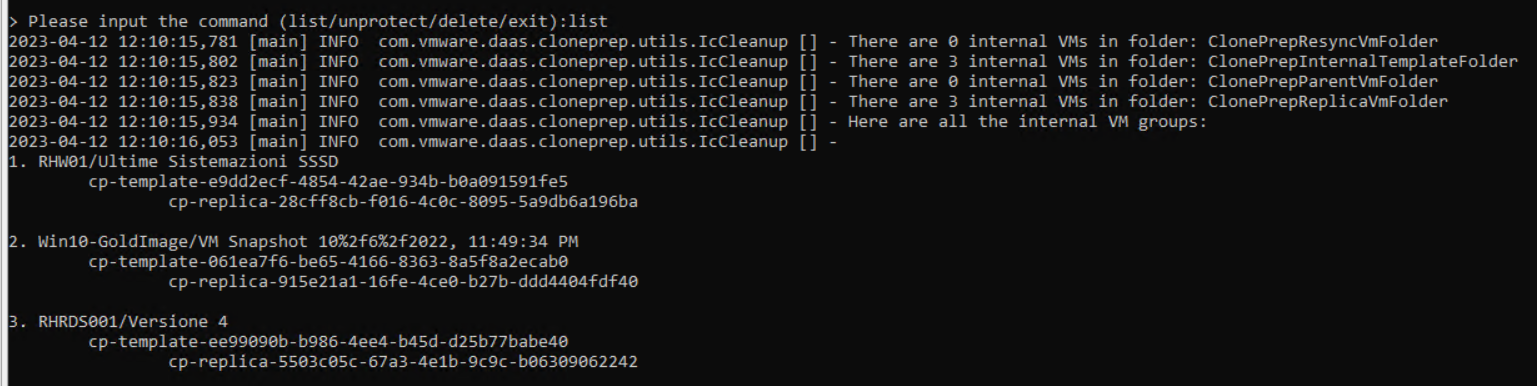
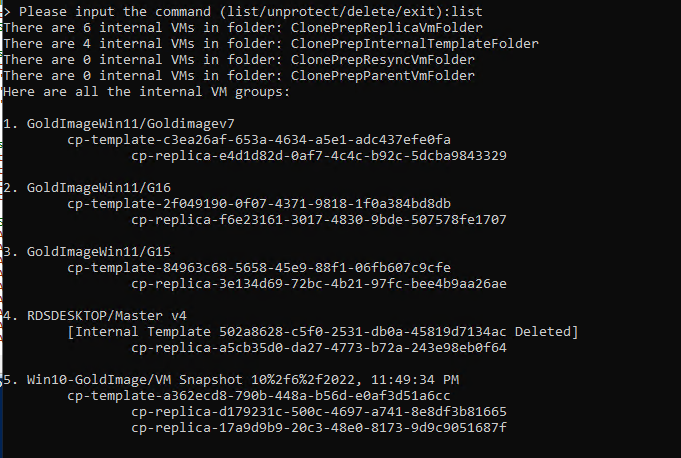
Run with the list command the list of service VMs to be deleted

Text

Description automatically generated

In my case, they are the VMs indicated with ID 2 and 3

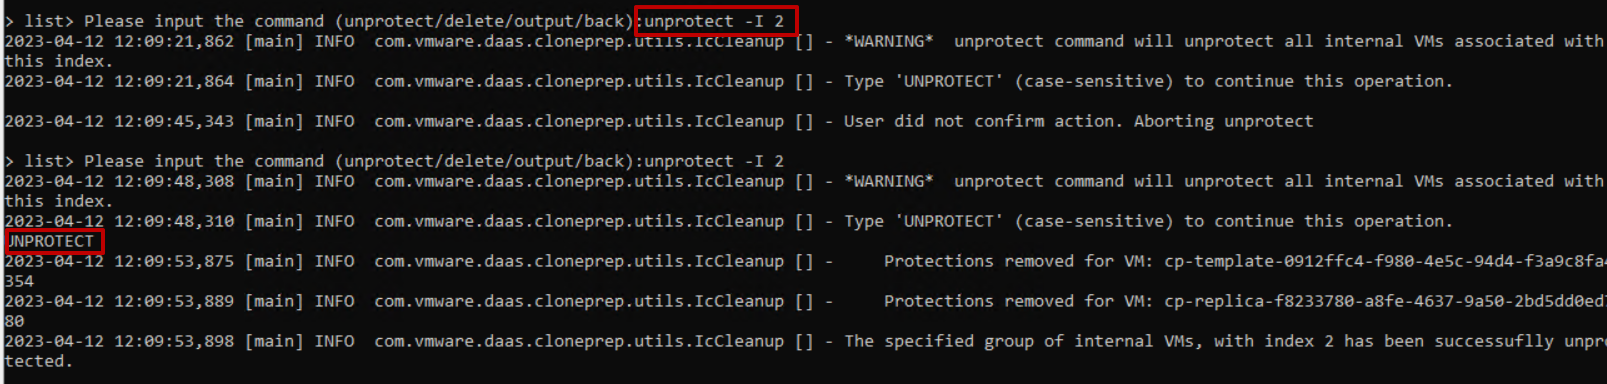
We start from 2 and first launch the unprotect indicating with -I the number 2 (unprotect -I 2) and confirm by writing unprotect

Text

Description automatically generated

Then we delete with the question delete -I 2 and confirm by writing  delete

Graphical user interface, text

Description automatically generated

Let’s go back by writing Back

Relaunch the List command and verify that Index has taken the other chain of system VMs to be deleted

Text

Description automatically generated with medium confidence

Ha was taken as index 2

We review the operations of unprotect and delete once again for index 2

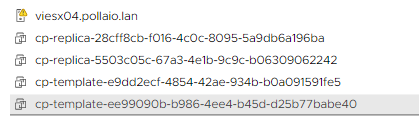
At the end of the vCenter  (they are service VM from other pools that should not be deleted)

Text

Description automatically generated

Already in this case, we may have deleted the DesktopPool that was in a deleting state.

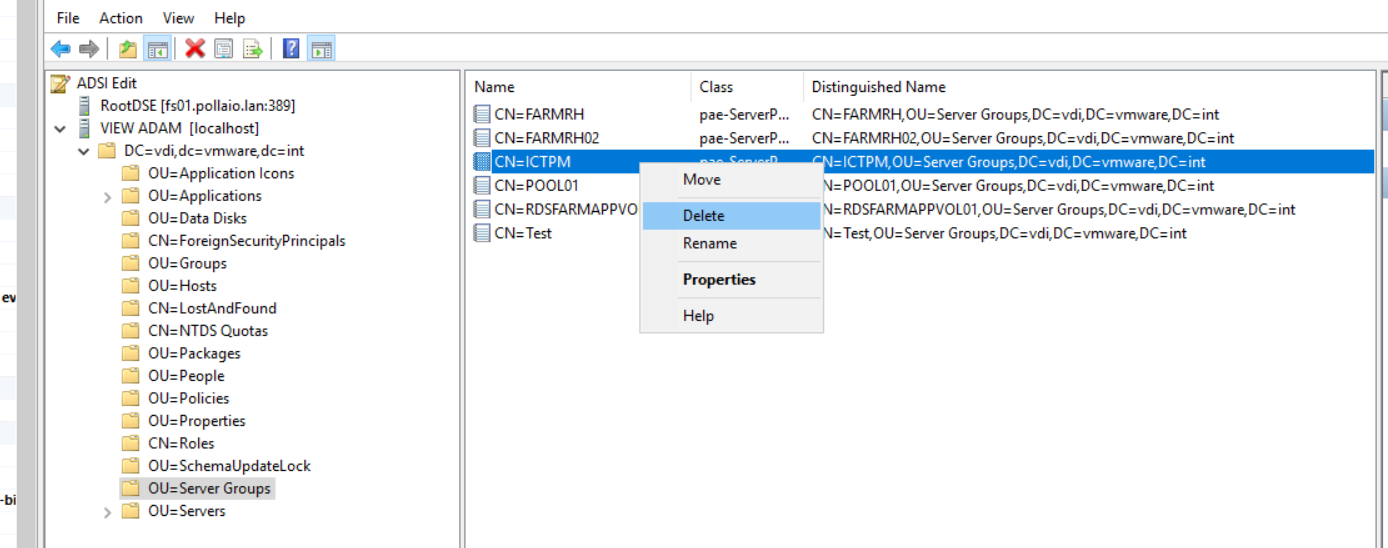
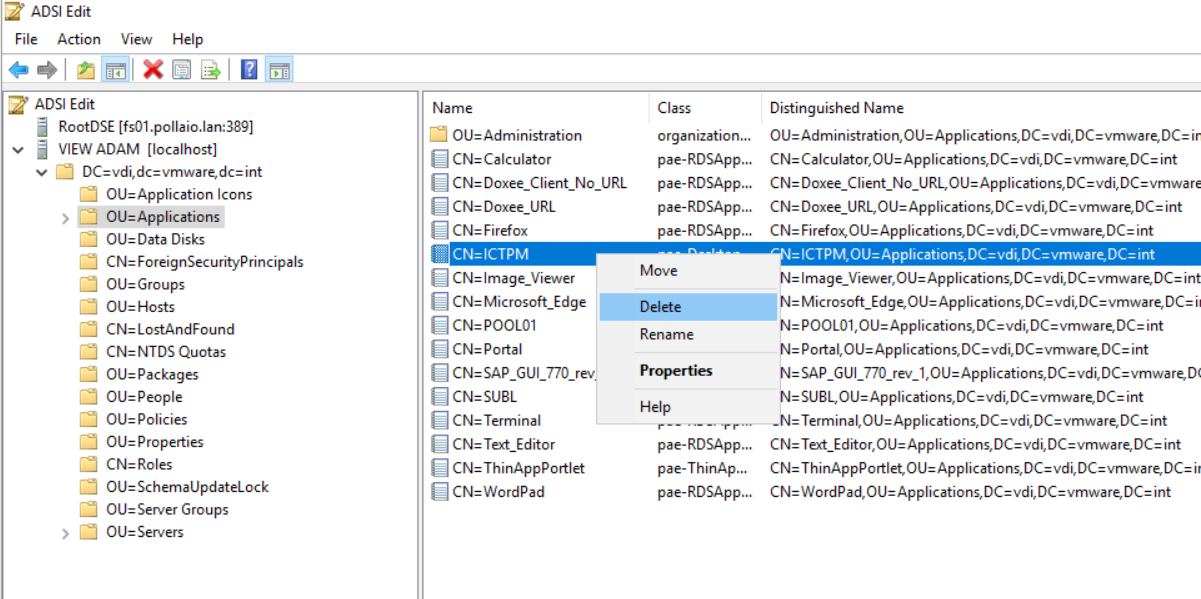
If the Pool in question is still present and in a deleting state, we proceed to access the ADSI Edit console and modify the ADAM DB by deleting the references left to the pool in deleting state (in my case ICTPM)

  • Remove Desktop Pool from ADAM Database

To connect follow this KB:

Connecting to the Horizon View Local ADAM Database (vmware.com)

remove the pool from Adam as follows.

Graphical user interface, text, application

Description automatically generated

Graphical user interface, text

Description automatically generated

Remove an instant clone desktop pool in a deleting state

VMware Horizon 8 2303

At the end of March 2023, new versions of the products that make up the Horizon suite were released. (Connection Server, Volume App, DEM, and Unified Access Gateway)

There are several interesting features, below I report the link to each release note.

I bring to your attention the presence of AppVolume in a preview solution related to the use of AppVolume in the Azure environment. (This deployment option is intended for applications packages and not Writable Volumes)

Horizon

VMware Horizon 8 2303 Release Notes

App Volume on Azure

VMware App Volumes Manager Deployment Guide for Azure –

App Volume 

VMware App Volumes 4, version 2303 Release Notes

DEM

VMware Dynamic Environment Manager 2303 Release Notes

Unified Access Gateway

Unified Access Gateway 2303 Release Notes (vmware.com)

VMware Horizon 8 2303

VMware Horizon 8 2212

VMware has just released a new version of Horizon 2212. These are some of the features/support introduced:

  • Horizon 8 version 2212 in conjunction with App Volumes 4 version 2212 introduces Horizon Published Apps on Demand.  With this new feature, administrators can use App Volumes applications directly in their instant-clone RDS farms.  Now applications can be delivered dynamically to a generic Windows OS as users launch them. This greatly simplifies static image management and gives administrators the ability to reduce their application specific farms. This also brings the Horizon and App Volumes administration consoles closer together, allowing Horizon administrators to add App Volumes Manager servers and entitle applications to users without the need for duplicate entitlements in App Volumes. This feature creates an opportunity to reduce the time-consuming management of application installations on RDS Farms, and enables scenarios such as multiple users being able to use different versions of the same application while logged in to the same RDS Server.
  • Microsoft MAK licenses are now supported with Instant Clones.
  • When you create an automated pool of full clone desktops, you can now specify an active directory OU in which computer accounts can be created. Previously, computer accounts would get created in the default OU and administrators would manually move them after pool creation. This feature, which already exists for Instant Clone desktop pools, addresses this pain point for administrators.
  • Cloud Pod Architecture is supported with IPv6 environments for more security and added address spaces.
  • Administrators can now generate a CSR configuration file, import a CA-signed certificate to Connection Server, and monitor health of the certificate from Horizon Console.

More details here:

VMware Horizon 8 2212 Release Notes

VMware Horizon 8 2212

AppVolume Application in Pending Delete

In some situations, removing an Application of AppVolume may not result correctly, and as a result, the state of applications from the UI may result in deleting and stalling:

In my case, I also have the advantage that they have not remained in cancellation even if the Packages

To perform the cleanup, you must work on the AppVolume Database.

To proceed we must:

  • Locate the server that hosts the DB.
    • On an AppVolume server, in 64-bit ODBC, there is an SRVMANAGER entry edit the entry and identify the server’s name and its DB name.
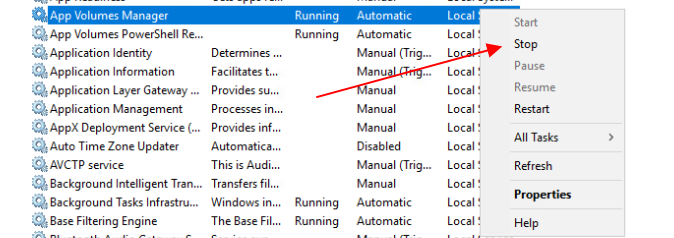
  • Shut down each server with the App Volume Manager role of the App Volume Manager service.

  • Connect with SQL Management Studio to AppVolume DB.
  • Back up your DB.
    • Using the native SQL tool or third-party backup tools.
  • Remove the rows corresponding to the application in the dbo.app_products table.
    • In some situations, it may not be enough the name and then in the removal query we indicate the status that is deleting.

Image containing text, device, gauge, screenshot

Auto-generated description

If there are also packages in a state of deleting also proceed with the removal of the corresponding rows that we can find in the dbo table .app_packages.

AppVolume Application in Pending Delete

Horizon Instant Clone -VM Replica and Template in inaccessible state

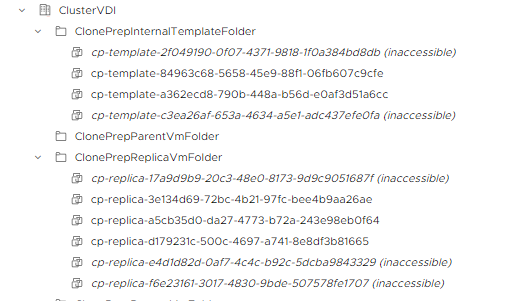
In the various maintenance activities of a Horizon infrastructure, it can happen to find VMs of the instant clone chain in an inaccessible state. (Caused by issues on hosts or vCenter such as sudden shutdowns without properly maintaining Horizon Desktop Pools.)

Image that contains text

Auto-generated description

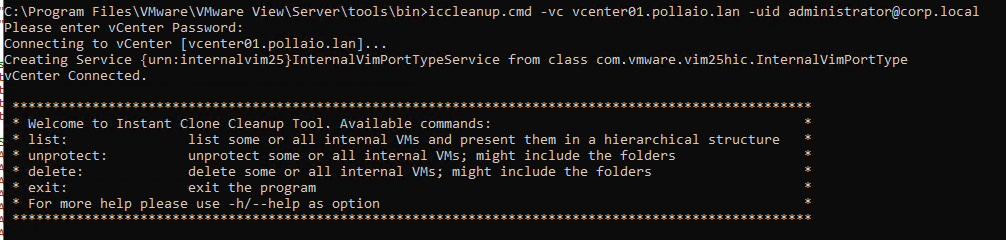
In the VMware Horizon solution there is a tool, from the command line, that allows the cleaning of these objects.

The tool is present in the directory

C:\Program Files\VMware\VMware View\Server\tools\bin>

of one of the connection servers of the Horizon infrastructure

The command is iccleanup.cmd

The first step is to connect to the vCenter in question by launching the following command

iccleanup.cmd -vc <fqdn of vCenter> -uid <administrative user>

Once you have entered the password you will have the possibility to list the VMs of the instant clone infrastructures implemented on that vCenter with the LIST command

Image that contains text

Auto-generated description

Or delete objects in an inaccessible state, for example:

With the delete –index 2 command

Image that contains text

Auto-generated description

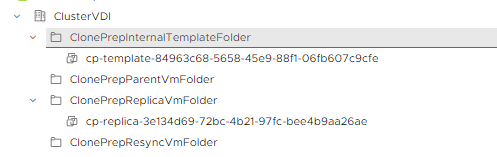
After the completion of the cleaning, the situation will be as follows:

Image that contains text

Auto-generated description

Horizon Instant Clone -VM Replica and Template in inaccessible state

I updated my Home Lab with the gift of Cohesity and the vEXPERT community

Immagine che contiene testo, interni

Descrizione generata automaticamente

Until a few weeks, my Home Lab was composed of two physical ESXi nodes (respectively an INTEL NUC NUC8i3BEH and an HP Desktop HP ProDesk 600 G2 DM), with 32 GB of RAM each and 5 TB of total disk.

For my testing activities, especially in VDI (Horizon) and some vSAN (implemented a 2-node cluster to test the operation of Shared Disks for Microsoft clusters) could be enough.

But the desire to test vSphere 8 (vSAN etc …) and the possibility of trying the Kubernetes world was pushing me to evaluate an expansion of my Home LAB ……….

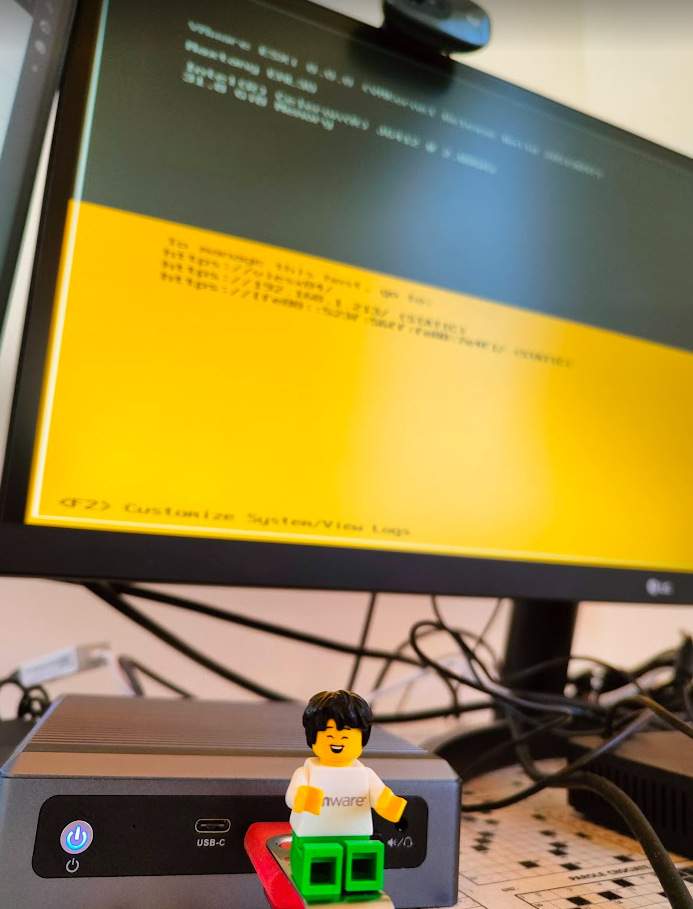
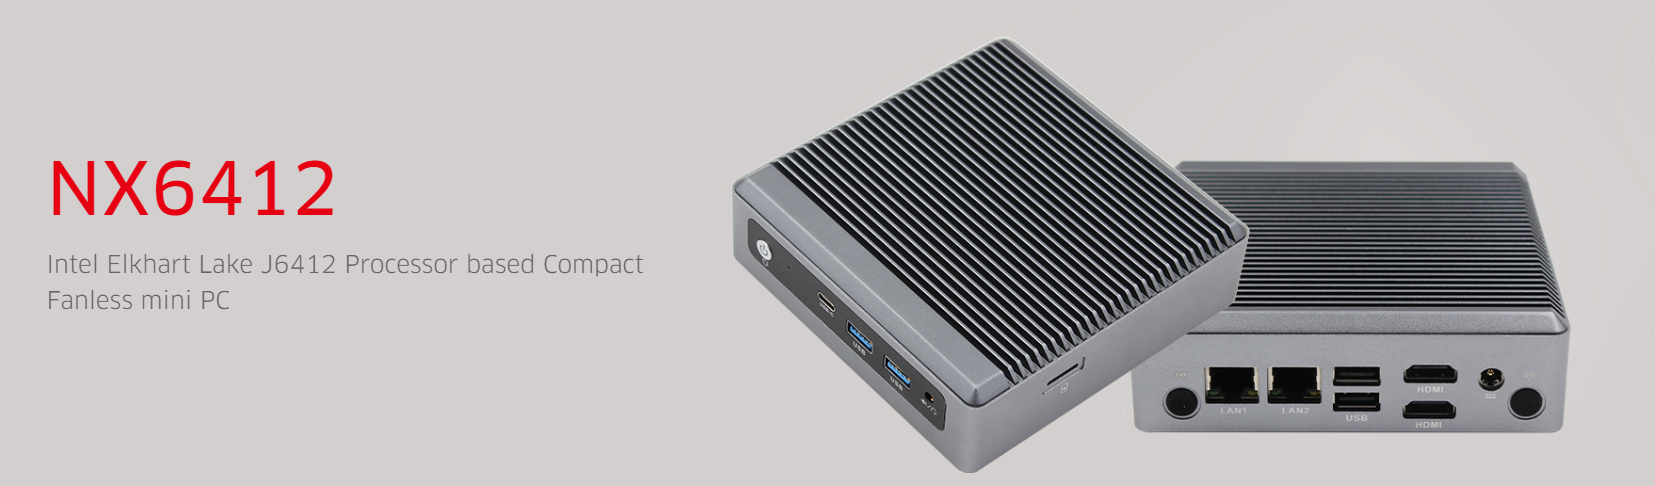
………. And thanks to COHESITY and the vEXPERT community at VMware EXPLORER in Barcelona I was able to have my expansion…. a beautiful Maxtang NX6412 NX6412-Maxtang-A premier manufacturer (maxtangpc.com)

Image containing electronic, projector

Auto-generated description

here’s how I activated the new HW:

  • Equipment
    • Being barebones I had to buy RAM and DISK, taking advantage of Black Friday I bought:
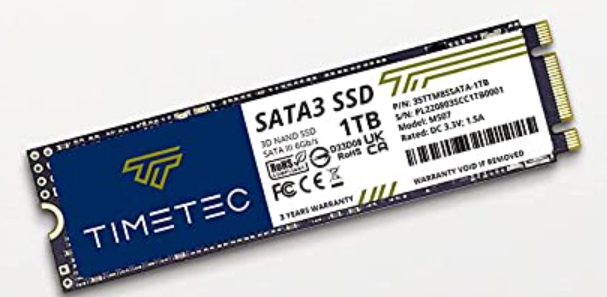
      • Timetec 1TB SSD 3D NAND TLC SATA III 6Gb/s M.2 2280 NGFF 512TBW
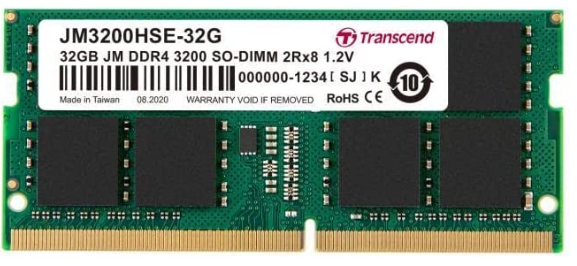
      • Transcend JM3200HSE-32G 32GB DDR4 3200MHz SO-DIMM 2Rx8 1.2V

Image containing text, electronic, circuit

Auto-generated description

For the RAM I will proceed to evaluate an expansion with an additional 32GB bank

  • Installation
    • Updated vCenter to version 8
    • Installed ESXi version 8 on a USB stick (Using VMware Workstation and installing ESXi from an ISO on my USB stick) and used it to boot from Maxtang.

At this point I encountered the first problem, the two network cards are not compatible… I had to use a USB dongle -> Ethernet and I managed to start everything (Thanks also to the community drivers USB Network Native Driver for ESXi | VMware Flings

    • I finally added ESXi to my vCenter
  • First use
    • The first thing I did was use William Lam’s script to deploy a vSAN 8

Automated vSphere & vSAN 8 Lab Deployment Script (williamlam.com)

    • I configured the HA of my vCenter
    • Now I’m trying to improve my know-how on Tanzu and WorkSpace One

So THANK YOU vEXPERT, VMware and COHESITY

I updated my Home Lab with the gift of Cohesity and the vEXPERT community

Using Secondary Image on Instant Clone Desktop Pool (VMware Horizon)

In the management of a pool of Instant Clone (IC) VMs in a VMware Horizon infrastructure, one of the most useful aspects for a system administrator is the ability to make updates by modifying the GoldImage, subsequently generating a new Snapshot of it and applying it to all the VM ICs of the Pool.

Since version 2111, we have the possibility to use a “second image” in the same Pool to allow the deployment of this second image in a “selective” way on only some VMs.

This allows us to test the changes made only on a limited number of users.

Let’s see how it works, in my Home Lab where I have a Pool of type IC with Guest OS Windows 11.

The VMs (in this case there are 2) point to the following snapshot of the GoldImage:
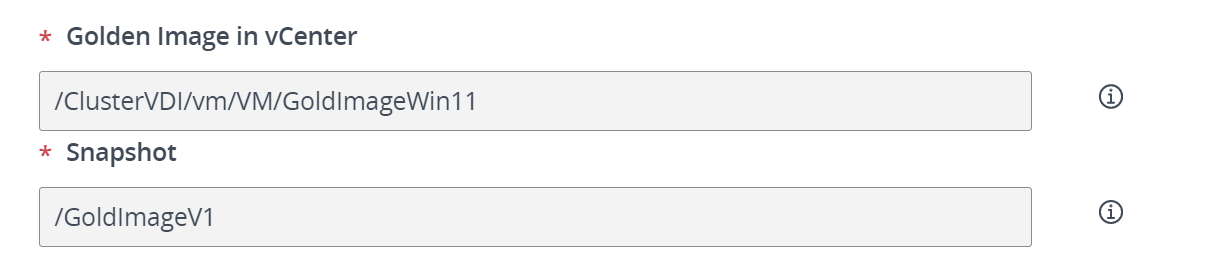
Immagine che contiene tavolo

Descrizione generata automaticamente

Let’s proceed to update the VMware Tools on the Gold image, where the version is currently present
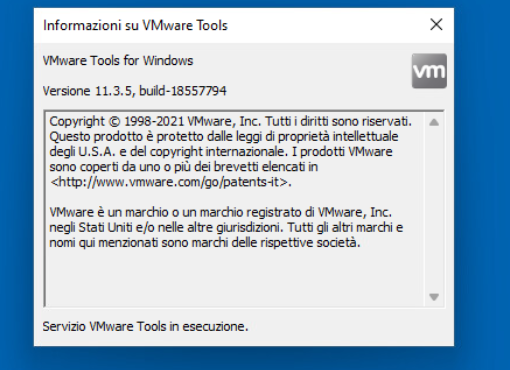
Immagine che contiene testo

Descrizione generata automaticamente

Post update we have the following version
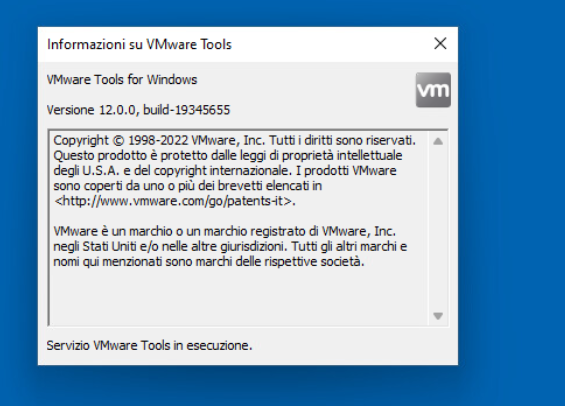
Immagine che contiene testo

Descrizione generata automaticamente

We proceed with turning off the GoldImage and create the snapshot to use.

Once the snapshot is created, we go to the Desktop Pool and proceed to assign the snapshot created as a secondary image.
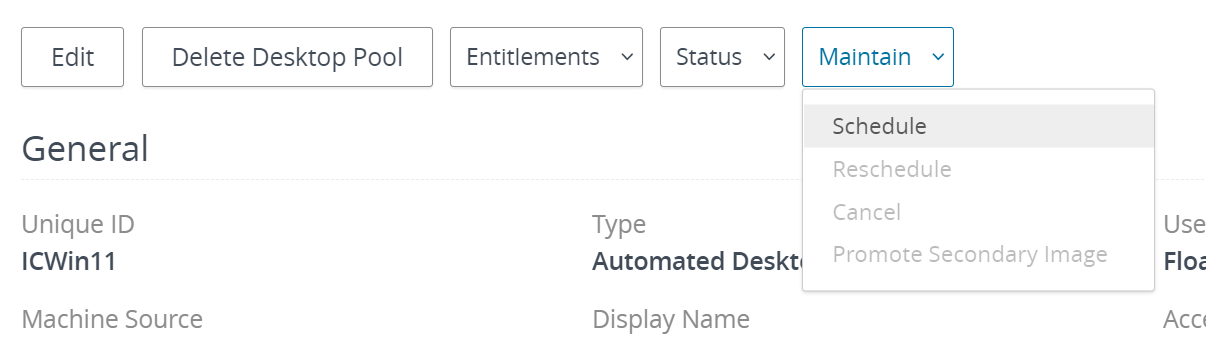
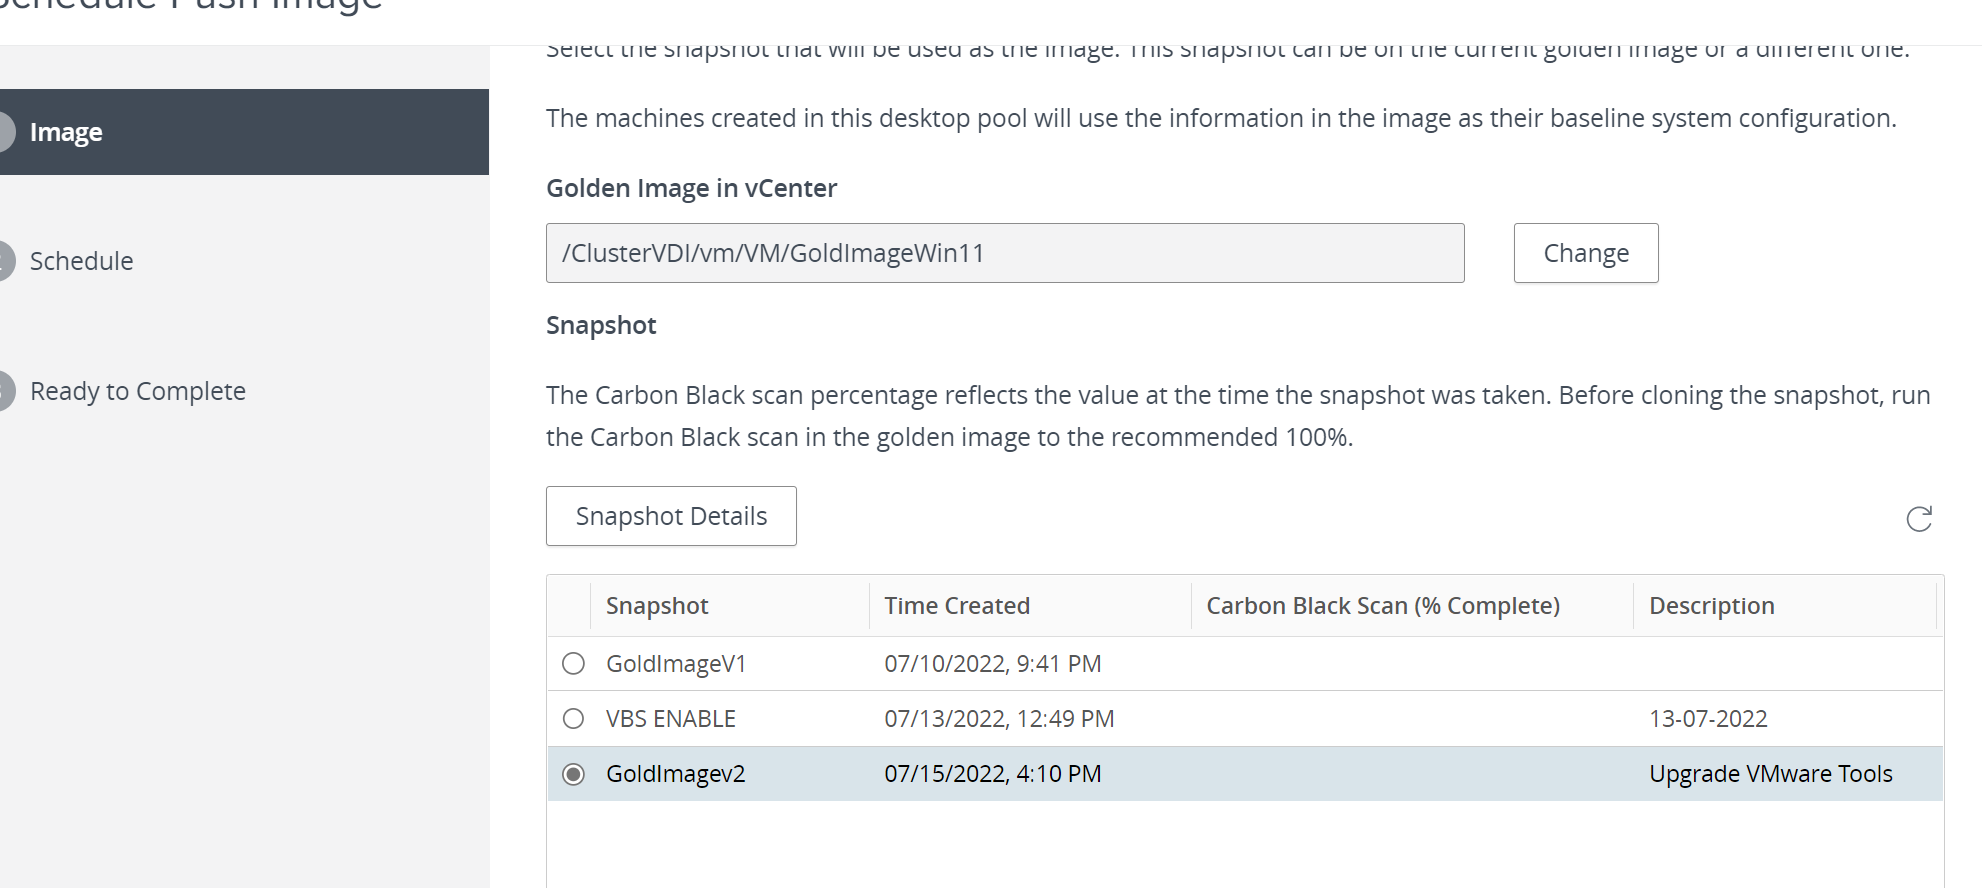
Immagine che contiene tavolo

Descrizione generata automaticamente

Immagine che contiene testo

Descrizione generata automaticamente

We select the option to publish it as a second image
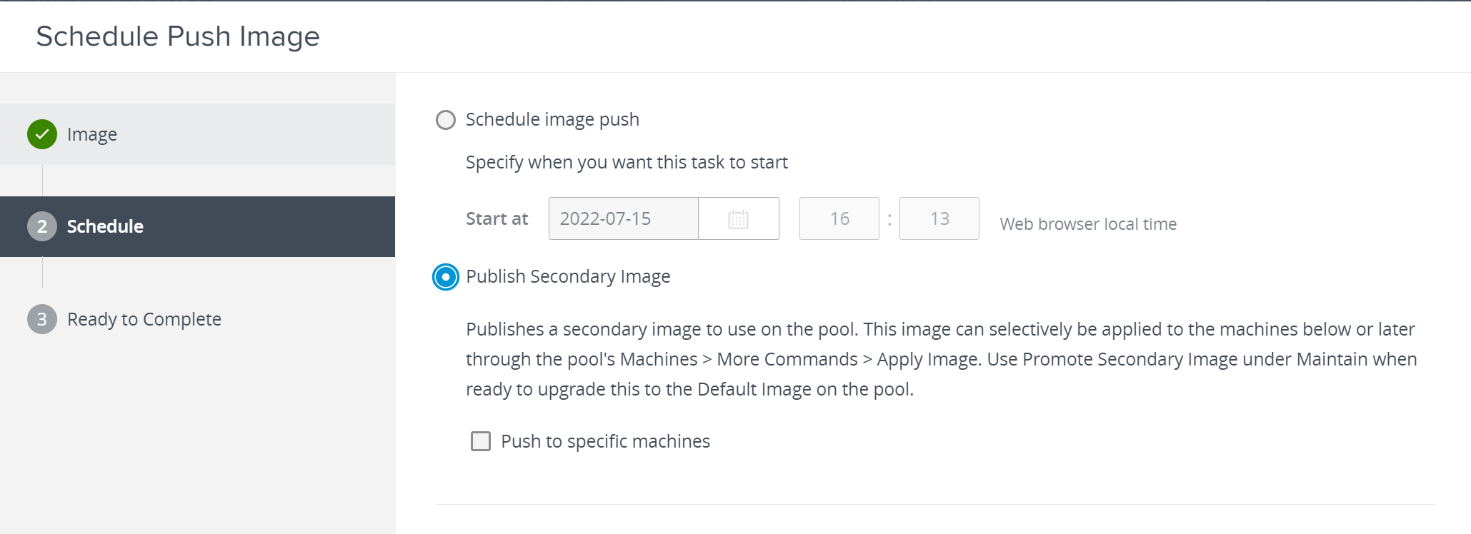
Immagine che contiene testo

Descrizione generata automaticamente

If we want to select now the VM IC on which to push we put the flag to:

In my case we will select after the VMs ICs
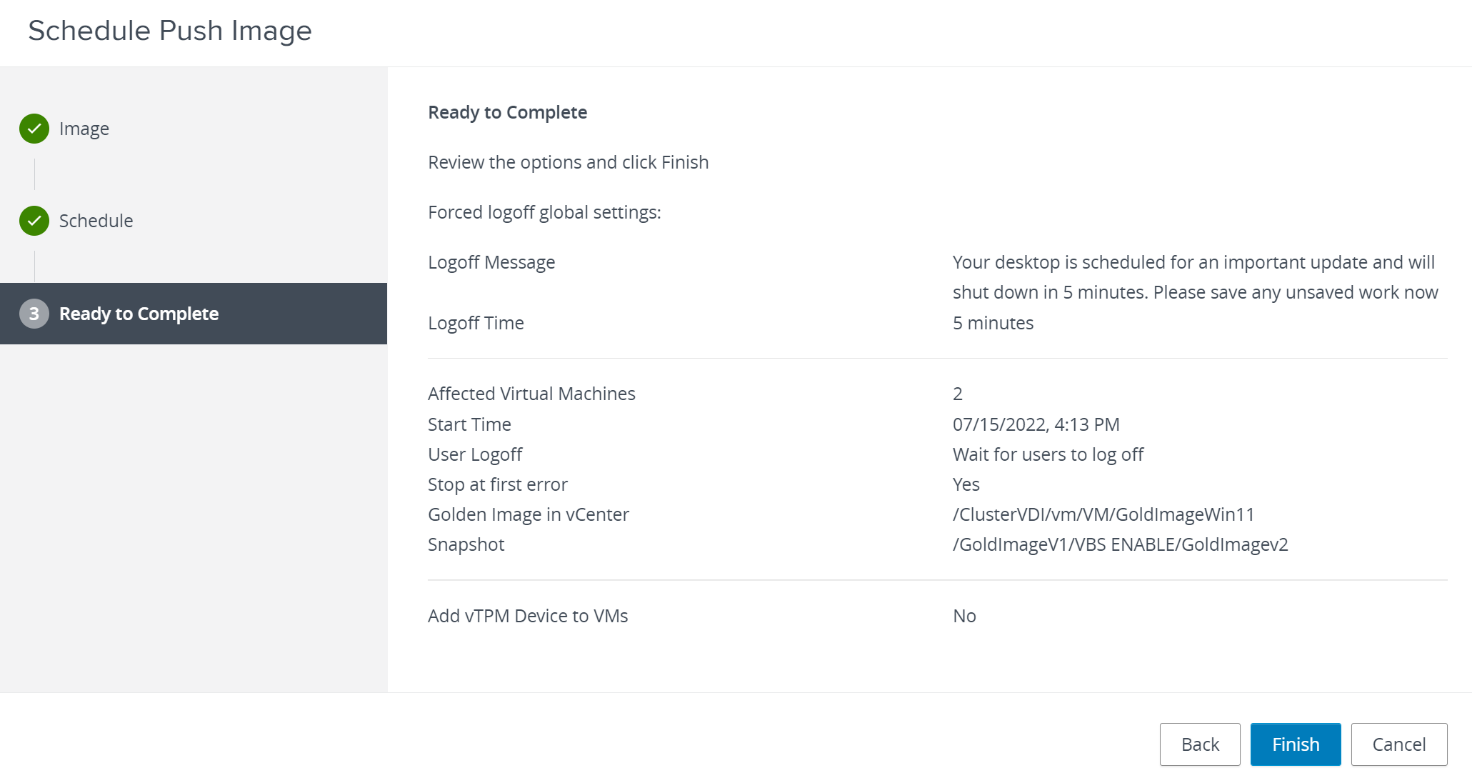
We wait for the secondary image to be ready for deployment

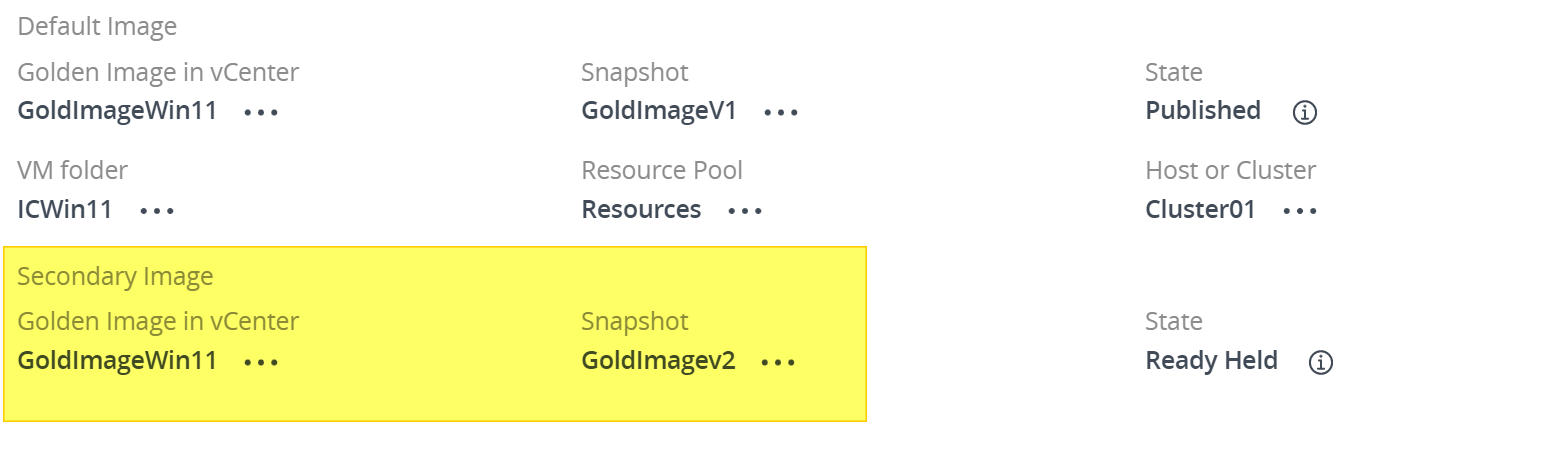
When it is ready we will be able to see the following in the details of the pool

!
At this point in the “Machines (Instant Clone Details)” menu, you will enable the following option:
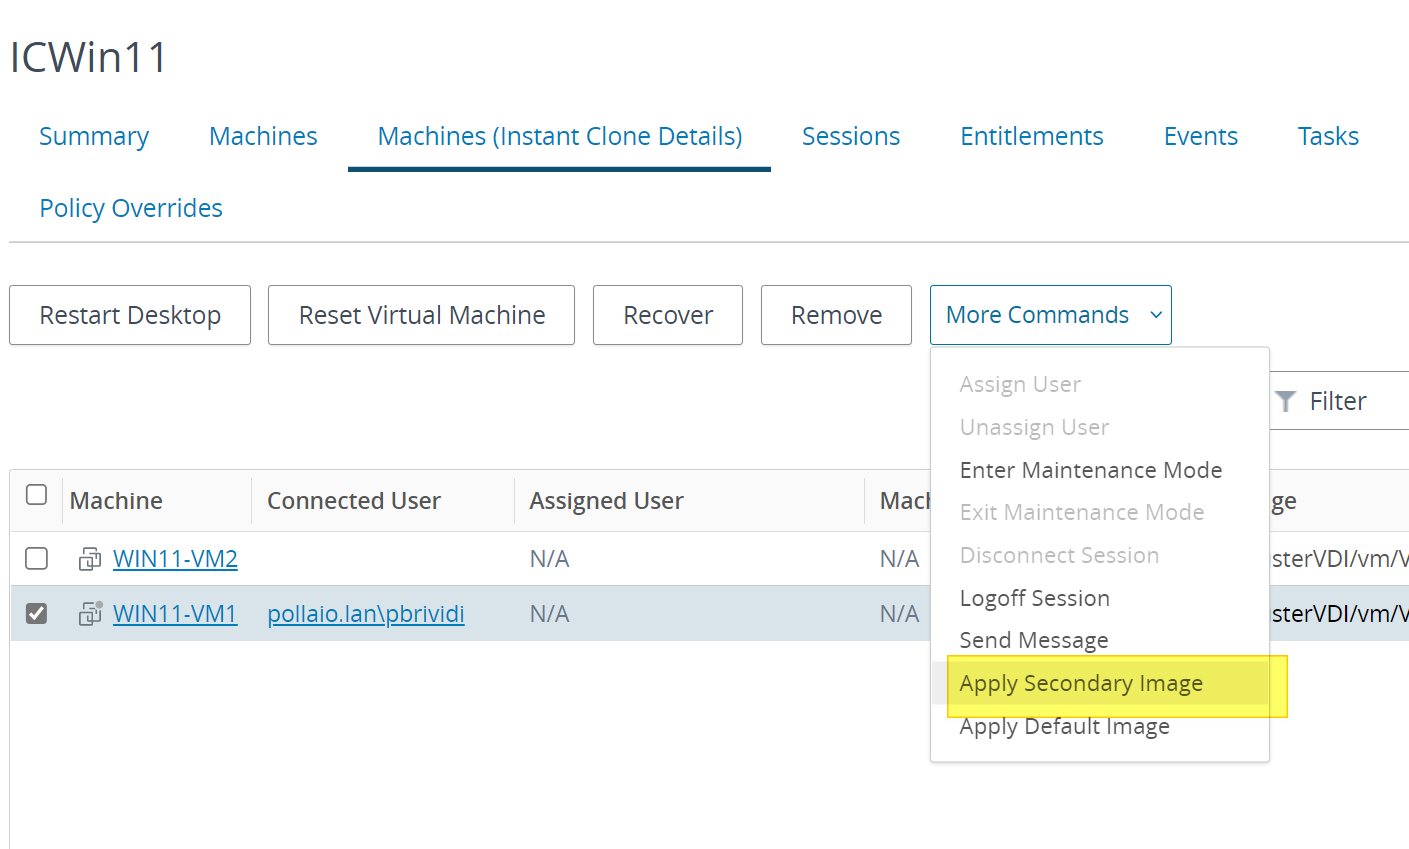
We select the VM on which we want to apply the image and proceed:
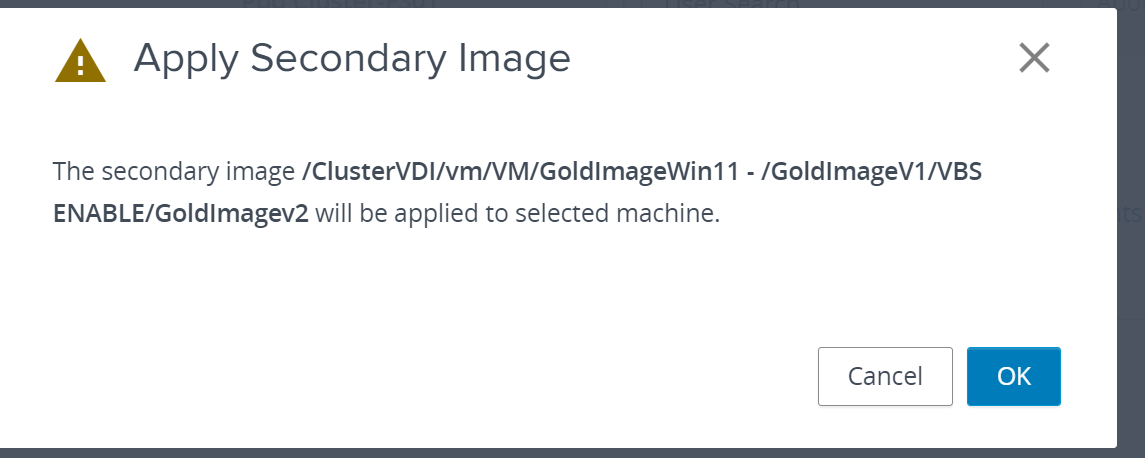
Immagine che contiene testo

Descrizione generata automaticamente

And we wait for this to be applied

Immagine che contiene testo

Descrizione generata automaticamente

Let’s try to connect with two different users to the same pool to see the differences between the two VMs and we will notice that one IC has the updated VMware tools and the other does not
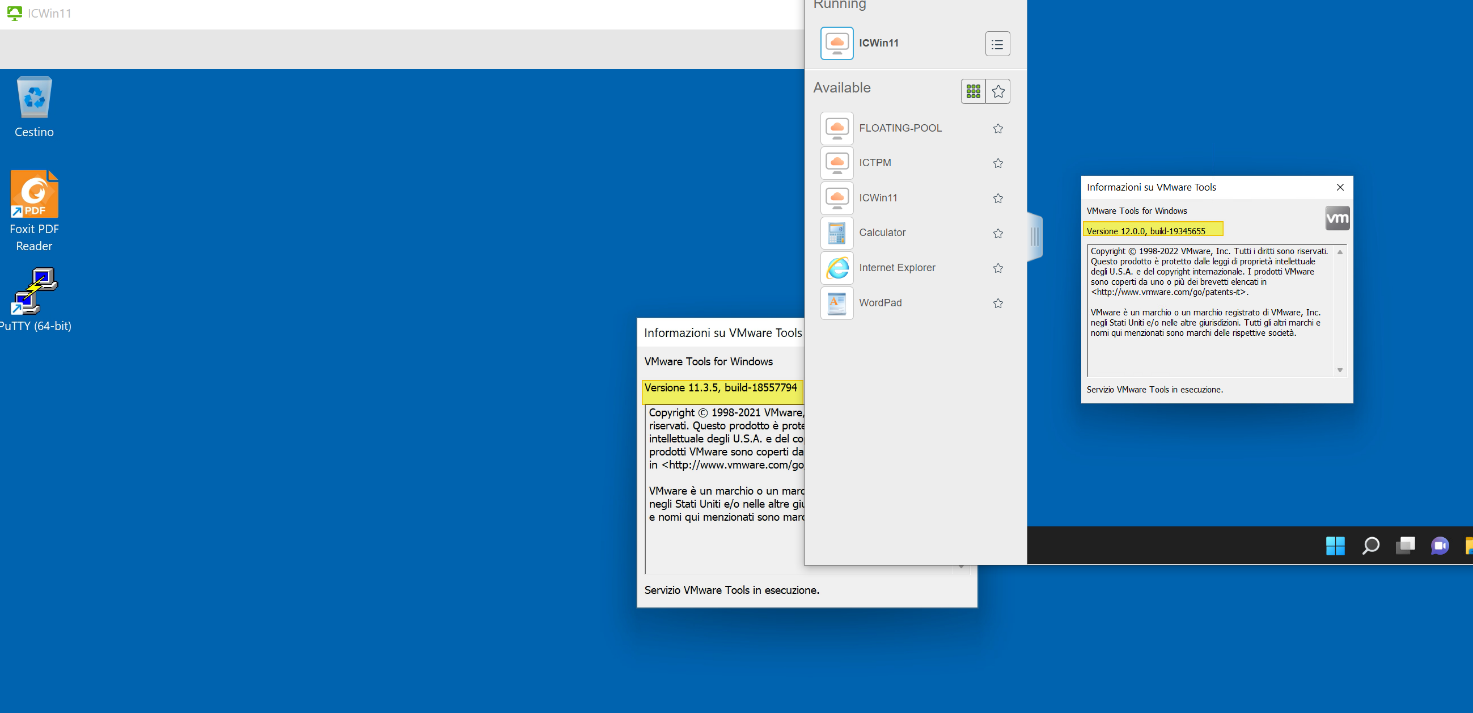
Once all the tests of the changes have been carried out, we have three possibilities:

  • Apply the default image to the VM on which we tested the subimage
  • Authorize the second image as Default
  • Delete the second image because it doesn’t meet your needs

Apply the default image to the VM on which we tested the subimage
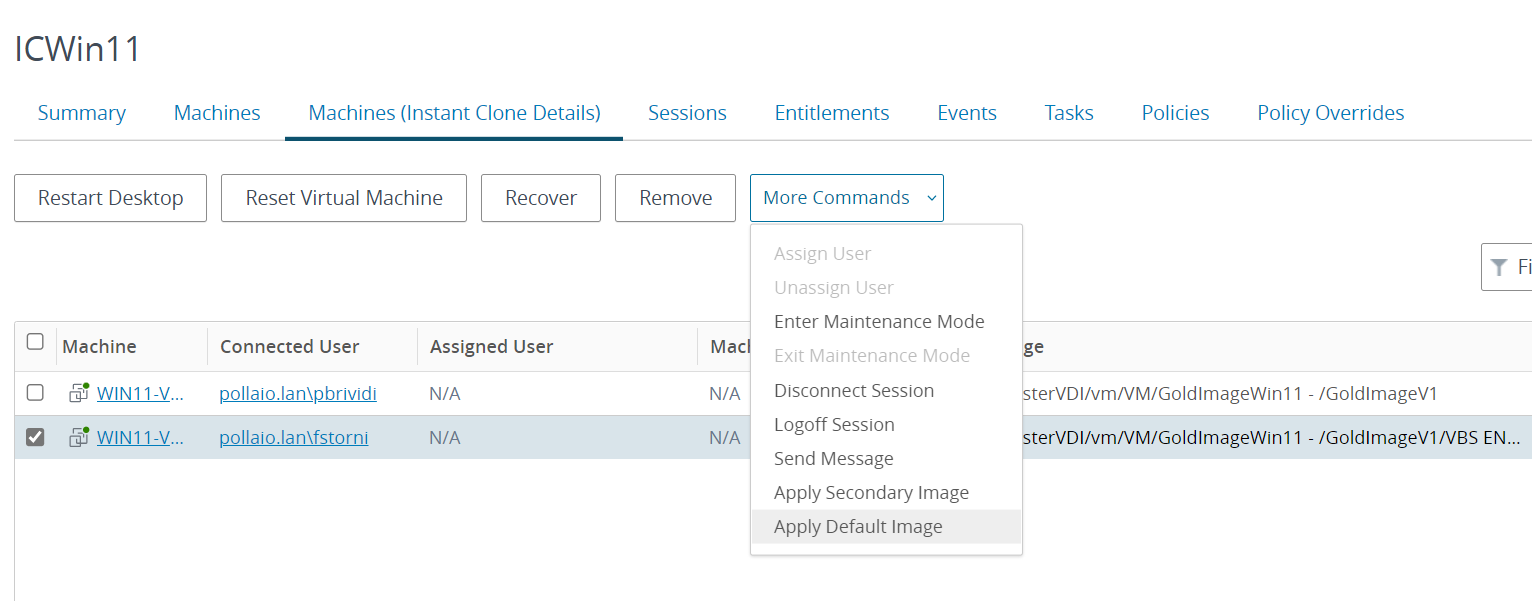
Authorize the second image as Default
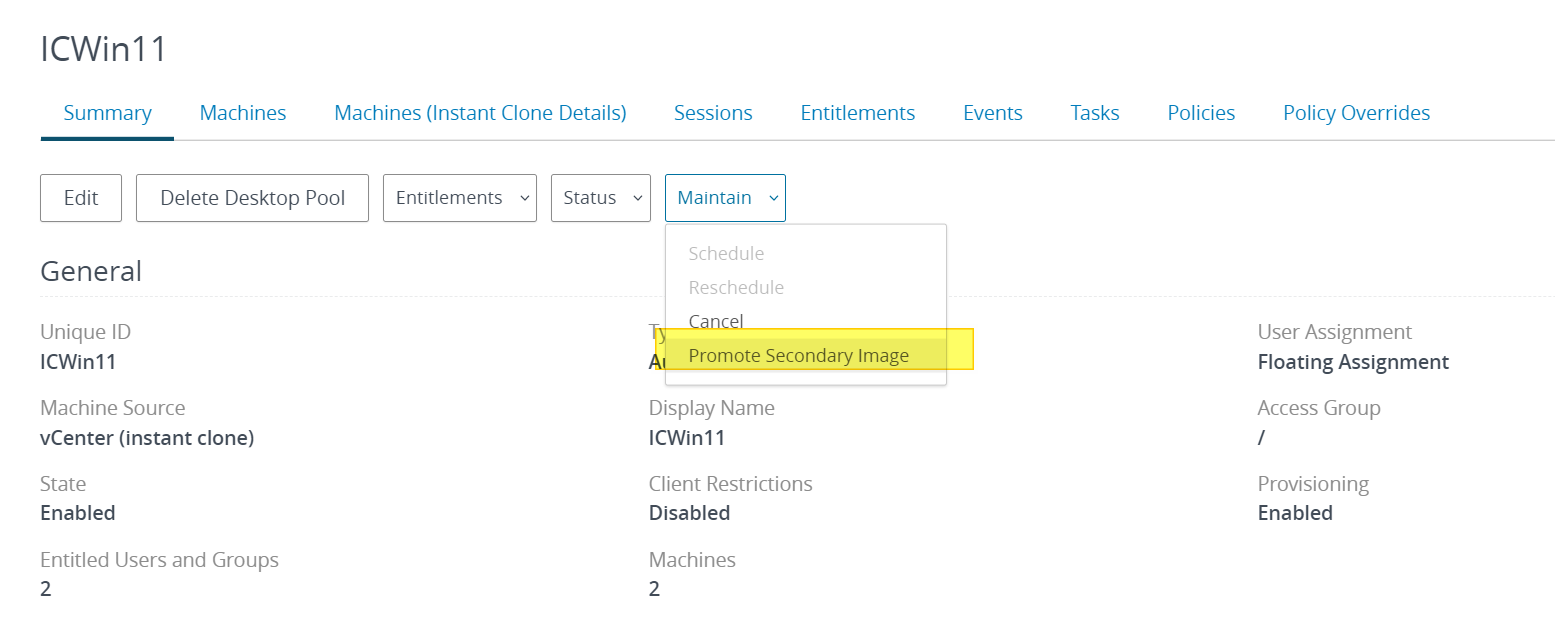
Delete the second image because it doesn’t meet your needs
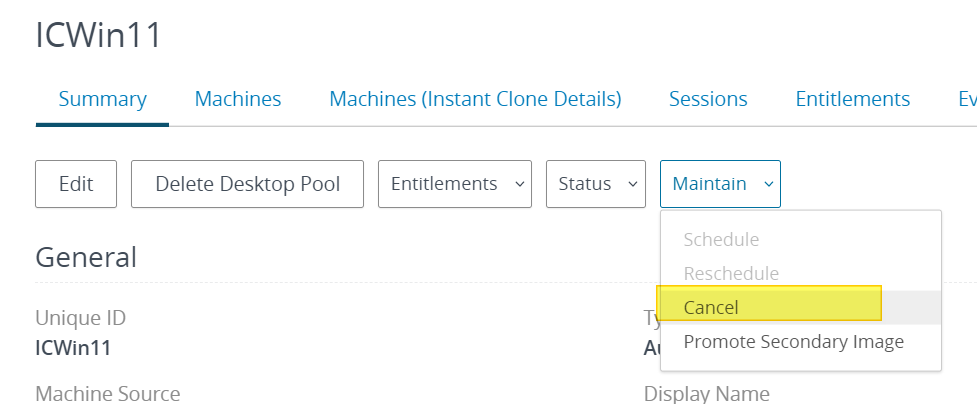
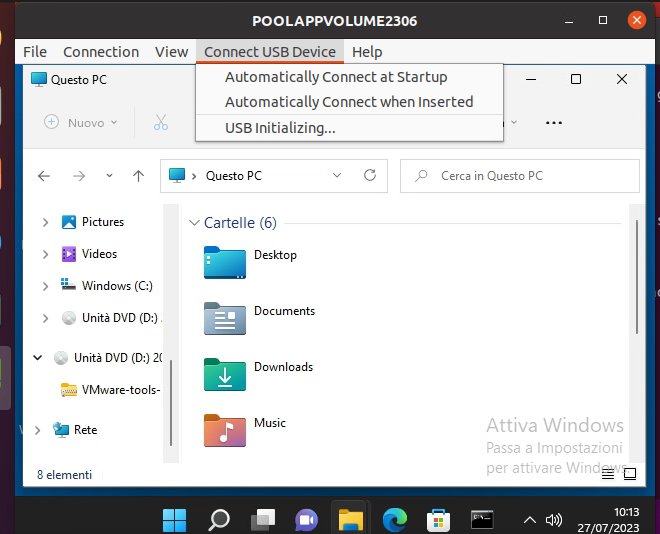
Immagine che contiene testo

Descrizione generata automaticamente

Using Secondary Image on Instant Clone Desktop Pool (VMware Horizon)

Script for removing and installing Horizon agent

Requirements:

  • Share containing the installation file of the Horizon agent version and a . bat containing the command to silently install the Horizon agent
  • List of VMs on which to perform the operation
  • A user to access vCenter with administrative rights
  • One user to install horizon agent on VMs

The script includes:

  • Credential request
    • First request the user to access the vCenter (line 6)
    • Second request the user to remove and install the Horizon Agent on the VMs (line 8)
  • Import the VM list (line 12)
  • Connecting to the vCenter (line 13)
  • Part a for each machine contained in the file with the list of VMs (line 14)
  • Check if the Horizon Agent is present (line 25)
  • If present, remove it and reboot (line 29), if not present, switch to the installation fa
  • Installing the Horizon agent (line 54)
    • Share mount
    • Running the .bat contained in the share
  • Waiting for the installation to finish and reboot

There are 3 “procedures” in the script

For  verification if the Horizon Agent is installed (line 18 to 20):

$script = @”

Get-WmiObject Win32_Product -filter “Name=’VMware Horizon Agent'” | Select Caption

” @

For the removal the Horizon  agent (line 22 to 24):

$removeapp= @”

wmic Product Where “Name=’VMware Horizon Agent'” Call Uninstall /NoInteractive

” @

For agent installation (Line 50 to 54):

$installapp = @”

New-PSDrive -Name “S” -Root “\\vimng03\share” -Persist -PSProvider “FileSystem”

S:\agentinstallv8.bat

” @

In this last agent installation procedure, you must modify:

  • S 🡪 letter with which the share will be temporarily mounted on the VM (which we can change but must also be modified in the installation file .Bat
  • \\vimng03\share –> put the share where you want the Horizon agent installation file and the installation file .bat
  • S:\agentinstallv8.bat is the file that will install the agent in silently mode

Where inside it is start:

s:\VMware-Horizon-Agent-x86_64-8.0.0-16530789.exe /s /v”/qn ADDLOCAL=BlastUDP,Core,HelpDesk,RDP,RTAV,TSMMR,USB,VmVideo,VmwVaudio,VmwVdisplay,VmwVidd”

to be parameterized according  VMware’s guide.

in my case the file will look like this

#The script need:
#List the VMs name where remove e reinstall the agent (file c:\vdi.txt or where you want)
#Share where is the horizon agent installation file and the file agentinstallv8.bat that contain the silent command for installation
#When the script start ask the vCenter Credential and the Admin User Credential for install the Horizon Agent on the VM
#Credential for access to vCenter
$credential = Get-Credential
#Credential with administrator role for install horizon agent 
$VMCredential = Get-Credential
#vcenter
$vcenter = "<FQDNvCenter>"
#List of VMs where remove e install new agent version
$VDIs = Get-Content "c:\vdi.txt"
connect-viserver $vcenter -Credential $credential
foreach ($VDI in $VDIs){
$VM = Get-VM -Name $VDI
Write-Host "Start remove agent from $VM"
#Script for verify if the agent is installed
$script = @"
Get-WmiObject Win32_Product -filter "Name='VMware Horizon Agent'" | Select Caption 
"@
#Script for remove
$removeapp= @"
wmic Product Where "Name='VMware Horizon Agent'" Call Uninstall /NoInteractive
"@
$value = Invoke-VMScript -VM $VM -ScriptType Powershell -ScriptText $script -GuestCredential $VMCredential 
#Check if horizon agent are install if present the script remove it and reboot the VM
if ($value.ScriptOutput -like "*Horizon*") {
     Write-Host "Horizon agent is installed"
     Invoke-VMScript -VM $VM -ScriptType Powershell -ScriptText $removeapp -GuestCredential $VMCredential -RunAsync
     While(Test-Connection $VM -Quiet -Count 1){
        Write-Progress -Activity "Rebooting $VM" -Status "Waiting for $VM to shut down."
        Start-Sleep -sec 1
     }
     While(!(Test-Connection $VM -Quiet -Count 1)){
        Write-Progress -Activity "Rebooting $VM" -Status "Waiting for $VM to come back up."
        Start-Sleep -sec 1
     }
     if ($value.ScriptOutput -cnotlike "*Horizon*") {
     Write-Host "Agent removed from $VM and $VM rebooted"
     } 
   }
   else { 
   Write-Host "Horizon agent is not installed on $VM" 
   } 

#####Agent Installation
Write-Host "Start the Horizon Agent installation in $VM"
Sleep 15 
#Installation with share change the fileserver,the share name, the labl and the file 
$installapp = @"
New-PSDrive -Name "S" -Root "\\vimng03\share" -Persist -PSProvider "FileSystem"
S:\agentinstallv8.bat
"@
Invoke-VMScript -VM $VM -ScriptType powershell -ScriptText $installapp -GuestCredential $VMCredential -RunAsync
While(Test-Connection $VM -Quiet -Count 1){
        Write-Progress -Activity "Rebooting $VM" -Status "Waiting for $VM to shut down."
        Start-Sleep -sec 1
    }
While(!(Test-Connection $VM -Quiet -Count 1)){
        Write-Progress -Activity "Rebooting $VM" -Status "Waiting for $VM to come back up."
        Start-Sleep -sec 1
    }
Write-Host "$VM after installation is UP" 
$value = Invoke-VMScript -VM $VM -ScriptType Powershell -ScriptText $script -GuestCredential $VMCredential
if ($value.ScriptOutput -like "*Horizon*") {
    Write-Host "New Horizon agent is installed in $VM"
    }
    else
    {
    Write-Host "New Horizon agent is not installed in $VM" 
    }
}
Disconnect-VIServer $vcenter -Force
Script for removing and installing Horizon agent