Remove the warning banner on the Horizon 8 Web Console
![]()
Select the settings icon in the top left:

And remove the Banner’s display flag.

And save.
Remove the warning banner on the Horizon 8 Web Console
![]()
Select the settings icon in the top left:
And remove the Banner’s display flag.
And save.
After upgrading Horizon to 2306 2212.1 or 2111.1 we see this message when trying to connect from UAG
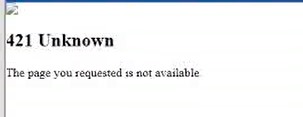
In the log, I see this error:
2021-09-24T22:05:34.737-07:00 ERROR (1B08-1A58) <SimpleDeamonThread> [h] (ajp:admin:Request190) Unexpected Origin: https://newname.net
2021-09-24T22:05:34.738-07:00 DEBUG (1B08-1A58) <SimpleDeamonThread> [v] (ajp:admin:Request190) Response 404 Not Found [close]
The fast solution is to set allowUnexpectedHost to true on the locked.properties file. This is located on each connection server in c:\program files\vmware\VMware View\Server\sslgateway\conf. and restart the horizon connection services
For us consultants, the VDI used in the Horizon environment can also be useful for having environments where we can install customers’ VPN clients.
Normally we find ourselves having, if the customer does not have Horizon infrastructure to give us access from the outside (Through UAG, MFA … all possible security), different VPN clients to support our customers, with the consequence of possible problems of compatibility between clients and degradation of your laptop.
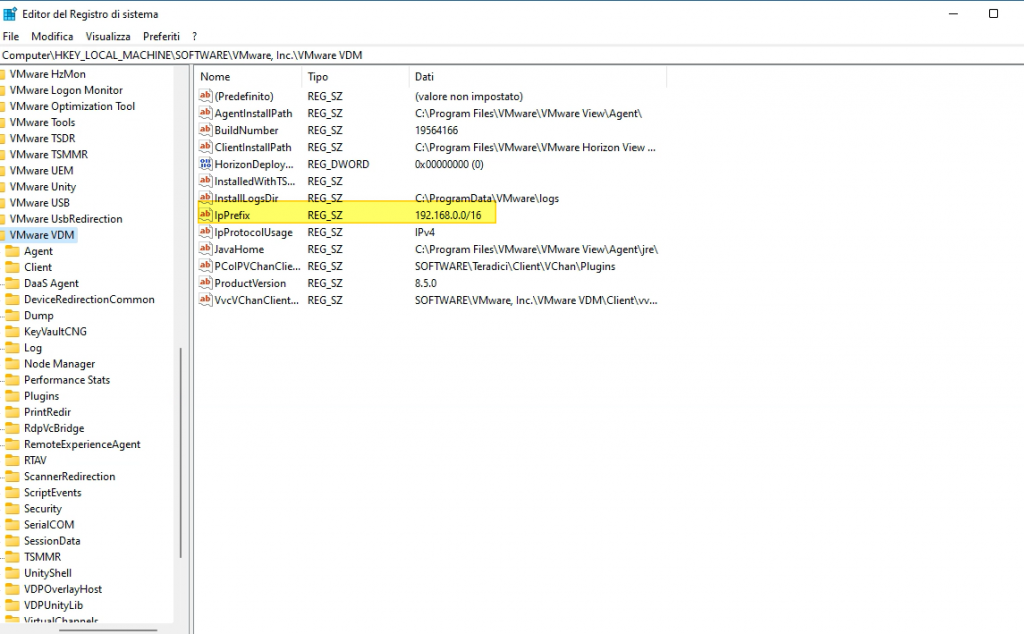
In my case, I have a Horizon infrastructure in my Home Lab and I have created my own VDI where to install the clients’ VPN clients.
The only change to make, to prevent my Horizon session from ending when I activate a VPN connection, is to enter the following registry key
HKLM\Software\VMware, Inc.\VMware VDM\IpPrefix = n.n.n.n/m (REG_SZ)
where in n.n.n.n is the subnet and m is the number of bits in the subnet mask. Specifically, the network that must be used for the connection between the horizon agent and the various components (Horizon Client, Connection server, etc..)
es:
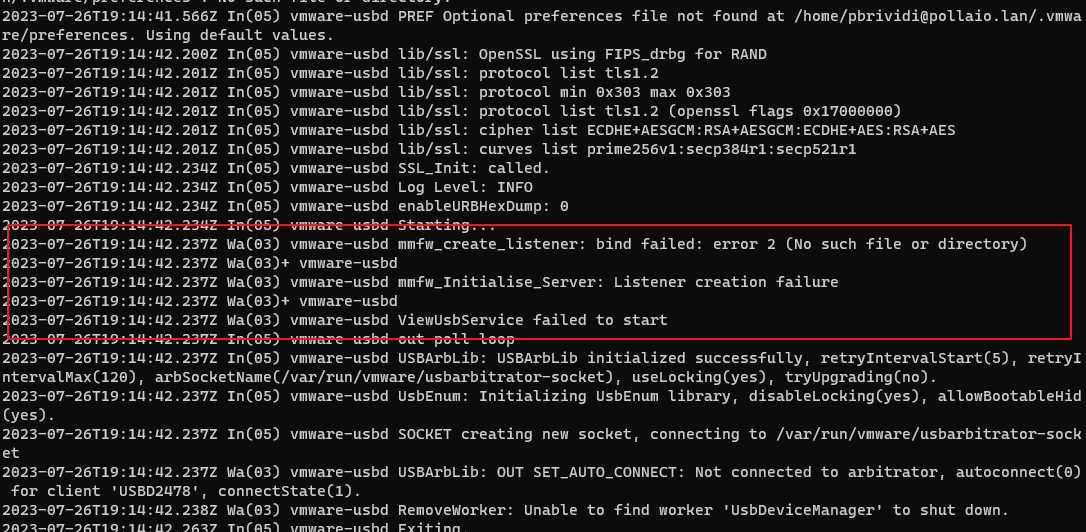
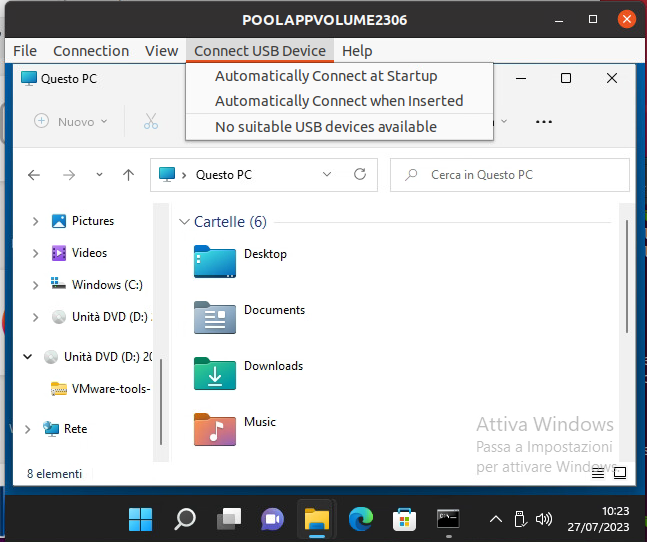
We have a problem with USB redirection on the Linux client, the issue is present when a Linux guest OS (UBUNTU 20.04 in my case) is joined at the domain and we try to use a domain user to access the Linux to start a Horizon session with the Horizon client
The issue is “ USB initializing…” remain for all time and no USB device is redirected
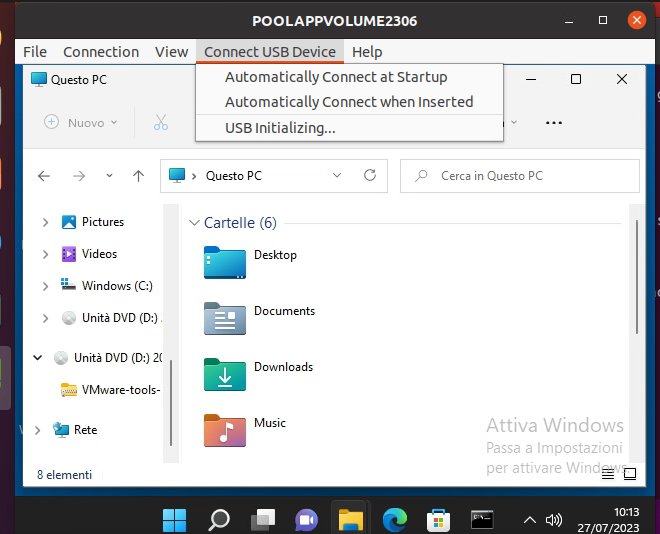
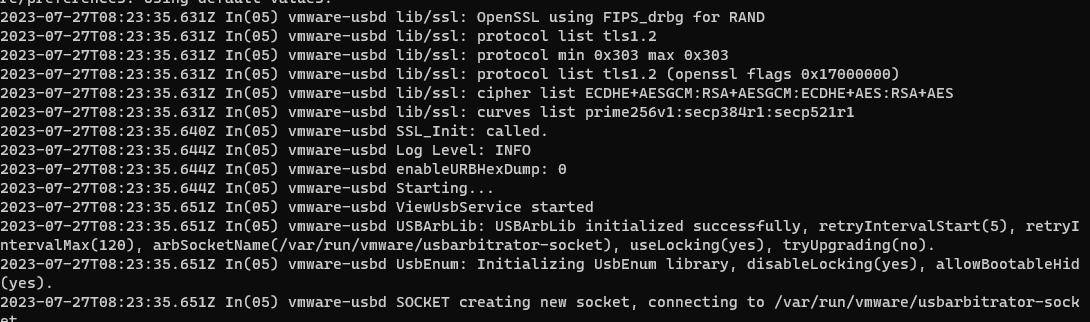
In the log file /tmp/vmware-<user>/vmware-view-usbd-<pid session>.log we found
With a Linux local user, the problem is not present.
Workaround
Add to /etc/passwd the domain user, for recover GID e UID use the command id <username>

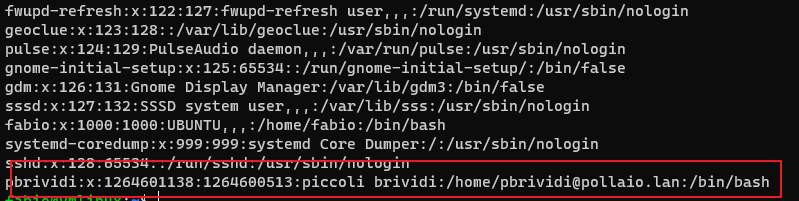
After this, we need to restart the USB Arbitrator

After applying the workaround the problem is resolved
And I don’t have any error in the log file
For us VMware systems engineers who every day find ourselves “dialoguing” with those who manage the network ecosystem, we can only find the vSphere Distributed Switch health check function useful.
These are some of the common configuration errors that health check identifies:
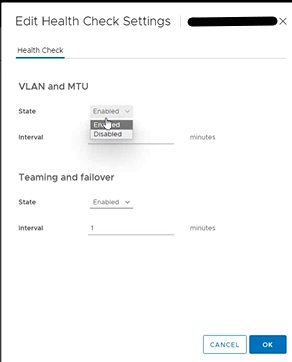
The network health check in vSphere monitors the following three network parameters at regular intervals:
Access the network section of our vCenter
Select the vDS on which we want to activate health checks
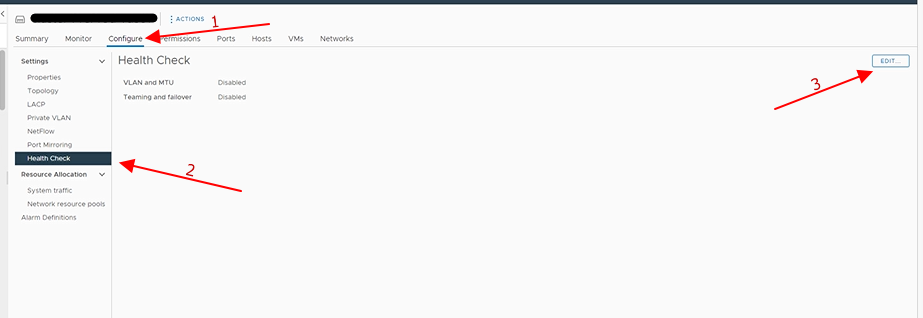
And enable the check that interests us:
Wait a few minutes and already first feedback we can have it on ESXi hosts using the vDS in question, where if there are problems the classic red dot will be displayed
For more details, access the network section of our vCenter and select the vDS in question
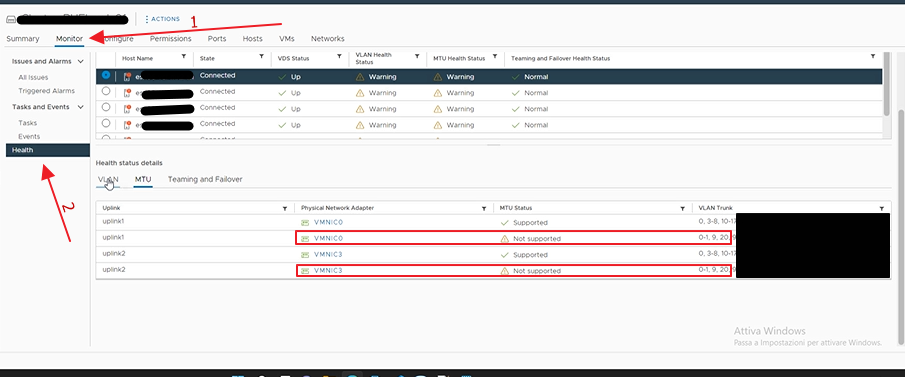
And we can see that on the vmnic0 and vmnic3 of the first host, there are vLANs of which we have a Portgroup but which are not proposed correctly on all the ports of the switches to which we have attested our hosts. Then we have to have the configuration verified by our colleagues in the network.
Repeat the enabling steps but this time select disable.
Depending on the options that you select, the vSphere Distributed Switch Health Check can generate a significant number of MAC addresses for testing teaming policy, MTU size, vLAN configuration, resulting in extra network traffic.
Ensure the number of MAC addresses to be generated by the health check will be less than the size of the physical switch(es) MAC table. Otherwise, there is a risk that the switches will run out of memory, with subsequent network connectivity failures. After you disable vSphere Distributed Switch Health Check, the generated MAC addresses age out of your physical network environment according to your network policy.
More info:
vDS Health Check reports unsupported VLANs for MTU and VLAN (2140503) (vmware.com)
Enabling vSphere Distributed Switch health check in the vSphere Web Client (2032878) (vmware.com)
Copy and paste operations between the guest operating system and remote console are deactivated by default.
To enable it:
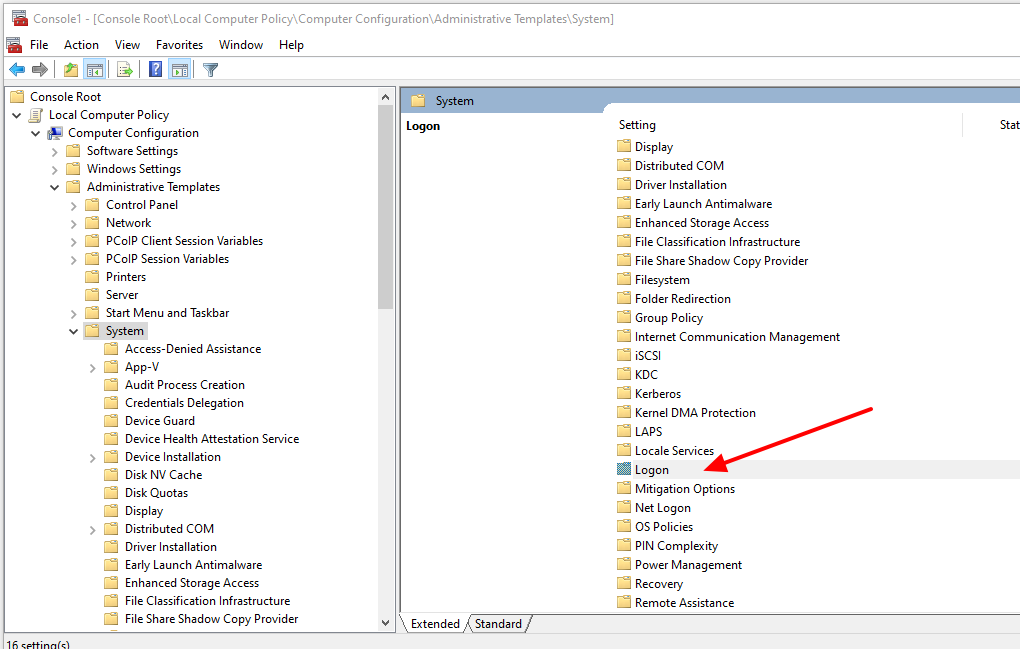
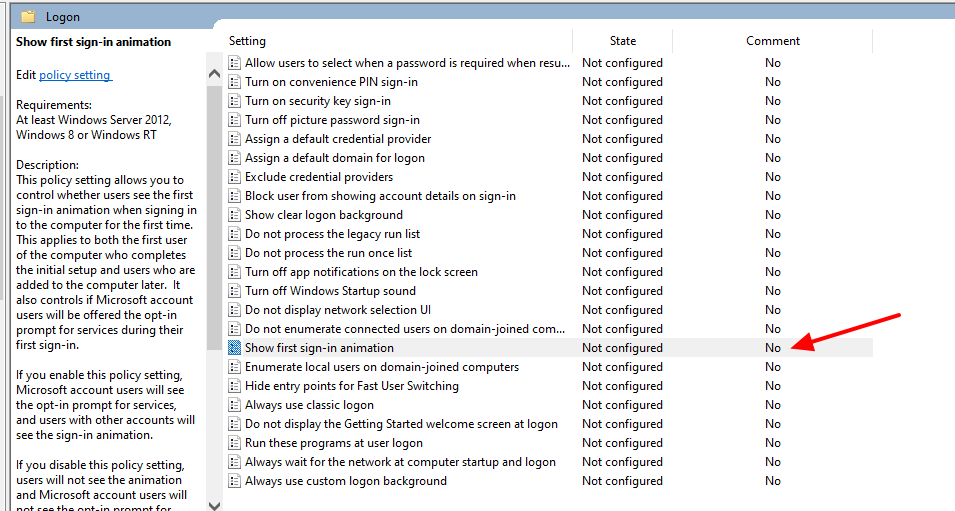
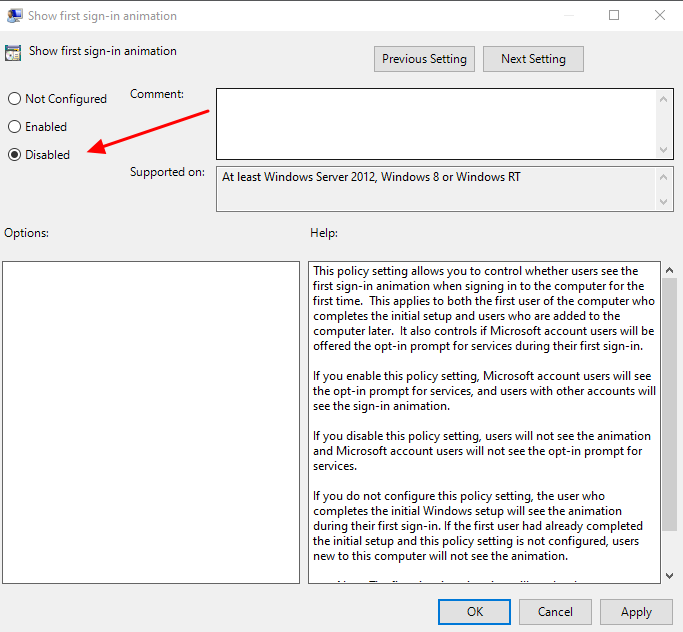
On the Horizon Instant-clone Pool the first end-user reaction upon the first login is “Why does Windows 10 need to reconfigure my profile?” Because the user sees the first login to Windows 10
To disable the Windows 10 First Sign-In there is a Local Computer Policy
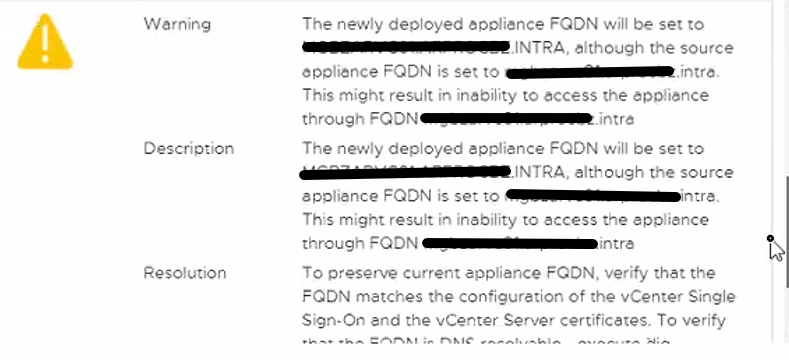
When upgrading vCenter 6.5x to version 7u3x we encountered the following problem
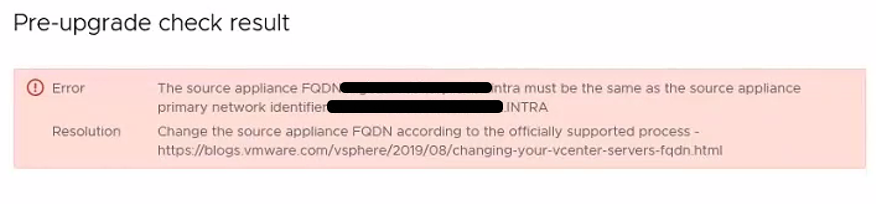
Following this KB
Upgrading to vCenter Server 7.0 fails when case differs between FQDN and PNID (84355) (vmware.com)
We identify the problem in the fact that we have the hostname that differs from the PNID because one is all uppercase and the other lowercase.

From the following KB we find that we can not on vCenter 6.5 updatethe hostname
To solve we proceed first with the update to the version of vcenter 6.7u3 that fixes the part of FQDN
Once updated to 6.7 relaunch the commands indicated by KB and see that the PNID and hostname coincide

Then we update to the vCenter version 7u3
A customer during the integration of Workspace One Access with Azure AD for MFA activation “locked out” the admin interface.
Prior to version 21.08, a URL was enabled by default on each Workspace One Access VSA for Break-glass URL Endpoint access.
https://< TENANT URL>/SAAS/login/0
from 21.08 onwards it was disabled because it was not security complaint for customer environments
To enable it, you must SSH or WEB GUI access one of the Workspace One Access VSA and run the following command:
hznAdminTool configureBreakGlassLogin –enable -loginZero
and restart the horizon-workspace service with the following command.
Service Horizon-workspace restart

At this point the “Emergency” URL is enabled again
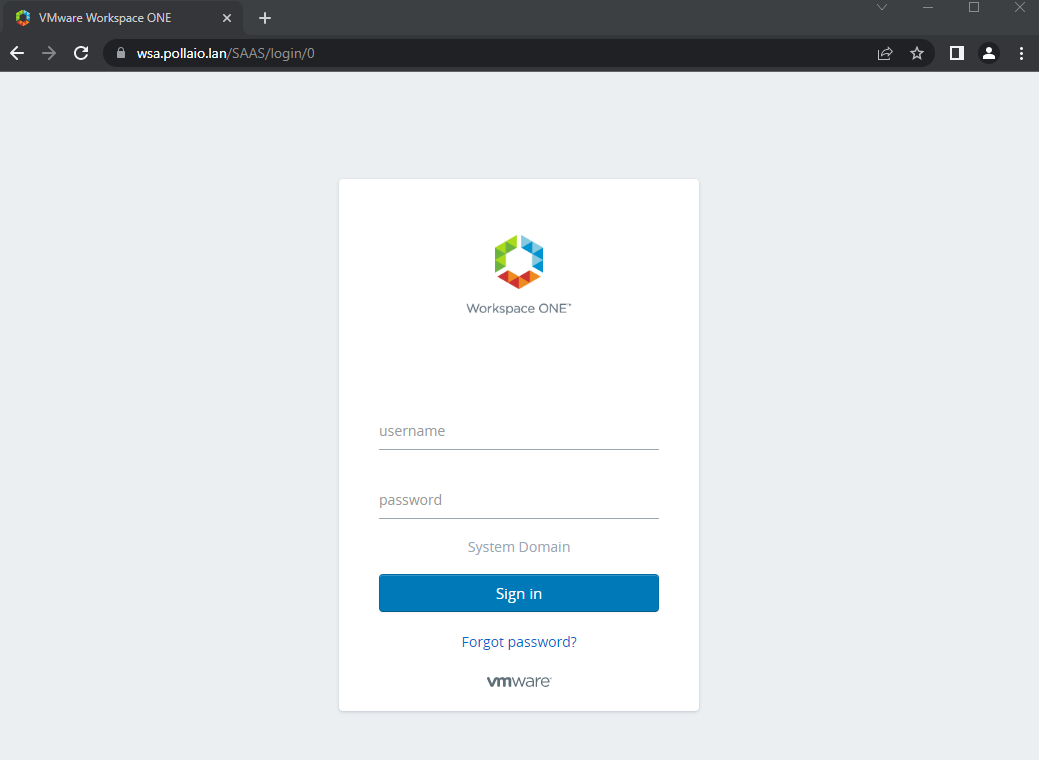
And you can access it to fix the necessary policies.
To turn it off:
hznAdminTool configureBreakGlassLogin –disable -loginZero
Service Horizon-workspace restart
It is very important to activate MFA (Multi-factor authentication) using applications such as Google Authenticator on corporate services exposed on the internet that require access using credentials.
If we talk about VMware Workspace One Access, a solution that allows us to publish applications and business services on the internet, it is mandatory to activate the MFA.
Since Workspace One Access version 22.09, you can use Authentication Applications such as Microsoft or Google.
Enabling MFA requires a few steps:
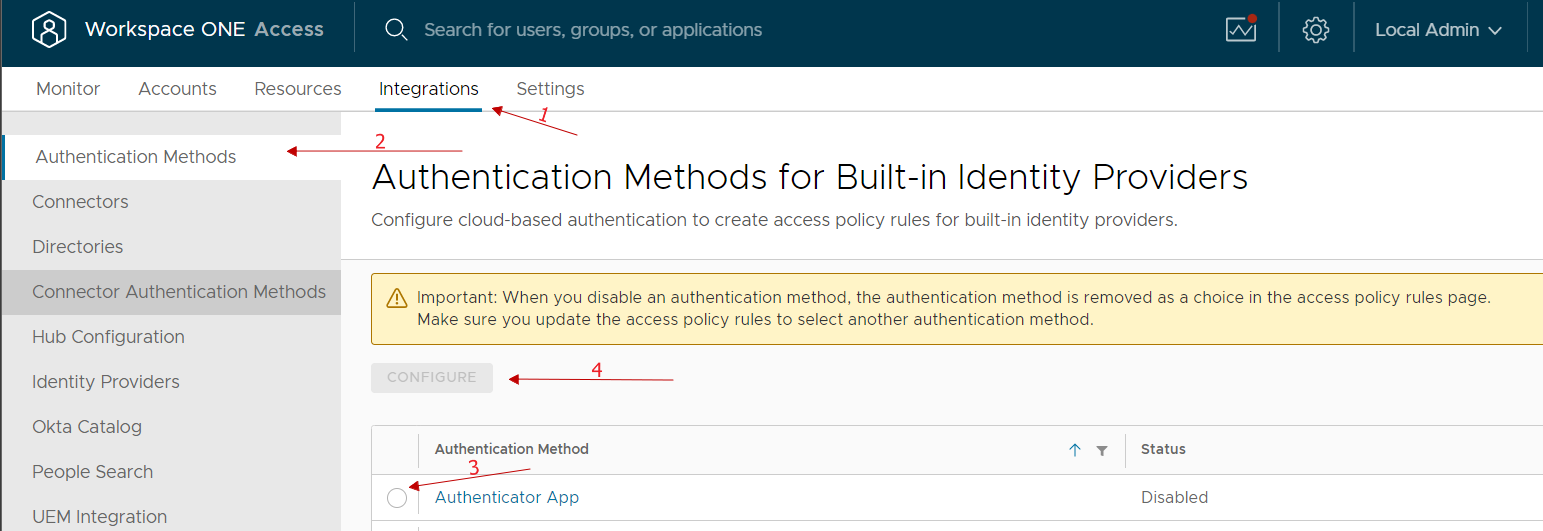
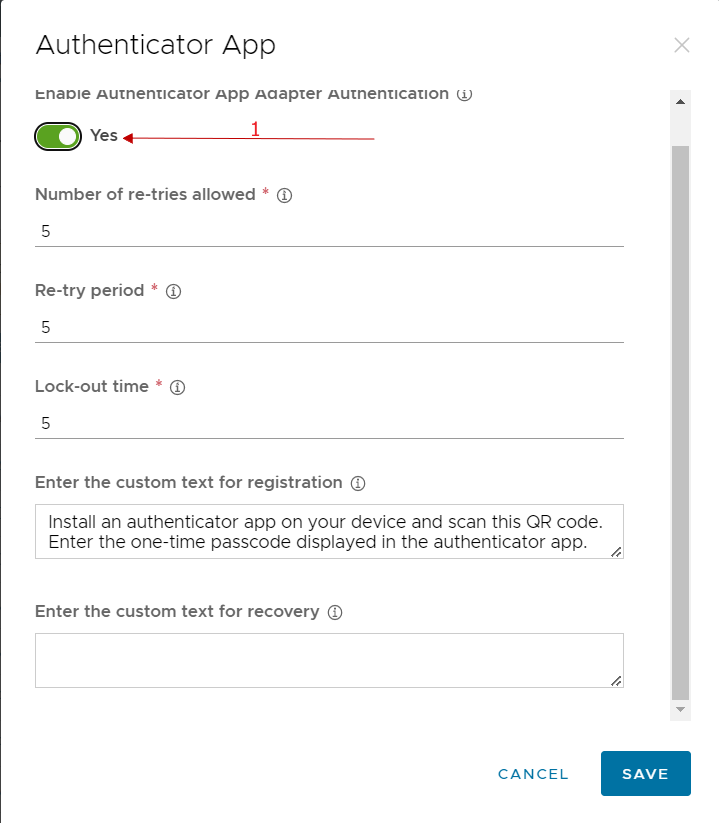
Enable the “Authenticator APP” authentication method on Workspace One Access
Access the Integration menu, select Authentication Methods, enable Authenticator App and select Configure.
We enable and possibly can change any classic account lock parameters etc …
At this point, we go to integrations, select identity provider and select our IDP related to the integration with AD
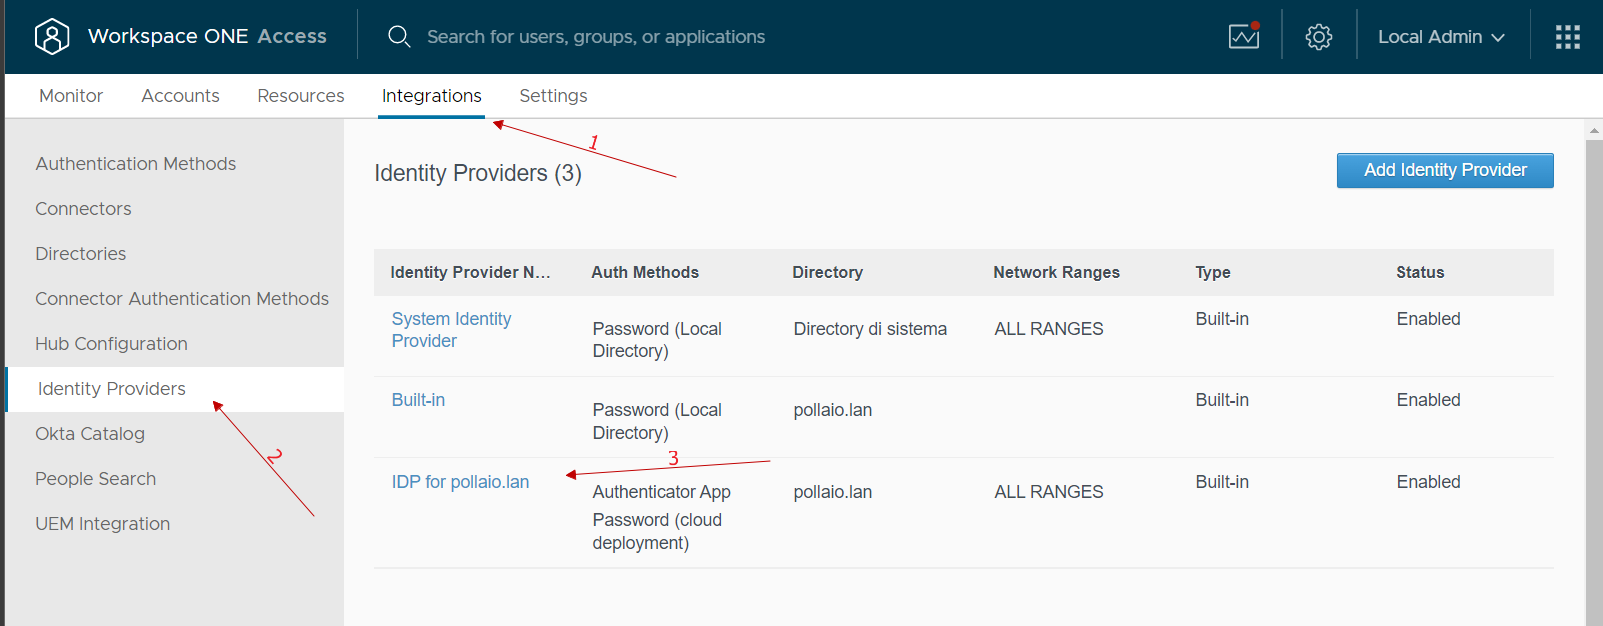
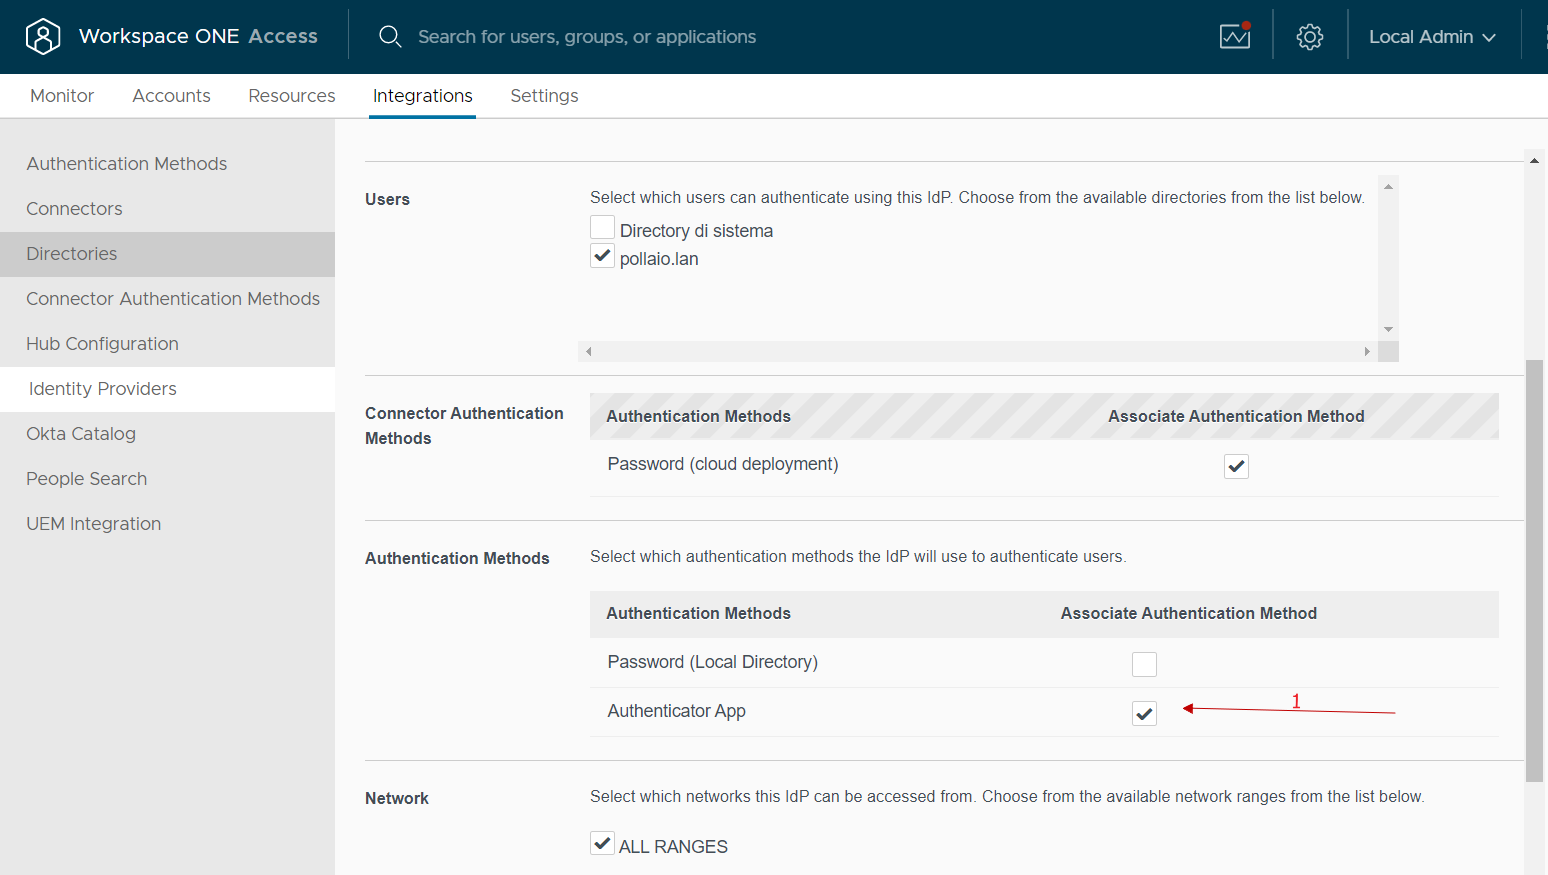
In the Authentication Methods menu select Authenticator APP
At this point, we just need to go and modify the policy used by our users by adding MFA for authentication
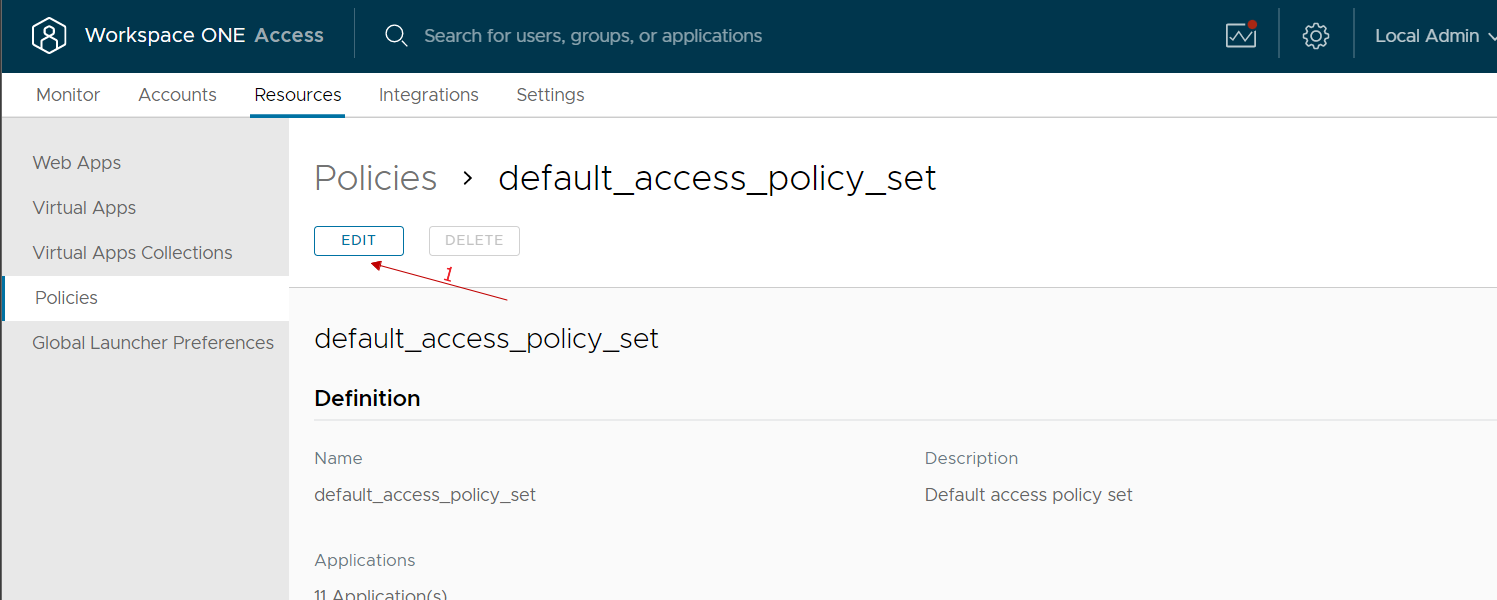
We go to the Resources, policies menu, select our policy and modify it
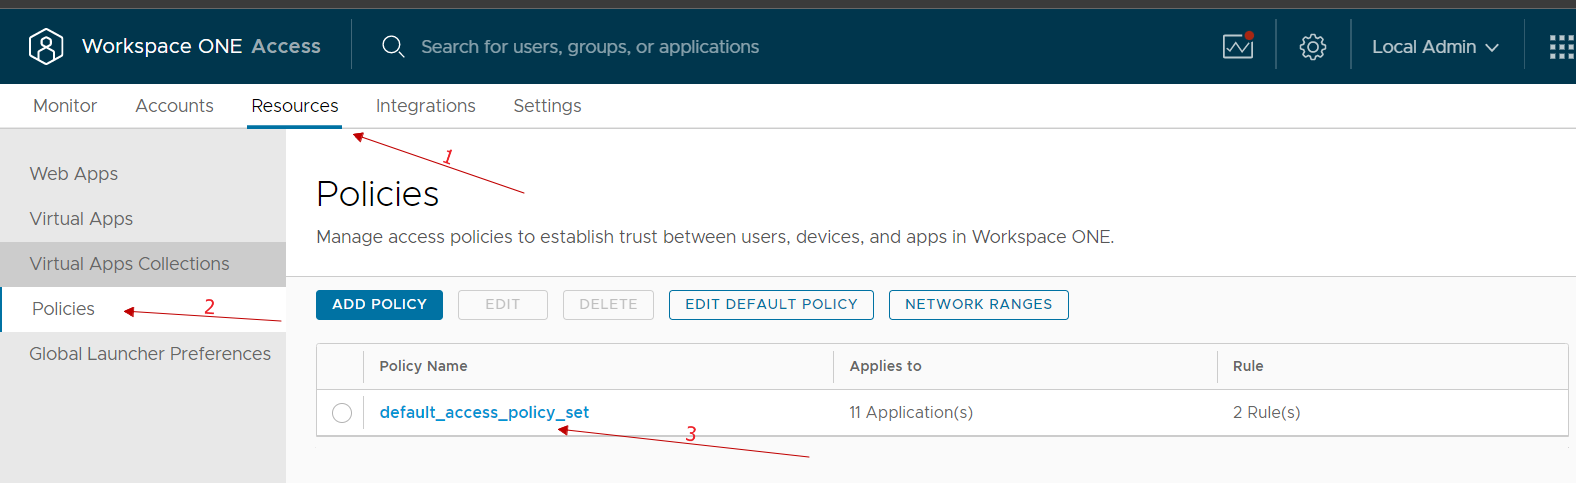
We select the rule of our interest (normally we select the one relating to access from public networks because we could reason that those who access from the company network have already done other methods of secure authentication …)
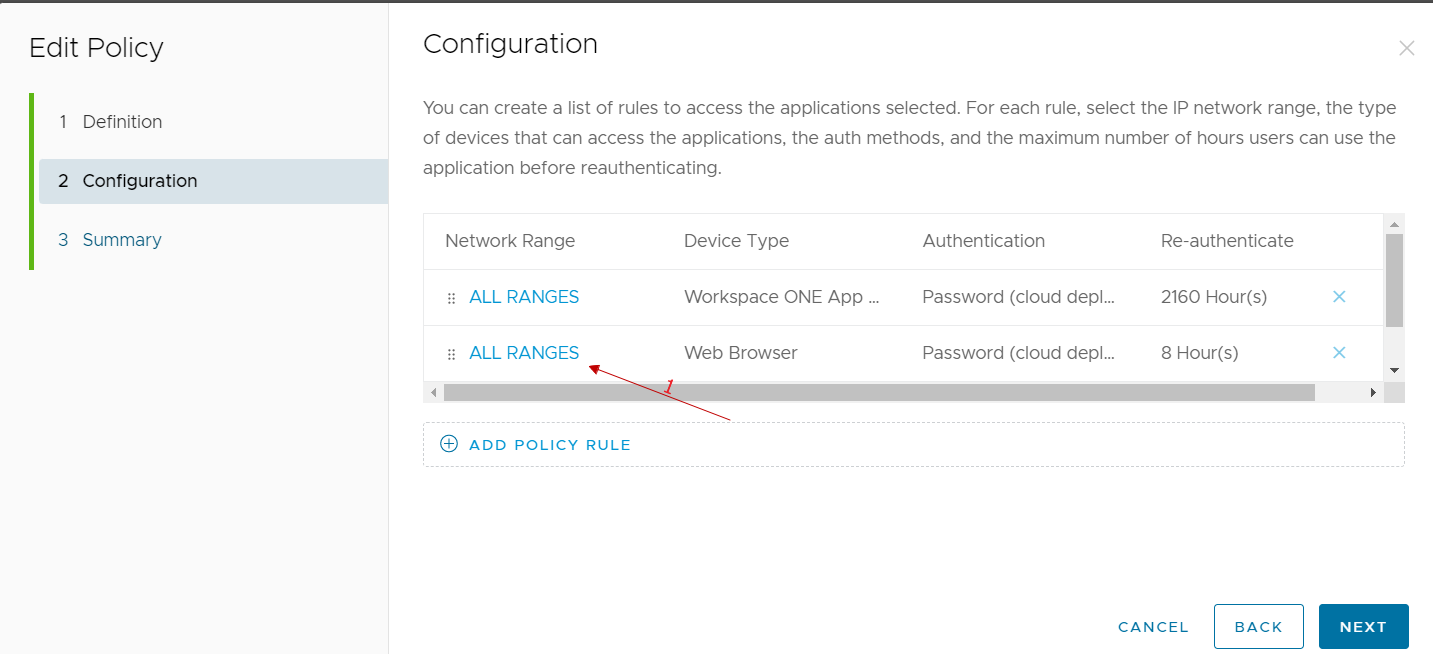
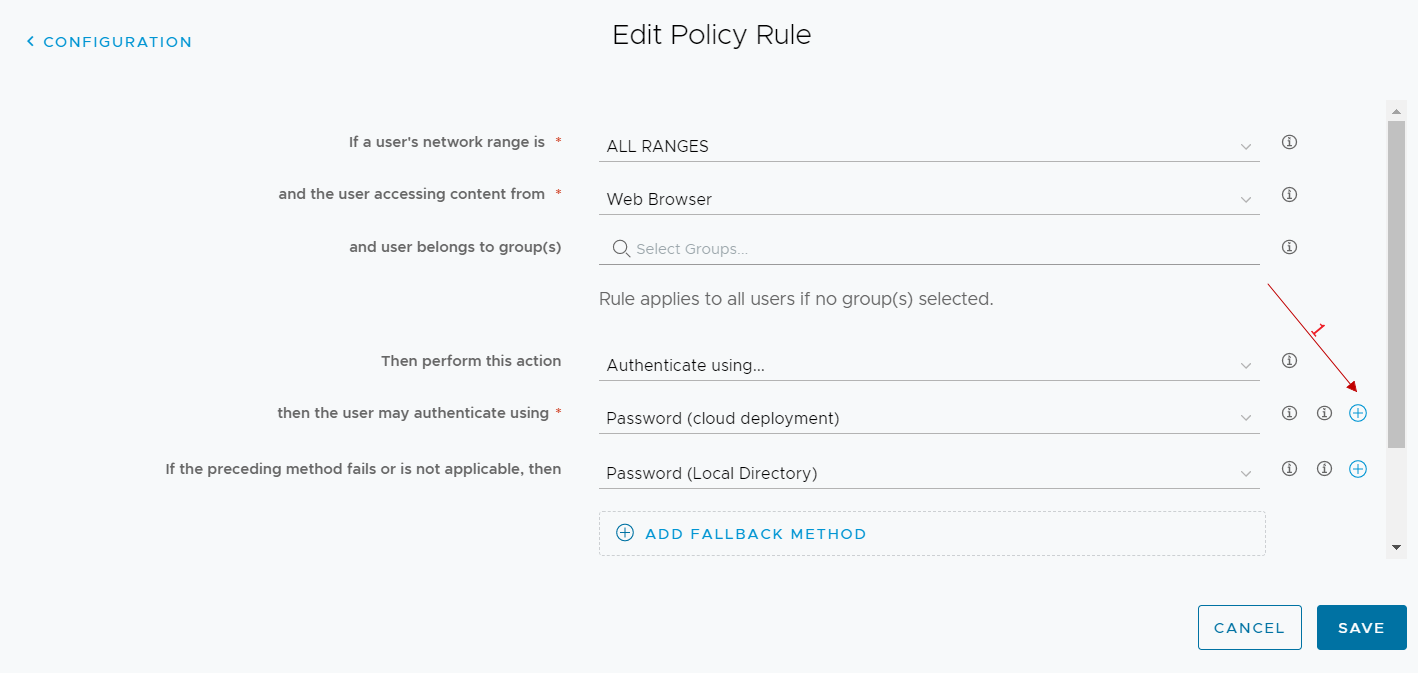
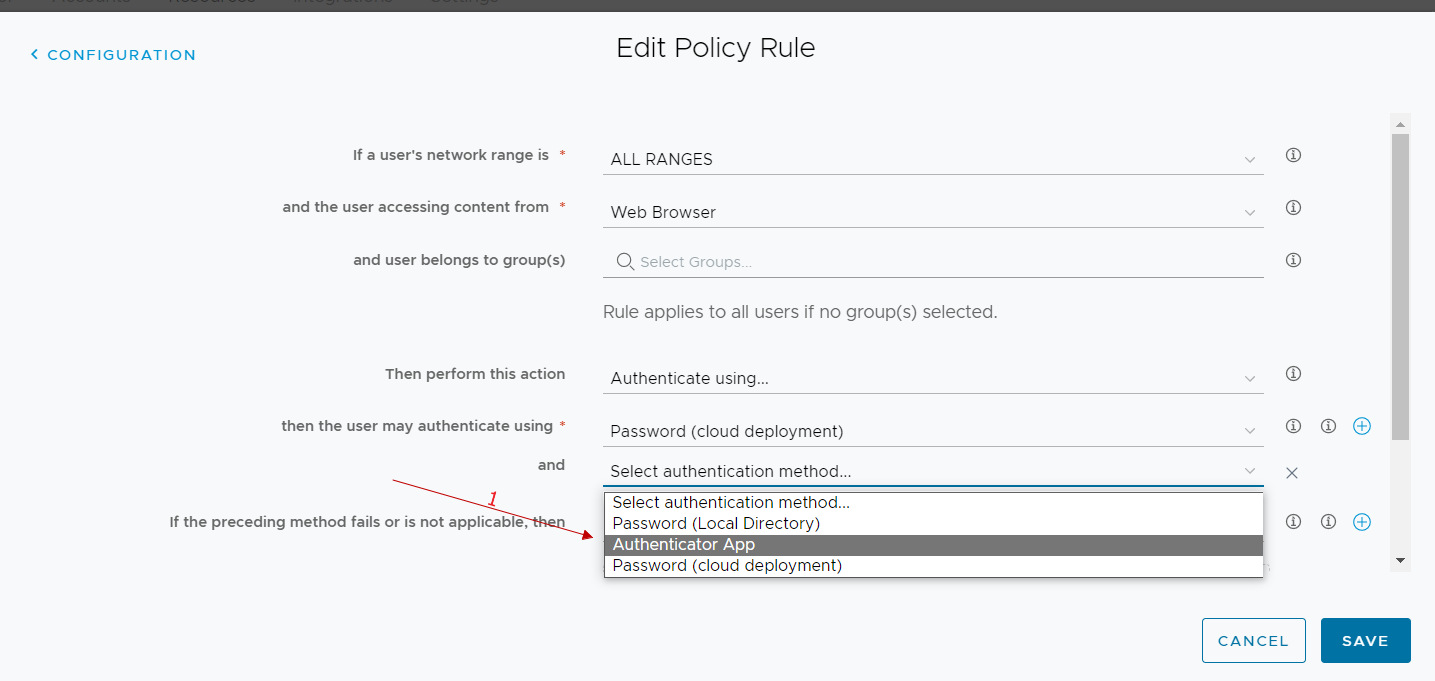
In the authentication methods used, we add the authenticator app
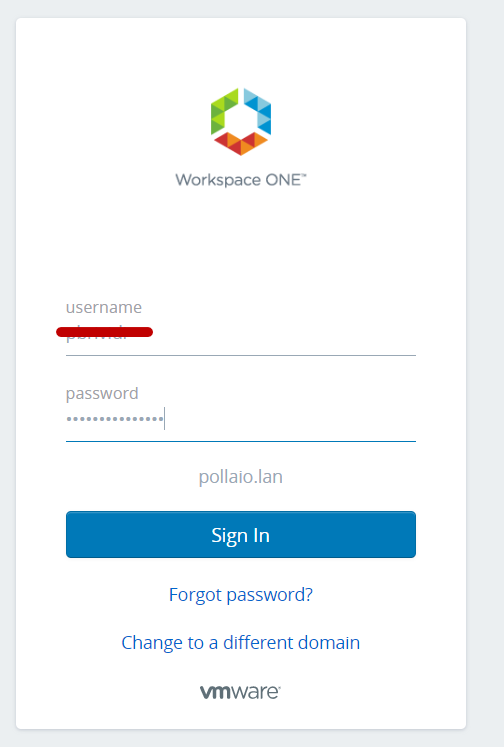
From now on, all users who log in to workspace one access and run with the rule we have modified we have the following user experience at the first login:
User experience at login
Go to WorkSpace One Access public URL.
If prompted, they will have to select the domain.
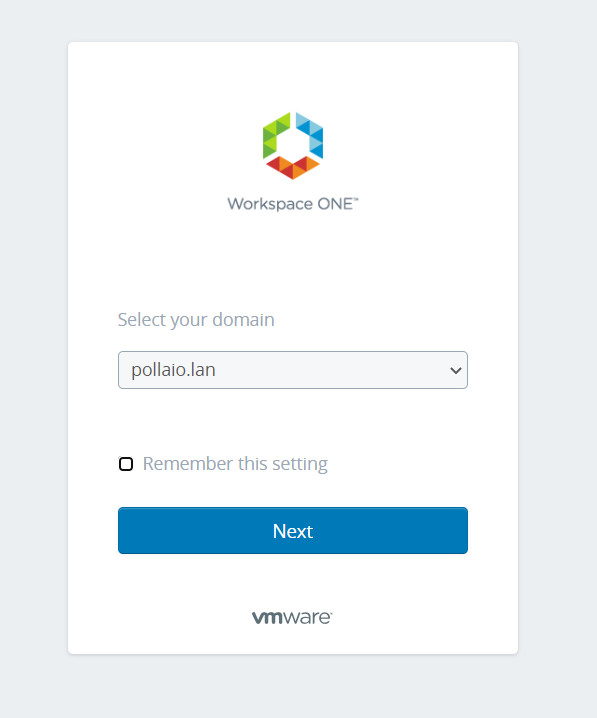
Then they will have to enter username and password
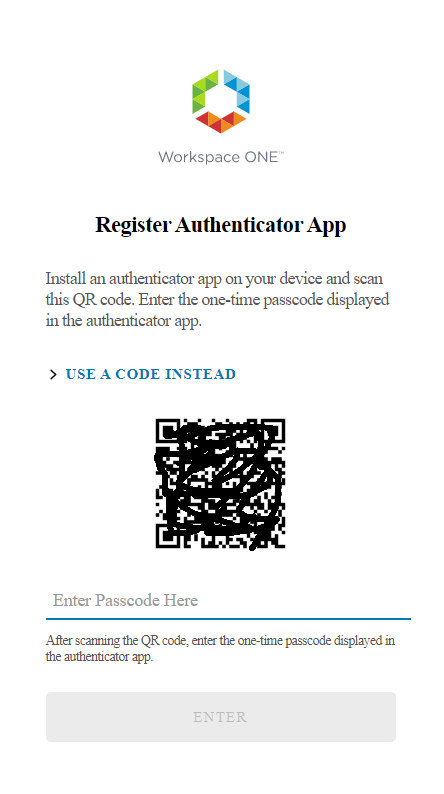
Finally, they will have a QRcode that they will have to use to configure their Authenticator APP (Microsoft or Google). So, in the selected phone app they will have to add an account by reading the QRCODE
We access our smartphone and launch the authentication application that we will use (in my case I launch Google Authenticator)
![]()
We add the new account

We select the option to scan a QRCODE and scan it 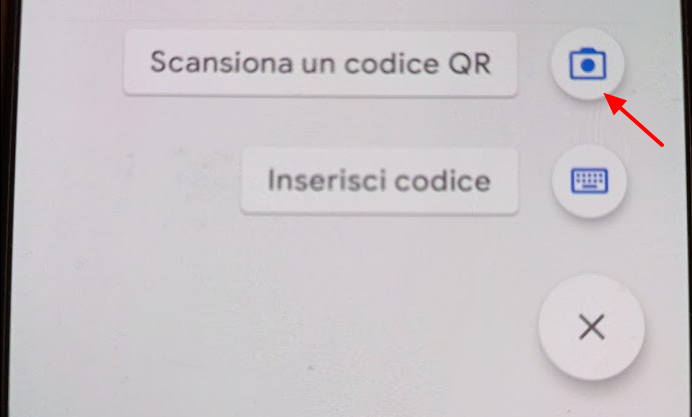
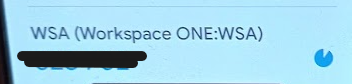
Enter the passcode generated after scanning the QRCODE in the space provided under the QRcode code on the page WEB

We will now have an account named WSA (Woekspace One:WSA) linked to our authenticator app
From the next login after entering your username and password you will be asked for the access code generated by the user application